Meyomyx
-
Posts
148 -
Joined
-
Last visited
Content Type
Profiles
Forums
Events
Everything posted by Meyomyx
-

MFG Crosswind Rudder Pedals v2 brake issues
Meyomyx replied to SailorDoc4781's topic in Controller Questions and Bugs
It should look like this. Make sure each pedal is at zero - 4096 when depressed. If not, use the START calibration buttons - DON@T FORGET TO HIT "APPLY". when you're done
-
MFG Crosswind Rudder Pedals v2 brake issues
Meyomyx replied to SailorDoc4781's topic in Controller Questions and Bugs
Agree - I only had 50% braking on one pedal. Resolved by recalibrating the pedals internally. Download the software from Crosswind - there's an onboard eprom that it talks to. -
Approach turn bank angle - trouble keeping constant
Meyomyx replied to markturner1960's topic in DCS: F/A-18C
I haven't flown the real Hornet of course, but in DCS it does seem to show a pronounced tendency to drop the nose at the slightest bank angle. Very small amounts of bank necessitate an amount of back pressure to maintain altitude. Maybe this is accurate .... -
Launch Bar Binding On/Off Switch
Meyomyx replied to Captain Orso's topic in Controller Questions and Bugs
Mildly annoying ... but just keep your modifications in a text file. When an update occurs, you can simply paste the block of mods at the top of the new controls file. Only takes a few seconds - they don't need to be placed anywhere specific in the control file. It would be good if the default controls file called "mods.lua" .... which would simply be your own mods file. -
ED SIMS SCREENSHOT AND VIDEO THREAD!!!! (NO USER MODS OR COMMENT)
Meyomyx replied to rekoal's topic in Screenshots and Videos
-
Question on the steering cue (HUD) during CCRP
Meyomyx replied to Cruizzzzer's topic in DCS: F/A-18C
2.5 miles is quite close. The closer you are, the greater the angle with a tiny offset. Take it to the extreme - if you're 20 feet away, you could have a 90 degree bearing to the target - yet still be 20 feet away. If you follow the "fall line", it'll take you over the target. Once you're "cleared hot", ignore the bearing to target -
MOST (not all) of the videos you can find of F18s launching off a carrier indicate that full military thrust is used, rather than with the burners - even with what looks like a moderate loadout. You can just about get away with it in DCS most of the time but you'll almost become an expensive speedboat in the process!
-
I use zero curve for the roll axis and 10 for pitch. The problem with running much of a curve is that a) your inputs will no longer be linear and b) it makes the aircraft feel "sluggish" in response - particularly in the roll axis.
-
How to turn off ThrustMaster slew mini stick?
Meyomyx replied to gdotts's topic in Controller Questions and Bugs
The mini stick works well - the secret is to use custom curves on both axes so you can make micro adjustments. I use: 1/3/5/8/13/20/28/38/58/74/100 on both axes. 100% Saturation (gives you max movement at full deflection) 5 dead zone (allows you to use depress without moving the cursor) If you really want to disable it, simply unassign the axes in the controls section, -
ED SIMS SCREENSHOT AND VIDEO THREAD!!!! (NO USER MODS OR COMMENT)
Meyomyx replied to rekoal's topic in Screenshots and Videos
Low level single ship strike at dawn. Cleared hot ........ -
DCS: F/A-18C Screenshots and Videos (NO DISCUSSION)
Meyomyx replied to Vitormouraa's topic in DCS: F/A-18C
Cleared Hot A single ship tasking following intelligence reports of insurgency build up. Cleared hot ... -
As title suggests, stab trim is missing from the Checklist page of the left DDI
-
Should I use flap to land on carrier while adverse wind?
Meyomyx replied to MivwTaupos's topic in DCS: F/A-18C
I think you might be falling into a trap here .... your approach speed is exactly the same whatever the wind strength or direction (dictated by angle of attack in this environment). Remember that you're simply flying in a moving block of air. If you're flying at 140kts into a headwind of 100kts, your AIRspeed will be (and must be) 140kts. However, your GROUNDspeed will only be 40kts. In a conventional approach, you may increase your approach speed by a few knots IF it's gusty so that any sudden gusts won't drop your speed too low - and you may use one notch less flap so that a go-around is easier BUT you're in an aircraft where the FCS is doing the work of dealing with gusts and you only have 2 flap settings. So its full flap, fly the angle of attack ... which will give you the same AIRspeed, whatever the wind speed or direction -
Press "undesignate". Other sensors can set a target point. Hence, that point is maintained regardless of whether the TGP is on or otherwise, until you move it or "cancel" it with "undesignate" :)
-
I'm guessing you have the Warthog? You can do this no problem. The secret is to use custom curves. I use: 1/3/5/8/13/20/28/38/58/74/100 on both axes. 100% Saturation (gives you max movement at full deflection) 5 dead zone (allows you to use depress without moving the cursor)
-
Can't launch weapons or fire in missions and campaign
Meyomyx replied to jork3's topic in Controller Questions and Bugs
It's impossible to know without a video or track file. It wasn't long ago I was at the same stage as you. I had many occasions when I couldn't get things to work. Every time it was me not understanding or omitting a vital step. It probably isn't a software issue or thousands of people would be reporting the same thing Remember the 3 basics: You MUST have a weapon selected in the stores page (boxed) You MUST have selected A/G or A/A mode You MUST have master arm selected ON I had usually omitted one of these .......... Then each weapon has it's own parameters that must have been set. Rockets are good for testing as they don't need any fuse/codes/delivery mode. Create a mega simple mission. 6 trucks in the desert. Your aircraft 10 miles away. First practice strafing. Then some rockets etc etc. THEN you can post with a track file if you're having problems. -
Transition from Engine Power to Ground Power
Meyomyx replied to Captain Orso's topic in DCS: F/A-18C
I'm not sure of the correct procedure IRL but this works every time without tripping up the FCES -
Transition from Engine Power to Ground Power
Meyomyx replied to Captain Orso's topic in DCS: F/A-18C
Here's the work around; Before you shutdown your engines, move the battery switch to the ORIDE position. When you shut down the engines, the displays WILL go blank. Do a ground reset and energise ground power. The screens and systems will come up AND you won't get an FCS error. You will have a battery warning displayed. Do you turnaround. Once you have both engines running again, return the battery switch to the "ON" position and you're good to go. The battery warning will extinguish. -
I had exactly this problem. Almost gave up ... but then had a complete "reset" and worked out why. Within an hour or so I'd cracked it - after months of frustration. I'm in the process of producing a video that might help. Until then, here's the script - Hardware. There’s quite a range of sticks and throttles out there with a wide range of characteristics. I have the Thrustmaster Warthog. In theory, this is the kit to have. Well made, accurate … but with some qualities that (I thought) might affect my ability to refuel. Whatever your hardware, be aware that you will be making very subtle, gentle movements to get into position. We don’t have the feedback that you get from flying a real jet – we’re relying on a huge spring for feedback. I’ve always thought the Warthog stick had quite a stiff action and have tried to reduce the tension. But In the end, it didn’t seem to help so it’s back to standard. Whatever hardware you use, you should be used to it and it should be in a position where your arm is comfortable and can operate in a relaxed fashion. Make sure it is calibrated properly. Ideally, you want a stick with as little noise at idle as possible so that your dead zones can be as small as possible. The bigger your dead zones, the more you’re going to have to move the stick before anything happens. Set it as low as you can. A good way to tell if you’ve set it too low is to try to set the F18 barometric hold with the autopilot active. If it won’t set, it’s detecting too much noise around the joystick centre points so you need to increase the dead zones. I use 1 for roll and 2 for pitch. You’ll find differing opinions about curves. I’ve seen people go as high as 20 while others recommend no curve at all. Once again, if you set your curve parameters too high, you’ll end up moving your stick more. 15 seems a popular value. I find the pitch axis twitchier than roll, so I use a curve of 10 in pitch and no curve for roll but try 10 in both. It’s just as important to make sure your thrust levers are set up and calibrated. You need to be working these A LOT so make sure they’re well located and have a predictable response. I use a custom curve 0-6-19-25-35-43-57-67-80-90-100. Ignore the wiggly line you get – it works! I don’t touch the rudders during refuelling – I keep my feet off. It’s easy to make a small movement where none is needed. Creating Your Training Ground. You need to find or make a simple mission with a tanker where you can hone your skills. Use the KC135 tanker. It is trickier to connect and refuel with the tanker in a turn so in your mission editor, create the tanker and then set it a waypoint a LONG way away – you want to be practicing in straight line in the first instance. Set it to orbit between your two waypoints – or even simply fly one long straight line! Select 18000 feet as its assigned altitude and 300 knots for the groundspeed – which will be about 230 knots of indicated airspeed. Remember to assign your tanker a TACAN frequency so you can find it! Make sure you have no wind or turbulence set. Spawn your own aircraft a couple of miles behind the tanker flying in the same direction and at the same altitude. Make sure you head for the port hose – the starboard one won’t work for you in this practice scenario! Alternatively, you can set the tanker to operate over your home base and simply practice the intercept as a “warm up” to refuelling practice. I won’t go over creating this mission in detail as it’s covered in some other videos but the one by 104th Maverick tells you all you need to know. ( ) Practice. Before you can refuel, you need to have some basic formation flying skills. Spend some time forming at varying distances from the port wing of the tanker. Try to keep the tanker in the same relative position but don’t fly in the tip vortices of the tanker. The key thing here is to establish your reference speed. When you announce your intent to refuel, you’ll be given an approximate altitude and airspeed. These will vary somewhat so, for example, 230 knots will typically give you a reference speed of 225 – the exact match for the tanker. This speed is critical. You’ll find that in turns, the speed is a knot or two slower. You can practice this formation flying at any time and without the basket deployed. You need to trim the aircraft out in all axes so that you’re flying in formation with little or no correction. Oh, and make sure your flap switch is set to Auto or you’ll suddenly get flap extension along with the associated nose up pitching moment. A crucial thing to practice is throttle control. You need to be able to settle at your reference speed. Then you need to move forward a little and hold, then drop back and hold. To move forward, be quite firm and rapid with your thrust lever movement and increase your IAS to your reference speed plus 2 knots. We’ll call this your advance speed. Don’t gradually increase thrust, give it a small kick, then return the thrust levers to their original position. You need to be able to notch up to advance speed, then with a similarly rapid aft movement of the thrust levers, stop at that speed. Now, reverse the procedure. Go for your reference speed -2 knots (which we’ll call your retreat speed) and drop back. Now get back to your reference speed. The transitions should be quite brisk. Keep practicing these forward and backward adjustments and holding. You should be moving your thrust levers firmly to move it forward, back to keep it at that speed, then similarly firm reduction to slow to your retreat speed, then back to reference speed. You will find the trust response much slower if you are heavy and with lots of draggy stores on the pylons. You can practice this while flying behind the basket …. BUT don’t get distracted by trying to connect with the tanker at this time. You need to get used to these precise positional movements. Connection! You can creep up to the basket from astern and a little below. Use your advance speed. DON’T try to connect at this time – we need to get close enough to the basket to get “Cleared Contact” from the tanker. IF YOU KEEP GETTING “RETURN PRE-CONTACT” FROM THE TANKER, YOU NEED TO GET CLOSER. UNLESS YOU HAVE THE “CLEARED CONTACT” MESSAGE FROM THE TANKER, YOU WILL NEVER GET A CONNECTION. Get close to the basket, then return to your reference speed. Once you have “CLEARED CONTACT”, move to retreat speed and drop back a little. Let yourself settle at reference speed. Keep formation. Keep the FPV level in the HUD. There is plenty of advice to not watch the basket but when I perform my approach, my focus is firmly on the basket. Find out what suits you. Right, let’s try it out. Keep yourself in position at your reference speed. Now, move to your advance speed. No more, no less. You will creep up to the basket at a constant speed. Using gentle movements, guide the probe toward the basket. Use very small movements and remember, the moment you have made a control input, you will need to use the opposite control input to get straight and level again. Keep that advance speed. If you miss, keep the FPV straight and level and hit your retreat speed (reference minus 20), then stabilise again at reference speed. Settle, hit your advance speed, gently guide the probe. Repeat until you get contact. The moment you get contact, you need to slow rapidly to reference speed. Keep the FPV in the zone. You’ll probably disconnect a few times – staying connected in formation takes practice. That’s OK. With a little practice, you can connect at, back off rapidly to Ref … then tune your fore and aft position – often you’ll need to drop back a little. Use Ref -1 or ref +1. Pick a visual point of reference on the fuselage of the tanker to monitor to monitor your position fore and aft. You’ll be doing a lot of thrust lever shuffling - all the time keeping that FPV nailed. When you get this far, you’ve cracked it. It’s time to simply keep practicing! What was I doing wrong? OK so the road to Damascus moment was changing my approach technique. I was very gradually creeping up on the basket, often stopping with the probe a few feet from the basket, waggling the stick and waiting for the moment to creep forward and connect. MISTAKE. All the time you’re flying at the same speed very close to the basket, you’ll be trying to steer the probe but without making any progress. You’ll end up chasing the basket and getting into an oscillation. Drop back. Get stable. NOW hit your advance speed (ref plus 2) and fly the probe into the basket – DON’T loiter at the point of connection waiting for the right moment to creep forward. If you miss, hit your retreat speed, drop back and stabilise at reference speed. You may find that, when connected, your reference speed is often 1 knot slower than when you try to connect. Remember to make sure you have “CLEAR CONTACT” and don’t fly up into the tip vortices of the tanker. Expect to only maintain a connection for a few seconds to start with BUT you have connected …. And that means you can practice. Keeping the connection just needs practice. After a few days, I can connect and take fuel 80% of the time – even in turns now. NO more shooting down the tanker!
-
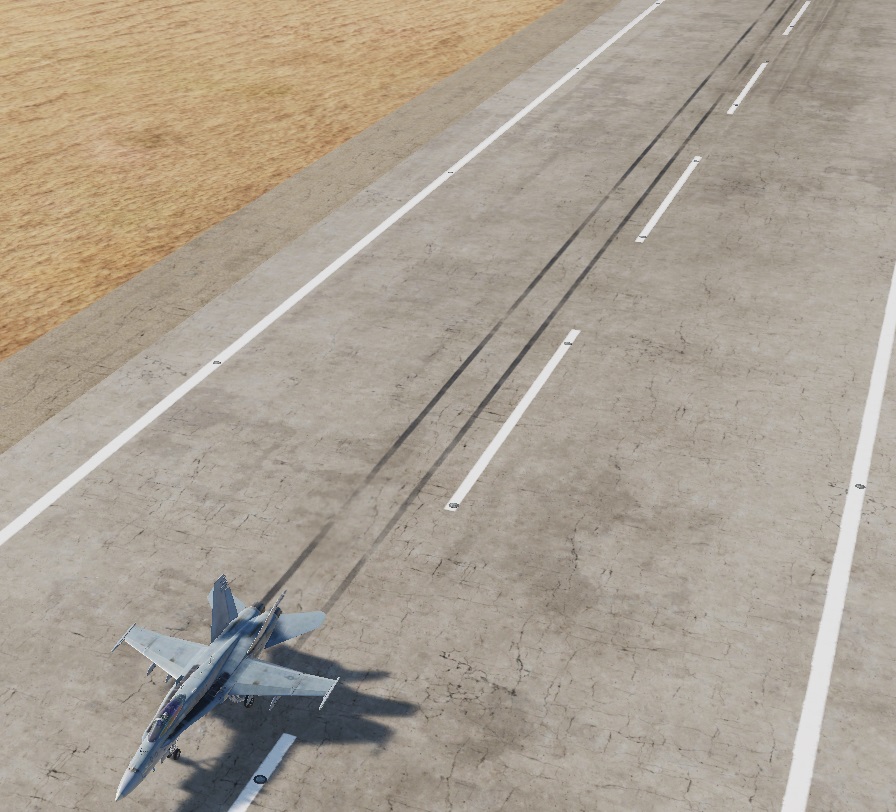
Braking results in the appearance of wheel locking regardless of anti skid status. Anti skid works in that it allows the pilot to retain directional control - but visually it leaves the same thick black tyre marks whether active or otherwise. Skid.trk
-
mapping TDC-slew to a POV-button of TM-Warthog throttle
Meyomyx replied to oho's topic in Controller Questions and Bugs
The Warthog TDC thrust lever mini joystick works well for me for anything that requires cursor slew. Assign the axes with curves (remember they are axes!) to make small adjustments easier. It can be difficult to depress to designate without moving the cursor, so I have "designate" mapped to the flat thumb hat on the joystick giving Zoom in, Zoom out, FOV and designate all on the same control. -
.. no, still bugged. Should be an easy fix?! :)
-
If real life is like DCS, most Hornet pilots must get shot down whilst trying to manage the MFD's / radar settings ;) ...
-
The designated target point displayed on the SA page x axis movement is reversed - but only when the SA page is de-centred. The y axis functions correctly whether DCNTR is active or otherwise TGP Bug.trk
-
The only unresolved bug I can find is that the TGP target point indicator on the SA page moves in the opposite (wrong) sense when the SA page is de-centred.