
edmuss
-
Posts
1740 -
Joined
-
Last visited
Content Type
Profiles
Forums
Events
Everything posted by edmuss
-
Pretty please with icing and cherries on the top? @AlphaJuliet sorry for the tag but is this something that could be looked into? ED have put a lot of work into really polishing the implementation of leap motion and it's working well, it would be so nice to be able to use it in all modules.
-
You mean instead of whinging about it like kids? edit: Do you mean rotary knobs like the abris on the ka50 or a multi position rotary switch? The rotary knob does work quite nicely with the thumb/index, seems more controllable than previously. Couldn't get the same to work on a multiposition switch, this is still the biggest failing of leap so far in DCS.
-
Really? I'll test later, amazing if that's the case, I did try the other night but didn't achieve anything. @Leader98 you can turn off the laser pointers on the VR tab or special tab (depending on which you've enabled it from but most people are having best experience enabling it from the VR tab). edit: sometimes I think a lot of the fun of DCS open beta updates is discovering new functionality that hasn't been documented anywhere
-
If you use a mod manager like ovgme then you shouldn't have to (I think). Much easier to enable and disable them then.
-
Time for a "@BIGNEWY here, from Eagle Dynamics...." video demonstrating all of the functionality of the leap motion
-
I tap it in the direction I want to turn, the trick I think is learning where the activation points are on each rotary. So rotating clockwise I would tap the finger from left to right just above the axis of the rotary, now I'm not sure if the activation point is static or rotates with the switch?
-
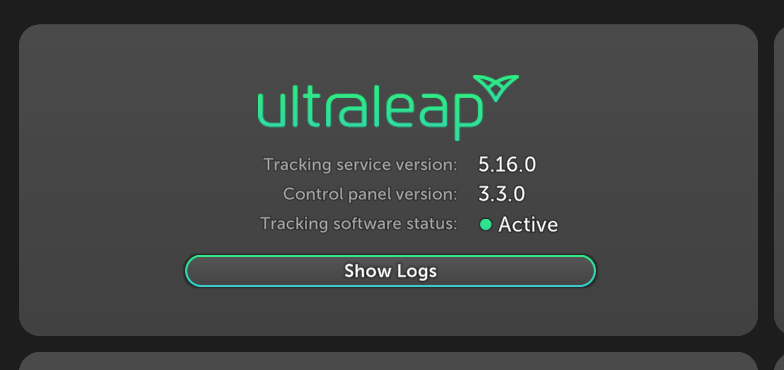
@joso the ultraleap drivers are 5.16.0 @A.F. Confirmed, hands no longer hide when stick is moved - Huzzah! @BIGNEWY Please pass on thanks to the devs on this one, it's getting real good - I even managed to move a rotary switch in the right direction earler Just got to get all the 3rd part devs to get on board!

-
That's really weird seeing my post translated into Italian! I'm not sure what version the drivers are, whatever was current a couple of weeks ago. I can check later on tonight
-
I updated the gemini software the other week (before 2.9 landed). Has the functionality with the hands hiding on stick input been changed with the hot fix? If so awesome, it was never a significant issue before but once in a while I would accidentally grab the cyclic and the hind is suddenly upside down I have noticed with 2.9 that I have much better tracking than ever before, I always struggled to actuate the weapon selection and electrical panels in the hind and now it's all pretty easy to get to. Whether this is the gemini update or DCS update or a combination of the two, I feel that it's more on the DCS side of things; either way it's all working nicely Still enabling it from the VR tab though as it is just far superior!
-
Does the same thing, not everyone delves into the depths of the menus though! Should be 8Gb on a 3070 This is also a good observation, the overflow doesn't happen when usage approaches 100%, I have seen it happen at 7GB but also been flying perfectly smoothly at 9gb.... It isn't just a VRAM capacity thing, something else is playing it's part to cause the problems.
-
I've found that based on the technique outlined by @desolunatic above you can reliable solve a VRAM overflow, turn on the expanded performance metrics and keep an eye on the VRAM usage/allocation numbers. Switch to F10 map, alt tab out and wait for the VRAM usage to drop (mine goes down to around 2.5gb) and FPS to settle, alt tab back in and it should stay stable, then F1 to cockpit and it should repopulate the VRAM having flushed it properly. Not an automatic thing but only takes about 3-4 seconds to do
-
I've just had a sanity check playing with enabling the leap from both special and VR tabs and the finger response when enabled from the VR tab is much more consistent than when enabled from the special tab. When using special tab leap a number of controls in the hind are not useable (most of the left hand side of the cockpit and the sight controls up front), some are but even then the trigger points (where you would expect them to actuate the control) are not where they were in 2.8. Disabling special tab leap and enabling VR tab leap restores the expected functionality as per 2.8 but with the addition of the axis sliders. Special tab leap is functionally broken at this present time.
-
Perhaps you need to have leap enabled in the special tab in order for it to populate into the VR tab drop down? I had it enabled in special, set it in VR and a warning message about disabling it in special came up and it's worked spot on since then. It's auto disabled the special tab leap.
-
There are axis sliders on the VR tab as well, works nicely all round
-
Try enabling leap motion in the drop down on the VR tab and disable it on the special tab. Thinking about it, I got better control actuation response setting it via the VR tab over the special one. It's now working as per it did in 2.8 but with the added benefits that came with 2.9. I suspect that the special leap motion tab might be phased out and removed in future betas.
-
Reinstalled them this afternoon and it's dropped the VRAM usage a fair amount so still on my ovgme list for now
-
Turn on hands use stick and throttle in the VR options tab, that stops the hands auto hiding. I've not checked the hands moving with the head, it's never really bothered me that much. I did initially really struggle to activate anything with my left hand but I think that's linked to an existing settings hangover. One thing that is somewhat confusing, on the VR tab for input control you can select leap motion from the drop down (as opposed to the VR controllers), this appears to override the leap motion special tab. Not an issue per se, just two places to input the same set of options. Yeah, that oddity doesn't seem to work now We need to push the 3rd party devs to implement the API!
-
Massive updates for 2.9! I think just about all of the requested improvements have been implemented and it's working nicely. Off the top of my head: - Leap hands now automatically initialise, no need to go activate them every time you start up DCS. Hand model fingers more accurately track the physical ones, fingers don't converge when you make a knife hand and you can touch index and thumb tips to make the OK sign. Hand offset sliders in all the axis, helps massively with reaching forward and not clattering the desk. Just better integration all round Still needs improvement on the rotary functionality but so far it's feeling much more like a core feature of DCS rather than a tack on.
-
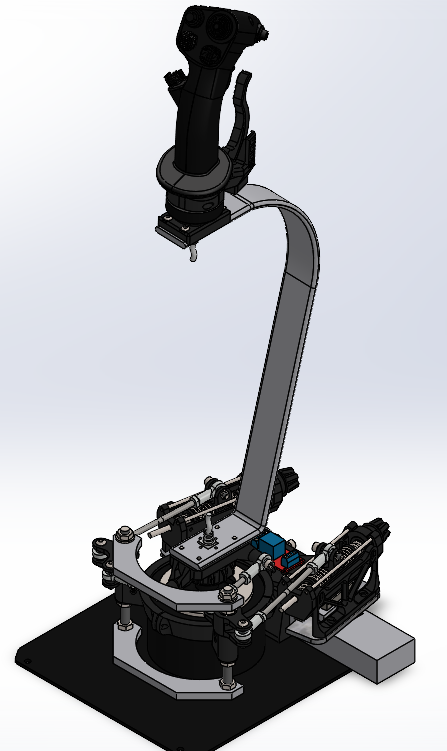
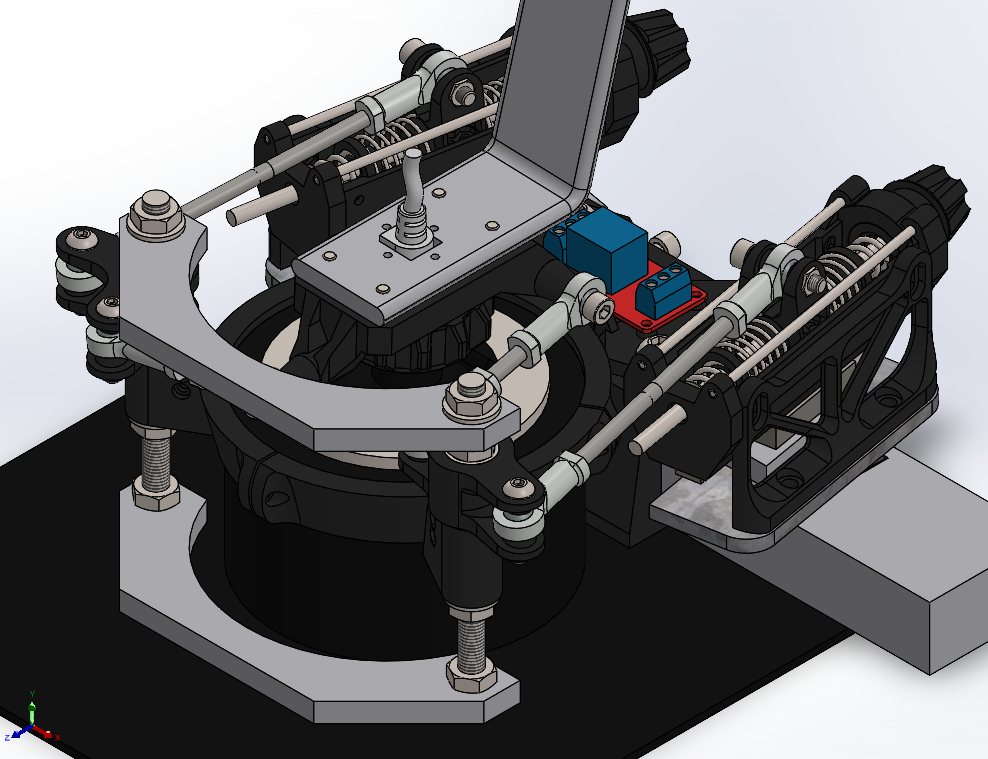
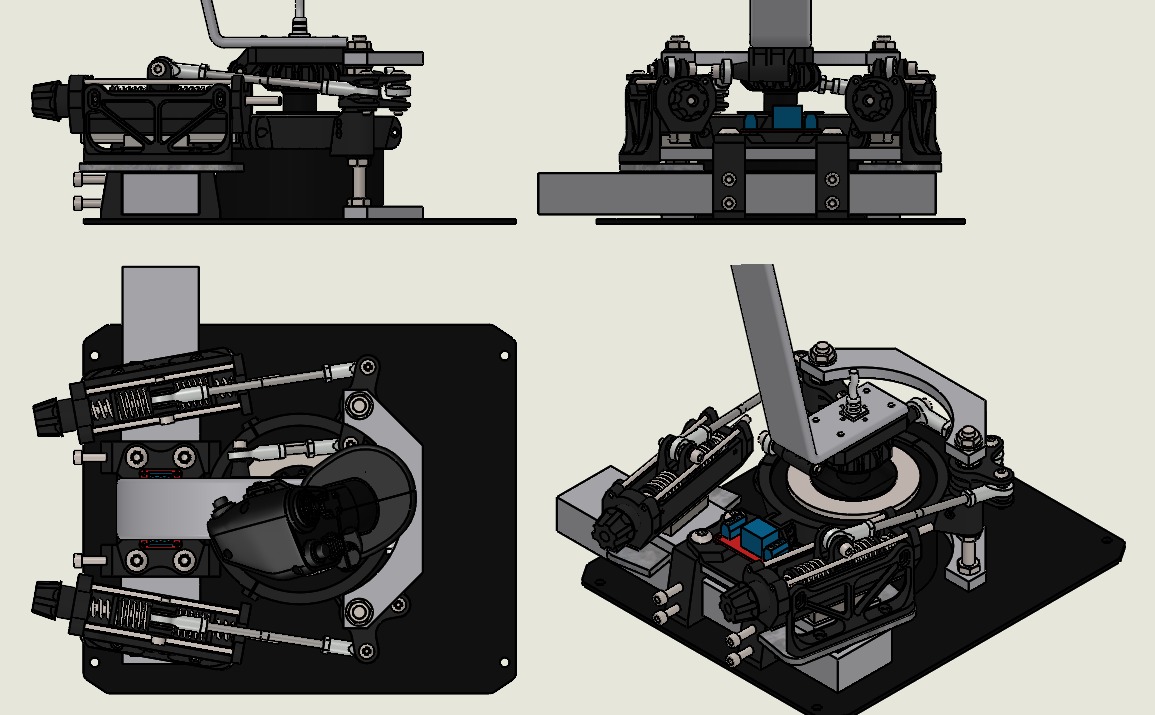
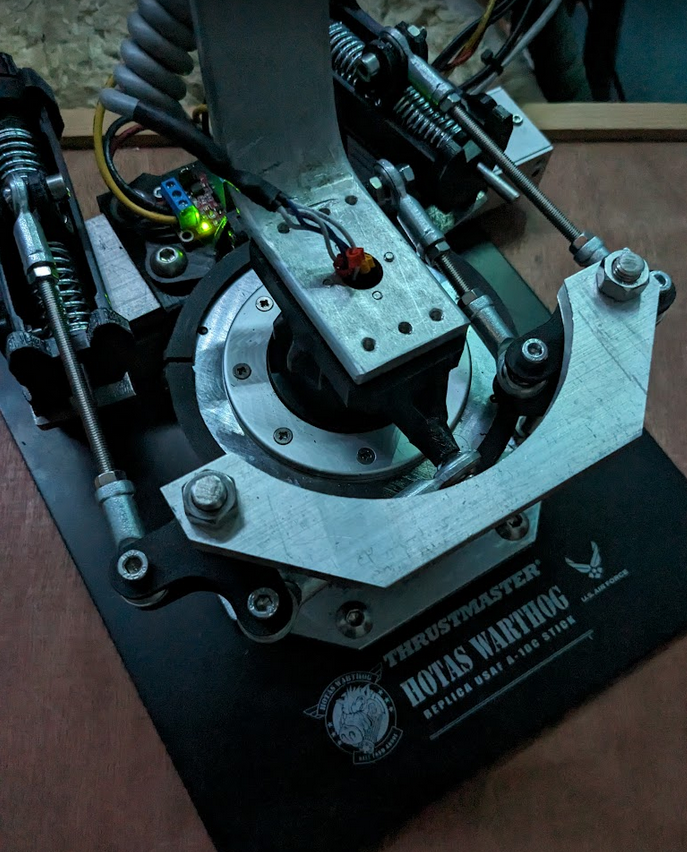
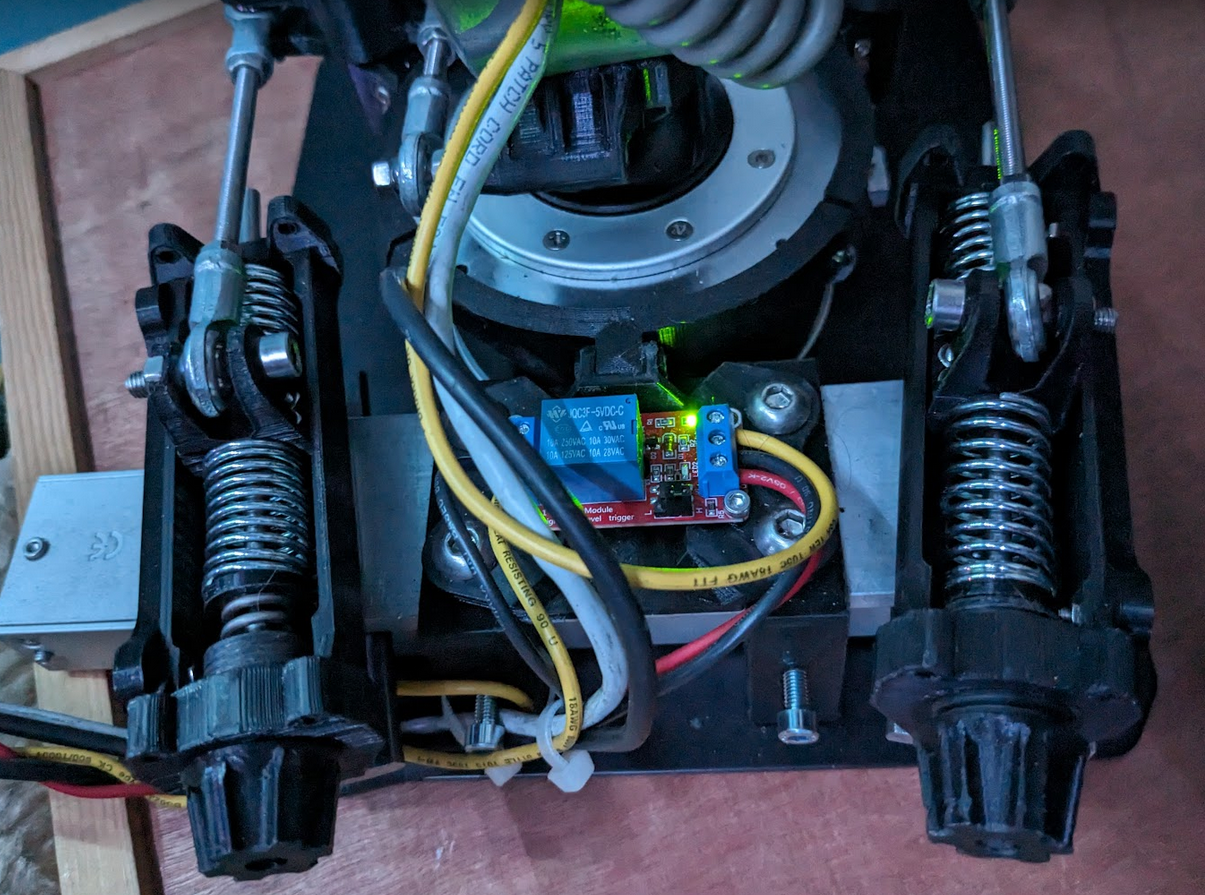
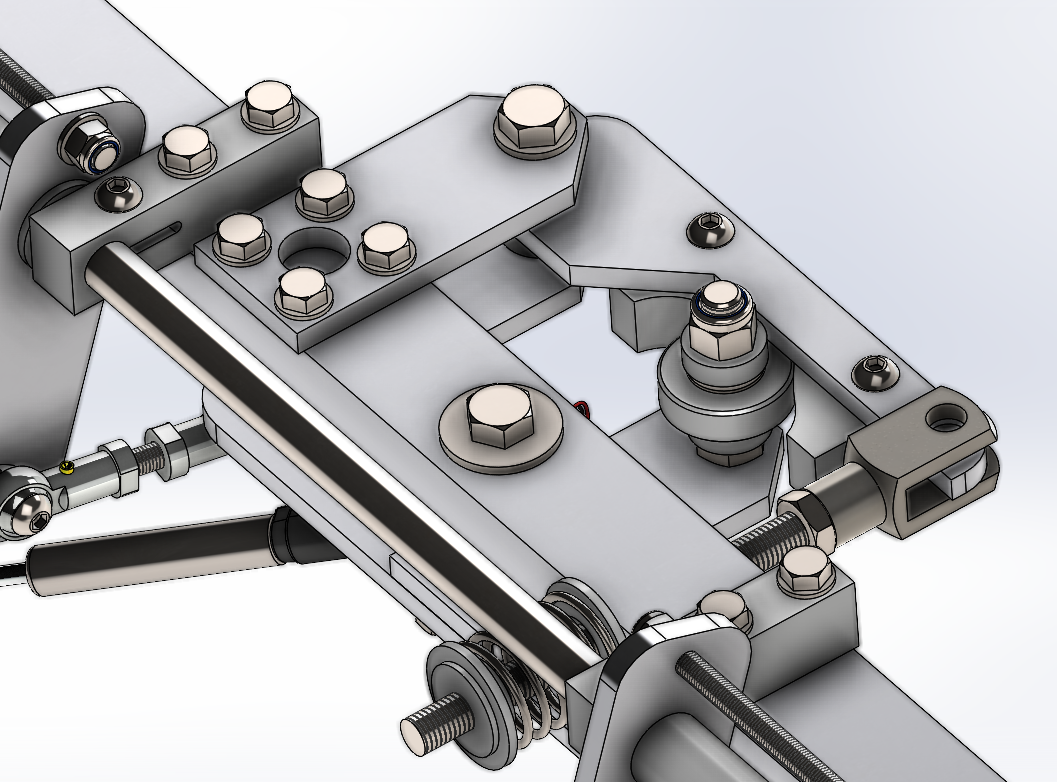
Following on from this: - https://forum.dcs.world/topic/319474-diy-mechanical-cyclic-trimmer/ Whilst the last iteration worked nicely as a trim mechanism, the range of movement of the stick whilst trimmed was only a couple of inches which wasn't really enough - it should be full range of motion but sprung. Inspired by the stupendous mi24p simpit by @molevitch, who fortunately assisted on the bits I'm too thick to work out myself Also inspired by the cyclic mechanism made by @yoreh, which I originally saw linked to by @bradmick in discord. I set about designing an electromagnetically locked trim mechanism with the intention that it would be mostly 3D printed where practical and be a bolt on to a stock warthog stick/base with minimum of modifications. I intended to reuse the trim lever, gooseneck extension from the mechanical trim. I sourced a bunch of cheap 300kgf security door maglocks on ebay with the intention of using one to lock the axes when force trim is released, I also wanted to eliminate as much slop in the mechanism as possible so opted for linear bearings for the spring units, oilite bushes for the spring rods, rod end bearings for the linkages and ballraces for the bellcranks needed to translate the motion. Threw all the bits togther in solidworks and after a few weeks of thought and design iteration this is the result! null The maglock is mounted behind the stick base, spring units and linear bearings on a 50x8 aluminium strap to resist the forces to be applied. The bell cranks are mounted onto the triad ring (reused from the mechanical system) clamped to the top of the stick base, each crank has a pair of ballraces to keep everthing smooth and tight. The original printed bell crank supports weren't stiff enough so I cut the half moon braces from the same 50x8 aluminium, the lower is bolted through the base plate (the only modification I've had to make to the stick base) and M8 all-thread tapped and locked into position. The original springs (shown) didn't have a high enough rate to resist the weight of the heavy grip sagging when not centralised so they have been replaced with some much heavier units which work well enough. The springs have adjustable preload by winding in the knobs at the back - in reality I have these wound in fully so largely pointless now but they aid assembly. The through rod on the spring units are running on the oilite bushes so as to not bind at all. The original armature plate for the maglock was obviously not suitable so I cut some 5mm mild steel plate at work and spent a couple of hours draw filing to ensure that they were as flat and smooth as possible. Air gap is the enemy of electromagnets so it was essential that these were flat enough to attract with enough force. The maglock needs to be energised when the force trim control is inactive and de-energise when holding the force trim, I had previsouly used a tact switch wired into a cheap USB controller board for the mechanical trim and it worked very well. The maglock needs a 12v supply so obviously power needs to come from somewhere else, additionally the normally open tact switch wouldn't be suitable for switching the maglock whilst still connected to the USB board. I used a 5v relay (the blue and red thing) set to normally closed operation to keep the maglock energised until the tact switch is depressed; this also required a 5v feed in addition to the 12v. I sacrificed a power cable for my PSU to supply both 12v and 5v using, extended and braided the cable into a loom to so the stick is constantly plugged into the computer PSU - peak current draw is about 6w at worst and almost zero once the maglock is energised. The physical manifestation! Video evidence! https://photos.app.goo.gl/86ew3K5fVxanxFrf6 https://photos.app.goo.gl/eXPQEFSnvz1uyw3R6 https://photos.app.goo.gl/Rtuwt5BKyfoG5cvf6 https://photos.app.goo.gl/HNatykyBPiv4YQFe7 I had to tweak the balance point of the gooseneck to stop some sagging on the pitch axis in certain trimmed positions (damn that heavy metal grip!) but it's all good now. The total weight of the joystick is now around 6.3kg. I also replaced the original warthog gimbal with this as the stick is over 10 years old and had developed a bit of rotational movement which would only be exacerbated by the offset spring loads applied by the linkages. The switch to a full ball race gimbal is nice although I did need to reinforce the prints with some 1.8mm stainless rod to keep the strength in them. I retained the original warthog spring to apply a slight passive centring force so that it's easy to refind centre if need be - the length of the extension means it can be overcome by the weight of the grip alone. In use the stick behaves exactly as I intended, pulling the trim lever de-energises the maglock and it becomes light as a feather, essentially a floppy dead stick, releasing the trim energises it and locks it into position. Whilst trimmed there is a fairly soft return to the trim centre so the stick doesn't significantly osscilate but it's enough to give a definite force so you know you're flying against the trim. Very pleased with the result, it's become something of a monster project and has become a little more involved tooling wise (beyond the 3D printer) than I'd like but it's doing exactly what I set out to do. If flying fixed wing then I just leave the trim lever alone and the stick behaves like a normal sprung centre joystick. If anyone is masochistic enough to want to make one, I can let you have the STLs for printing and generate a set of drawings for the other parts to be made - it's obviously designed around my specific gooseneck but it should be pretty simple to redesign the linkage base to suit a stock warthog or extension. Why? Because I like to tinker, does it make me a better pilot? Absolutely not but it's fun to use!
- 3 replies
-
- 4
-

-

-
- thrustmaster
- warthog
- (and 2 more)
-
Larger tracking envelope (more range and FOV) in a smaller package that absorbs less power to the best of my knowledge.
-
If I was using me left hand on the left MFD the button just to the right of my fingertip was the one that actuated - more testing needed I think edit: it definitely activates a button when you get near it, seems to be the Z depth that is the trigger. It activates whatever control is under the crosshair, it doesn't quite line up with my index finger though, I suspect it's slaved to one of the metacarpals.
-
Good that I'm not going mad and there's some correlation I think I saw button actuation inboard of the target control as well.
-
Curious one here! Testing out the laser pointers in the harrier (which doesn't support leap fingertip interation) and found out that if (when the lasers are active) you get your finger near the control it triggered without a thumb pressure/index bend action. The accuracy wasn't great, likely due to muscle memory but is this a new development to perhaps alleviate the 3rd party devs needing to implement the full API? Anyone else care to try it out? Perhaps it was just conicidence but it seemed pretty repeatable for me
-
Which click emulation do you use? The index curl always moves the pointer for me and the thumb squeeze seems really inconsistent; perhaps I'm simply not moving my thumb in the right manner?
-
Huion 640p here, cost ten quid on ebay. 3D printed a saddle and buckles with an elastic strap so it straps to your thigh like a proper kneeboard, also added a pen holder onto it