Search the Community
Showing results for tags 'warthog'.
-
UPDATE: Version 2.72 is available. The new installer now points to the new webhost. Special thanks go out to the Virtual Armed Forces for hosting CTS on their website. Hosting by the VAF is a significant improvement in uninterrupted service and consistency. Please check out the Virtual Armed Forces for an outstanding PvE multiplayer experience! You can also check out the VAF in the Air Combat Sim podcast #42. If you don't wish to do a fresh install, you can replace the top line of your CTS\DB\version.txt with the following entry: http://cts.virtualarmedforces.com/CTS/DCS/CTSversion.txt You may also download the new installer, or simply download and replace the updated version.txt below (note, this does not work for the CTS Legacy version; you'll need the installer for that). Special thanks to Tercio Sampaio for developing the GUI. If you wish to donate for this program, please send any donations to Fisher House, a charity that supports wounded veterans and their families. Exception: if you want me to program for a module or hardware I don't have, please PM me and we can discuss it. DCS World TARGET Script for Thrustmaster Cougar or Warthog and MFDs is now available. Download it from: Eagle Dynamics User Files Box.com This file is an installer which will install and launch the updater, which will then download the latest version of the script. You can also periodically run the updater to keep your script up to date. This script for the HOTAS Cougar/Warthog and Cougar MFDs includes dedicated profiles for the following aircraft: A-10C Warthog AV-8B N/A Harrier II AH-64D Apache Ka-50 Black Shark P-47D Thunderbolt P-51D Mustang UH-1H Huey Mi-8 Hip Mi-24P Hind F-86 Sabre Fw-190A8/D9 Bf-109K-4 Kurfürst MiG-21bis Fishbed MiG-15bis M-2000C SA-342 Gazelle L-39 Albatross F-5E Tiger II Spitfire LF Mk. IX Mosquito FB Mk. VI AJS-37 Viggen C-101 F-14 Tomcat F-15E Strike Eagle F-16C Viper JF-17 Thunder F/A-18C Hornet MiG-19 Farmer I-16 Ishak A-4E Skyhawk T-45 Goshawk Combined Arms Flaming Cliffs 3 The script is fully implemented with both code and custom keyboard and joystick LUA files. The included "Standard DirectX" profile can me used to create a versatile profile for anything else. This script uses TARGET, so you need to install it (though Cougar users can leave Foxy where it is). I also recommend the latest MFD Drivers, as I have found fewer profile crashes with these enabled. The script offers the following features: Graphical User Interface (GUI) to save your settings and auto-generate script files. Both HOTAS Cougar and Warthog Compatibility with F/A-18 Grip Support for selected modules. All documentation (except for the Setup Guide) is in HTML with context-sensitive help in the GUI. CommState routine allows for the selection of F1 through F12 keys with Hats 2-4 while the MIC switch is pressed Hot-selectable “TriggerZoom” allows you to zoom into your target or HUD when depressing the first trigger stage LED indications for airbrake, landing gear, TriggerZoom, CommState, and Teamspeak3 PTT Compatible with TouchControl (formerly TouchIR), VAICOM Pro, DCS Simpleradio Standalone, and all major VoIP solutions Optimized for TrackIR, but compatible VR or with Hat1 as POV Individual HOTAS profiles are mapped as closely to their real world counterparts as practical Flaming Cliffs 3 (FC3) HOTAS mappings correlate to the A-10C (attack aircraft) or F-16C (fighters) as closely as practical FC3 Context Sensitive Autopilot routine that reverts to last used mode on toggle A-10C Profile includes direct entry for CDU, CMSP, and UFC Ka-50 Profile allows direct entry for ABRIS (RMFD) and Rubicon Datapad Ability to automatically pause TrackIR while at the Door Gunner Station (UH-1) Context sensitive communications menus based on crew station (framework in place for DCS implementation) TARGET based Central Position Trimmer Mode that greatly improves upon the default trimmers when not using force feedback. Analog and digital differential braking routines, including paddle braking and nosewheel steering. Kneeboard mapping for all aircraft. NVGs for all capable aircraft, including "bonus" mapping for the A-10A, Su-25, Su-25T, and F-86 (H/T Zaelu). AWACS Mode for LotATC and SRS users. Simplified hot-selection of aircraft allows for potentially thousands of aircraft and variants in this script, along with audible feedback of aircraft selected. Screenshots are in the following post. I look forward to your feedback; any information that will help me improve this profile is greatly appreciated. To this end, there is now a public bugtracker for CTS. See the HTML documentation for instructions on how to submit a bug report or feature request. version.txt
-
Servus, Mein Warthog Throttle von TM funktioniert plötzlich nicht mehr. Also keine Reaktion beim einstecken seitens PC oder throttle. - alle USB Ports ausprobiert - am Kabel rumgewackelt - Aufgeschraubt (innen sieht alles gut aus - soweit ich das beurteilen kann) Hat jemand schonmal sowas gehabt? Evtl ein Wackelkontakt? Hat jemand Erfahrung mit dem Support von TM? grüße
-
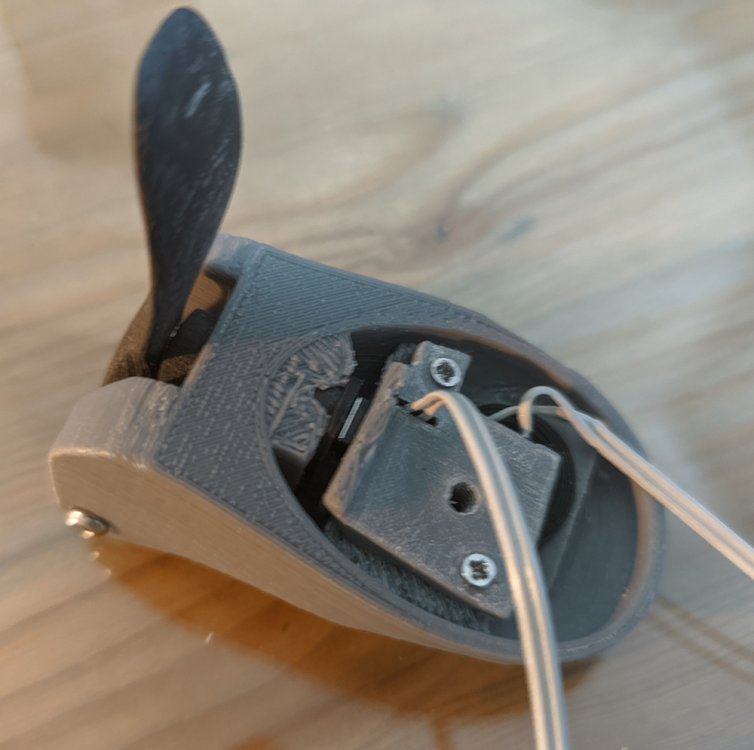
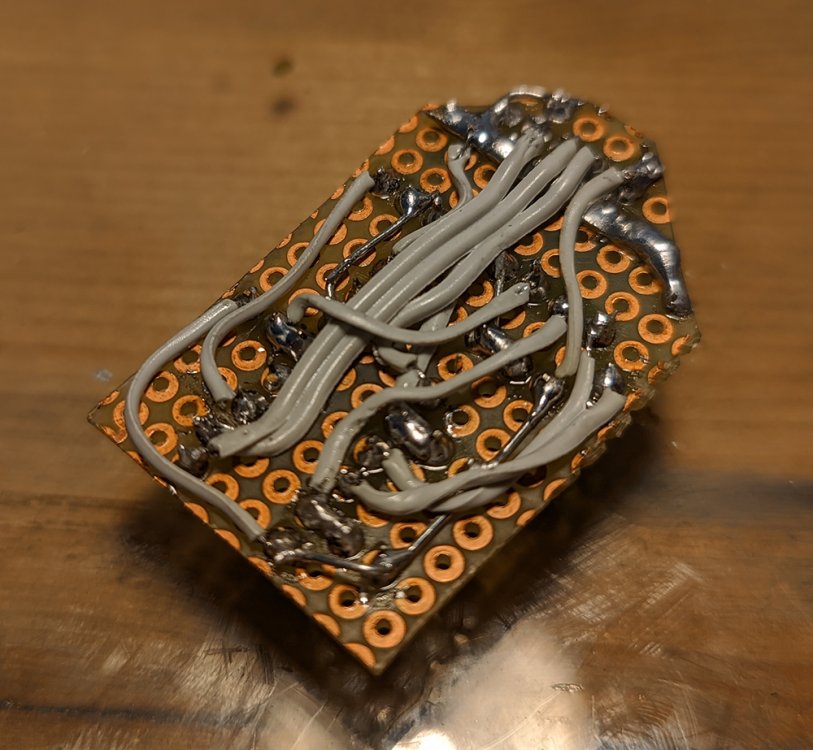
 Thrustmaster mods --------------------------------------------- F/A-18C (Hornet) grip upgrades OTTO P1 push buttons | OTTO T4 trim switch | OTTO T5 sensor control switch F-16C (Cougar) grip upgrades OTTO P1 push buttons A-10C (Warthog) grip OTTO P1 push buttons | OTTO T4 trim switch | OTTO T4/T5 hat switches for TMS/DMS/CMS A-10C (Warthog) throttle NEW--> Full mil-spec switch upgrade [OTTO, Cutler-Hammer, Honeywell, Mason] --------------------------------------------- Just a heads up, guys - the friendly engineers at Thrustmaster made it easy to swap their stock TM buttons with OTTO buttons to massively improve the clickity on the new Hornet grip same as what you can do on the Warthog grip. I opted for the 2.5 lbs actuation force for the pinkie and full 4 lbs for the pickle button. OTTO product numbers are P1-11111 and P1-11121 respectively: Here we go mashing buttons on the grip like a fool. No trouble reaching anything. Disassembly of the grip is pretty straightforward but you will run the risk of bricking it and you will probably void your warranty. First remove the paddle lever by unclipping the c clip and pushing the shaft pin out. There’s a spring in there and a small washer on the shaft. Unscrew the three hex bolts in the handle and pop the cover off. One of my bolts wanted to stay in the grip. Unscrew the PCB and push it out of the way. Unscrew the neck part that’s held in by a single bolt that also holds the ground wire and a small lock ring. Disconnect the pinkie button connector from the PCB and pop the button out through the front by pushing in the tabs on either side. You may need to rotate the button in place with pliers to be able to access both tabs. Cut the wires, strip the ends and solder them onto the OTTO button. You’ll want as much wire as possible for the new button as it can get a little tight in there. The OTTO button has a smaller diameter than the TM button so wrap some electrician’s tape around it; press it into the grip and connect it to the PCB. Fasten the neck part and PCB back into the grip and move on to the top part. Unscrew the two outer screws in the top part and pop the plastic top back and rotate it out of the way. The pickle button should be easy to pop out by pressing the two tabs in. Note that you have to cut the wires before removing this button, unless you want to try to disconnect it at the main PCB and re-threading the wire back down the neck of the grip. Replace it with the OTTO button same way as the pinkie button: leave as much wire in place in the grip as possible and use electrician’s tape to make a tight fit. You could file down the contacts or remove some plastic backing in the grip at this point if you want to set the OTTO button as deep as the stock button. I didn’t do it so mine sits at a very slight angle. Be careful not to pinch the flimsy wires and screw the top part and cover back on the grip. The paddle lever goes on last and it can be a bit tricky to get the spring seated correctly. Upgrade complete! Here's a short video showing how to get the paddle lever spring back on: In terms of difficulty I’d say this is easier than modding the Warthog since there’s fewer buttons to mess with. I suppose you could change the spring or the tact switch on the Hornet paddle lever but it’s not going to be as much of an upgrade as what’s possible on the warthog with a P1-11122. Compared to the Cougar though this is a walk in the park. Seriously. Don’t mess with the Cougar like I did. It takes a lot of Dremel grinding to fit the OTTOs in there and the result is not going to be as neat as what’s easily possible on the Warthog. Also, the new pinkie switch gets in the way of the paddle switch since they’re much closer together. Well, good luck if you decide to mess with your grips!
- 111 replies
-
- 2
-

-

-
- thrustmaster
- warthog
- (and 3 more)
-
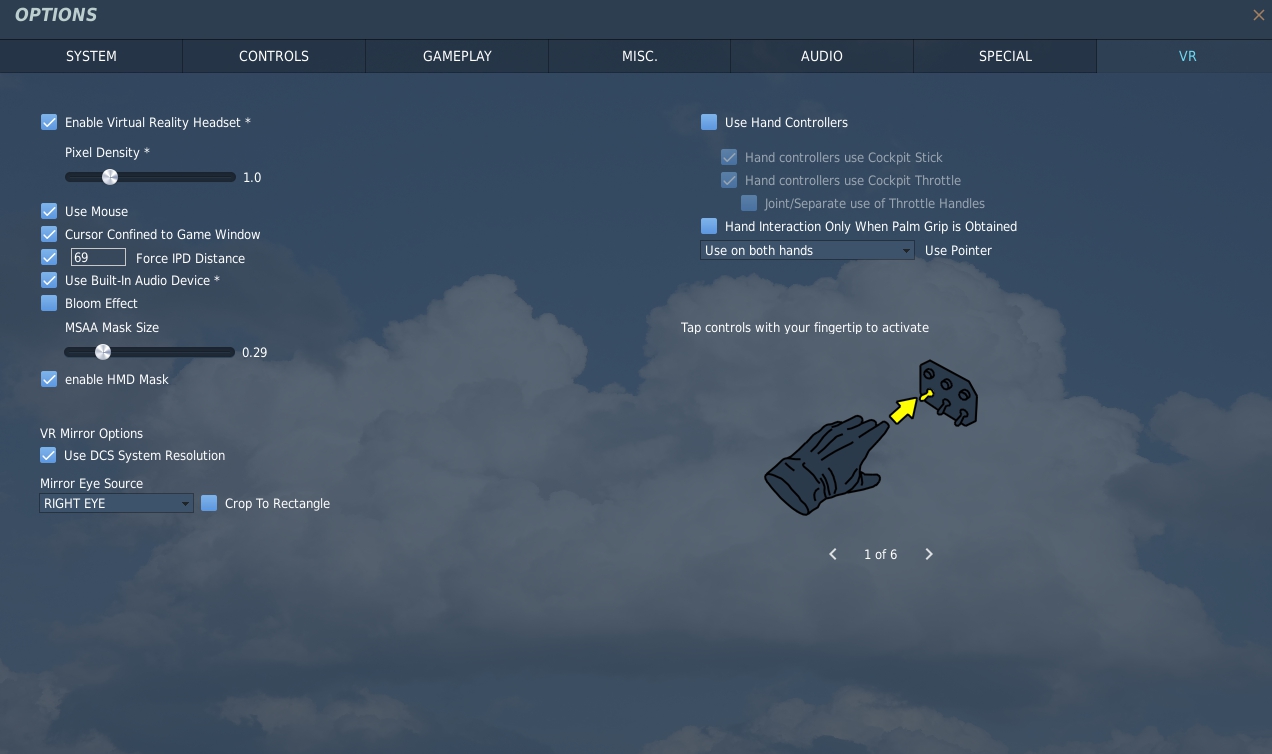
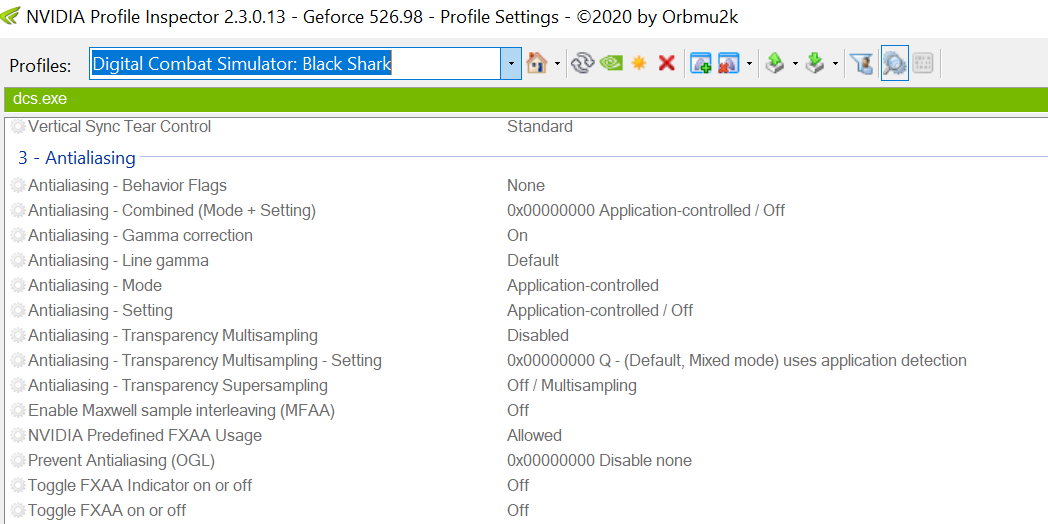
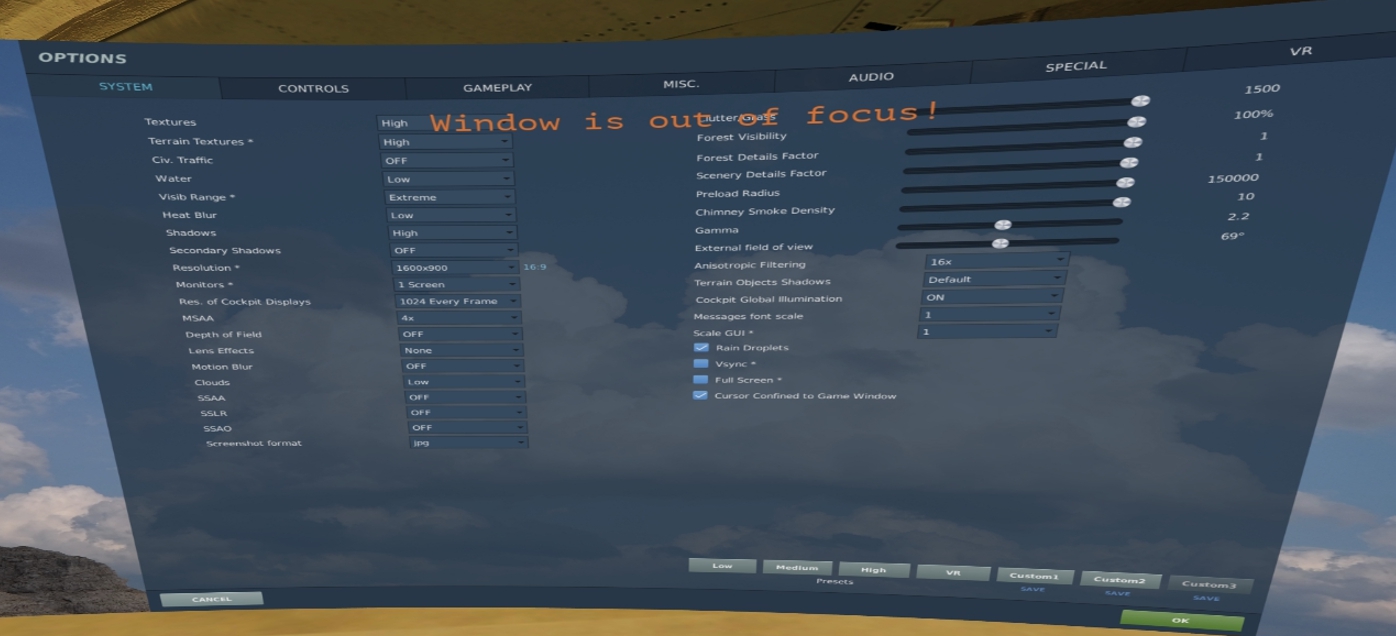
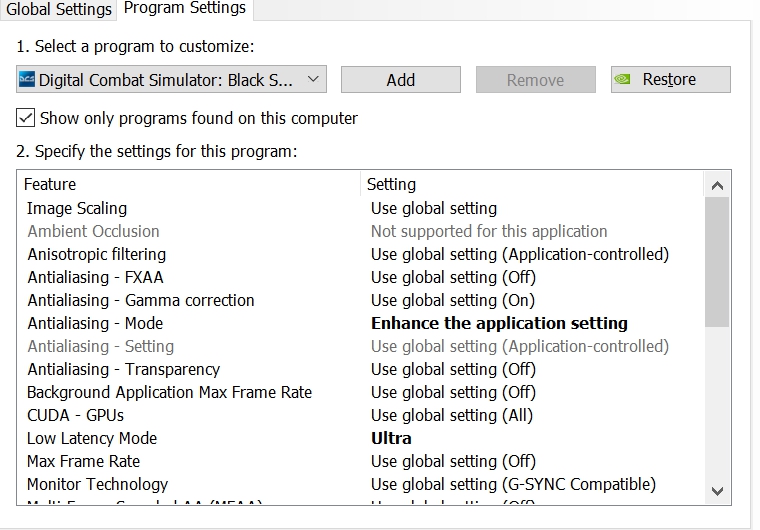
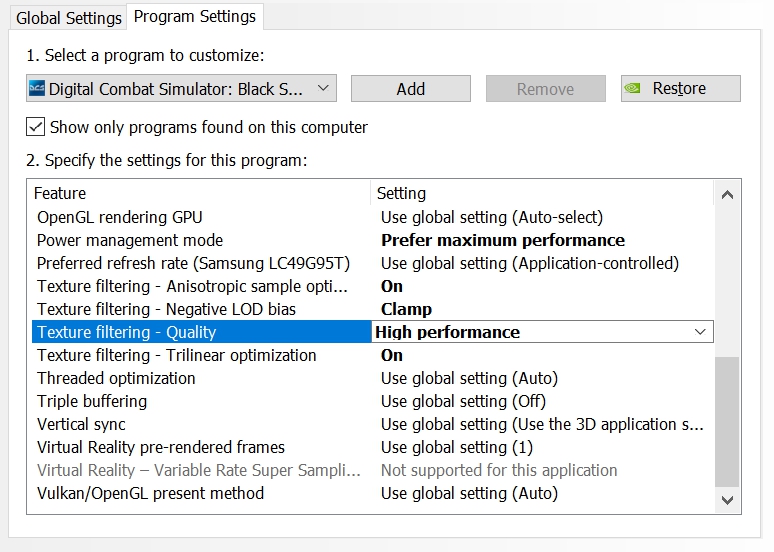
I started this topic to track and discuss my challenges with getting the best performance out of my system. I run DCS in windowed mode and run OBS on the side. My setup Windows 10 - latest version RTX 4090, no overclocking X570 Aorus Master Ryzen 7 5800x3D, no overclocking 64GB RAM Varjo Aero Reverb G2 v1.0. Mixed Reality: best quality, 90Hz. SSD for DCS and Windows, separated Configuration Rebar enabled XMP Memory Profile Hyperthreading OFF -> update 2023-07-24 testing at the moment DCS Latest OB version 32GB Pagefile Game mode OFF Game Bar OFF Windows registry Holographic PreallocateVirtualMonitors set to 0 Windows Holographic Shell Stopped ("Go to Computer Management → System Tools → Performance → Data Collector Sets → Event Trace Sessions. In this list, find HolographicShell, right click, and choose ‘Stop’.) Windows Power Management Stopped Windows Graphics performance for DCS set to High Performance. Variable refresh rate ON HAGS OFF Nvidia Control Panel: see screenshot OBS: No render lag and no encoder lag. See screenshot for settings. Update 24-7-2024 configured to use the GPU's NVENC HEVC encoder. DCS: see screenshot Process Lasso, currently no CPU affinity set. DCS and OBS have both High priority. Edit 5-1-2023: ProBalance and Performance Mode enabled Edit 2023-07-24: Not using Process Lasso at the moment. Will test some more Open-XR Toolkit latest version: Reprojection OFF, Shaking reduction 30%. Upscaling OFF, Foveated rendering OFF, No Framerate throttling OpenXR Developer Tools latest version: Motion Reprojection: OFF Edit 7-1-2023: 3dMigoto for sharpening OFF. DCS No shader mods installed Unneccesary Windows processes killed Drivers up to date TACView on client-side disabled Nvidia latest drivers, Geforce experience disabled Update 2023-07-24: QVFR - Quad Views Foveated Rendering by @mbucchia Highly recommended! https://github.com/mbucchia/Quad-Views-Foveated/wiki Edit 01-12-2022 Changed: Disabled 3dMigoto Enabled CAS 30% sharpening inside OpenXR Update 2023-07-24 No sharpening inside Open XR Toolki Items tried with no visible advantage: Frame limiter in NVCP and OpenXR-Toolkit - Removes Judder but gives terrible ghosting VSync Adjusting DCS Desktop window size Game Mode ON 60Hz in the headset (eyes can't take it) Items still to try: Undervolting the 4090 Get a 3rd SSD and have OBS record to this SSD. -> Done OpenXR - FSR 80%: Tried, but gives degraded visuals. Clouds Ultra: keep them on for now. Nvidia Control Panel: MFAA 2X or 4X (extra visuals at no extra performance when MSAA is on?) NvidiaProfileInspector SGSSAA - Sparse Grid Supersampling 4X or 2x Processor scheduling changing to Background Services Edit 5-1-2023 Changed: DCS Shadow High, Terrain Object Shadows Default (as per advice https://forum.dcs.world/topic/313901-my-4090-vr-performance-optimization/?do=findComment&comment=5118986. Edit 7-1-2023: Tried it but did not notice difference, so reverted back. OpenXR-Toolkit: Disabled CAS Sharpening (Don't need it). OpenXR-Toolkit: Switched Motion Reprojection to automatic. (sometimes my FPS drop too low and then I would like for Reprojection to kick in). Edit 7-1-2023: Edmuss told me this does not work for DCS. So keep Reprojection OFF.

-
Hi! I'm the squadron commander of the A-10s in my group, JTF-13. Recently just started the squad back up and I am in need of people to fill it up and give the Hog some presence in our missions and events. Whether you are new and have never touched the module, or a years-long veteran, we are happy to take you on board. It is a laid back community with very relaxed expectations. No mandatory time commitments or training stuff. In game, we do have the milsim-lite structure that most people want in these, such as tactical comms work, realistic flight plans and sortie orders in wings. We run missions almost every week, and even have special events such as running a month long RIMPAC and Red Flag in various times of the year, as well as our own private campaigns. Joining my A-10s will help give variety to these missions and make things more fun for everyone. https://hub.jtf13.com/ hope to see new faces soon!
-
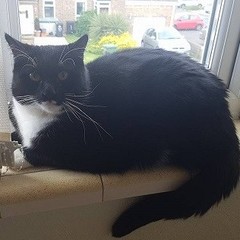
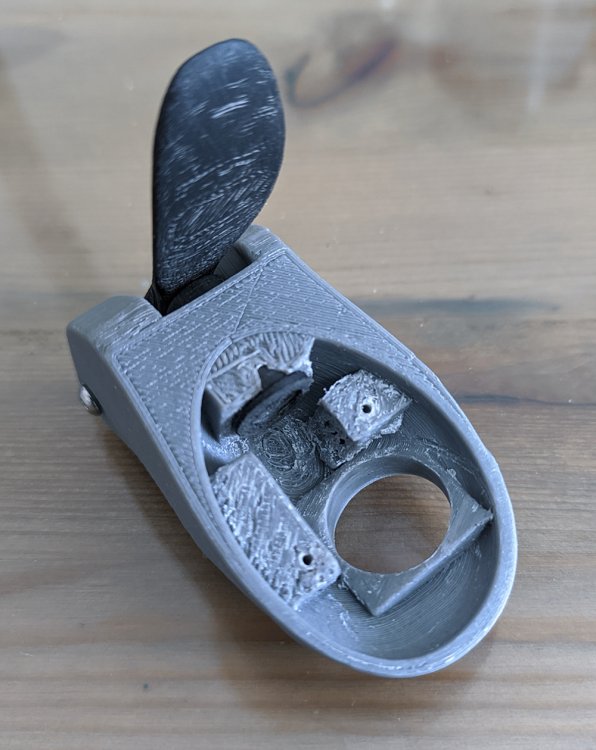
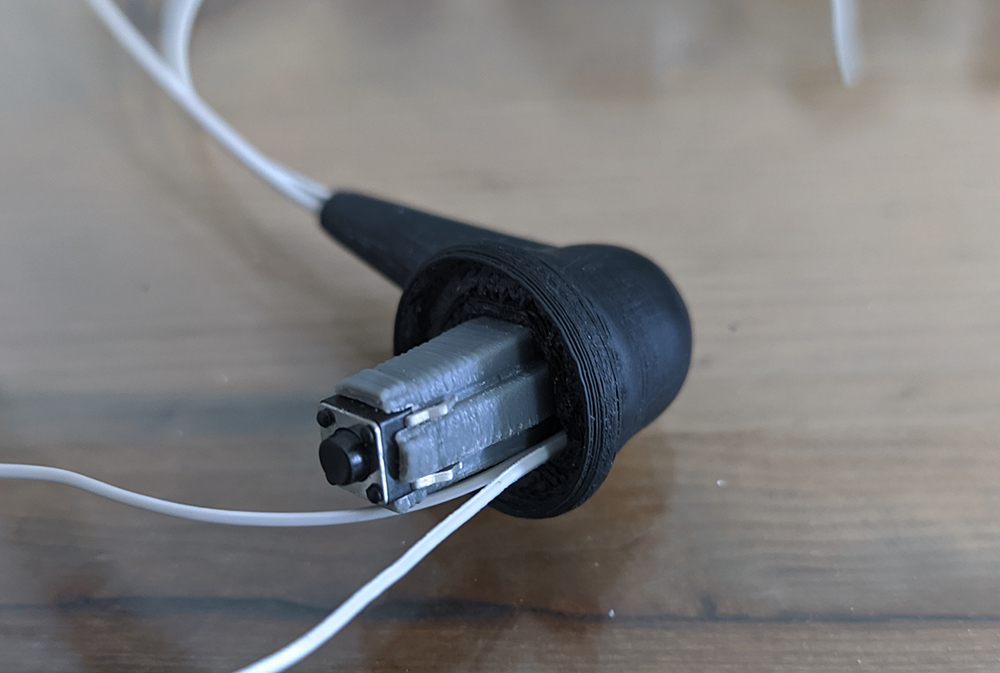
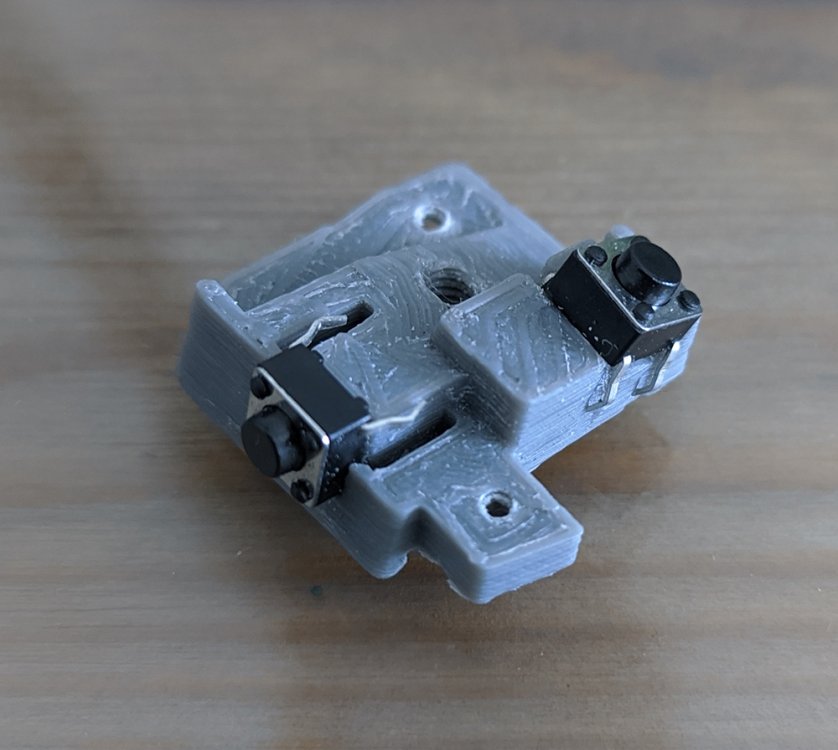
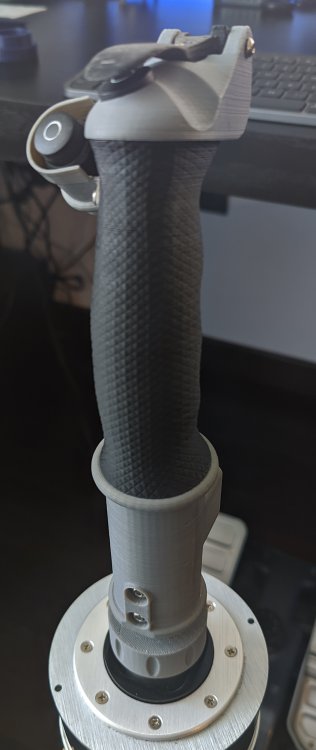
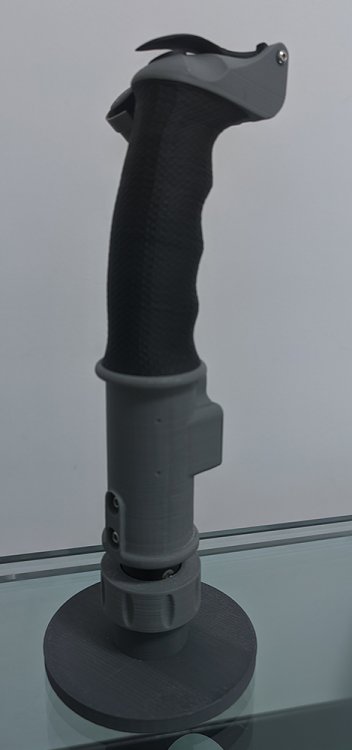
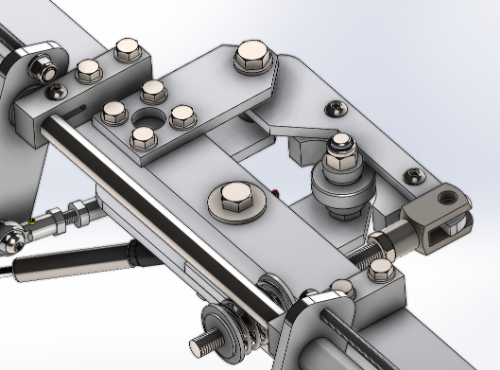
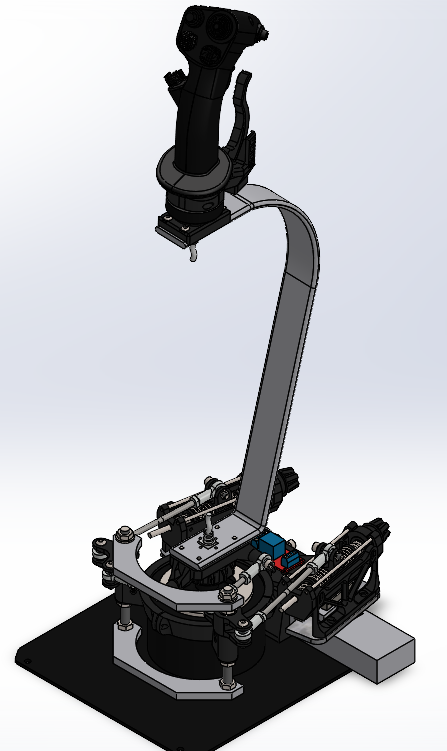
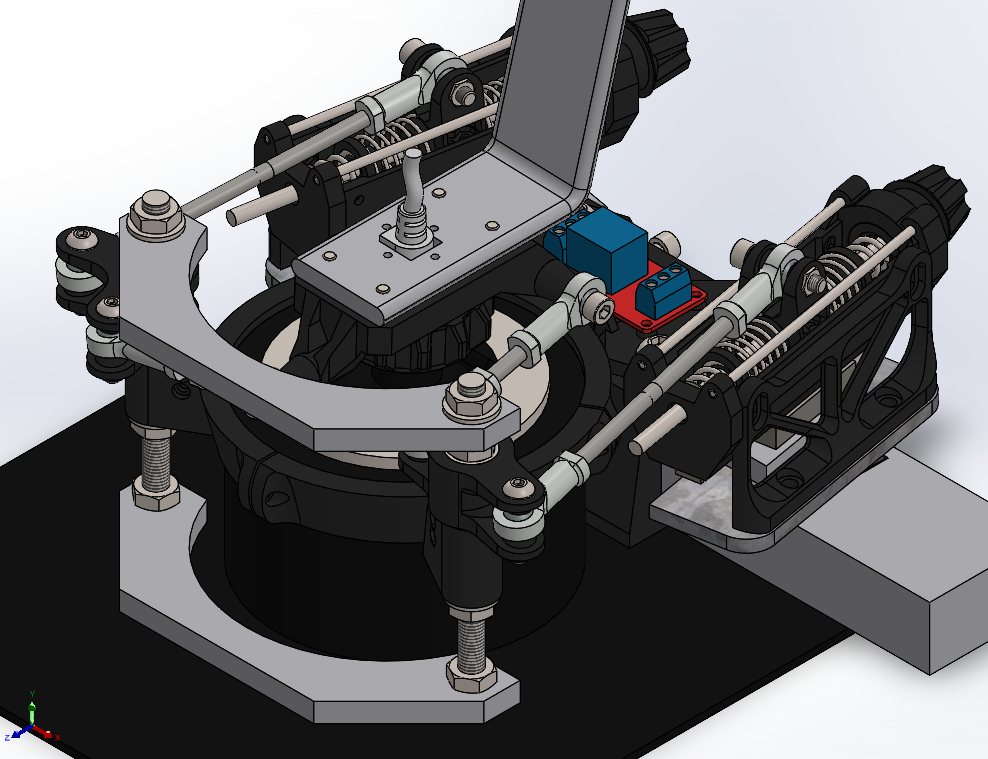
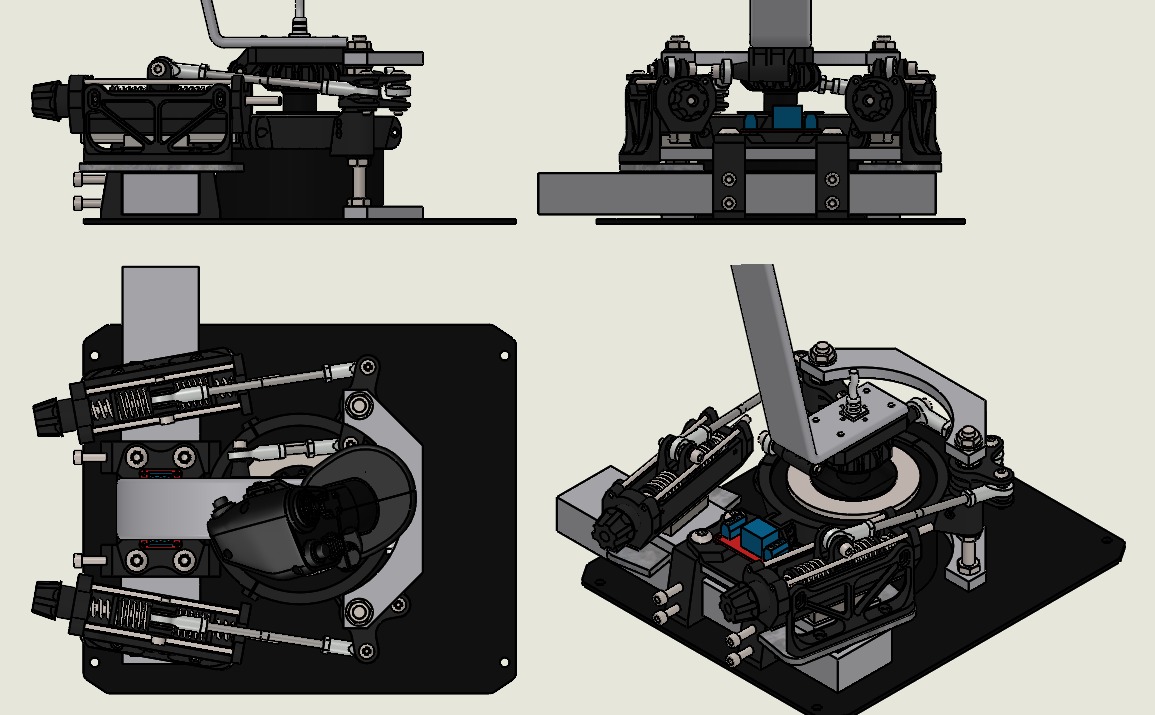
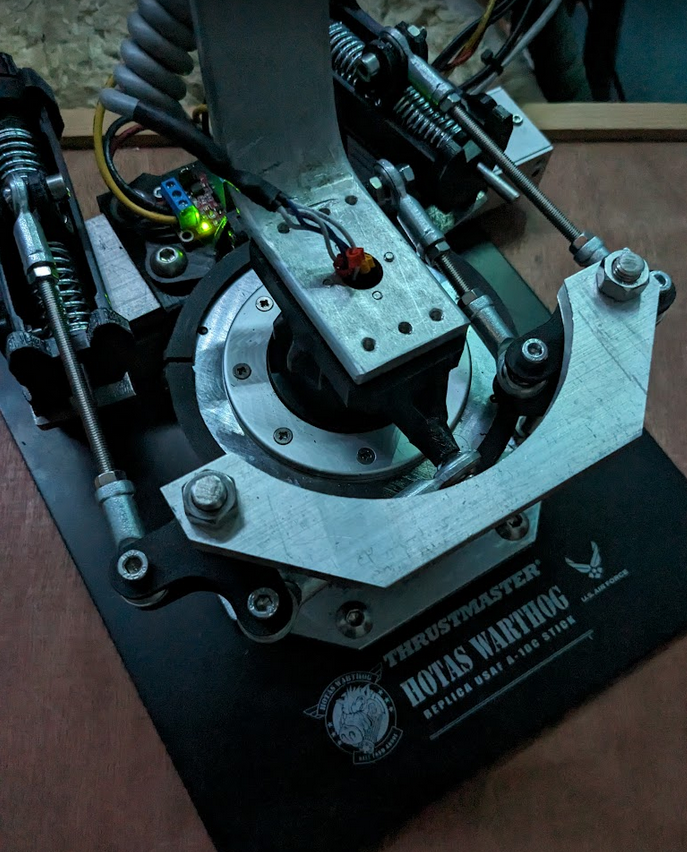
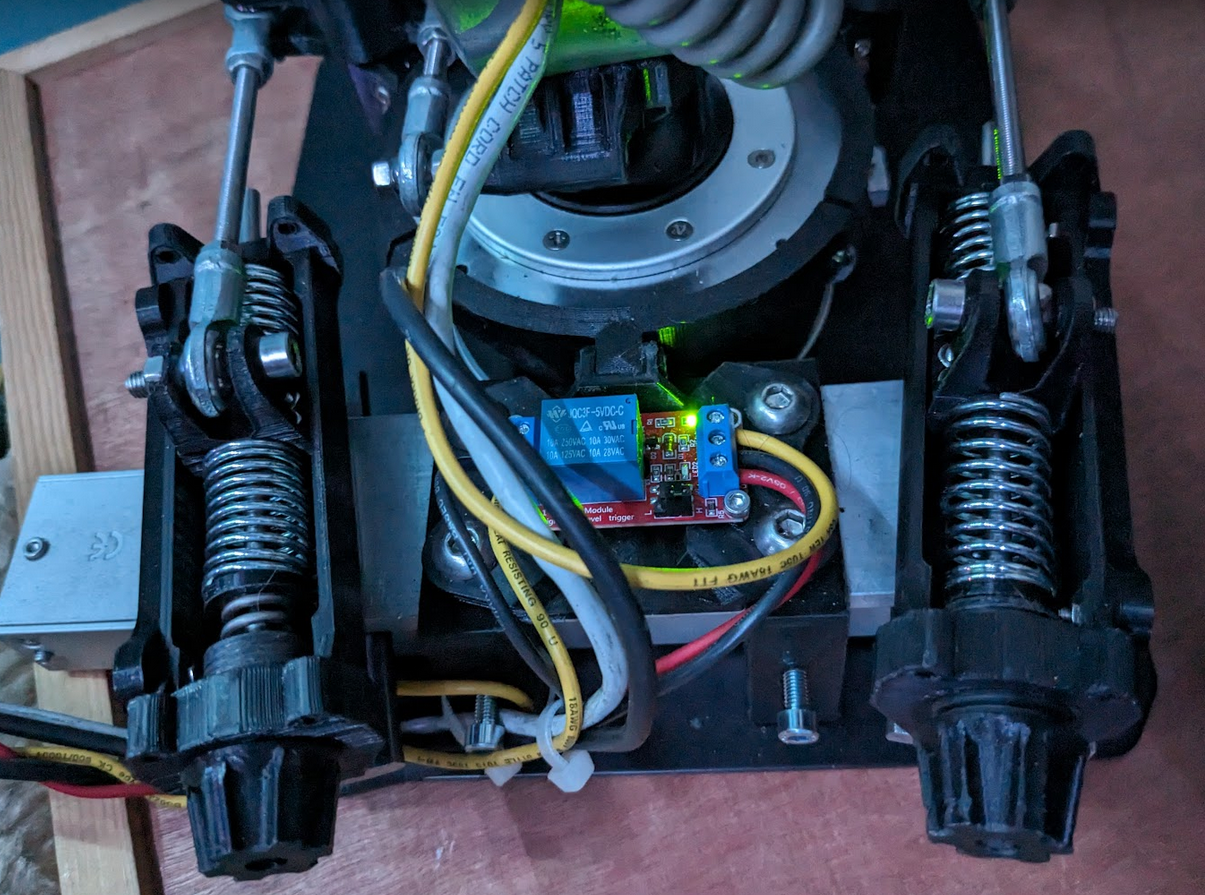
Following on from this: - https://forum.dcs.world/topic/319474-diy-mechanical-cyclic-trimmer/ Whilst the last iteration worked nicely as a trim mechanism, the range of movement of the stick whilst trimmed was only a couple of inches which wasn't really enough - it should be full range of motion but sprung. Inspired by the stupendous mi24p simpit by @molevitch, who fortunately assisted on the bits I'm too thick to work out myself Also inspired by the cyclic mechanism made by @yoreh, which I originally saw linked to by @bradmick in discord. I set about designing an electromagnetically locked trim mechanism with the intention that it would be mostly 3D printed where practical and be a bolt on to a stock warthog stick/base with minimum of modifications. I intended to reuse the trim lever, gooseneck extension from the mechanical trim. I sourced a bunch of cheap 300kgf security door maglocks on ebay with the intention of using one to lock the axes when force trim is released, I also wanted to eliminate as much slop in the mechanism as possible so opted for linear bearings for the spring units, oilite bushes for the spring rods, rod end bearings for the linkages and ballraces for the bellcranks needed to translate the motion. Threw all the bits togther in solidworks and after a few weeks of thought and design iteration this is the result! null The maglock is mounted behind the stick base, spring units and linear bearings on a 50x8 aluminium strap to resist the forces to be applied. The bell cranks are mounted onto the triad ring (reused from the mechanical system) clamped to the top of the stick base, each crank has a pair of ballraces to keep everthing smooth and tight. The original printed bell crank supports weren't stiff enough so I cut the half moon braces from the same 50x8 aluminium, the lower is bolted through the base plate (the only modification I've had to make to the stick base) and M8 all-thread tapped and locked into position. The original springs (shown) didn't have a high enough rate to resist the weight of the heavy grip sagging when not centralised so they have been replaced with some much heavier units which work well enough. The springs have adjustable preload by winding in the knobs at the back - in reality I have these wound in fully so largely pointless now but they aid assembly. The through rod on the spring units are running on the oilite bushes so as to not bind at all. The original armature plate for the maglock was obviously not suitable so I cut some 5mm mild steel plate at work and spent a couple of hours draw filing to ensure that they were as flat and smooth as possible. Air gap is the enemy of electromagnets so it was essential that these were flat enough to attract with enough force. The maglock needs to be energised when the force trim control is inactive and de-energise when holding the force trim, I had previsouly used a tact switch wired into a cheap USB controller board for the mechanical trim and it worked very well. The maglock needs a 12v supply so obviously power needs to come from somewhere else, additionally the normally open tact switch wouldn't be suitable for switching the maglock whilst still connected to the USB board. I used a 5v relay (the blue and red thing) set to normally closed operation to keep the maglock energised until the tact switch is depressed; this also required a 5v feed in addition to the 12v. I sacrificed a power cable for my PSU to supply both 12v and 5v using, extended and braided the cable into a loom to so the stick is constantly plugged into the computer PSU - peak current draw is about 6w at worst and almost zero once the maglock is energised. The physical manifestation! Video evidence! https://photos.app.goo.gl/86ew3K5fVxanxFrf6 https://photos.app.goo.gl/eXPQEFSnvz1uyw3R6 https://photos.app.goo.gl/Rtuwt5BKyfoG5cvf6 https://photos.app.goo.gl/HNatykyBPiv4YQFe7 I had to tweak the balance point of the gooseneck to stop some sagging on the pitch axis in certain trimmed positions (damn that heavy metal grip!) but it's all good now. The total weight of the joystick is now around 6.3kg. I also replaced the original warthog gimbal with this as the stick is over 10 years old and had developed a bit of rotational movement which would only be exacerbated by the offset spring loads applied by the linkages. The switch to a full ball race gimbal is nice although I did need to reinforce the prints with some 1.8mm stainless rod to keep the strength in them. I retained the original warthog spring to apply a slight passive centring force so that it's easy to refind centre if need be - the length of the extension means it can be overcome by the weight of the grip alone. In use the stick behaves exactly as I intended, pulling the trim lever de-energises the maglock and it becomes light as a feather, essentially a floppy dead stick, releasing the trim energises it and locks it into position. Whilst trimmed there is a fairly soft return to the trim centre so the stick doesn't significantly osscilate but it's enough to give a definite force so you know you're flying against the trim. Very pleased with the result, it's become something of a monster project and has become a little more involved tooling wise (beyond the 3D printer) than I'd like but it's doing exactly what I set out to do. If flying fixed wing then I just leave the trim lever alone and the stick behaves like a normal sprung centre joystick. If anyone is masochistic enough to want to make one, I can let you have the STLs for printing and generate a set of drawings for the other parts to be made - it's obviously designed around my specific gooseneck but it should be pretty simple to redesign the linkage base to suit a stock warthog or extension. Why? Because I like to tinker, does it make me a better pilot? Absolutely not but it's fun to use!
- 3 replies
-
- 4
-
-
-
- thrustmaster
- warthog
- (and 2 more)
-
DCS 2020 and Beyond Update - Aircraft Modules DCS: A-10C Warthog 2 Following the free A-10C cockpit update, we will be releasing A-10C Warthog 2 in 2020. This will be a dramatic visual and systems upgrade to our A-10C. Once the new features have been finalized, we look forward to sharing them with you. In addition to DCS: A-10C Warthog 2 being available as a new module that will replace DCS: A-10C Warthog, it will also be available to existing A-10C Warthog owners at a significant discount. Bye Phant
-
 EDIT/ADD: -Boost gauge tricky to read. Further down thread (see image) I found "true non bugged" idle boost ca -6.2. -I stupidly wrote zero (0) when meaning lowest idle boost. Edited to -6.2 in text (red). At no point during testing (all tests, all posts) did it actually show zero (0). Except engine off obviously. -Spitfire. Bugged (idle) high boost shifts between -3 or -4 depending HOTAS RPM level max/min. Might jump straight to post #6 (first with image). Previous posts I grasped less what's happening. Also, probably not intermittent (one thing I didn't grasp). I crashed Spitfire, did Quit -> Fly again. Suddenly Spitfire rolled on Spawn Rwy. Spitfire & P-51 both increase idle <1000 ~1500, Boost goes to -4 Spitfire instead of idle 0 -6.2. Seen once P-51, Spitfire all the time. Not tried others. When observed with Thrustmasters own software "Device Analyzer". All buttons work, analog hit correct endpoints (0-16383 for example). When plugging in the throttle the boost & rpm increases. What can this be? Throttle otherwise seems to work as it should, ie I can increase & decrease, just starting from boost -4 instead of zero -6.2 (Spitfire). Calibration? This has never happened before, bought 2018, so ie five years old, so I fear something more problematic is afoot.
 -
My Thrustmaster warthog joystick died. I was installing an extension on the stick and as I did so it made a couple of chirps and then the joystick column on the DCS controls disappeared. Now when I plug the joystick into that or anyother computer it is DEAD. No chirp and not recognized. I plugged it into my other computer which is running DCS with a a TMWH and it is dead there too. Has the firmware in the base been damaged? Can I reset/reflash the firmware? Can I send it to Thrustmaster for repair? Any help will be much appreciated.
-
Hi all very new here, trying to follow the A10II C training flight for HOTAS, I get put in auto pilot mode and the trainer talks me through the different buttons, hats etc then all a sudden, the auto pilot disengages and i spiral ground words and I crash. My question is this Is there a recommended Warthog combo profile that I can download from somewhere I also have TM MFD and Crosswinds MFG pedals in my setup. Many thanks for any help? Kind regards Humpster
-
A few days ago my Warthog throttle died like so many others and I just wanted to post a quick fix that just might get you going again until you can sort it out with an official board replacement/repair. This worked for me and I have not seen anybody else recover their throttle in any posts I have read. I found that by reducing the 5V line on the USB cable to less than 4.5V, the throttle came back to life. I did this by simply putting a Non powered USB hub between the throttle and PC, you could also add some other items onto the hub to load it down a bit more. Most people seem to try connecting direct to system board or another powered USB hub thinking it might be a low voltage issue causing the throttle to fail, which is the logical way to think. Another alternative would be to supply your own external power to the USB line to the throttle only that can be adjusted to less than 4.5V, isolating the power line from the PC/Hub, but only do this if you are confident in what you are doing. If you are faced with a dead throttle or stick give it a try, if you have had a failed firmware update you will have to do the firmware update again and get the last green verification tick before it will work properly. You can read my full ordeal with this issue here: https://forums.eagle.ru/forum/english/dcs-world-topics/input-and-output/thrustmaster-aa/64402-post-motherboard-specs-of-bricked-tm-warthogs-here-please?p=7130525#post7130525 Cheers Tri.
- 22 replies
-
- 2
-
-
-
- thrustmaster
- tm
- (and 4 more)
-

cannot reproduce Warthog Boots with Dust and IR protection
Bartacomus posted a topic in Bugs and Problems
Warthog and Harrier boot with Gazelle Dust Protection and IR countermeasure
-
Hi, I installed DCS again after some months off and wanted to fly the newly purchased A-10C II. Sadly the coolie hat isn´t working. I thought maybe it is broken, but when testing and recalibrating the throttle outside of DCS everything is OK, at least in the Windows 10 testing window. Did everyone know this error or could point me to an approach how I could find out the problem? I also loaded up Arma 3, mapped the coolie hat to the vision and could without any problems move my vision in any direction using the coolie hat, so it must be a problem with DCS... I hope somebody could help me. Greetings
-
Hi everybody, I would like to share another little project I developed in last 6 months during my spare time: a 3D printable Luftwaffe KG13B stick. As you can see project is for Warthog base but can be adapted. This is a replica of the stick used in most WWII Luftwaffe fighters such Me109 and Fw190. Starting from a free model I found on the web I deeply revised all the details in order to optimize 3D printing purpose: - Most of the screws are internal; - Models are separated in order to avoid to color them; - Internal space is adapted to common micro switch sizes; - Components thickness is enough to give strength (please note I printed it using ABS, but I think also a strong PLA can be suitable); - Fully working safety using a small magnets; - Some revisions from the original one to optimize usage. As you see replica it come out is pretty similar to real one; all parts are connected with screws and can be disassembled if needed. Screws visible are even few than the real stick, they are mainly inside the internal structure. Only lateral button needs some glue where it joins with handle, this will keep all the object completely dismountable for maintenance purposes. If anyone is interested to STL please write me a message, I decided to share them for a small price privately before start a subscription on any sharing platform (People interested might be few). I will also share schema for the internal board for the Warthog witch is by public use and far known. To resume, I include: STLs to print for yourself Renders showing how to assemble List of parts for the build (screws, resistors, etc) Schema for the internal board (working for Warthog stick) You can print for your own or, if you prefer, ask to print pieces to a 3D printing service. Obviously I will ask to use STLs for your own and keep them private.
-
--------------------------------------------- Warthog throttle Upgrading the throttle panels NEW-> Upgrading the outboard (left) grip Warthog, Hornet and Cougar stick grips Mil-spec upgrades for Thrustmaster stick grips --------------------------------------------- I've upgraded all switches to mil-spec on the Warthog throttle to improve the switch feel and make it more functionally realistic. This is probably only of interest if you really like the A-10C. This includes mil-spec locking and standard Eaton/Cutler-Hammer switches on the panel, the locking flap switch, OTTO push buttons and a functioning Honeywell mag switch. I had to provide 12VDC and install an Arduino running DCS-BIOS and a MOSFET circuit to control and sync the mag switch with DCS. Due to the size of the mag switch I had to extend the height of the throttle body with a simple 3D printed frame. On the throttle grips I put in all Eaton/Cutler-Hammer and one Honeywell toggle switch, OTTO hat switches and push button, and a Mason force transducer slew control out of a real F15 throttle unit. The force transducer is interfaced directly with the throttle using a small prototype PCB from Deltasim. I couldn't fit the whole mechanism from the F15 so I dropped the push functionality. It does exist in the real A-10C AFAIK but it is unused so not a great loss. While I was at it, I rewired the panel backlight to the Arduino I needed for the mag switch. This allows the LEDS to be directly synchronized with the in-game panel light intensity using DCS-BIOS. We included the actual brightness parameter in the latest DCS BIOS module for the A-10C. We have it for the Hornet as well in the DCSflightpanels branch. Here's a short video showcasing the look and feel of the switches. I've listed the switches I used, what they are in the real jet (based on Deadman's list) and some Honeywell alternatives at the end that are readily available from e.g. mouser.com This mod is neither cheap nor easy to do. It could be argued that it is in fact totally unnecessary and I would for sure have loved to convert a real throttle unit instead and it probably would have been cheaper. Good luck finding one though I intend to post a more in-depth guide to the various mods later - here's the short version for now: Rip out all switches and sub PCBs Poke it a bit with a Dremel tool Install new switches and wire them up You're golden
- 28 replies
-
- 9
-
-
-
- mason
- thrustmaster
- (and 5 more)
-
reported Emergency Wheel Brake Bug on A-10C II Tank Killer
zinzin posted a topic in Bugs and Problems
Hi All, This is my first post on this forum. I've been playing this marvellous game for a long time. About a month ago, began to play A-10C II Tank Killer. Read lots of user guide stuff and watched so many training videos on YouTube. After a while noticed a bug or buggy thing on A10C II. Emergency Wheel Brake works decent when I use only mouse button but it doesn't work if I use keyboard buttons. All my record is on the video which is at bottom.- 1 reply
-
- 1
-
-
- thunderbolt
- warthog
- (and 3 more)
-
Hi, i switched from the warthog throttle to the CM3 a couple of weeks ago and like it very much. My only downside is that I am missing the feel of the different buttons e.g. the China hat and boat Switch on the warthog. It’s not so easy to differentiate the buttons on the CM3. is there a way to change them or has anyone made custom buttons?
-
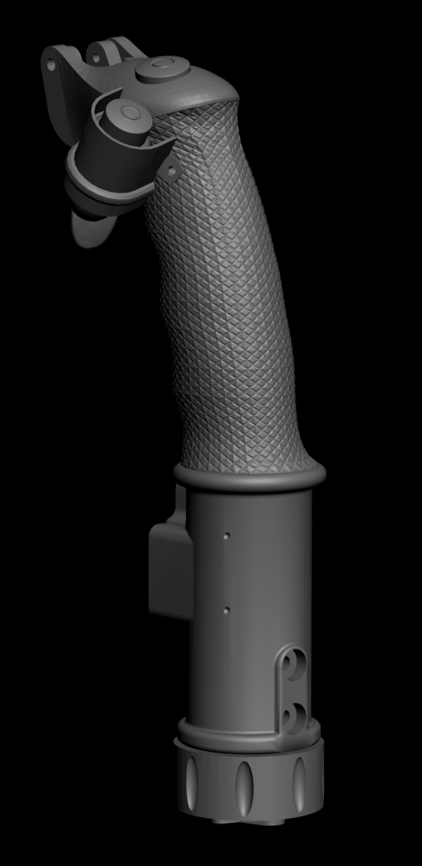
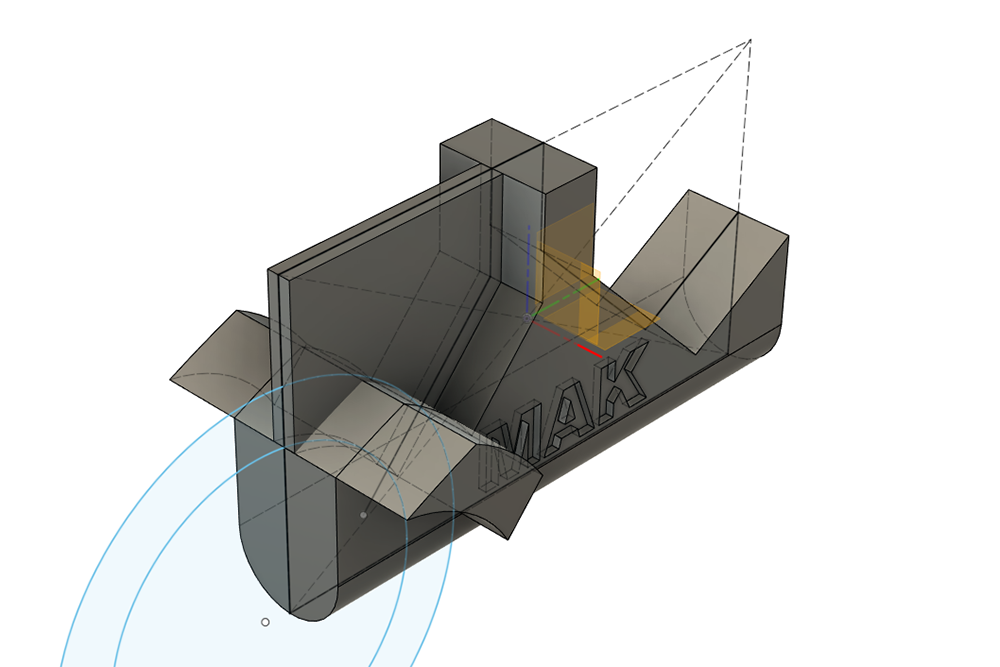
I hope HOTAS Warthog users will find this little project useful. It is 3D printable afterburner custom detent, to replace genuine part which require to rise throttles up to activate afterburners. 3D printed part allows to just push the throttles through, but with still detectable detent and resistance. There are three versions of it available for free download, with different resistance levels. Cheers & enjoy! https://makcorner.net/mak-thrustmaster-hotas-warthog-afterburner-detent/ NOTE: my STL file is free. If you own 3D printer, the only cost to make this thing is few cents for filament .
- 10 replies
-
- 3
-
-
- thrustmaster
- hotas
- (and 3 more)
-
Hello, I am selling the FSSB R3 Lighting base that I originally purchased from Real Simulator in September 2021 and used very little due to starting a new job in the meantime. I am based in EU (Germany). I am selling the base together with the Angled Adapter from Real Simulator useful for putting Thrustmaster and Virpil sticks on it. The old straight base stem is of course included, as is all the original packaging. Even more, I also add in the extended warranty for its third year (which would cost you 99 EUR from Realsim + tax = c. 120 EUR, but this way you get what is left of it for free). https://imgur.com/a/VD4OCFh If you were purchasing these new from RealSimulator it would cost you 555 EUR + tax (in my case it comes out as 126,66 EUR at 21% rate for Germany) = 729,82 EUR. Whereas I could part with it for around 650 EUR, and you get a slightly longer warranty with it too. Optionally, I also have the mounting plate from Monstertech for it, ideal for 4080 aluminium extrusions. This comes with four holes as per Monstertech's older (and better) design for absolute FSSB stability (the new one they use has only two holes for connecting with the mounts). You can see it in the imgur picture.
- 3 replies
-
- 1
-
-
- fssb r3 lightning
- warthog
- (and 1 more)
-
Greetings chaps and chapeses, I'm creating this thread rather to share info about my struggle with HOTAS Warthog joy setup with T.A.R.G.E.T script editor and primarily to share the solution/workaround I found to work for me. I'd appreciate if someone more insightful explained/confirmed the reason for such behavior. My HW: HOTAS Warthog Throttle HOTAS Warthog Magnetic Base HOTAS Warthog F/A-18 Grip (? is this problem F/A-18 Grip specific ?) My T.A.R.G.E.T + HOTAS Warthog setup procedure: clean win10 install install HOTAS Warthog drivers (devices plugged first time after shut down system | unplug devices | - reboot probably unnecessary boot system | install target plug devices run script The problem: Running basic or advanced GUI profile works without problem, but running script from GUI or Script Editor either did not see the Warthog Joystick at all or generated the following error: Running script: C:\T.A.R.G.E.T\marbe's_profiler.tmc *** Allocated ProcInstances found from the previous run: use FreeProcInstance() *** Mapped plugin module "C:\Program Files (x86)\Thrustmaster\TARGET\Plugins\sys.dll" Compile Succeeded. Physical USB HID devices managed by script! Currently plugged USB HID devices[2]: 1: "Joystick - HOTAS Warthog" - "USB\VID_044F&PID_0402&REV_0100" 2: "Throttle - HOTAS Warthog" - "USB\VID_044F&PID_0404&REV_0100" USB HID device "Throttle - HOTAS Warthog"(USB\VID_044F&PID_0404\6&E264243&0&1) selected USB HID device with hardware id "VID_044F&PID_0402" cannot be found USB HID device "Joystick - HOTAS Warthog"(USB\VID_044F&PID_0402\5&357A1272&0&9) selected USB HID device with hardware id "VID_044F&PID_b351" cannot be found USB HID device with hardware id "VID_044F&PID_b352" cannot be found USB HID device with hardware id "VID_044F&PID_0400" cannot be found USB HID device with hardware id "VID_044F&PID_B10A" cannot be found USB HID device with hardware id "VID_044F&PID_B10B" cannot be found USB HID device with hardware id "VID_044F&PID_B687" cannot be found USB HID device with hardware id "VID_044F&PID_B679" cannot be found USB HID device with hardware id "VID_044F&PID_B68F" cannot be found USB HID device with hardware id "VID_044F&PID_0405" cannot be found USB HID device with hardware id "VID_044F&PID_0406" cannot be found USB HID device with hardware id "VID_044F&PID_0407" cannot be found USB HID device with hardware id "VID_044F&PID_0408" cannot be found Virtual HID devices managed by script! Connecting virtual joystick...Done Device name set to Thrustmaster Combined Connecting virtual keyboard...Done Connecting virtual mouse (absolute axes)...Done The 'Thrustmaster combined' virtual device is crated. Device analyzer shows it is consists of the throttle and the stick. The device analyzer shows all physical device interaction (both throttle and stick), but only throttle gets captured and transferred to the Combined virtual device.
-
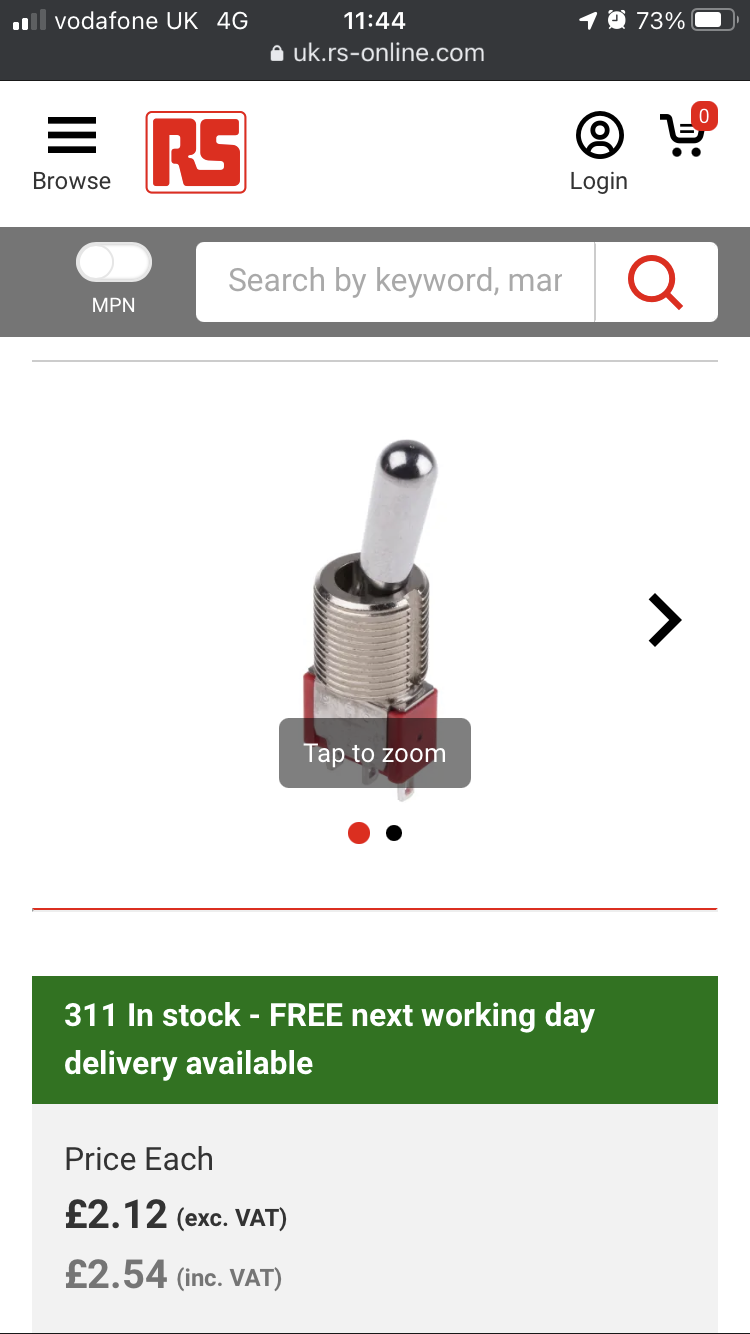
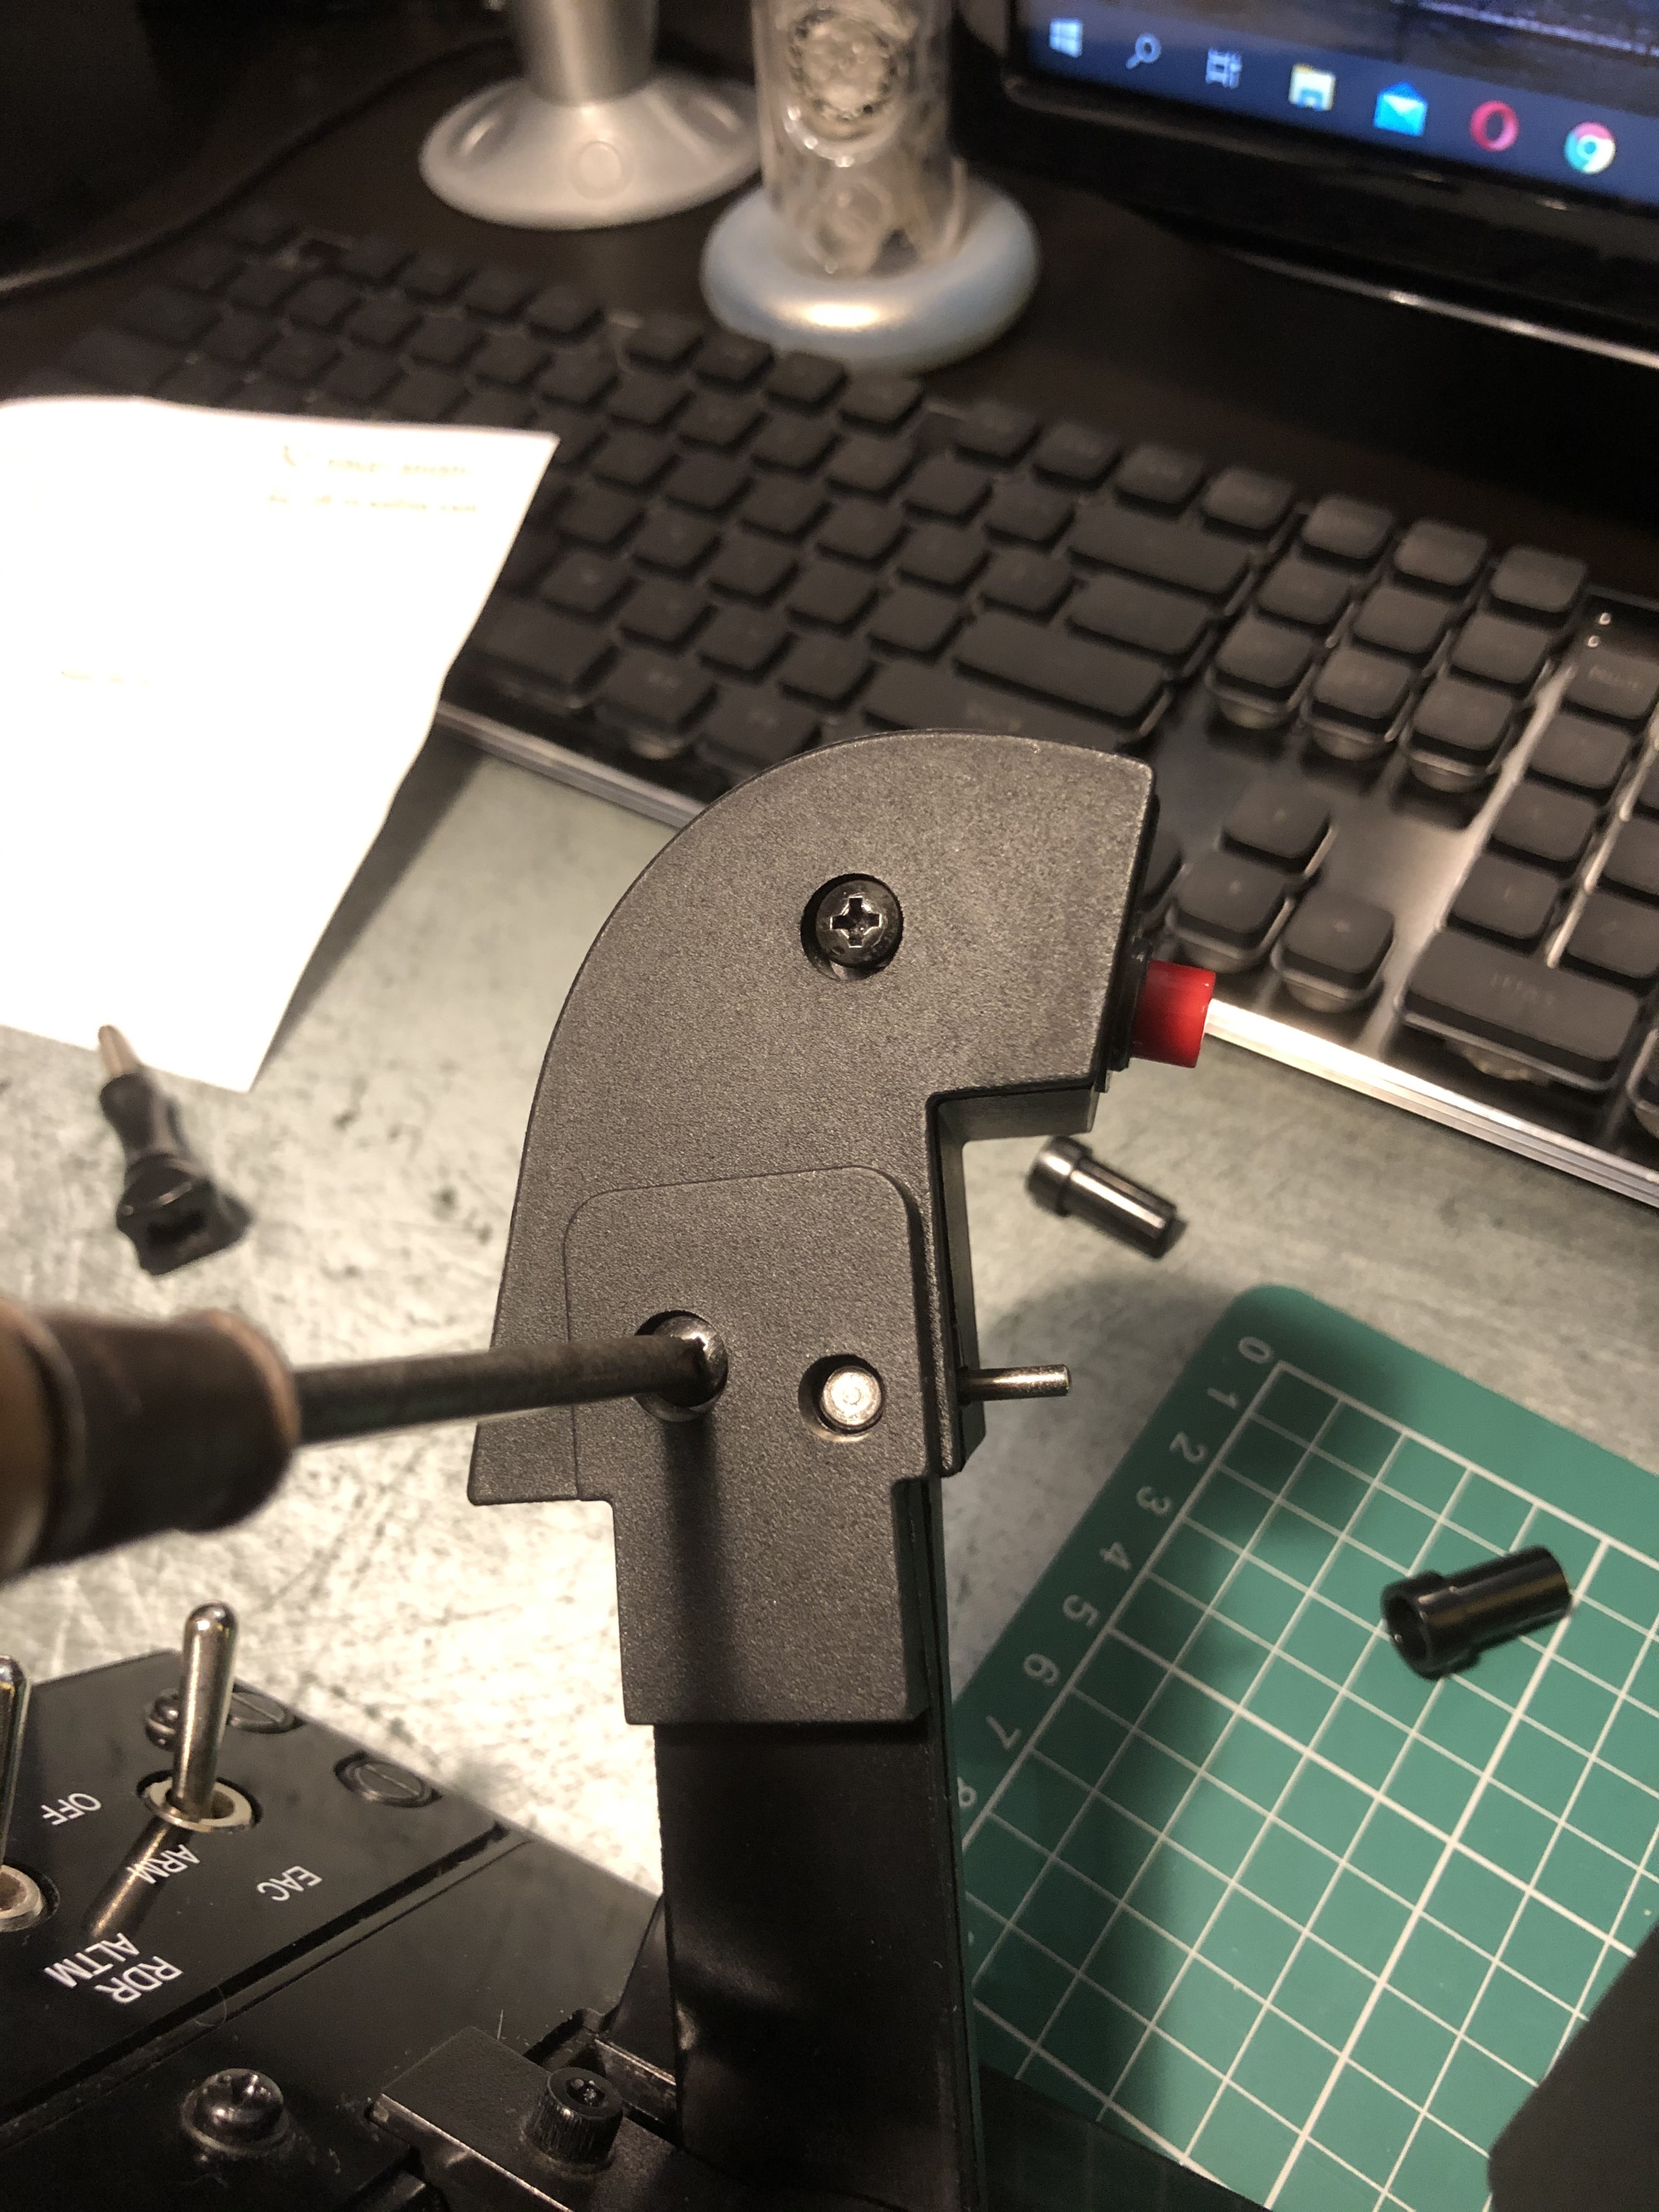
PART 1 Hello and welcome to my Thrustmaster Warthog throttle pinky switch replacement guide. I live in the UK and have found it difficult to find any information with regards to replacing the pinky switch in the UK specifically. I found numerous vids and advice on HOW to replace it, but not WHERE I could source the correct switch from in the UK. This guide presumes you are comfortable taking apart your beloved throttle and have access to, and can use, a soldering iron. No special tools are required. If you're reading this you probably already know that there are an abundance of SPDT switches out there, and if you don't know what one of those is, like I didn't, just google it. It'll make more sense. I found it difficult to decipher all the sizes and switch types so I wanted to share exactly WHAT switch I used and WHERE it came from at a very reasonable price. So lets get to it.... THE SWITCH From a reputable electronics company, RS Components. RS stock number: 7347139 REMOVAL OF SWITCH To remove, undo the 2 phillips screws holding the left throttle together. They are located on the INBOARD side of the throttle. The OUTBOARD panel that the switch sits in should now start to come away from the body of the throttle. ***NOTE - IF THE INBOARD PLASTIC PANELSTARTS TO COME AWAY, TRY TO PREVENT THIS FROM HAPPENING. THAT PART ISN'T DESIGNED TO COME AWAY WITHOUT FURTHER DISSASSEMBLY. You will find 2 black spacers inside that will become loose once the screws are fully removed. Take those out and keep them safe with the screws. At this point don't worry about which way around they go as I'll specify that later on. I'm going to have to break this post up into stages as my images are too big and limited to a max of 5MB per post.
-
 Looking for a squadron with weekly campaign missions, realistic IADs, a great community to hang out in, and place to learn your aircraft? https://tvalhalla.com Join Us on Discord! Task Force Valhalla was founded as a place for DCS members to fly together in realistic, coordinated operations while minimizing the milsim nature of most DCS squadrons. While we do have ranks, they are solely tied to the proven proficiency in your airframe, and our squadron commanders are chosen by community vote for their dedication in their airframe. We try to democratize as much as possible in the Task Force and have representatives from all squadrons provide input and vote on any changes that affect everyone. We'd like to think our missions are unique, and we hope to get more active mission makers to increase the storytelling and depth available to our members. We currently use HighDigitSAMs integrated with Skynet-IADS in all of our missions, and implement realistic ROE and border patrols. We try to flesh out the ground environment as much as time allows and are experimenting more and more with voiced AIs! Currently we're midway through our first campaign, which is a police action in Georgia as Ossetian and Abkhazian forces attempt to obstruct the construction of a new pipeline in Georgia and unify as the Alanian Republic. Our campaign nights are FRIDAY, 9PM CST with briefing ramping up 30 minutes beforehand. We also have weekly scheduled training nights every Monday at 9PM CST. We just have a few basic requirements to join • Must be 18 years old to join • Must own the F-16, AJS37 Viggen, A-10CII Tank Killer, or Mirage 2000C OR be willing to own LotATC if you'd just like to GCI. • To fly in weekly ops, we require all members to pass a basic type rating in their chosen aircraft. This basically boils down to being able to takeoff, navigate, use the aircraft's most basic weapons, and land. Most people that have been flying the aircraft for about a week should be able to at least stumble through it successfully and you'll have someone who will help you through it. We're more than happy to train you even if you've never flown the module before or are new to DCS! • We have no attendance requirement, but we do require you to RSVP every week to let our dedicated mission makers have an accurate head count so they can tune the campaigns properly. 93rd Tactical Fighter Squadron "Outriders" Commander: Capt. Hex Director of Ops: M. "D20" Shepard Roster Limit: 18 Slots Available: 2 The 93rd Outriders were founded in September of 2020 as an offshoot of Carrier Strike Group 8, comprised of pilots that were looking to fly in Air Force operations with the F-16. The 93rd specializes in SEAD, DEAD and precision strike missions. We currently have 12 pilots on active roster and are always looking for more! 357th Fighter Squadron "Wyverns" Commander: Capt. R. Greyson Director of Ops: Vacant Roster Limit: 12 Slots Available: 4 The 357th Wyverns were founded in October of 2020 shortly after the 93rd. Much could be said about the 357th, but primarily it specializes in BRRRRRTing and supporting our allies armored divisions on the ground. We currently have 10 pilots on active roster and are looking for 2 more highly active individuals to fly weekly with us! 332nd All-Weather Fighter Squadron "Valkyries" Commander: Capt. Kora "Kortana" Director of Ops: N/A Roster Limit: 6 Slots Available: 0 - Recruiting Closed The 332nd Valkyries was founded by our fearless head of mission making Kortana in an effort to bring the joys of Mirage-ing to the masses. There was a noted gap in American time zone based communities for the Mirage and Kortana saw an excellent opportunity to put together a squadron for her favorite aircraft. Although aging and simpler than the F-16, the 332nd has been providing accurate and aggressive CAP for Task Force Valhalla with minimal losses. In the future we expect the 332nd to include the Eurofighter on it's release. F10 Angelholm "Ragnerok" Commander: Capt. K. Sakhir Director of Ops: Capt. R. "Bean" Green Roster Limit: 9 Slots Available: 0 - Recruiting Closed F10 Ragnerok brings the Viggens to a American friendly time zone and is Task Force Valhalla's surprisingly fastest growing squadron. F10 holds the special distinction of providing all of Task Force Valhalla's precision intelligence. Their ELINT missions are the only reason any flight can use a pre-planned target or has knowledge of the precise location of our adversary's mobile SAM network. When not performing ELINT, F10 has proven themselves as the best deep strike package in all of TFV. >>Our Website<< Discord Currently we institute an application process to screen members before they join. We do this because we want to make sure that applicants meet our age requirement, and that our operations actually meet the experience that they're looking for. It's also a good time to ask any questions you might have! Our application process is pretty straight forward: 1. Apply on our website 2.Join our Discord 3. Do 5-10 minute interview with someone from our recruiting team.
-
- 2
-
-
- recruiting
- squadron
- (and 12 more)
-
Living in Australia being so far away can suck at times, in this case Thrustmaster DO NOT have a support channel in this country. I have a Warthog Joystick that needs parts, I have examined the unit and know what I need to buy, can anyone put me in touch with a repair agent anywhere (most likely Europe or the USA, but if there's one in Asia) that would be awesome. After spending more than a $1000 on products you would think the support arm is able to support their products anywhere needed? Premium products demand a better level of support when spending this amount of money......... All I want is someone who can supply and ship parts to Australia. Thanks in advance to anyone who can help.
-
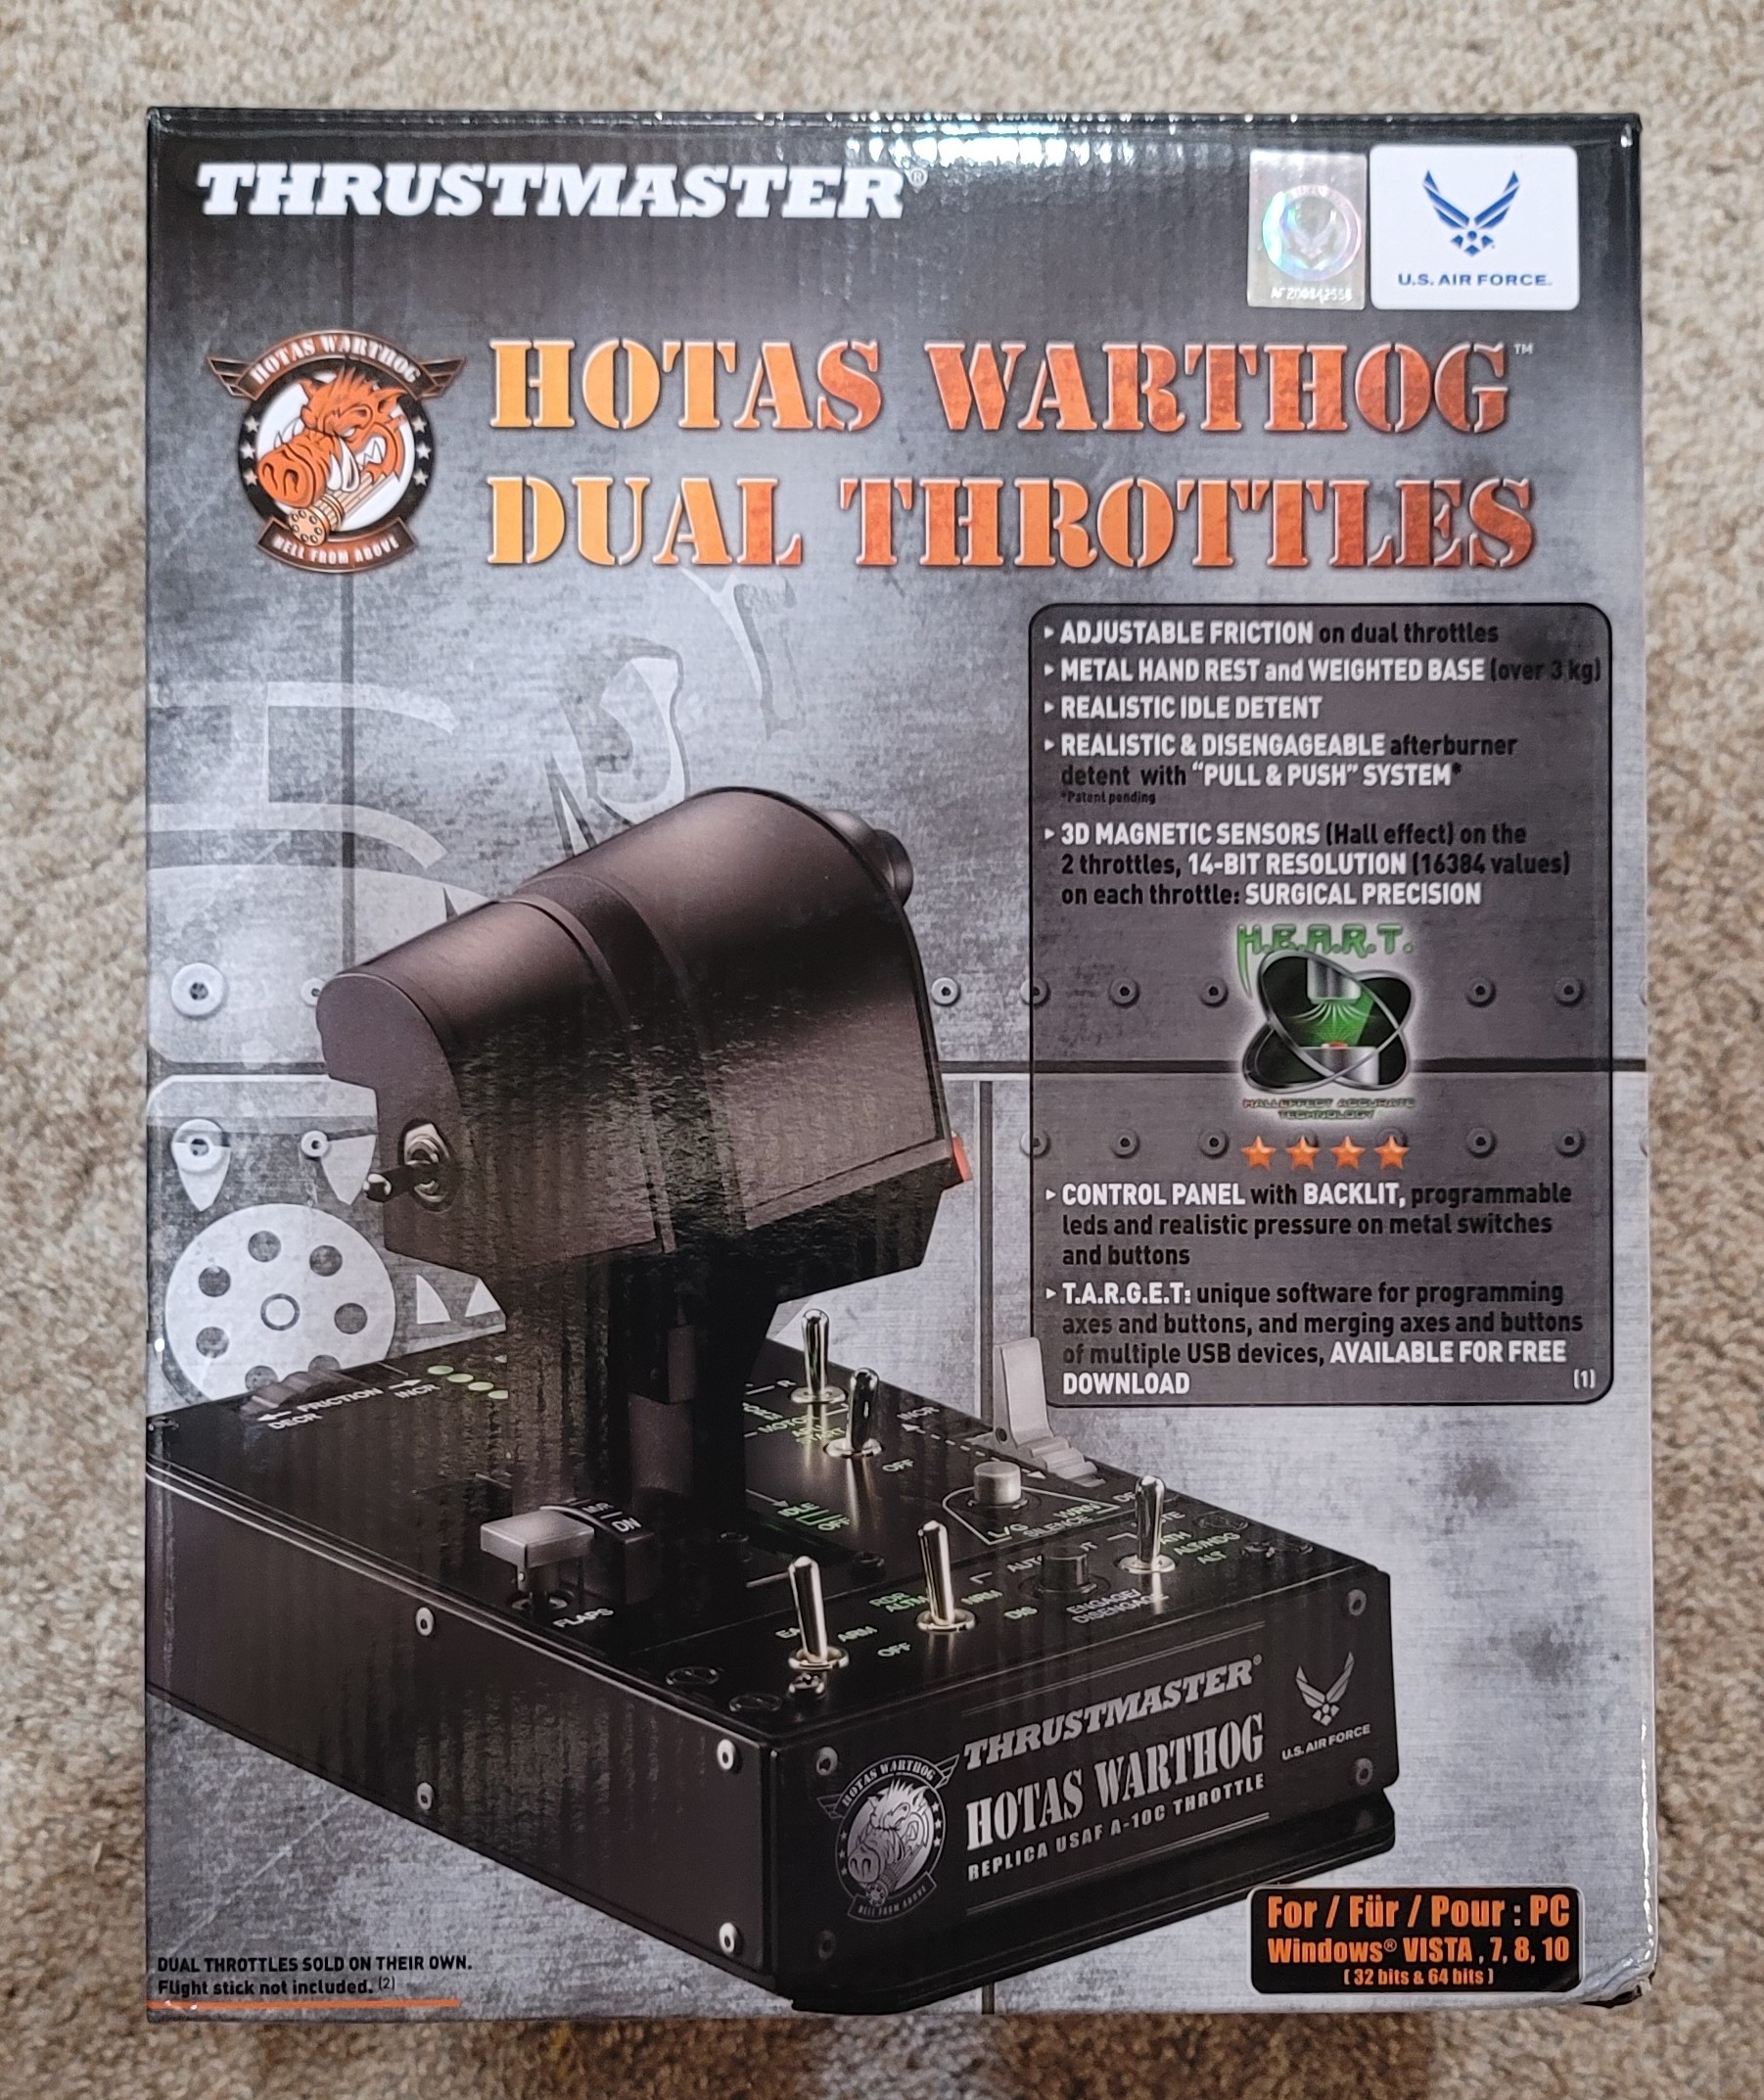
Please see my Facebook listing for more info. Like new condition. Works perfect. Only selling because I upgraded to a WinWing F16EX. Also includes MonsterTech Gimbal dust cover. Ships in the original box. Used for under a year. Paypal only. Thanks! https://www.facebook.com/marketplace/item/1170035330210520/
-
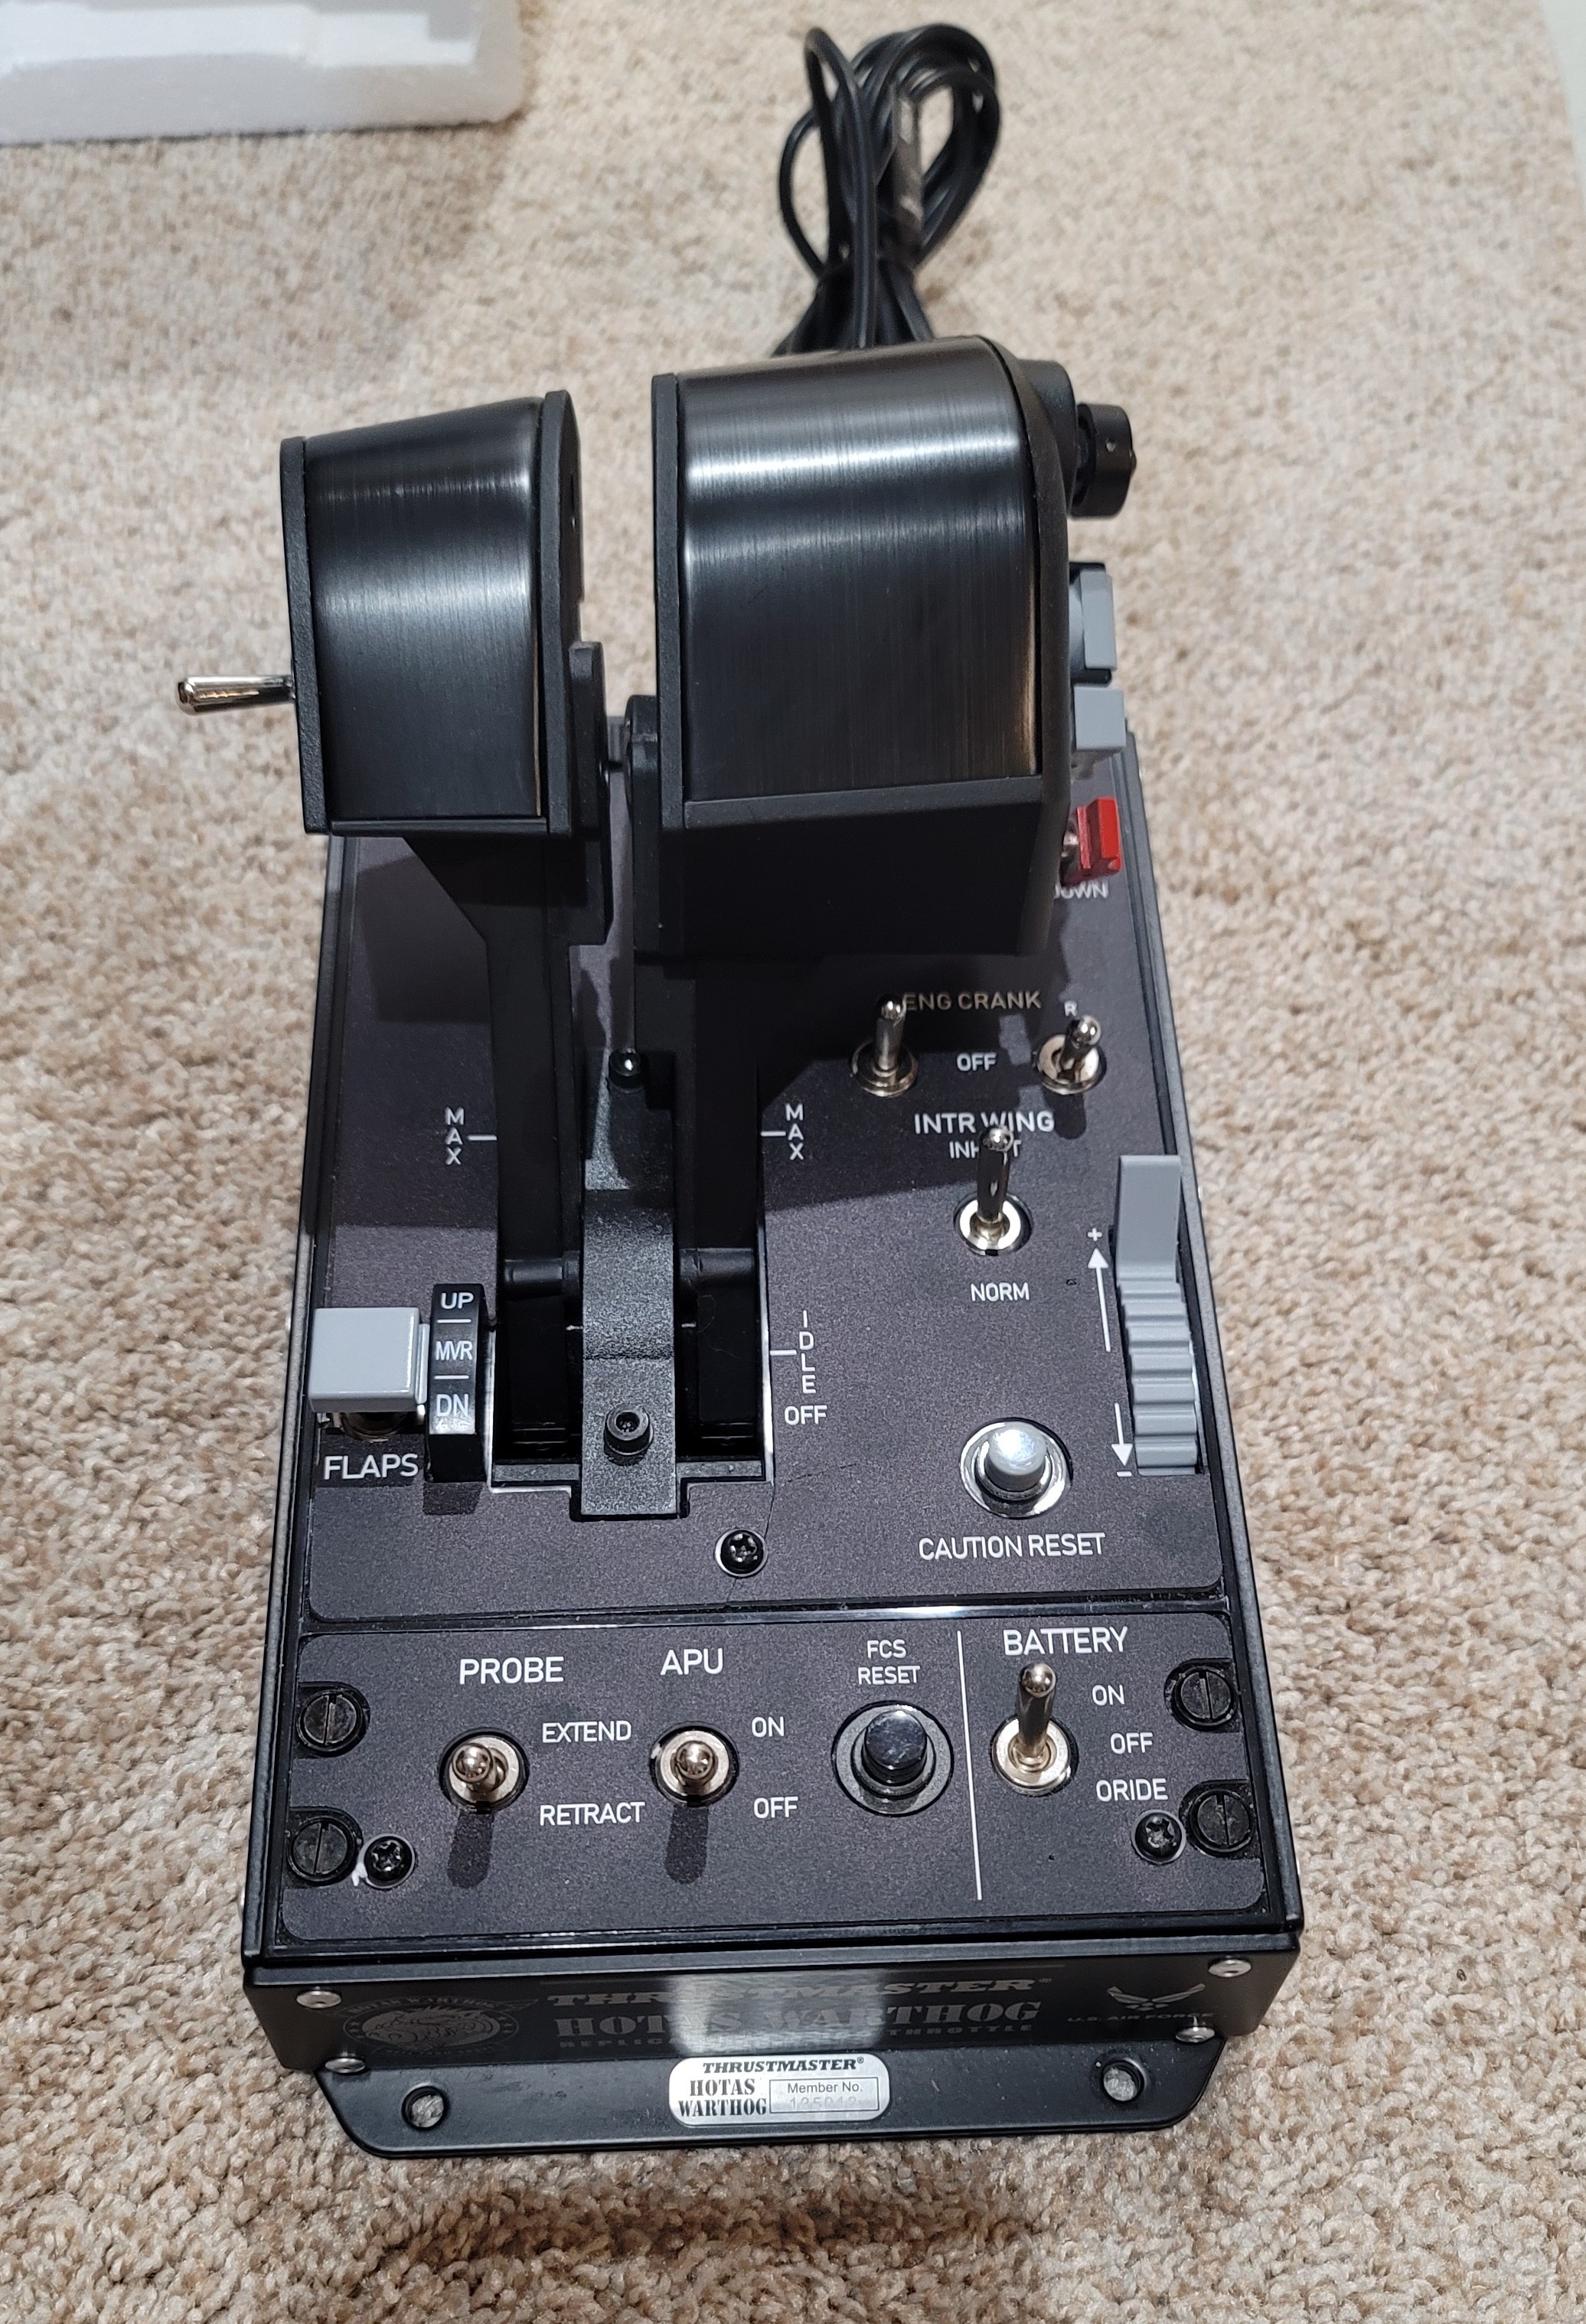
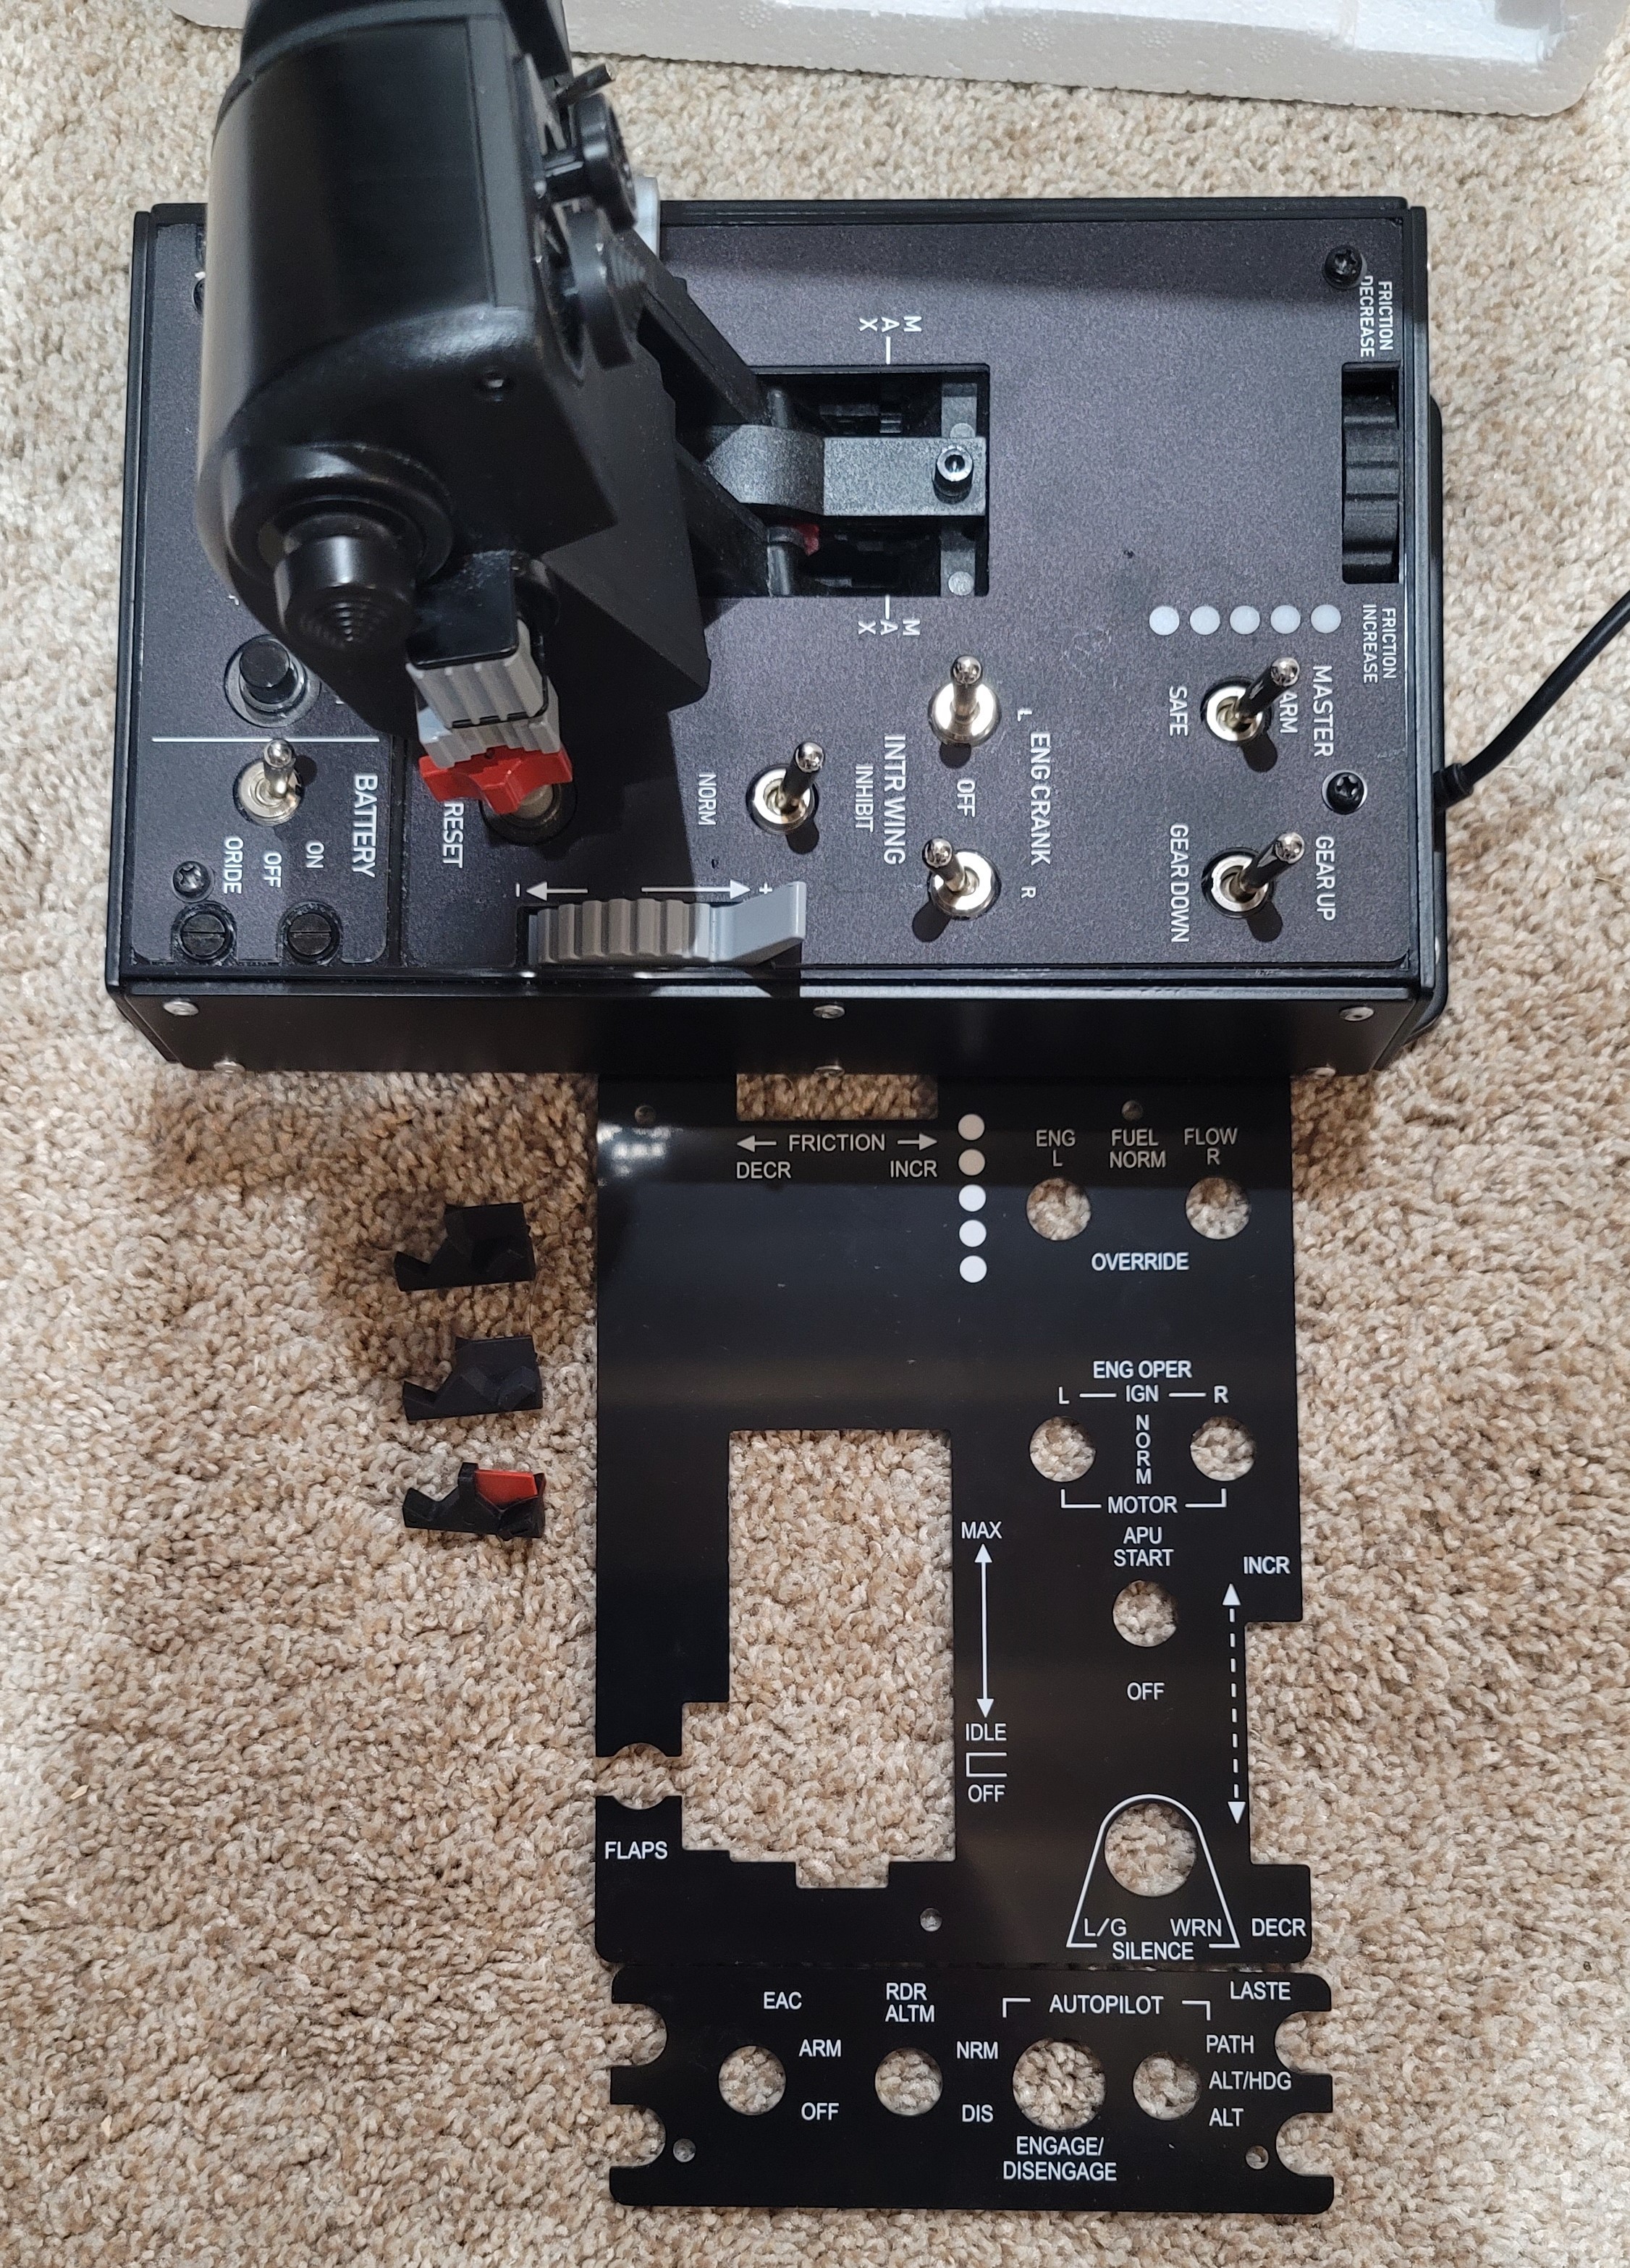
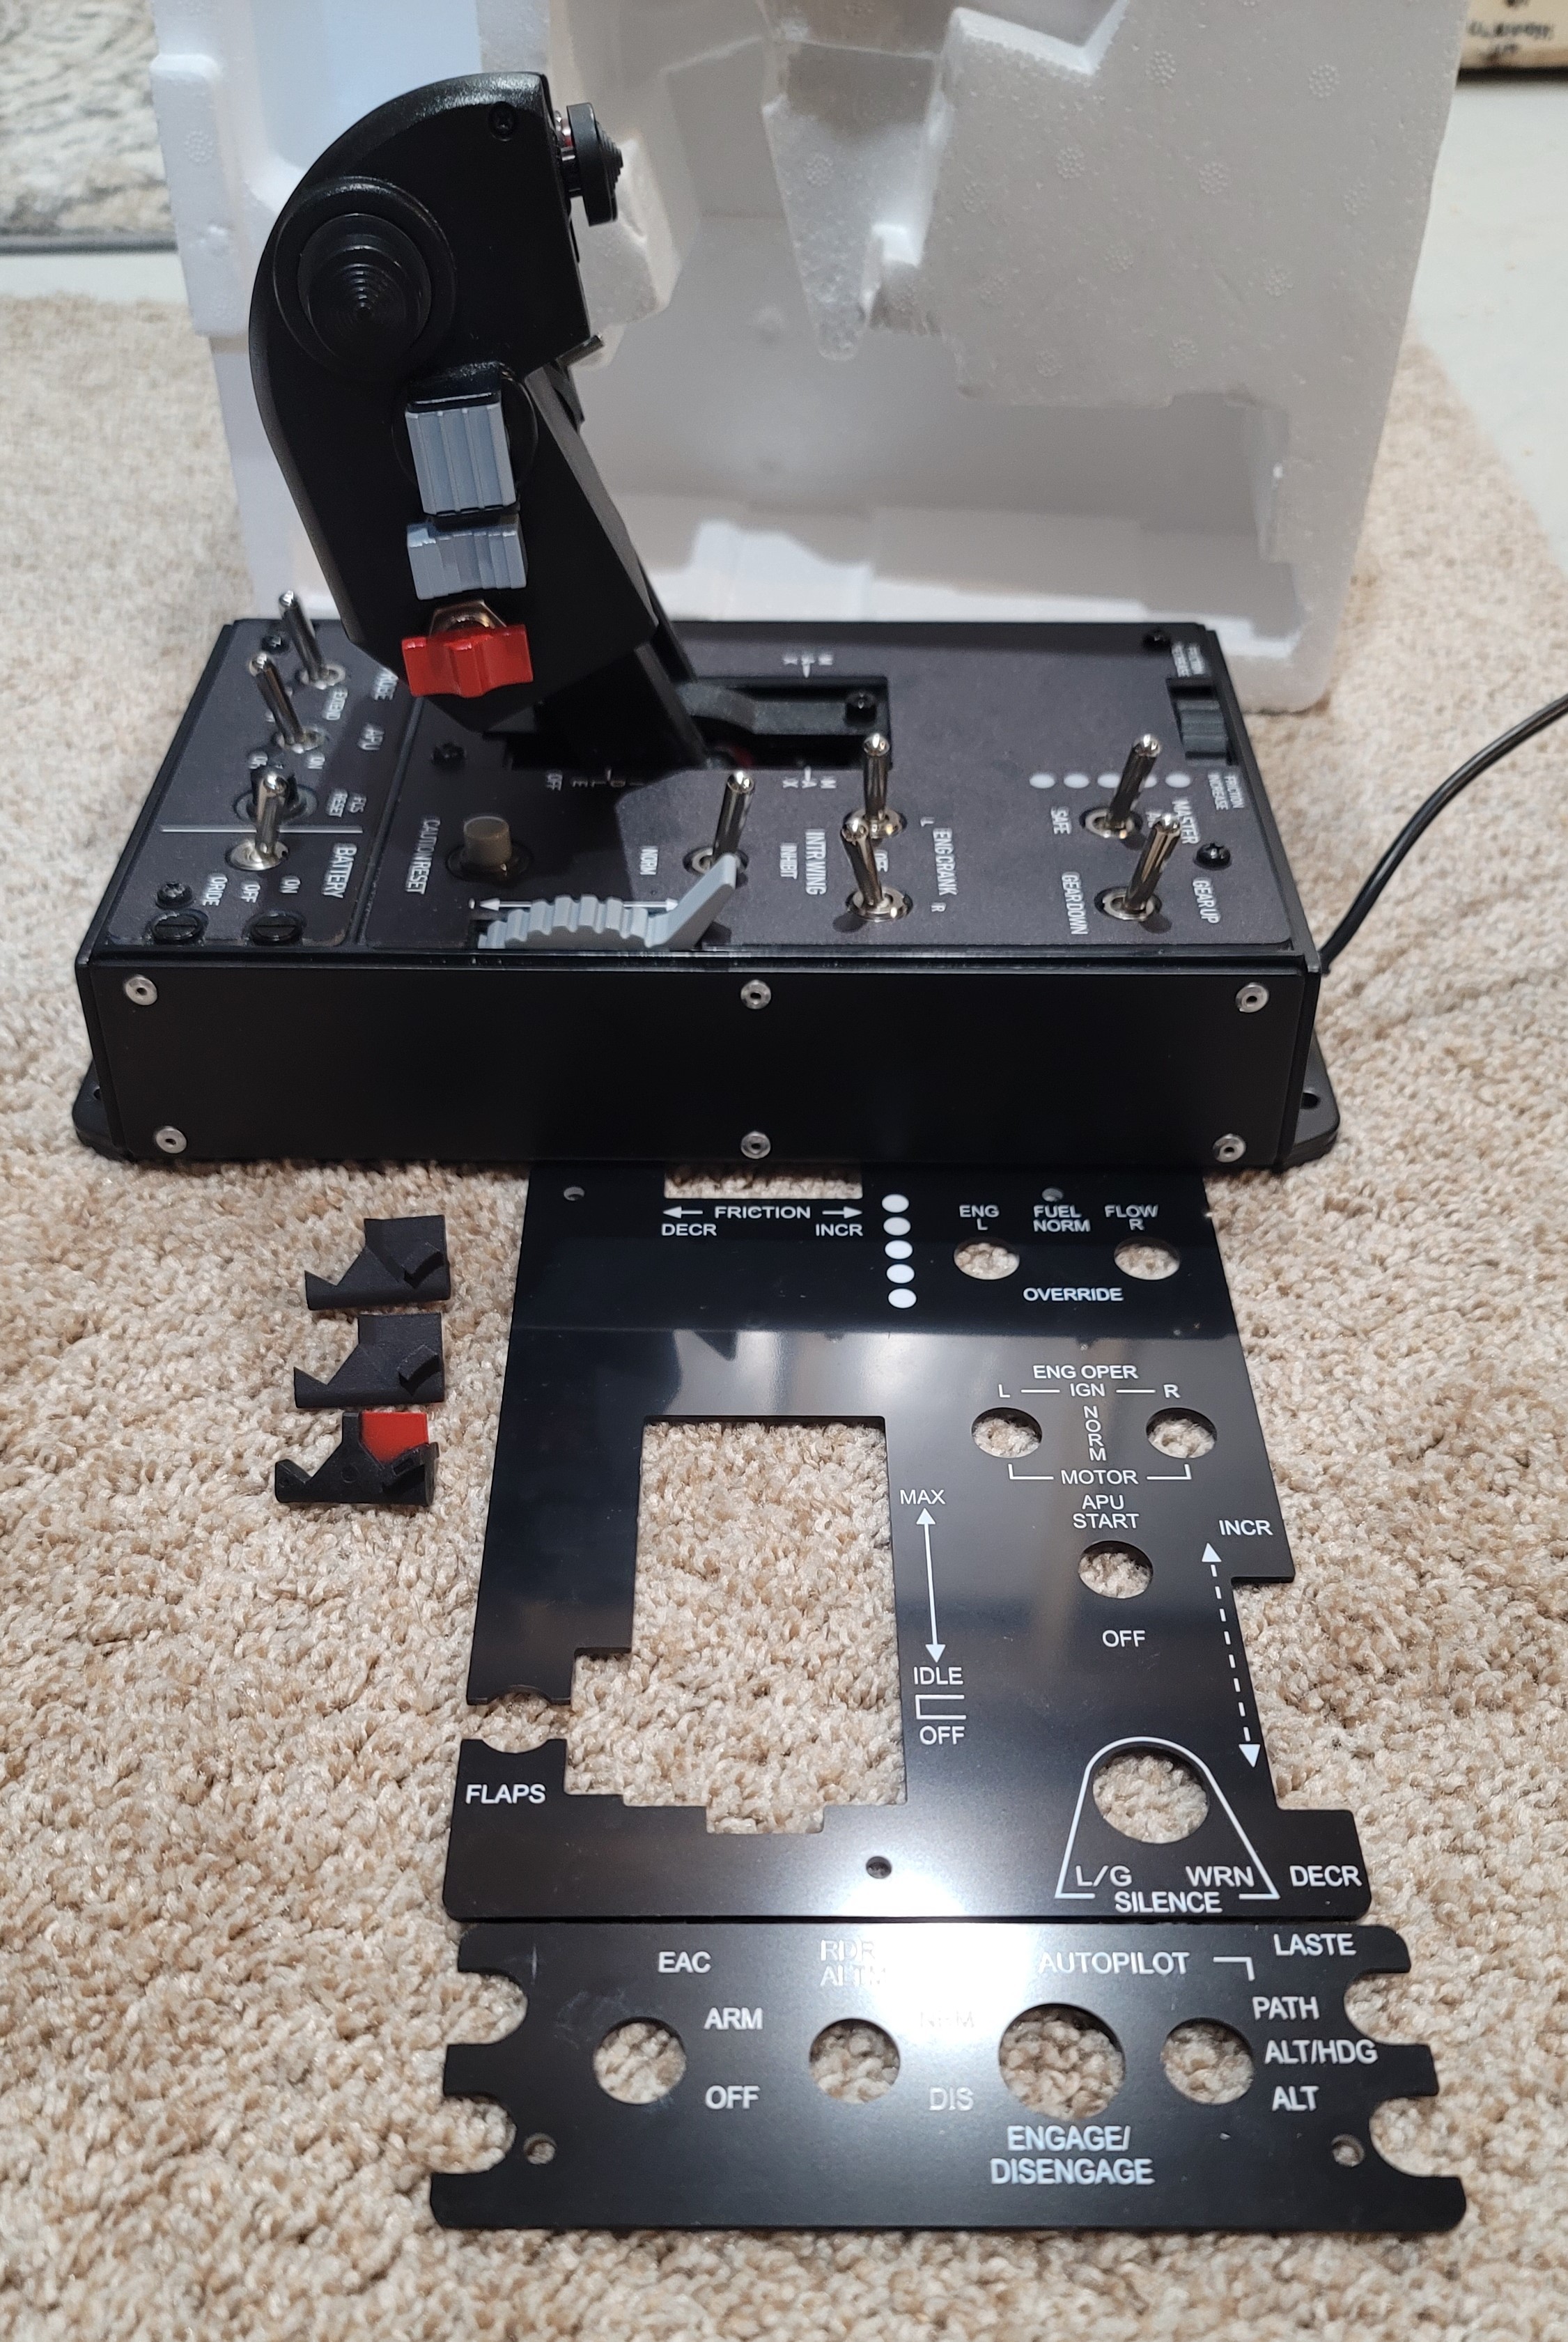
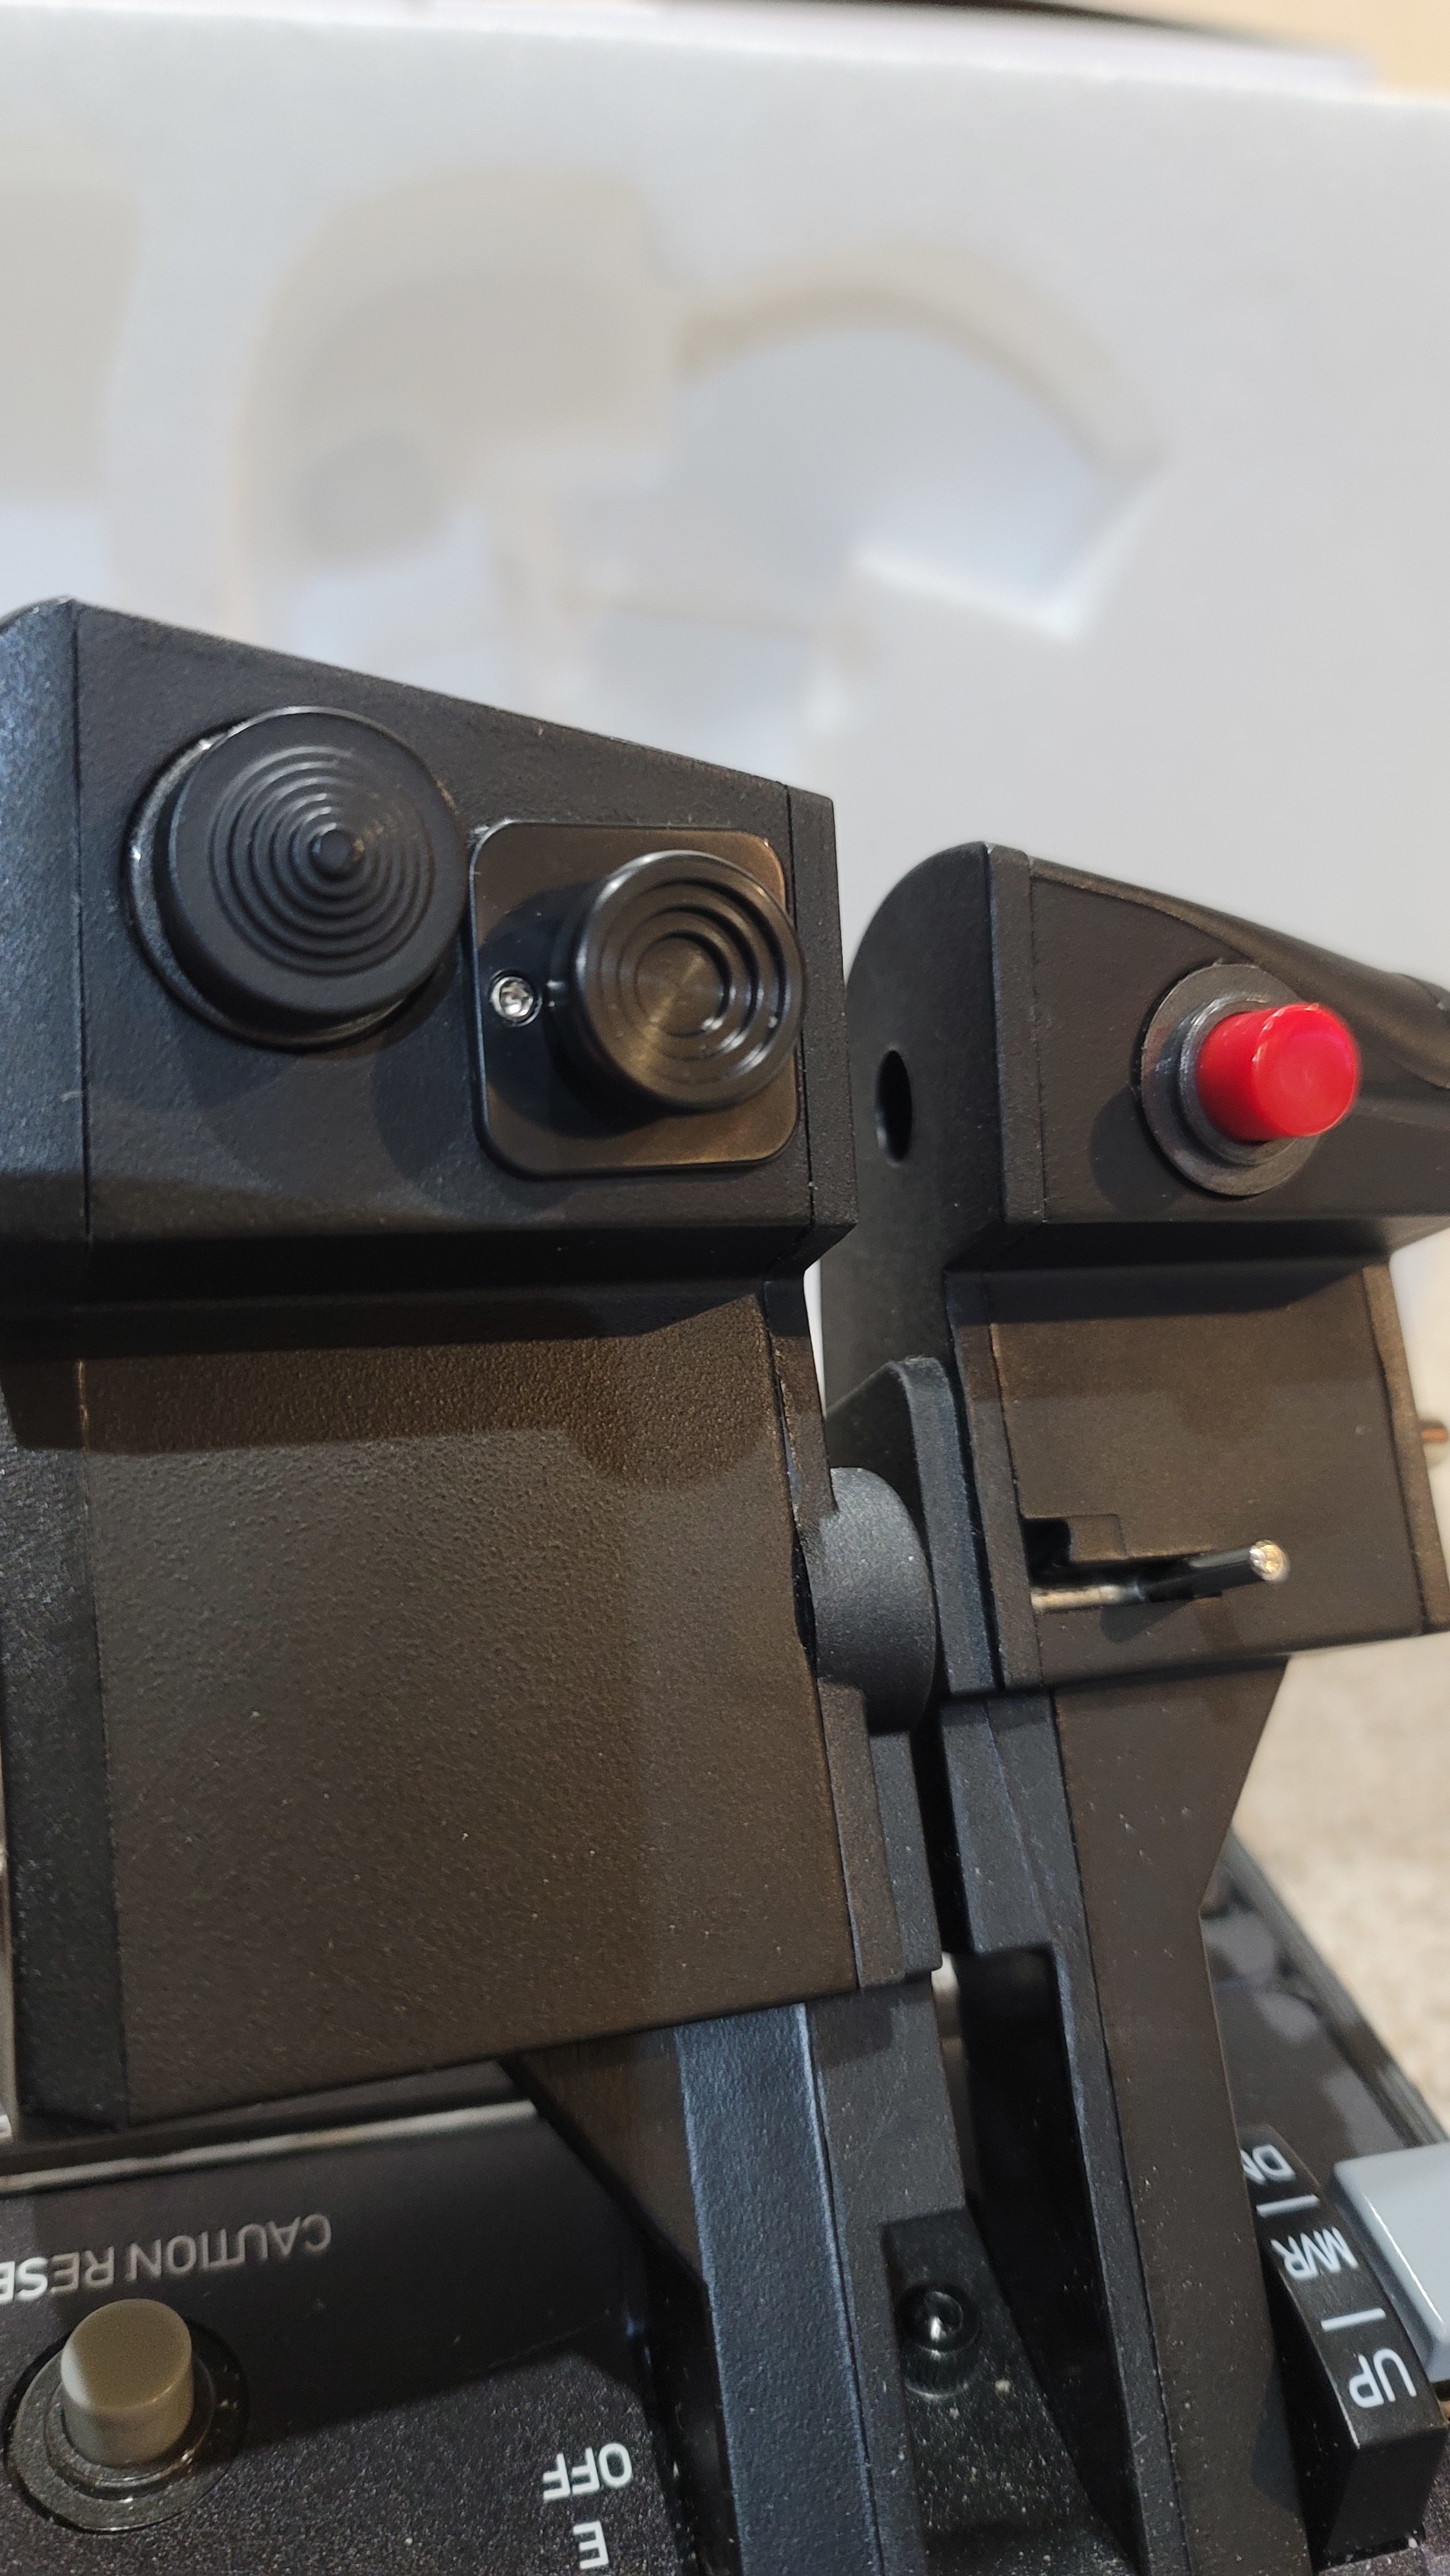
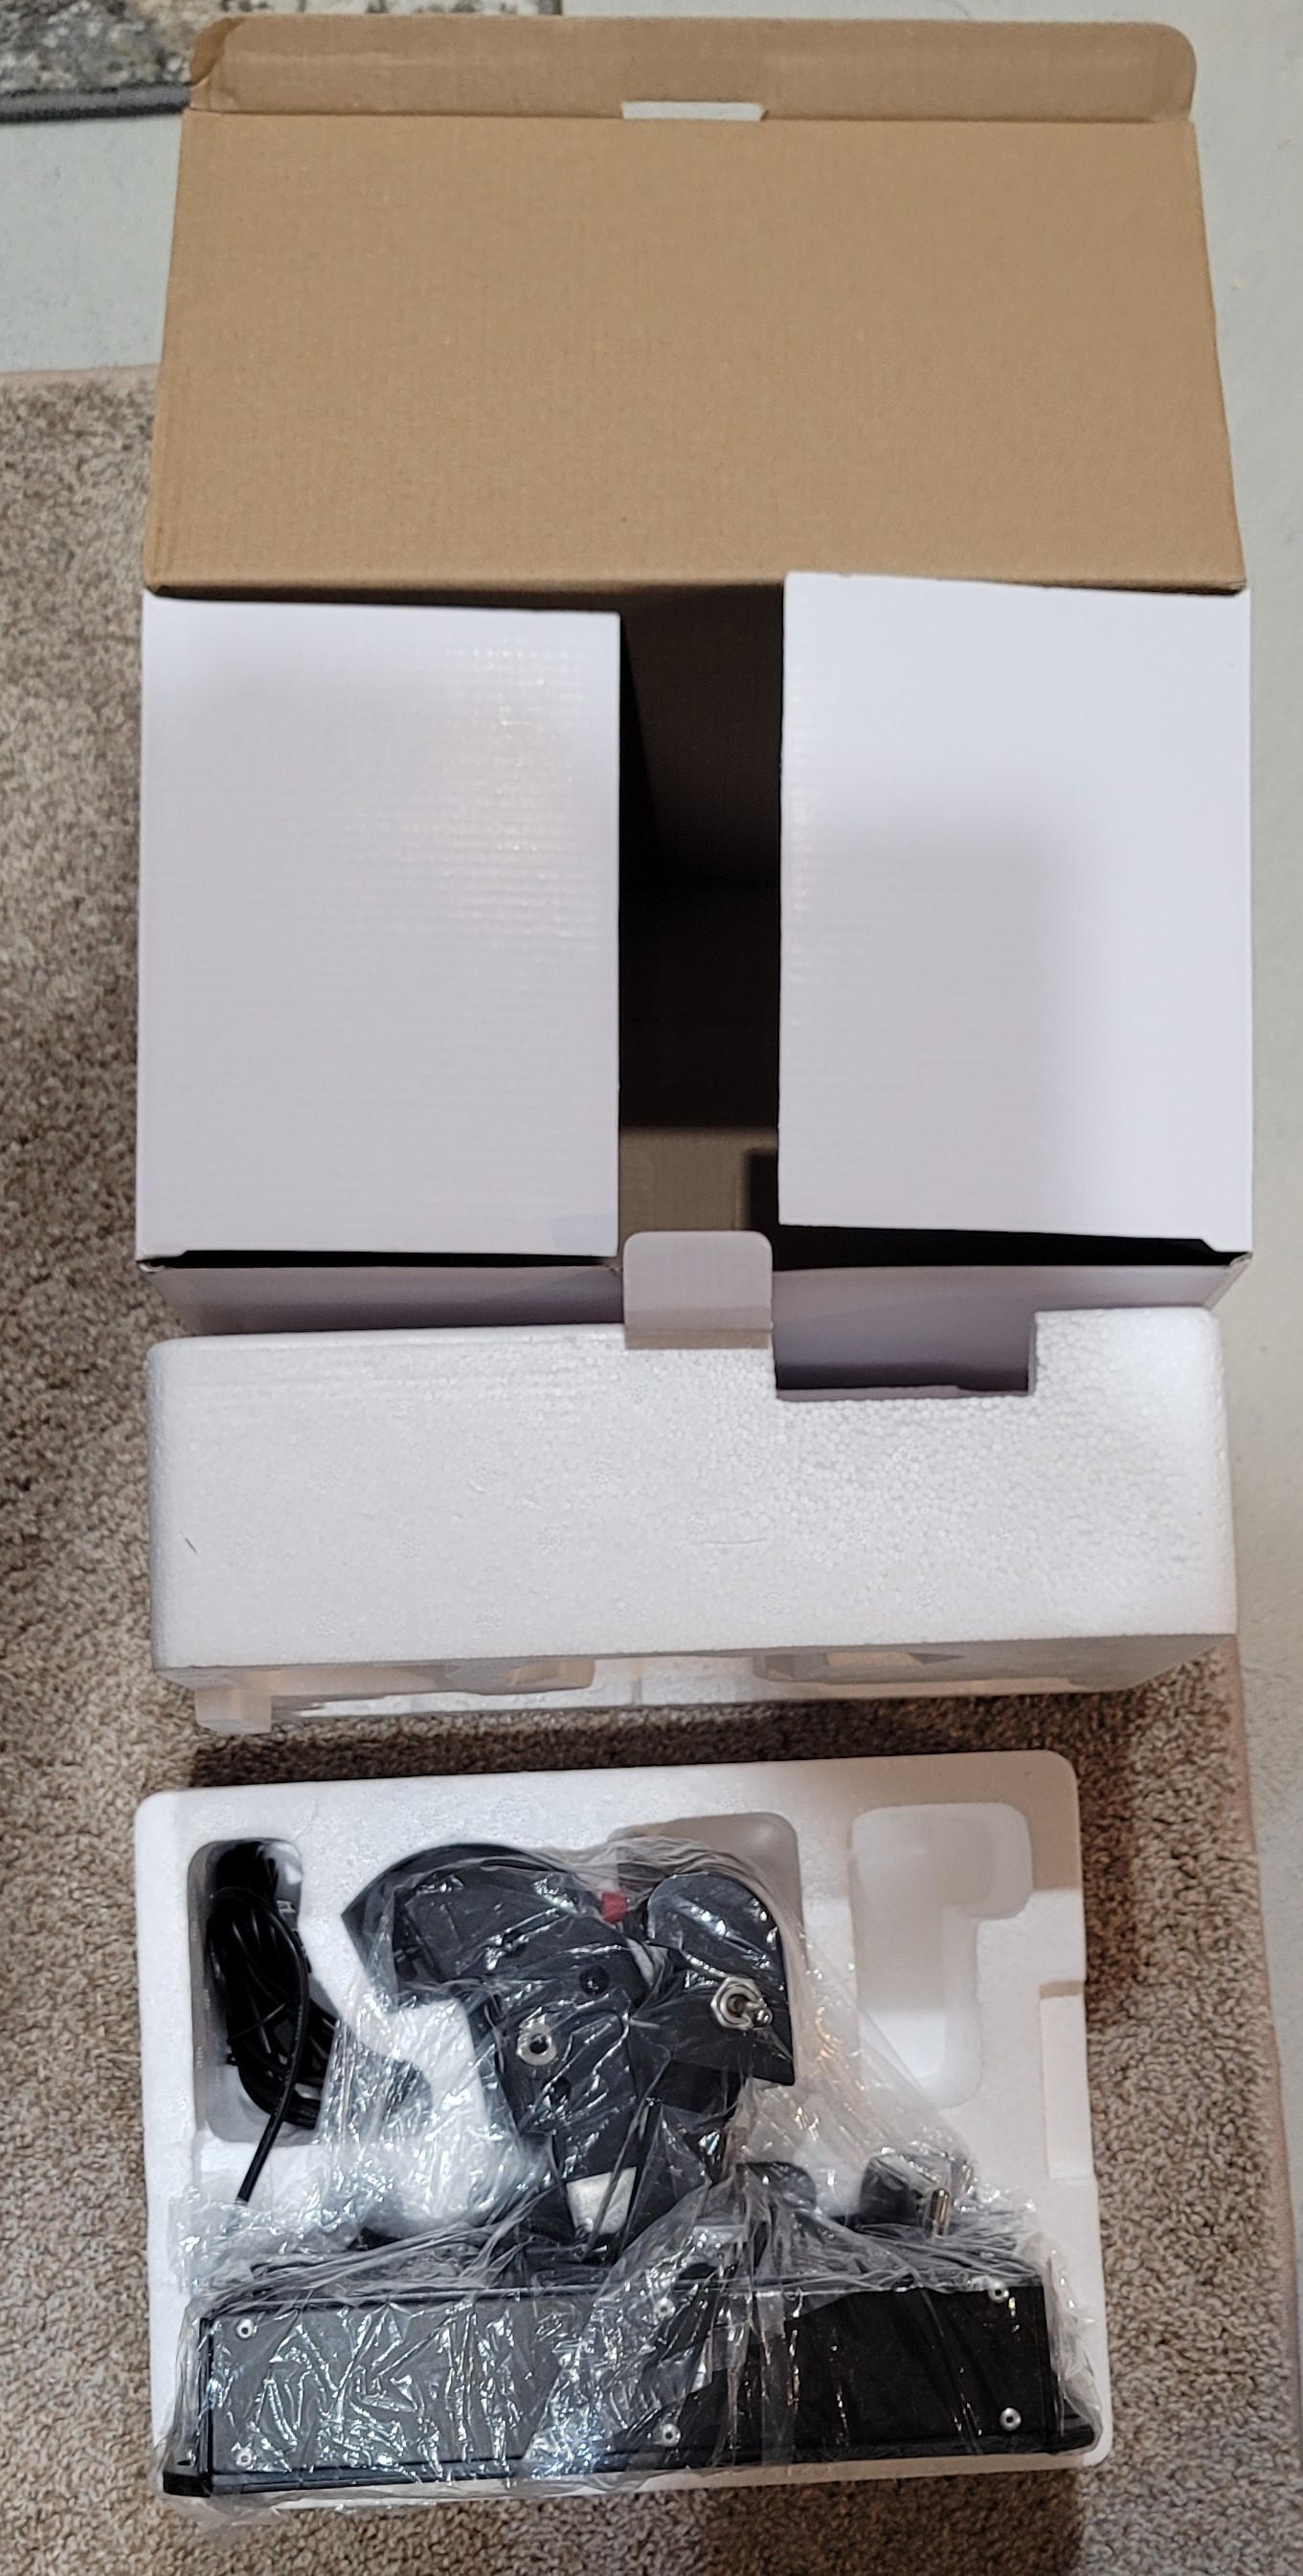
SOLD Thrustmaster HOTAS Warthog Dual Throttle Like New Played it for about 7 months then bought a Winwing Super Taurus. Includes... Delta Simulations TDC mod installed (Delta Sim TDC) F/A-18 Hornet overlay (original included in box) "Push-through" afterburner insert installed (you do not have to lift the throttles to go into afterburner) Original insert 2 nylon 3D printed "push-through" inserts In original packaging. null


.thumb.jpg.df7af3b734edbf1450f7f602a47e59cb.jpg)