CubPilot
-
Posts
212 -
Joined
-
Last visited
Content Type
Profiles
Forums
Events
Everything posted by CubPilot
-
LOL...... how do you remember what everything does? Better use heavy gloves with this joystick, it's backbone looks like a porcupine. :lol: :pilotfly:
-
Well, just guessing, but it could be that the capabilities of the Warthog are not known to the persons suggesting it's a "1 sim HOTAS". Or they just don't like TM products. Let me add that they are entitled to their opinion. I'm not crazy about the CH HOTAS products. I'm not saying it is a bad HOTAS, just that I have some issues with it and prefer something else, it's a personal thing. I'm sure that those that would never get a TM Warthog prefer something else for various reasons, and that's fine, we are all individuals, with different tastes and needs. Yes, the TM Warthog is a very good and realistic HOTAS for DCS A-10C, IMHO. That's what it is modeled after. But, with button programing it can certainly be used for other sims also. :pilotfly:
-
Add TrackIR Center & Pause on 1 Joystick button
CubPilot replied to CubPilot's topic in PC Hardware and Related Software
Docbrown, glad to see that you got it setup and working. I assume that my new instructions were clear enough to get it working with not much trouble. Cheers :beer: :pilotfly: -
Add TrackIR Center & Pause on 1 Joystick button
CubPilot replied to CubPilot's topic in PC Hardware and Related Software
I just updated the first post and the readme in the zip file dated 1/6/2013. The readme in the zip file has the info in my first post and also includes pictures to help get this setup properly. :pilotfly: -
Add TrackIR Center & Pause on 1 Joystick button
CubPilot replied to CubPilot's topic in PC Hardware and Related Software
Sorry if I confused you. Don't worry about the DirectX button comment. What was happening is I originally had the two additional AHK scripts that I used only once to change the default Pause & Center key assignments in TrackIR (One AHK script for Pause, one AHK script for Center, after TIR was setup I didn't need to use these AHK scripts again). Sometimes these would work correctly changing the TIR Pause & Center key assignments to F15 & F16 ( I ran one AHK script, opened TIR and changed the default key assignment to F15 by pressing the Warthog pinky lever, closed the AHK script, then opened the second AHK script and did the same thing for the F16 key assignment in TIR). However, sometimes the AHK scripts and Warthog pinky switch would not assign F15 & F16 to TIR, but instead assign the DirectX button pressed on the Warthog to the TIR key assignments ("joystick4" in this case if I remember correctly). This would usually result in assigning the same key assignment for Pause & Center, "Joystick4" in TIR because we are using the same button to send two different commands. TIR will not allow the same key assignment for two different actions. Also the "Joystick4" TIR assignment would not work with the AHK script used with DCS as it would send F15 or F16, but TIR was looking for the DirectX button (joystick4) that was incorrectly assigned to it. To get around this "flaky" TIR key assignment behavior (I think related to TIR) I changed the method to creating a TIR "DCS" profile and then manually editing the DCS TIR profile to change the Pause & Center TIR key assignments. If done correctly this will work every time. Bottom line is don't worry about the reference to DirectX buttons. My new method takes that out of the equation and it is no longer a problem. Only one AHK script is needed, the one in the zip file, and it needs to be run every time before opening DCS World. I hope this cleared this up for you and again, sorry if I confused you. :pilotfly: -
Warthog buttons conflicting with Track IR?
CubPilot replied to dburne's topic in PC Hardware and Related Software
There was a typo in step 7, but I have just corrected it about 30 minutes ago. :pilotfly: -
Add TrackIR Center & Pause on 1 Joystick button
CubPilot replied to CubPilot's topic in PC Hardware and Related Software
:poster_oops:, forgot to change that. Sorry about the typo, it has been corrected. The typo above was used to change the default Pause key assignment in Track IR, but it did not always do the job and assigned a DirectX button sometimes instead of the F16 key. So, I'm not using that method or file anymore. That's why I suggest editing a user DCS profile manually, that always works. The .exe in step 7 should be "WH_DCS_A-10_TrackIR_short_long.exe". Thanks for pointing out my brain fart. My VAC profile isn't on the forum. It is pretty basic and still needs a lot of work & updated for DCS World. But, there should be some great ones in a sticky thread on these forums (I think in the Input & Output thread or elsewhere on the forums). :pilotfly: -
Warthog buttons conflicting with Track IR?
CubPilot replied to dburne's topic in PC Hardware and Related Software
I did something a bit different. I use the Warthog pinky lever to center & pause TIR. A short press centers TIR, a long press pauses TIR, only uses one button and it is really handy having it on the joystick. I also used "F" keys above F12 for the TIR button assignments so I don't conflict with the default DCS key assignments. So if you aren't using the pinky lever for anything you might what to look here for another solution. :pilotfly: -
Haven't been doing much lately to the "pit". :( Other matters have needed my attention and taken me away from it. The newest addition is modest. I added a switch just below the LDG Panel for the seat height adjustment. I just bent up some aluminum to mount the switch to (it's angled similar to the real switch), but I plan to use some MDF or something to cover the back side where the wires attach to the switch. It's open right now. It comes in quite handy when some info on the HUD "falls off" the HUD. I just raise or lower the seat until everything is shown on the HUD again. :D Been thinking about a CDU, well the functions of the CDU, it might not look like the real thing. But, it's winter and I don't have the extra $$ to do much with it. I need to do something with my temporary throttle mounting because it isn't in the ideal position, it's too far in towards the middle and makes me have my chair off center. I think I will mount it to the bottom of my table & move it further to the left so I can sit centered with the instrument panel. The LDG knob I made myself. It's made of aluminum that I had on hand (yes I turned it on my lathe), so it won't light up (I don't have a input PCB to do that anyways). The handle is 1" x 0.25" aluminum bar stock. I think there are some pics of it in this thread somewhere. :pilotfly:
-
HOTKEY START FOR DCS,TIR,TSPEAK AND VAC
CubPilot replied to bomber's topic in PC Hardware and Related Software
Cool! I will have to check this out when I get some time. :thumbup: -
Add TrackIR Center & Pause on 1 Joystick button
CubPilot replied to CubPilot's topic in PC Hardware and Related Software
I can't comment on PeterP's programming as I have not tried it. Basically it's a different way to do a similar thing. I think it takes care of only the TrackIR. VAC would be something else. But I could be wrong about this. I use the bat file that I posted in an earlier thread to make it easy for me to load the two AHK scripts, one for TrackIR Pause, Center and the other to load the proper VAC profile and have it turned ON with one click of my mouse. I only load these when I want to use DCS. Then I open DCS normally. As for my modified keys that I use in TrackIR I can switch back to the Default TIR Center & Pause key assignments within the TIR software easily, and it only takes a moment to do so (it's on my SSD drive & opens immediately). In the TIR software under the Profile Tab, and in the Profile drop down window in which you will see "Default", "One to One", and "Smooth" I added a new profile with my modified Pause & Center key assignments and named it CubbyDCS , which now also shows up in the drop down. When I want to fly DCS I choose "my" DCS profile in TIR . If I want to go back to the TIR default Pause & Center keys I choose "Default", One to One", or "Smooth" which will still have the default keys (or if you have other custom TIR profiles for other sims, choose one of them, assuming you haven't changed the default TIR keys in the profile). I guess that my wordy explanations make it seem really complicated, but it really isn't that bad. :pilotfly: -
Add TrackIR Center & Pause on 1 Joystick button
CubPilot replied to CubPilot's topic in PC Hardware and Related Software
The statement in the bat file to load & turn VAC I found in the VAC documentation: VAC System can take two command line parameters separated by a comma (,). 1. Profile as parameter one can be a valid VAC profile description or profile name existing in the VAC Builder list of profiles. 2. A "True" can be sent to start VAC System with VAC On set. Some examples of using parameters with VAC System: Start VACSystem and load the IL2 profile using the file name with VAC active. VACSystem.exe IL2.xml,True Start VACSystem and load FS2004 profile using the profile description with VAC off. VACSystem.exe FS2004 This works in a windows bat file, I'm not sure how to do the same within a AHK file. PeterP would probably know without even thinking about it. I'm not the programmer here (I would be considered a hack)! :smilewink: :pilotfly: -
Add TrackIR Center & Pause on 1 Joystick button
CubPilot replied to CubPilot's topic in PC Hardware and Related Software
Nope, you won't need those keys on your keyboard because you will assign F15 & F16 to the lever (or button) on the Warthog joystick and in the Track IR software, you won't use the keyboard to send these keys. F13 thru F24 are valid "keys" to the OS, even if your keyboard only has F1-F12 keys (of course if your keyboard only has 12 "F" keys that is all that will be available to you on that keyboard). But, F13-F24 keys can be used by a programmable keypad (at least the one I'm using) and by controller buttons along with some additional programming as has been done here. The nice thing about using the F13-F24 keys is they should never conflict with any current or future key assignments that DCS uses for other keyboard key assignments (unless keyboard makers add these keys to their future standard keyboards & DCS uses them). This works with the TrackIR v 5.1 software, but the newest 5.2 version has been a problem according to a previous poster. I haven't tried the 5.2 version yet. PeterP's method my be easier for you if you have trouble with mine, or want to use his instead. He is more programming savy than I am. :pilotfly: -
Add TrackIR Center & Pause on 1 Joystick button
CubPilot replied to CubPilot's topic in PC Hardware and Related Software
Cool, I will have to give this a try. I'm not a programmer and I always said my way was not elegant! Where were you when I needed you?? :smilewink: :pilotfly: -
Add TrackIR Center & Pause on 1 Joystick button
CubPilot replied to CubPilot's topic in PC Hardware and Related Software
I haven't updated TIR to v 5.2 yet, so that could be the problem. You remembered to use the two AHK scripts to set up the Center & Pause keys in TIR? It looks like you did set the joystick to Controller ID#2, so that should be OK. I know with the TIR v 5.1 software I sometimes needed to run the script more than once to get F15 & F16 to be registered correctly in TIR. Otherwise it would be registered as "Joystick4" button in TIR. Is there a big advantage to using TIR v 5.2 vs. v 5.1 ? :pilotfly: -
TM Warthog HOTAS lights of at boot up?
CubPilot replied to Asp's topic in PC Hardware and Related Software
I have the USB plugged into the front of my computer. After the computer powers down I unplug the Throttle USB cable, the LEDS go off, I then plug the USB in again ready for the next power up. It wouldn't be so good if plugged into the back of the computer, but this does work on my motherboard. -
Yes, it appears that what worked in the Betas and v1.1.1.1 are different from the DCS World version. I would suggest that you be sure what toggle switches you bought ON-OFF-ON, ON-OFF, etc. Review Tigersharks videos on switches, he explains them in detail. DCS A-10C will automatically write the LUA code, but only for a switch that makes contact (completes a circuit on your controller PCB). You need to wire the switches properly, assign the different switch positions in A-10C Options tab in the sim (only the Full UP and full DOWN positions of a ON-Off_ON switch, or the ON position of a ON-OFF switch. This will write the LUA file for switches just assigned in Options. DO NOT try to assign anything for the OFF positions of these switches in /Options, it will not work because the OFF position does not make a closed circuit to your controller PCB connections. The exception to this would be the ON-ON-ON or ON-ON switches, but not many will use these as they are much more costly than the others with an OFF position. Now go to the Saved Games folder, in Win7 use this path, C:Users\YOUR NAME\Saved Games\DCS\Config\Input\A-10C\joystick\NAME OF YOUR SWITCH/BUTTON/ axis CONTROLLER. Now we will edit the LUA statements for all the OFF positions of all your switches. Use Notepad ++ to open your switch controller LUA file. Look at my post #9 in this thread, an example of editing the Lua statement is there for a ON-OFF-ON switch and for a ON-OFF switch. The black type is the unaltered LUA statement, the green type is also the unaltered LUA statement but I used that part of the LUA statement to figure out what to edit in LUA statement for the OFF positions of your switches, each LUA edit will be different for different switches. In Notepad ++ I suggest that you use the search function. Type "combos" into the search window, click on "Find Next". Keep clicking "Find Next" until you find the LUA Statements for one of your switches. The "iCommand" part of the combos LUA statement will include the panel, switch, and switch position(s) by name. For ON-OFF switches it is easy, this is for the AHCP TGP ON-OFF switch, the "key= xxxx" part is the joy/switch controller Dx button # and will probably be different for you: {combos = {{key = "JOY_BTN3"}, }, down = iCommandPlaneAHCPTGPOnOff, name = "TGP switch ON/OFF", category = "Armament HUD Control Panel"}, The "down = iCommandPlaneAHCPTGPOnOff," is the LUA command sent to the sim when the TGP switch is ON (makes contact). We need to add something to let the sim know when the ON position is turned OFF (breaks contact). It's easy, copy the DOWN iCommand, in this case it is "down = iCommandPlaneAHCPTGPOnOff,". Next directly after this command type a SPACE, then paste "down = iCommandPlaneAHCPTGPOnOff,". Next change the "down" to "up" in the pasted portion of the iCommand. IT will look like this "up = iCommandPlaneAHCPTGPOnOff,". To see the full edited LUA statement look at my post #9. Don't include the quotes as shown above. Be mindful of the SPACE, forget it and it won't work. Try this for the ON-OFF switches and see how it goes. Then we can take a shot at the ON-OFF-ON switches if you need help with those. YES, ON-OFF and ON-OFF-ON switches will work in DCS A-10C with a little LUA editing! :pilotfly:
-
First, which version of DCS A-10C are you using? The sim will not automatically write the LUA code for any OFF position (breaking a connection) of a switch. It only will write the code when a switch is ON and makes a connection. ON-Off switches are easy. In push button terms there is only one "button", although in the case of a toggle switch the "button" can be held down as long as it is in a position to make contact. There are only two connections on the switch & it doesn't matter how the wires are hooked up with your + or (- GND) wire from the USB controller PCB. ON-OFF-ON switches are different. Usually the two outer connections of the switch are hooked to the +, the middle connection to (- GND) of your controller PCB. Think of the toggle switch as two "push buttons", each outer + connection will be attached to a different button position on your USB controller PCB, the middle contact will be connected to (- GND) on the PCB. Either all the way UP or DOWN makes contact & completes a circuit, the middle position doe not make contact & is not a completed circuit. In all cases when a connection is made a + connection will come in contact to a - connection completing the circuit. When this happens the controller PCB knows to send that output to the sim. I would review your wiring using TS's excellent info and double check your wiring. Then refer to my post (for DCS World & DCS A-10C) on how to modify the LUA files for the OFF, no contact position of the switches. My post #9 (i think) shows both switch configurations . One other thing, you need to edit the correct LUA files which should be in your C:Users\YOUR NAME\Saved Games\DCS\Config\Input\A-10C\joystick\NAME OF YOUR SWITCH/BUTTON CONTROLLER (in Win7, not sure about XP). :pilotfly:
-
I have polished my post about switches & LUA edits a bit more today. Check my post #9 for the info on how to edit LUA for the ON-OFF-ON switches. First of all are you sure that you have ON-ON switches ( I'm talking physical switches, not the action that a switch does in the sim)? ON-ON and ON-ON-ON switches are usually much more expensive due to the added contacts on the switch. Does your ON-ON switch have two positions or three. I only ask just to make sure that I understand what you really have as I have no idea as to how much you may know about switches. Also, are you using DCS World or the standalone DCS A-10C v1.1.1.1 or lower? Generally pots are used for a joystick,throttle,or rudder axis, etc, and can be wired to output either a variable voltage or a variable current. I think for the light dimmer to use with A-10C that you talk about you need a digital rotary switch. This will send out pulses as the shaft is rotated (like turning a switch on and off quickly, when ON a pulse is sent to the sim) . They look very similar to a pot. :pilotfly:
-
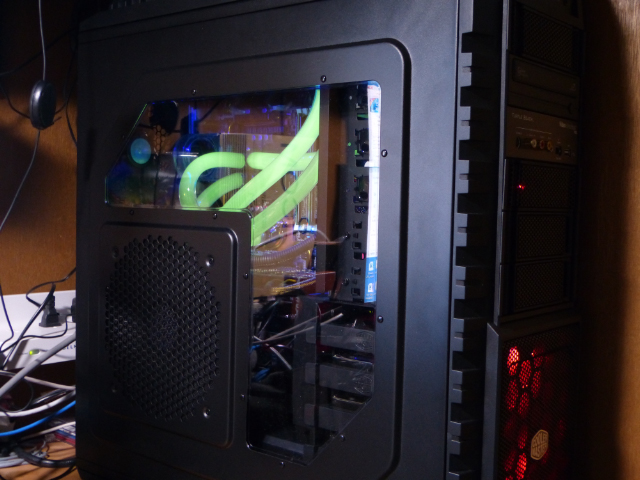
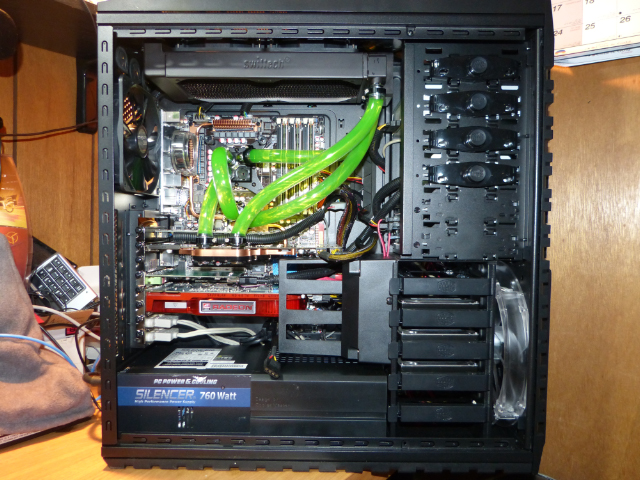
Thanks. It is much better that the CPU only Anatek closed loop water cooler that was on it originally. That sucker would result in ~90C + @ 100% use when overclocking an i7 920 to 3.6 GHz in a CM Centurion mid tower case. When I installed the Swiftech unit I also went up to a full tower CM HAF-X case as i wanted to have the rad inside, it just works out better for me that way. Now with the CPU @ 4GHz + HD 5870 w/full water block + a small water block on the N Bridge I never go over 70C @ 100% load. The lower vid card is air cooled and only runs my MFCD's for A-10C (not in Crossfire mode). There's still some life left in the old i7! :pilotfly:
-
My first attempt at water cooling. I went with a Swiftech H2O Edge kit in a CM HAF-X case cooling the CPU, full vid card cooling, and North Bridge and S Bridge a bit. :pilotfly:

-
DCS World / A-10C cockpit builder switches / LUA statement edits Tigershark did a great job explaining how to change the LUA files for using toggle switches (along with his other info). If you are using DCS World this information may be a bit outdated (unless it has been updated, I haven't checked). The LUA files needing editing have changed and do not look like those from the standalone DCS A-10C versions. First, assign your switches in DCS World Options UI if that has not already been done. In win7 the controller LUA files are located in C:Users\YOUR NAME\Saved Games\DCS\Config\Input\A-10C\joystick\NAME OF YOUR SWITCH/BUTTON CONTROLLER. Use Notepad++ to open, edit, and save the LUA file, it won't cause problems like MS Notepad can when saving your edited LUA file. Also it might be a good idea to save a copy of the default LUA file as a backup if things go wrong. DCS creates the LUA files for your controllers but it can only write LUA code for switch/buttons to sense when a connection is made (closed), it does not write the LUA code when a connection is broken (open). So what needs to be done is to add the LUA statement that senses when a connection is broken (open). Here's an example of a three position (ON-OFF-ON) switch (NOTE: There are three position (ON-ON-ON) switches but these are more $$). This is the AHCP ALT SCE switch. UP & DOWN makes electrical contact, the center position does not make any electrical contact and thus the LUA file needs to be altered to sense when the switch is placed in the center position. We do this by telling DCS A-10C when the connection is broken (as opposed to when a connection is closed as is the case with the up and down switch positions). NOTE: The JOY BTN #'s will probably be different that shown below, they depend on where you wired them to your controller. Example of Default DCS World LUA statements AHCP ALT SCE (ON-OFF-ON) switch: {combos = {{key = "JOY_BTN2"}, }, down = iCommandPlaneAHCPAltSCEBaro, category = "Armament HUD Control Panel"}, {down = iCommandPlaneAHCPAltSCEDelta, name = "ALT SCE switch DELTA", category = "Armament HUD Control Panel"}, {combos = {{key = "JOY_BTN8"}, }, down = iCommandPlaneAHCPAltSCERadar, name = "ALT SCE switch RADAR", category = "Armament HUD Control Panel"},In the LUA statements above it appears that DCS World A-10C will support three way ON-ON-ON switches without modifying the LUA code. There is a "down" statement for all three switch positions. However, for a three position ON-OFF-ON switch the LUA statements have to be modified as shown below because the middle switch position does not close a circuit, it opens it. When looking at the LUA statements a "down=" statement indicates an electrical connection is closed and completes an electrical circuit (example: "down = iCommandPlaneAHCPAltSCEBaro"). An "up=" statement means that the electrical connection is broken and the circuit is open (example: "up = iCommandPlaneAHCPAltSCEDelta"). Which panel, which switch, and which position is stated after the "=" sign (example: "= iCommandPlaneAHCPAltSCEBaro" , AHCP panel, ALT SCE switch, Baro switch position). Example of Edited DCS World LUA statements AHCP ALT SCE (ON-OFF-ON) switch: {combos = {{key = "JOY_BTN2"}, }, down = iCommandPlaneAHCPAltSCEBaro,[color=Red][b] up = iCommandPlaneAHCPAltSCEDelta[/b][/color], name = "ALT SCE switch BARO", category = "Armament HUD Control Panel"}, {[color=SeaGreen][b]down = iCommandPlaneAHCPAltSCEDelta[/b][/color], name = "ALT SCE switch DELTA", category = "Armament HUD Control Panel"}, {combos = {{key = "JOY_BTN8"}, }, down = iCommandPlaneAHCPAltSCERadar, [color=Red][b]up = iCommandPlaneAHCPAltSCEDelta[/b][/color], name = "ALT SCE switch RADAR", category = "Armament HUD Control Panel"},The statements in red above are added to sense when the BARO (UP) & RADAR (DOWN) switch positions are moved to the DELTA (MIDDLE) switch position. It does this by sensing when either the UP or DOWN switch positions are broken (not making contact). I determined what the "UP" statement should be from the statement in green above and changed "down" to "up" at the beginning of that statement segment. What about ON-OFF switches? Example of DCS World Default LUA statements for AHCP TGP (ON-OFF) switch: {combos = {{key = "JOY_BTN3"}, }, down = iCommandPlaneAHCPTGPOnOff, name = "TGP switch ON/OFF", category = "Armament HUD Control Panel"},Example of Edited DCS World LUA statements for AHCP TGP (ON-OFF) switch: {combos = {{key = "JOY_BTN3"}, },[color=SeaGreen][b] down = iCommandPlaneAHCPTGPOnOff[/b][/color], [b][color=Red]up = iCommandPlaneAHCPTGPOnOff[/color][/b], name = "TGP switch ON/OFF", category = "Armament HUD Control Panel"},In this case it's easy, copy the green part of the statement above and paste it after the copied statement as shown in red above, then change the "down" to "up" as shown in red above. Be mindful of where spaces & commas are in the LUA statements and do it in a similar manner. I'm doing the same thing Tigershark did with the standalone versions of DCS A-10C. The only difference is ED has changed the LUA statements and they don't look like the A-10C standalone versions. One tip I can pass along to make finding the switch statements in the LUA file easier is to look for "combos" statements. Using Notepad++ it's easy, search is your friend! Type "combos" into the search box and click NEXT until you find the combos statement you are looking for to edit. Hope this helps! :pilotfly:
-
Monitors on eBay for MFCDs
CubPilot replied to hog_driver111th's topic in PC Hardware and Related Software
I'm running two 8" VGA monitors for my MFCD's with the adapters Cali mentioned. :pilotfly: -
Add TrackIR Center & Pause on 1 Joystick button
CubPilot replied to CubPilot's topic in PC Hardware and Related Software
Sorry for the delay, I have had major 'puter problems as well as ISP connection problems. Your script looks OK. You say you made the changes and saved it. Did you compile the script or only save the script file? The saved script file will have an ".ahk" extension and is not used to do the actual work. The compiled script will have a ".exe" extension and that is what is to be executed prior to starting A-10C. I use "SciTE4AutoHotkey" to make or edit AHK scripts and compile them. Also AutoHotKey needs to be installed or else the scripts will not work. :pilotfly: -
Different axis sensitivities with modifier
CubPilot replied to Svend_Dellepude's topic in PC Hardware and Related Software
Ahhh.... no T.A.R.G.E.T. needed for this. AutoHotKey does the trick! :D And With a Warthog HOTAS using TARGET is not the way to go unless you want to differ from the plug & play realistic joy & Throttle A-10C functions.