0utLAW
-
Posts
333 -
Joined
-
Last visited
Content Type
Profiles
Forums
Events
Everything posted by 0utLAW
-
thanks for the comments guys!
-
I show how to set the bindings for the toggle switches in Helios that in turn update the switch position in the game and vice versa. I also show how to bind physical real world toggles switches to control those in Helios as well as the game. Let me know if you have any questions and I will be happy to assist if I can.:thumbup:
-
Part 2 is now in the first post. Intrepid- glad to help out.
-
Hey guys, I making a short 2 part video for an introduction to Helios. Let me know what you think and if you have any comments or would like to see a topic covered. I'm no expert in Helios but would like to have a source of the basic workings of this great program. I'm still working on part 2 and will post it in this message when it's complete. Introduction to Helios Part 1 Introduction to Helios Part 2
-
:notworthy:
-
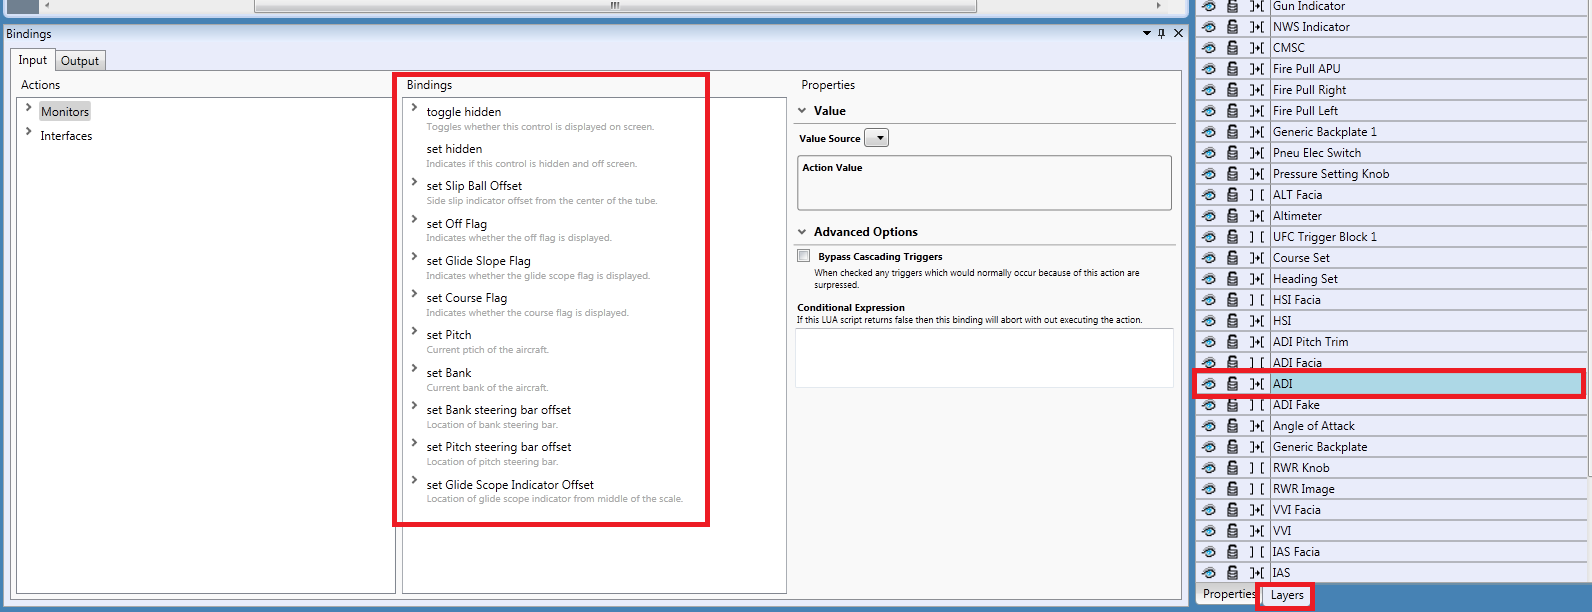
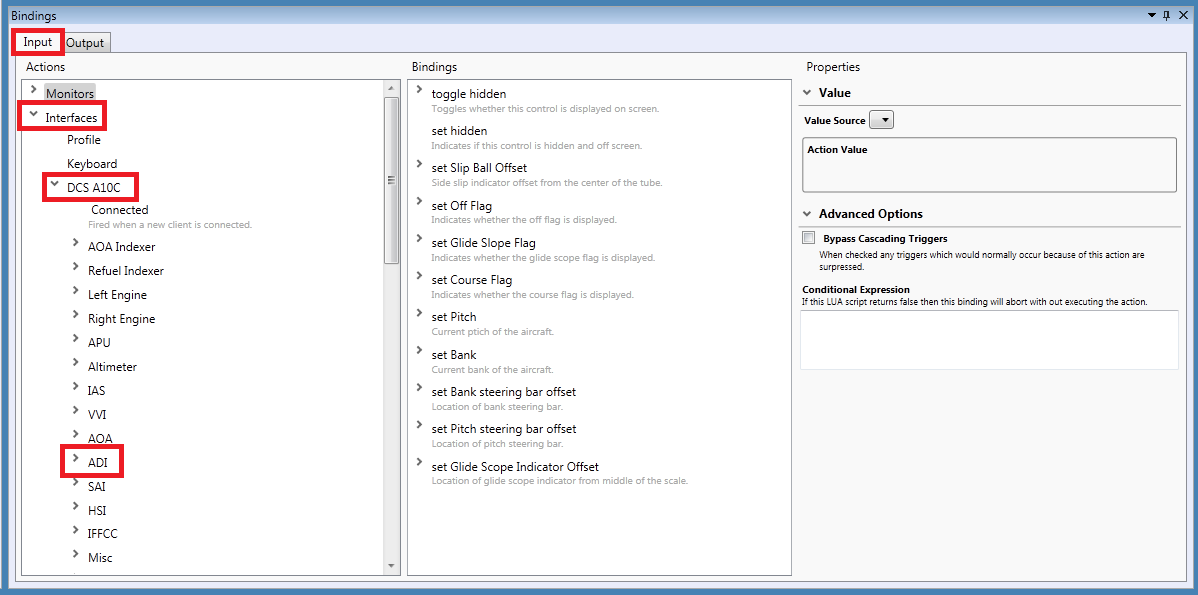
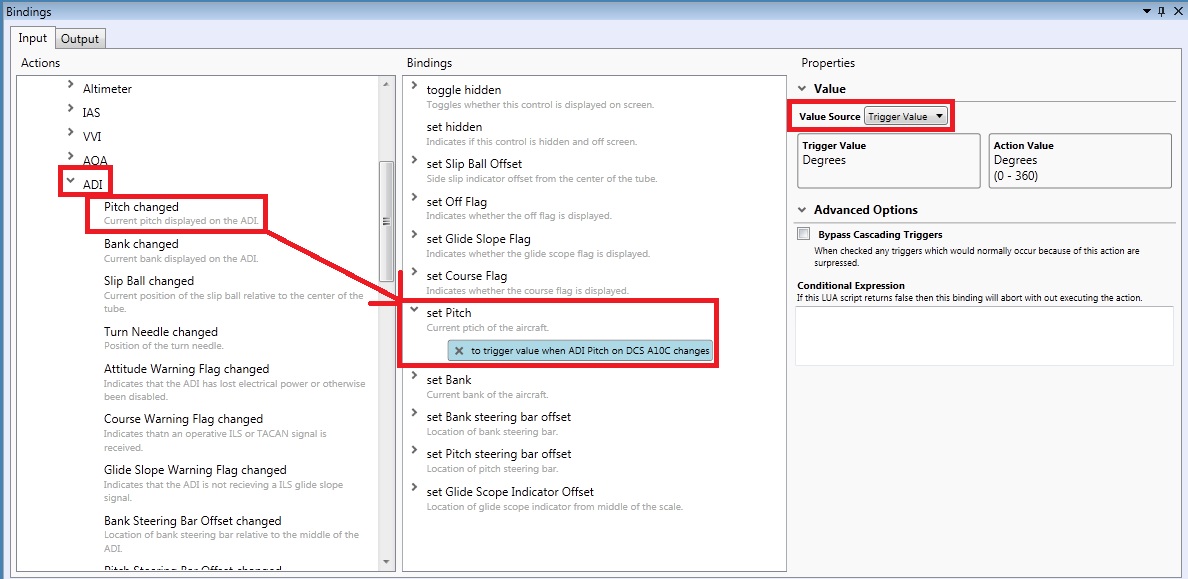
So if you want to set up the ADI in Helios try the following; 1. In the Layers section select the ADI Layer. You should see the available options populate in the Bindings section; 2. Next click on the Input tab and hit the drop down for the following; Interfaces\DCS A10C\ADI; 3. In the ADI drop down section, drag the words "Pitch changed" to the words "set Pitch"; ****VERY IMPORTANT**** 4. SAVE YOUR PROFILE and restart your Helios profile from the Control Center. 5. Run the Game and test. I think that's all you have to do. I'm not sure if you need to change the Value Source to Trigger Value in the Properties section or not. Like I said in my previous post I used CapLoz's profile and just re sized items to fit my monitor. (NOTE: Hold down Shift while re sizing. This will keep the proper aspect ratio but will also be sure to capture all items associated with that item.) Again, anyone one if I'm wrong on any of this please let me know. Tomorrow I may put together a short(I'll try to make it short) video tutorial for Helios.

-
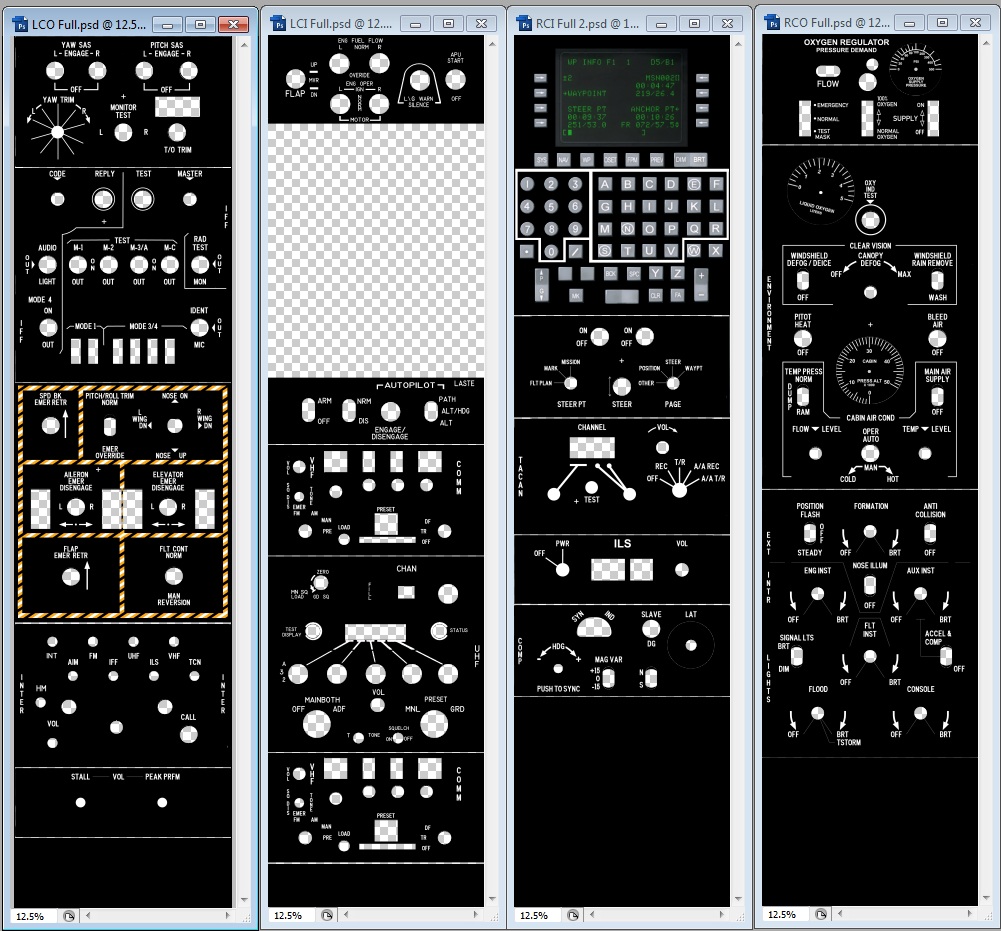
I have completed both Left inside and outside consoles. I did have a problem with the white orange and black caution lines around the EFC panel. I put them on a different layer but not to sure how to crop them. Illustrator is different like that. I'm not that proficient in Illustrator. If anyone could fix that and re upload I would appreciate it. LCO Full VECTOR.rar LCI Full VECTOR.rar LCI Full VECTOR.pdf
-
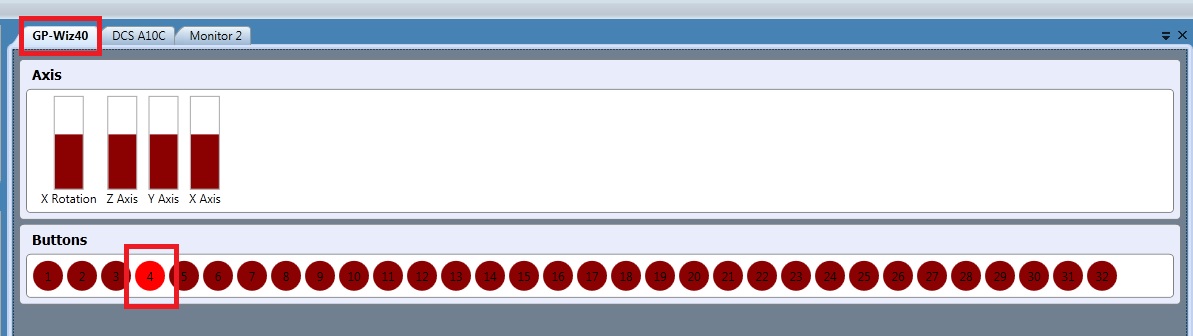
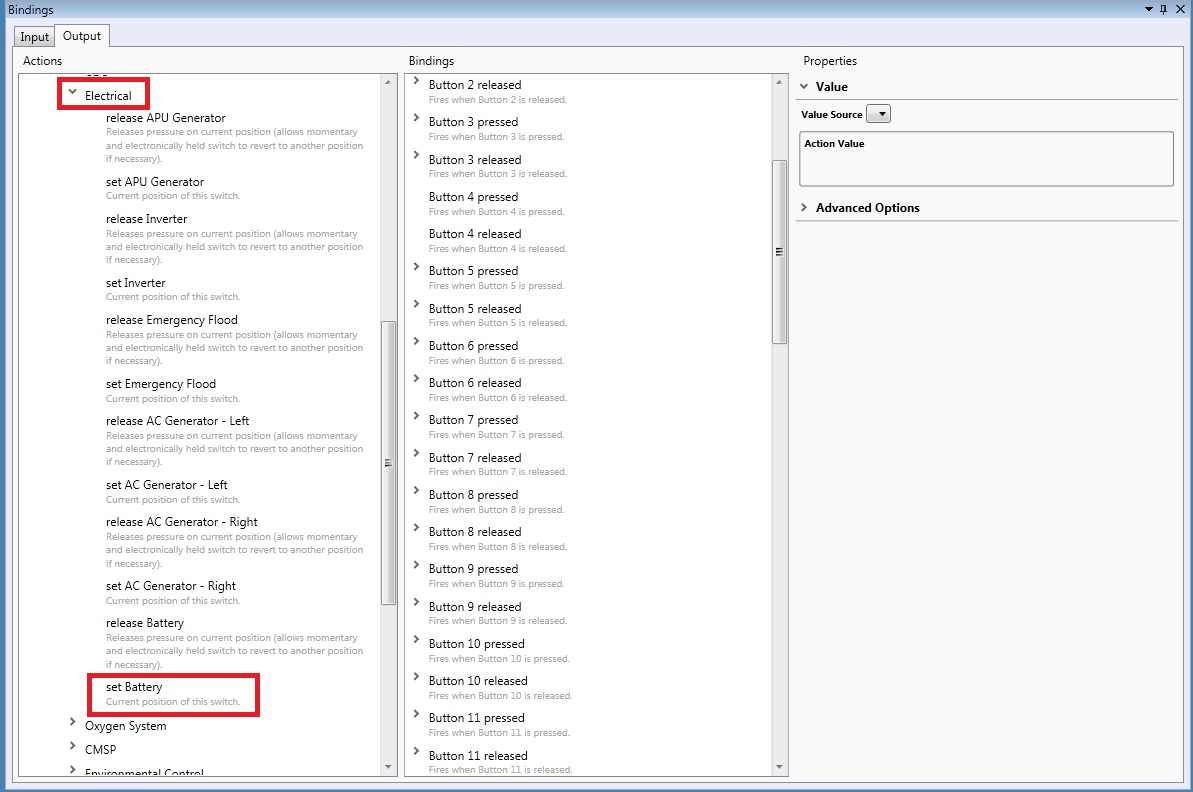
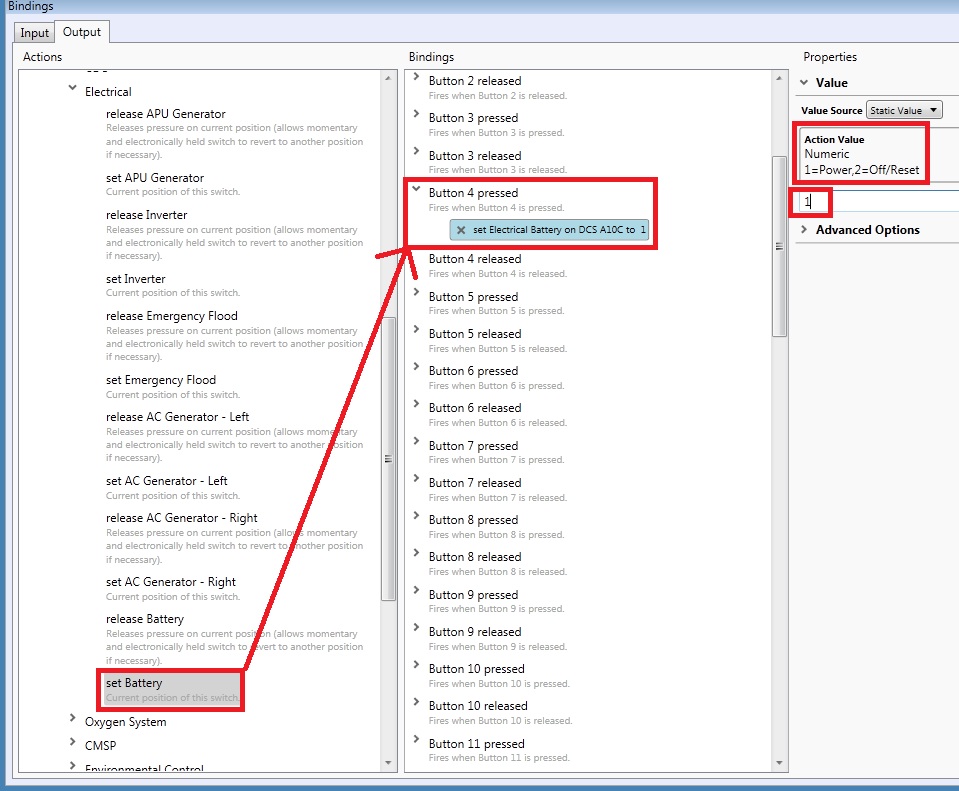
What I did was use CapLoz's profile and modified it to fit my monitor. Everything is already bound and if you want to know how to set up bindings take a look at some of the dials and switches already bound. It was a little confusing for me at first but after spending about 10 minutes looking at switches that were already setup it was pretty easy to figure out. I would start with simple On-Off toggle switch assignments. Here is an example of how bind the Battery Power On-Off switch; 1. Make sure your profile has the DCS A-10C interface set up correctly. Once you select "Setup DCS A-10C" you should get the following window confirming so; 2. Now add your interface board. Just like adding the A-10C interface go to "Profile/Add Interface". You should see your interface board in the list. Select it to add it. 3. You should now have three tabs. One tab for your Monitors Layout, another for the DCS A-10C interface and a third for your Interface board. Assuming you have switches already connected to your interface board you should be able to flip a switch and tell what number it correlates to in the interface. For this example I'm assigning button 4 to the battery power switch; Now that I know what the switch number is I can now assign it to a function. 4. Go to your Interface Boards tab and on the bottom go to the Output tab. You should see all your available buttons in the Bindings column. As you can see Button 4 Pressed and Released is not assigned anything as indicated by NOT having the > arrow to the left of it. (See next image) 5. Now in the Actions section hit the Interfaces drop down and do the same for the DCS A-10C dropdown; 6. Scroll down the list until you find the panel you want to assign. For this example it's the Electrical. Now hit the drop down and find the function you want to assign. For this example it's the "set Battery" ; 7. Now click on the words "set Battery" and drag and drop on to the words "Battery 4 pressed". You should now see an > arrow to the left of "Button 4 pressed" and a sub window stating "set Electrical Battery on DCS A10C to". Now all you have to do is set the "Action Value" as indicated by the Action Value options just to the right in the Properties section. I set it to 1 which as indicated by the "Action Value" options available (1=Power, 2=Off/Reset). This means when the button/switch is on it will set the Battery Power switch in DCS to on; 8. Now drag and drop the same "set Battery" word from the Actions column to the words "Button 4 released" and set the "Action Value" on the right to 2 which equals Off/Reset; ****VERY IMPORTANT**** 9. SAVE YOUR PROFILE 10. Relaunch your Helios profile from the Control Center icon. Now start up DCS A-10C and go to the intro on how to start up the aircraft and test your setting. Anyone please let me know if I have missed any thing or have any wrong information.
-
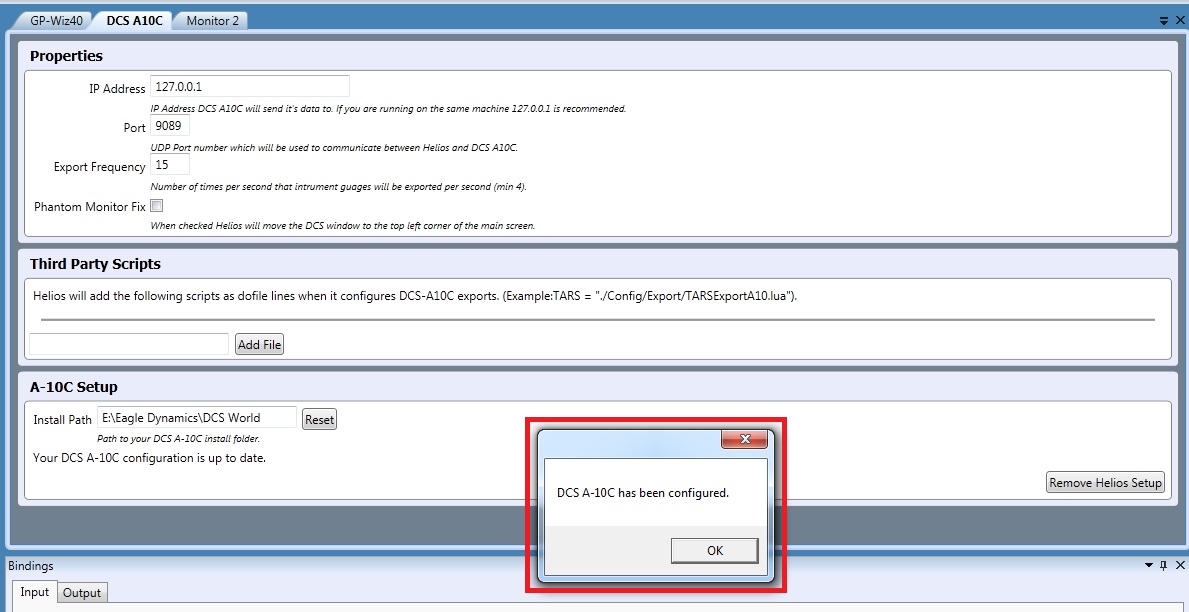
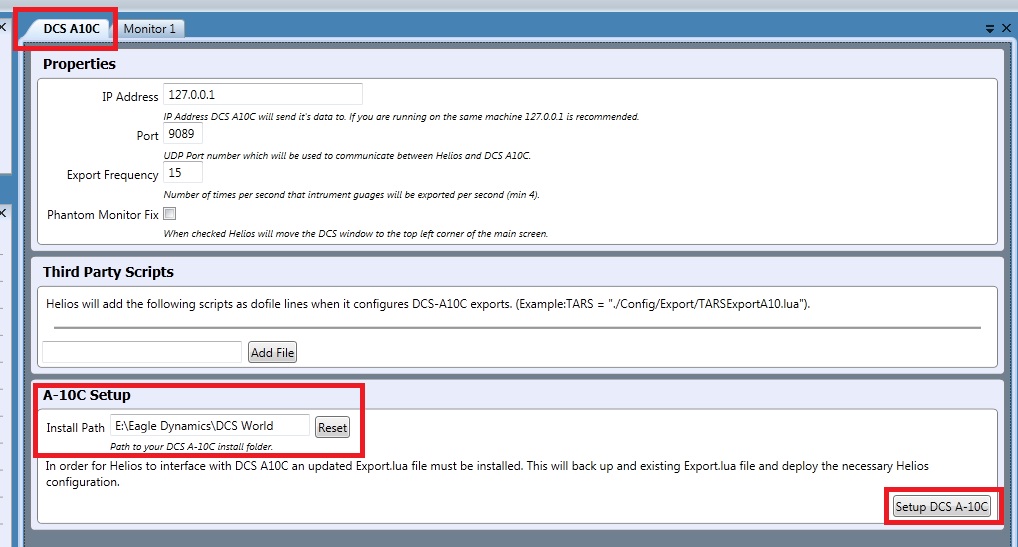
1. Go to the DCS A-10C tab 2. In the bottom section and make sure the Install Path to your DCS World directory is correct. 3. Once the install path is correct select the Setup DCS A-10C button in the lower right of that section.
-
sweet build by-the-way!
-
Have you added DCS as an interface? Go to; Profile/add Interface- and add DCS A-10C After you add DCS as an interface, click on the DCS A-10C tab at the top of the middle window. Go to the bottom section called A-10C Setup and make sure the install path is setup correctly. You can try hitting the reset button off to the right and once your path is set up hit the button in the lower right of the same section.
-
Here is the right inside console RCI Full VECTOR.rar RCI Full VECTOR.pdf
-
Anyone know what the font type is for the text in the CDU screen?
-
I made a copy of the Right outside console so it is vector data for re-sizing. I have also included it as a pdf. Dimensions are 5.75" x 23.25". I'm going to put them all in one file and try to get them printed on transparency film. The zip file is in .ai(Adobe Illustrator) format. I'll upload more as I finish them. RCO Full VECTOR.rar RCO Full VECTOR.pdf
-
Slight modification to option A. I removed the bezel and light from the environmental panel and added the CDU keys and screen. I also added small breaks between the panels to help define each panel. I think it's going to look sweet when it's backlit!
-
Thanks cichlid. I'm going to convert option A to vector data and bring those files to a graphics shop and get them reverse printed on some transparent film. This way the image will be protected by being face down on the acrylic.
-
I made several files in Photoshop using Reactorone's files and images from CapLoz's Helios profile. I plan on laying one set of these images over the light boxes. I'm either going to just print them on my printer using an 8.5 x 11 adhesive label or see if I can get them reverse printed on some clear film. We'll see. Option A and C do not have any knobs/dials. Option B and D do. I just don't like having blank spots. I'm most likely going to use option A and just drill holes as I add more dials and switches. The big white blank area is for my X52 Pro throttle. I'm also going to try to convert option A to vector data for re-sizing. I'll post the PSD, and AI files once everthing is done if anyone wants to use them. :) Option A Option B Option C Option D
-
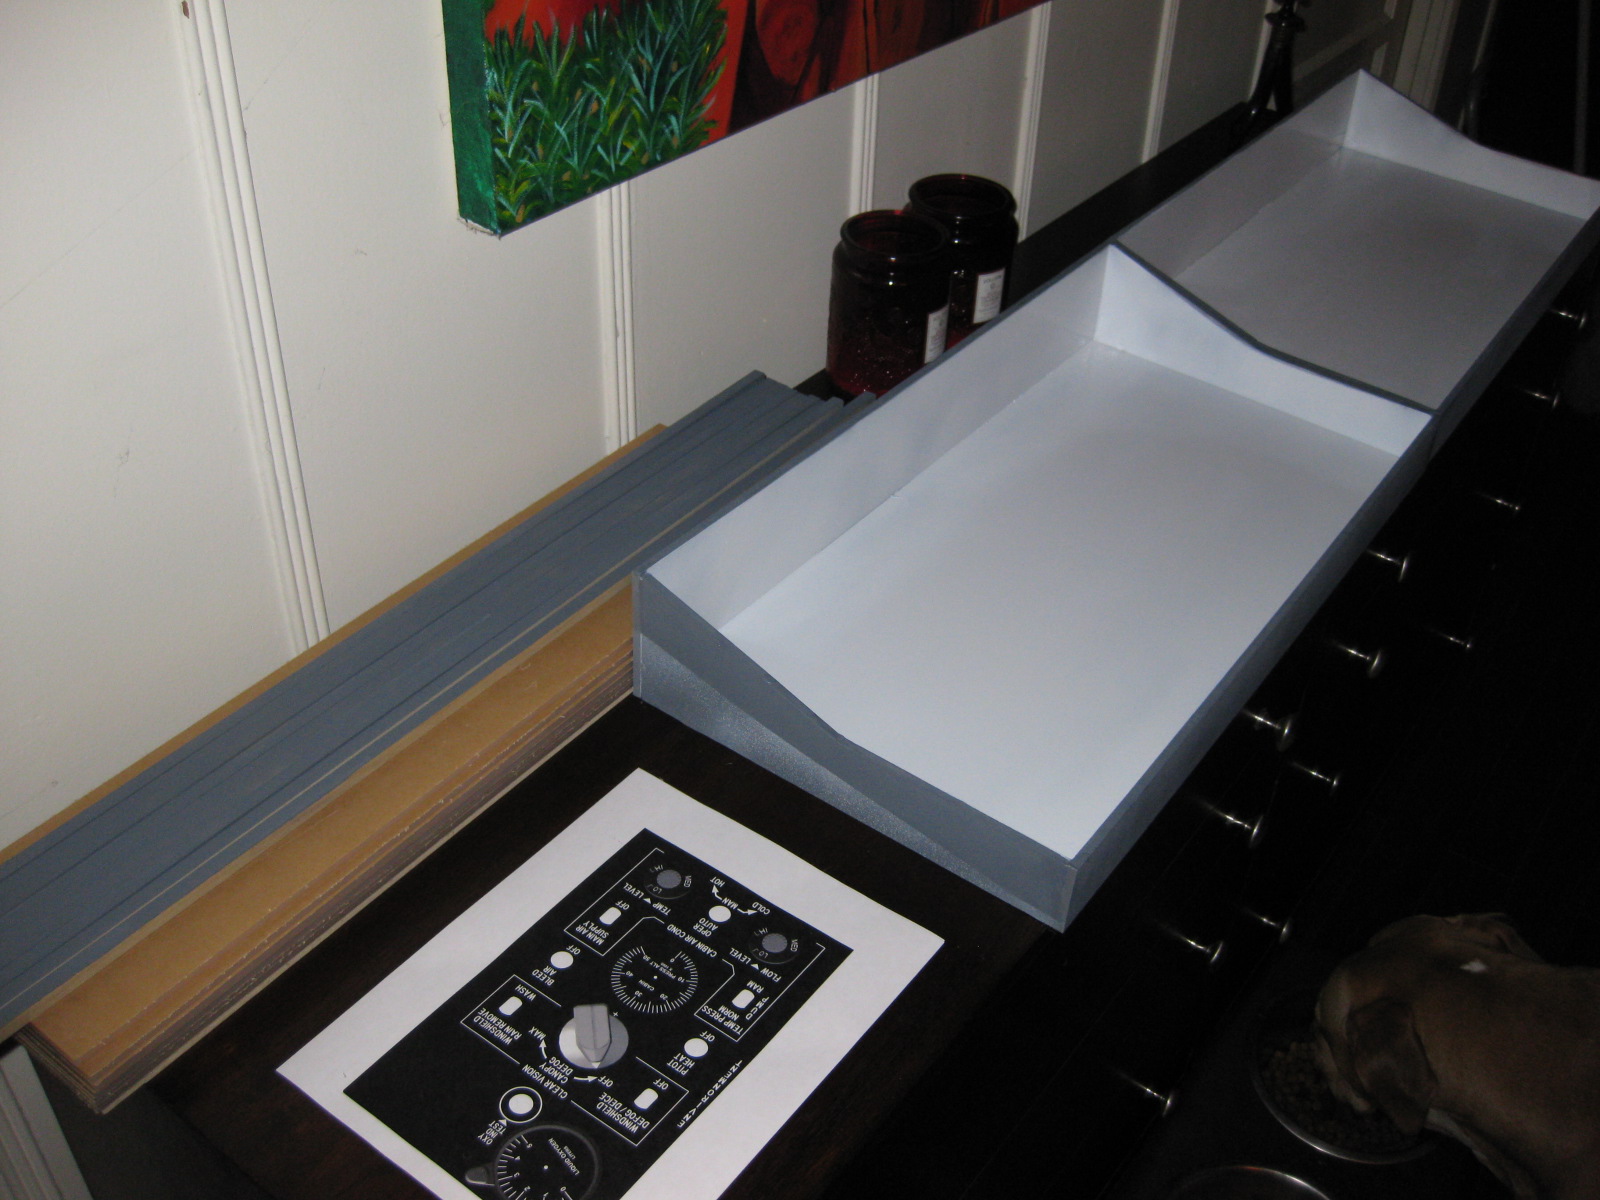
Happy Halloween! Here is a pic of my "Portable Dremel Pit". The pic is of the two boxes that I sprayed with gloss white on the inside and primer grey on the outside. Also in this pic you'll see several pieces of 1/4" wood strips that I'm going to line the top inside edge of each box. And in those protective films are 1/4" thick translucent white acrylic. Basically I'm going to make a light box.
-
I need a CDU and Aux Nav Panel in this format.
-
I think that's an unspoken rule between men and women. You never tell the other the actual price of something. I guess the other thinks of how that money could have been spent on them! Haha!
-
Not until I get into a house so I can have my workshop and man cave. :cry_2:
-
I dare not mention it. Seems I'm out of control with it as it is(she says).:music_whistling:
-
I currently have a 46" sitting in the living room. Now if I can just convince the gf to let me put it on my desk! ;)
-
Anyone have a good resource for panel images? I'm currently laying out my left and right consoles and I'm using reactorone's panel images but I want images of panels that have all the buttons, switches, dials and screens. I want them to look like they are fully functional to fill in the gaps of panels I haven't wired.