Triggerhappy69
-
Posts
932 -
Joined
-
Last visited
-
Days Won
1
Content Type
Profiles
Forums
Events
Everything posted by Triggerhappy69
-
Hey mate did you get the e-mail address for Thrustmasters Support? I have ordered thrre cooliehat's from them (They're situated in Canada), and the price was reasonable..? But most important they always respond to my questions quickly, and give out an impression of being a VERY customer focused organisation..! BTW.. I am a Cougar owner and you might have to actually have a Thrustmaster to buy spareparts from them. But I would still ask..? Ps. Dunno what happened to the Quote function here..?
-

Simpit Ka-50 from Razorback
Triggerhappy69 replied to Razorback's topic in PC Hardware and Related Software
:music_whistling:... If you do my cockpit building for me of this standard.. I sure has H..ll will not mind doing the solderiing in yours..! -
Simpit Ka-50 from Razorback
Triggerhappy69 replied to Razorback's topic in PC Hardware and Related Software
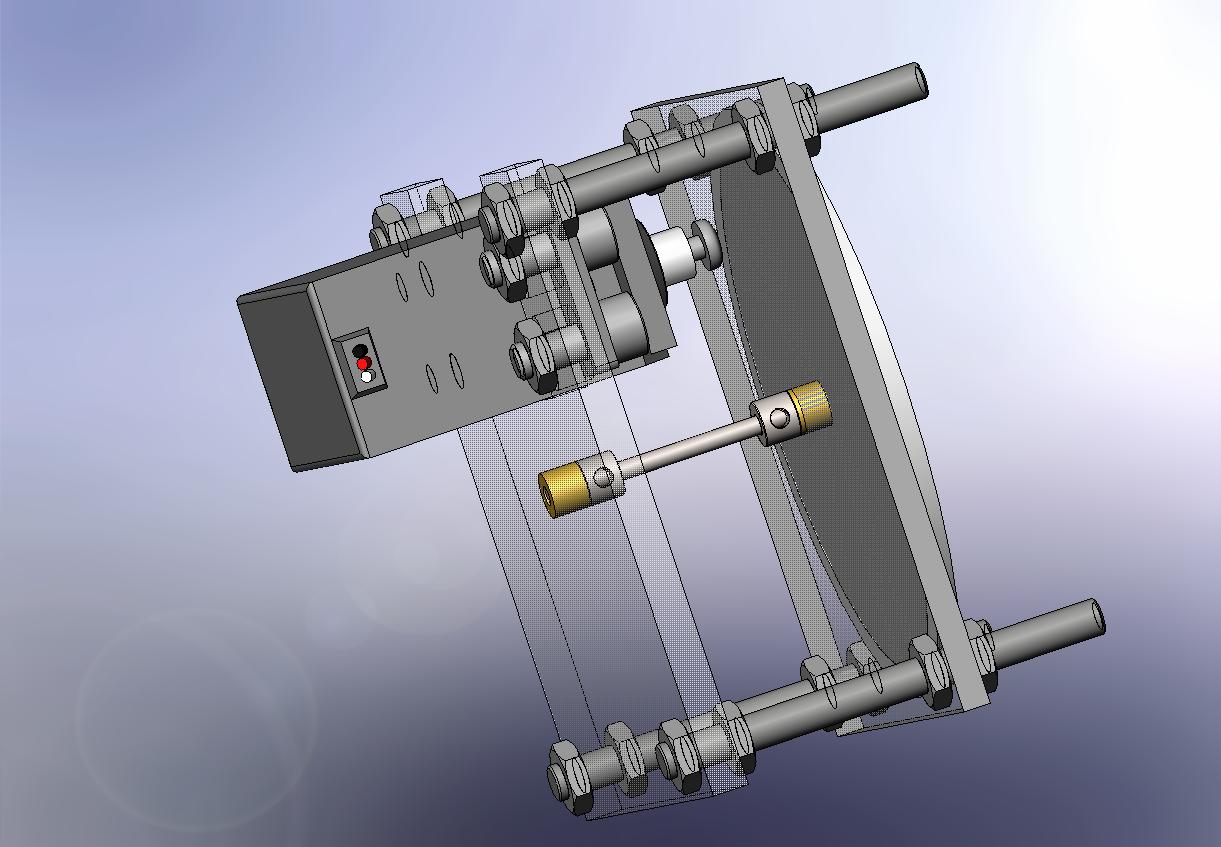
If you have the "urge" for pitbuilding you should just go ahead and start mate..! We always welcome one more mind in this community.. :pilotfly: As far as instruments go, you can go several different ways.! 1. Build them yourself..! It's really not THAT complcated to make the simple gauges (like temperature, fuel, RPM and so on). And you can control them with standard servomotors like in a model airplane? Here's a picture of the mechanics I have designed for the small 60mm Gauges: 2. you can use software and a second Pc to project the Gauges on a (or two) monitor(s). Software like "Simmeters" (www.simmeters.com) , "LockOn Virtuell Panel" (Freeware software) , and "Gauge Composer" are ready and available for all. The software from Simmeters is not free though, but they seem to turn out new gauges real quick when needed. So send them an e-mail and ask..!? "LOVP" and "Gauge Composer" does require some drawing and interface programming, but not more than anyone can master after reading the manuals. (my guess is that if you hold out a while, someone is going to do the work of drawing the KA-50 Gauge Faces anyway) 3. You can buy gauges from a manufacturer of flightsim gauges.! Or actually you CAN'T.. because none of them has shown much interest in adapting theyr product for LockOn yet, so I wouldn't hold my breath waiting for them to notice DCS (Why this is has always been an enigma for me?) .. As far as the rest goes, I guess we just have to wait and se what ED provides us with when they release BlackShark..!:music_whistling:
-
I couldn't agrre more..! :thumbup: That was the only reason for me building my own.. (but then again.. Saitek hadn't released their pedals at that point in time)
-
Forming pit building group in CA for BS
Triggerhappy69 replied to rocketeer's topic in Home Cockpits
SWEEEET..! Get to work man..! You know what we need..! :music_whistling: -
Forming pit building group in CA for BS
Triggerhappy69 replied to rocketeer's topic in Home Cockpits
Hey razorback..! Good to see you here finally..! Welcome To the pitbuilding "nut-house".. :pilotfly: Again.. You have done qiute a job building the cockpit.. impressive..! Do you plan on making the switches and instruments work at a later point? You would be WAY ahead of the rest if us if you did... I mean... you allready have a sweet lookin' pit to sit in.. The rst is just some soldering and a couple of wires and some programing and a little bit of swearing and sweating and nights awake.... Aaaargh..! WHY am I looking forwards to that..?:cry: -
DAMMIT... ! The hacker should be force****ed with a rotating pineapple on his towns square for all to see..!!!! I HATE hackers..!
-
Uuuuaaaah..! I have started building now..!
Triggerhappy69 replied to Triggerhappy69's topic in Home Cockpits
Update 4-way rocker switch 11 jan 2007 Quick before I go to bed..! Here's the new version of the switch.. It should be much easyer to make.. You just make all the plates 1-2mm to big, stack them on top of eachother with the switch-ball hole in center and drill the holes with a 3mm drill.. Taper the top plate ever so gently to allow for countersunk screws to be used.. And there you have it.. Now adjust the bottom plates to whatever distance you prefere, and the hard part in done.. :music_whistling: [ATTACH]14196[/ATTACH] -
BREEEWBER..! Good to see 'ya again my friend..! :thumbup:
-
Uuuuaaaah..! I have started building now..!
Triggerhappy69 replied to Triggerhappy69's topic in Home Cockpits
Neither of those actually..! I am working on a simpler model of the switch right now. One with only "in-house" parts (apart from the Gibson switch).. Things like ball pen springs and so on.. And with no need to glue the plexiglass pieces toghether (alligning them is a bitch.. and you need speciall glue to make the bond permanent)... Epoxy will only keep it together for a while, Crazy glue (like ZAP) is to brittle.. And ther's just not a whole lot of room for fixing it all together and alligning it with 1,5mm screws.. Give me a couple of hours in front of my computer and I'll post detailed drawings and a suggestion for parts list. But first I must eat..!:thumbup: -
I couldn't agree more.. Flying without pedals would like driving a car with only three wheels.. Sure it works..! But wouldn't you rather have that last wheel and get the full experience..? Also for A2G strafing attacks. I find myself totally lost without pedals..! And i a helicopter I can't even see how it would be practical to fly straight without them..? That being said.. I have tried several different types of pedals, but I still prefere the ones I made myself.. They are super simple to make, and then you can adapt them to the width you like..
-
Forming pit building group in CA for BS
Triggerhappy69 replied to rocketeer's topic in Home Cockpits
GOOD IDEA..! And a really good initiative..! Us "pit-Buidling lunatics" .. eeehh.. I live in Norway..? But I would really really like to join your group even though it will be through MSN..? As far as drawings go.. I use solidworks 2008. I can probably convert the drawings to whatever you want. But if you add me to MSN I'll just dump them in our shared folder.. Much easyer.! As of right now I have finished the drawings for all the "wood-works" that make up my Cockpit. And the panels you see on my thread.. The APU panel is just about finished in two versions.. One for those with limited tools (read as dremel and knife). And one for those lucky enough to have accsess to a cnc router.. Pm me your MSN adress mate..? -
Uuuuaaaah..! I have started building now..!
Triggerhappy69 replied to Triggerhappy69's topic in Home Cockpits
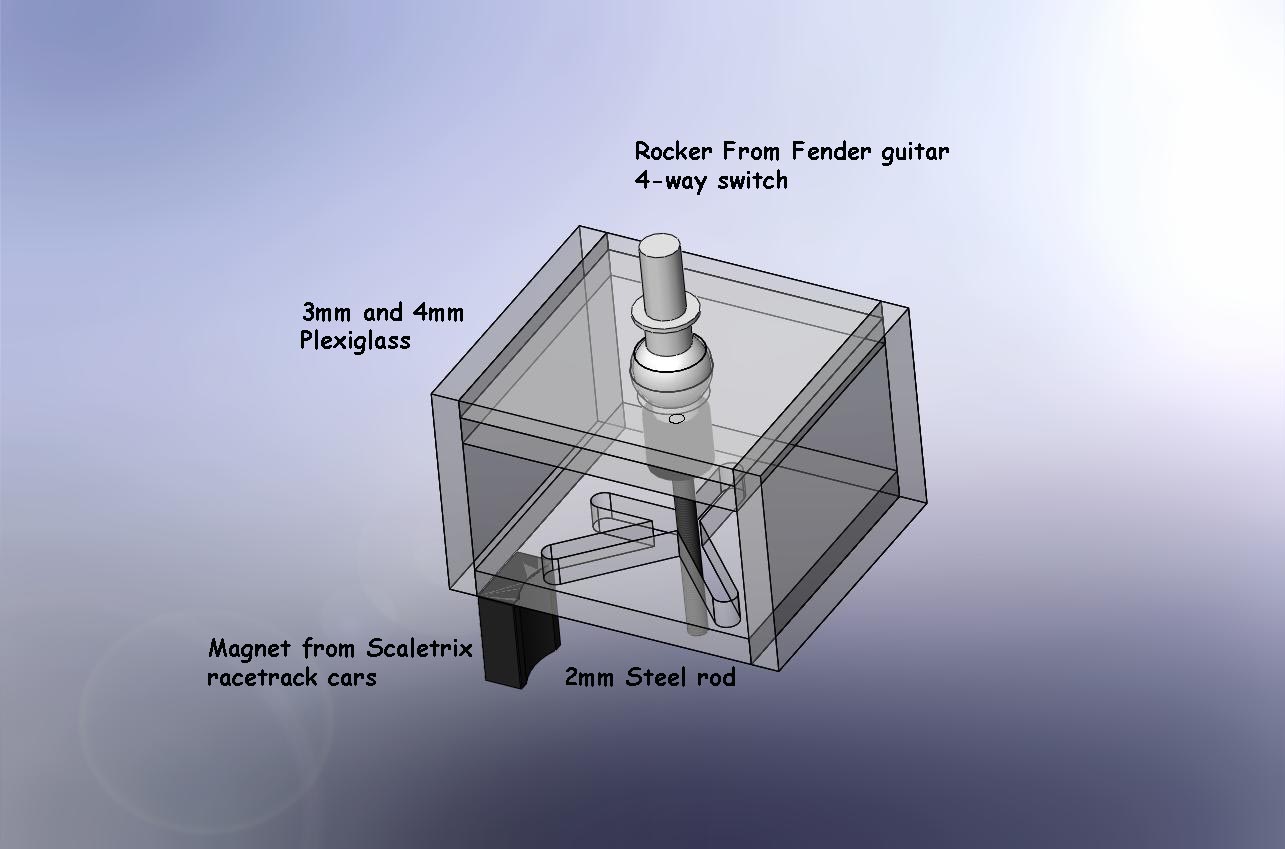
Update: 4-way Rocker Switch building.. To Urze: Thanks a lot mate..! That's really a compliment I'll save..! (how the hell DO you patent something anyway..? Naaaah.. I'll just keep sharing my ideas.. Most of them stink anyway..!):cry: Here's the finalized drawings of the 4-way switch for the panel in exploded view.: [ATTACH]14179[/ATTACH] As you see, I have split the connection plates into two pieces. One for guiding the connector pin into its outermost postition, and one that will work as electrical connection for the switch.. I am making these from a pice of copper PCB board that I'll etch the contact points from with PCB etchng "thingie" (ferrotricloride or something like that..) I have also cut out some notches from the guiding plate to allow me to have solering points on it.. Here's the 30mmX30mm plates that hold the ball-point for the switch. It's made for two pieces of plexiglass. One 4mm and one 2mm that i just a 7mm drill to taper the sidewalls, then I used the Dremel and a bit I had lying arround and Hey Presto..! It actually works like a charm..! ( An important note here.. I first made the ball-joint's on a large plate, and THEN cut it to the correct 30x30mm size.) [ATTACH]14180[/ATTACH] The Ball-joint was "stolen from this Gibson Guitar switch.. I tell you... finding this was a stroke of luck for me.! I searched for weeks trying to find it..! [ATTACH]14181[/ATTACH] Here's the part you need..! [ATTACH]14182[/ATTACH] All the parts laid out before final sanding, adjusting and mounting: [ATTACH]14183[/ATTACH] -
Uuuuaaaah..! I have started building now..!
Triggerhappy69 replied to Triggerhappy69's topic in Home Cockpits
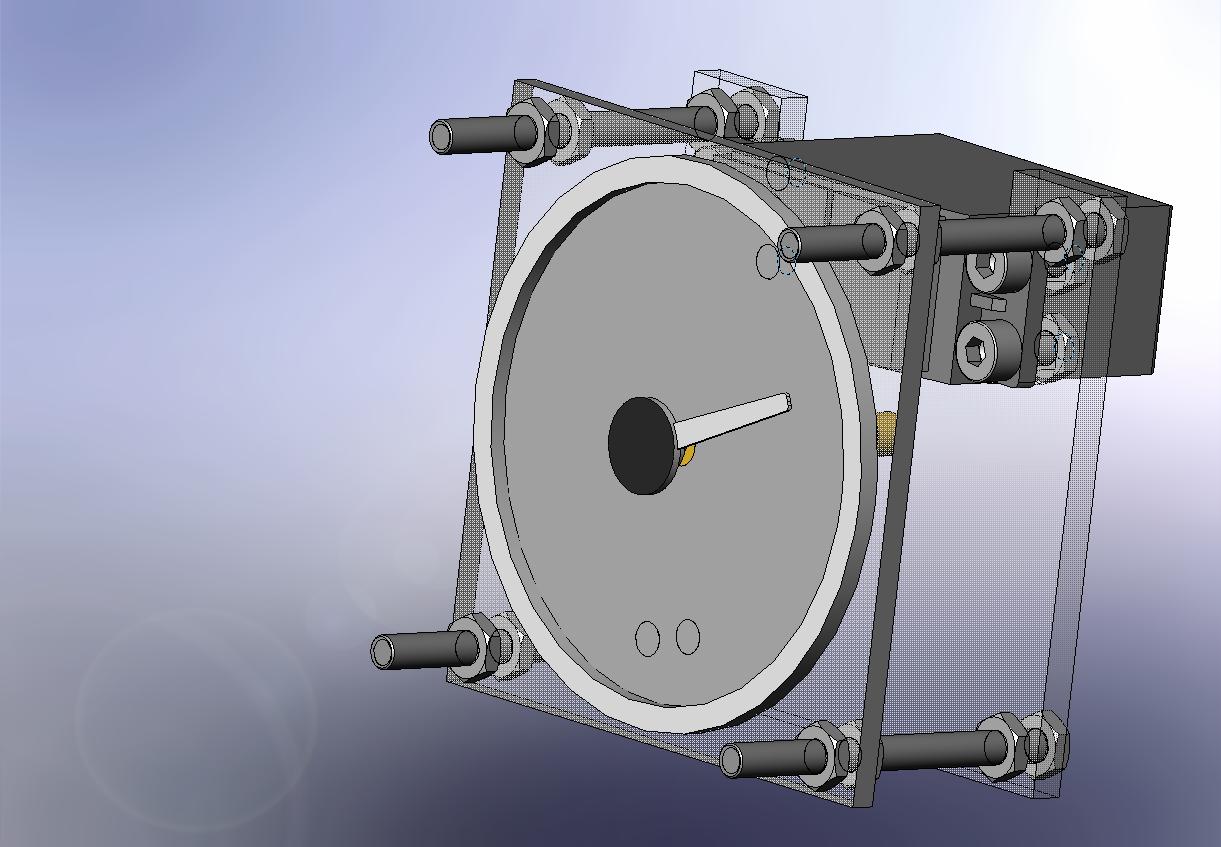
Update january 09. 2008 Well.. I have finished the epoxying of the Cyclic stick box now. Tonight I will give it a layer of black paint, and start sanding the surfaces..! The black coat of paint is just to better see where the "dimples" might be.. All of it should optimally be sanded off when I have finished..! Here I'm bonding the fibercloth to the plug.. A bloody meesy job. And I had to do it in three stages. First a layer of fibercloth, then some sanding to get the rought edges of, then one more layer of fibercloth and finally a good solid layer of epoxyresin to give me something to sand away without exposing the threads (better overall finish that way.. i hope) [ATTACH]14165[/ATTACH] And here it is awaiting the coat of paint and some heavy duty sanding to make it look sweet..! [ATTACH]14166[/ATTACH] Also I have been working on a way to make the 4-way switch out of things I have lying arround in my workshop.. This how far I have come.. The measures (seen from above) is 30mm x 30mm.. [ATTACH]14167[/ATTACH] Also a project that I will start tonight.. Wish me luck.. It's going to be fiddly..! :music_whistling: -
Uuuuaaaah..! I have started building now..!
Triggerhappy69 replied to Triggerhappy69's topic in Home Cockpits
DAMN..! Now I really feel the preasure here.. I can't promise it will be up to the standard of your pitbuilding mate..! I wish I could but we've all seen your work, and it's FANTASTIC..! I mean.. look at this..: If I reach your level of building I would consider myself lucky..! Ps. for you who are a bit slooow.. the picture if of the Su-27 cockpit that Wasserfall, Joe Curr and HPO are building (am I right mate?).. I just use it to drool over..:thumbup: -
Uuuuaaaah..! I have started building now..!
Triggerhappy69 replied to Triggerhappy69's topic in Home Cockpits
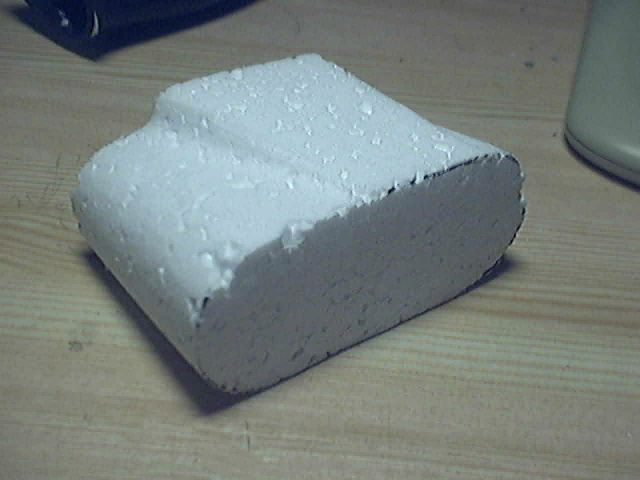
I totally agree with you Poko..! Making the plug out of Styrodur would have been a lot better since it doesn't have the airgaps that normal styrofoam has. The inside of the plug would have a much smoother surface, and need a lot less finishing after I have etched the foam away with thinner.. But I idn't have Styrodur at hand.. So I opted for what I had, knowing I may have to make another plug if this one goes to shambles.. :( Working on a ver2.0 of the APU Panel.. I don't like the way the old one looks.. The real one seems to be approximately 8-10mm high, and mine is.. 4mm..?:cry: Also since we now pretty soon will have the cnc to play with, I might as well take advantage of this and make some 100% finalized drawings to work with.. [ATTACH]14128[/ATTACH] [ATTACH]14129[/ATTACH] The 4-way switch is nearing it's finish in construction.. Playing with a couple other ideas to make it simpler and with fewer parts.. So that ANYONE can build it without the need for special tools.. I didn't have time to do the fibreglass bonding on the Cyclic stick top yesterday, so no pics yet,.. But I will do it after work today, so keep your eyes on this thread.. It will either be a succsess or a complete disaster..! Till later then..:thumbup: Ps. I don't know if I have mentioned this before, but if anyone want the drawings for the panels or parts, just PM me and I'll gladly share them with you.. -
Uuuuaaaah..! I have started building now..!
Triggerhappy69 replied to Triggerhappy69's topic in Home Cockpits
Finished plug for the cyclic Stick.. Phuuh.. That went a lot quicker that i had thought it would.. Here's my plan.! I'll make the stick box with epoxy resin and fibreglass cloth that will be to the plug. First the front side, and as soon as that is dust-dry I'll mount the plug on a stand in the upright position and do the sides. After that has cured I'll sand the rear flat and make the plate that holds the coolie hat and switches. Whitch I will make out of 4mm pvc plates. Comare the pictures to the drawing in my previous post.. I'm pretty pleased with the outcome so far.. And the stick will look something like this when done.: [ATTACH]14112[/ATTACH] [ATTACH]14113[/ATTACH] So now it's time to put on the rubber gloves ( i just love that ,... he he) and stir up some epoxy resin..:music_whistling:
-
Uuuuaaaah..! I have started building now..!
Triggerhappy69 replied to Triggerhappy69's topic in Home Cockpits
What I will do today..! It's sunday, and I have dedicated this day to finishing the top box for the modified Thrustmaster.. This is what I am aiming for: [ATTACH]14105[/ATTACH] [ATTACH]14106[/ATTACH] [ATTACH]14107[/ATTACH] So I guess we'll se what kind of builder I am when I show you the result later today..! Keep your fingers crossed for me mates.. LoL -
I gotta ask mate..! When you cut out the pvc panels for the HUD, did you use some kind of cnc router? Or is it all cut out by hand and sanded to fit.. If the last is the case, you mast have the presition of a surgeon..! Because that is such a piece of art..! And the whole thing with the mirrors in the HMTD seekers is just brilliant..! Keep it up mates.. ! Everytime I feel like caving in on my project I just look at your updates, and the world is a better place again.. Peace..!
-
Uuuuaaaah..! I have started building now..!
Triggerhappy69 replied to Triggerhappy69's topic in Home Cockpits
4-way switch solution? I have been pondering about how to build the 4-way switch in such a way that it will not break down and need replacement all the time. And Since the CnC router is still under construction it will have to be buildt with the tools I have at the moment. This is what I have so far: The Plexiglass plates are 30mm X 30mm in size seen from above.! It still seems like a relatively complex way to make the switch, but I'll have a go at it tonight and post some pics later.. But if you feel that you have another way to make it, or an improvement on this, please let me know.! Ps. still working on the electrical connections on the switch.. Aaaaargh..! Why couldn't they just but a rotary switch in there instead?
-
Uuuuaaaah..! I have started building now..!
Triggerhappy69 replied to Triggerhappy69's topic in Home Cockpits
Thank you all..! This year has been so much damn fun it's unreal..! The pitbuilding dream has finally begun, and With what I think will be the best FlightSim we have seen so far..! I had no idea when I started that it would be so time consuming to build a pit to my own standard. Also I had no idea how much additional knowlege I had to aquire to achieve this.! And as it seems I have just scraped the surface of learining. BUT STILL ITS BLOODY GOOD FUN..! One thing is for sure. Without the help of you guys I would have givven up a looong time ago..! I would like to thank all you guys for all the incouraging words I have sometimes needed sooo badly..! I would like to thank guys like:grandsurf and leafer - I check your motivating comments whenever I'm stuck and want to set the thing on FIRE..! HPO, wasserfall and Joe Kurr - For being such an insperation with they're own project and for sharing ideas and dimentions..! Nordic - Help and ideas (you got some sweet sollutions mate) Poko24 - For "kickin my butt" (got one under my seat now.. And you were right.. It's really cool..! And a special HUGE thanx goes to JimMack and URZE for saving my year, a lot of unnessesary work and probably my sanity..! There is no doubt that neither of you HAD to help, and still you did..! I O U guys BIG TIME..!:thumbup: And my hat goes of to my Comrades in the VVS504th squadron..! Allthough I haven't been able to finish my IQT and MQT training Goon..! It still frigging impresses me the amount of work and attention to training detail that's put into this.. IMPRESSIVE WORK.!:thumbup: -
Uuuuaaaah..! I have started building now..!
Triggerhappy69 replied to Triggerhappy69's topic in Home Cockpits
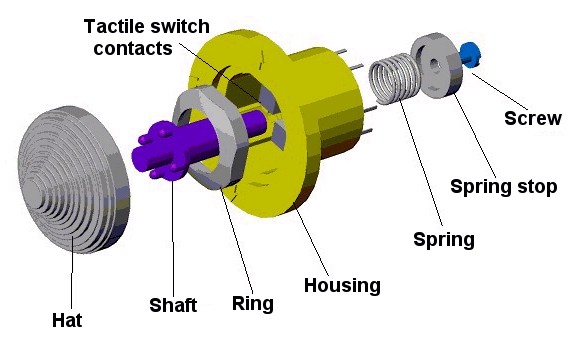
Here You are mate..! You mean this one right? Check this link: http://cougar.frugalsworld.com/faqhardware.php#Topic6.2 And this one: http://forums.frugalsworld.com/vbb/showthread.php?t=102394 I have made drawings for my Collective by uninstalling the cooliehats from my cougar and measuring them myself. Here's a drawing with the DIM's you need to build and drill mate..! I put the contack info on the DIM drawings itself for easy keeping. But to read it you have to download the drawing as a PDF file (below) as the resolution on the JPG wasn't high enough to read the small letters.. This is what the PDF drawing looks like: And here's the PDF file itself.. [ATTACH]14009[/ATTACH] HAPPY NEW YEAR EVERYONE..!!:thumbup:
-
Bow my head in AW..! This project is an example to all of us mate.! I am flabbergasted by the quality and realisticness of ... well just about every little piece of it.. Keep posting Pics mate.. I'll be waiting..! Hapy Hollydays ..!:thumbup:
-
Uuuuaaaah..! I have started building now..!
Triggerhappy69 replied to Triggerhappy69's topic in Home Cockpits
Brrr....! Sorry for stalling mate.. I haven't been arround during the hollydays.. I'll Send you the dimentions and where to get them as soon as I get home.. Maybe later tonight even..! BTW.. GOD DAMN you scared me with the threat of stripping..! LMAO:cry: -
Black Shark - a new level of switchology
Triggerhappy69 replied to RedTiger's topic in DCS: Ka-50 Black Shark
I just LOVE the music playing in the background mate..! :thumbup: I went all ZEN halfways into the How-To video last friday, and came to myself today wondering waht the hell happened.. Damn I gotta call my office..!

.jpg.397d5c8ead62d74a109f7c358ea20a62.jpg)
.jpg.775bb7dd8a62f68f35906b7586578e86.jpg)