
Triggerhappy69
-
Posts
932 -
Joined
-
Last visited
-
Days Won
1
Content Type
Profiles
Forums
Events
Everything posted by Triggerhappy69
-

Show your Flight set up :D
Triggerhappy69 replied to graywo1fg's topic in Lock On: Flaming Cliffs 1 & 2
Damn man..! I have been laughing ma ass of for hours now after reading that..! LoLx100:megalol: -
Uuuuaaaah..! I have started building now..!
Triggerhappy69 replied to Triggerhappy69's topic in Home Cockpits
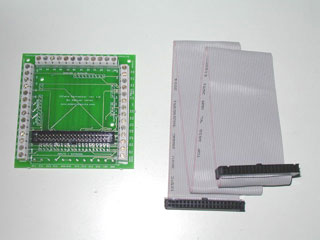
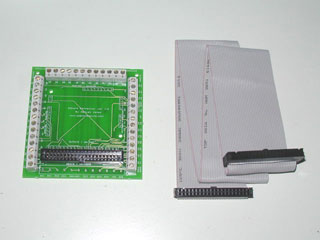
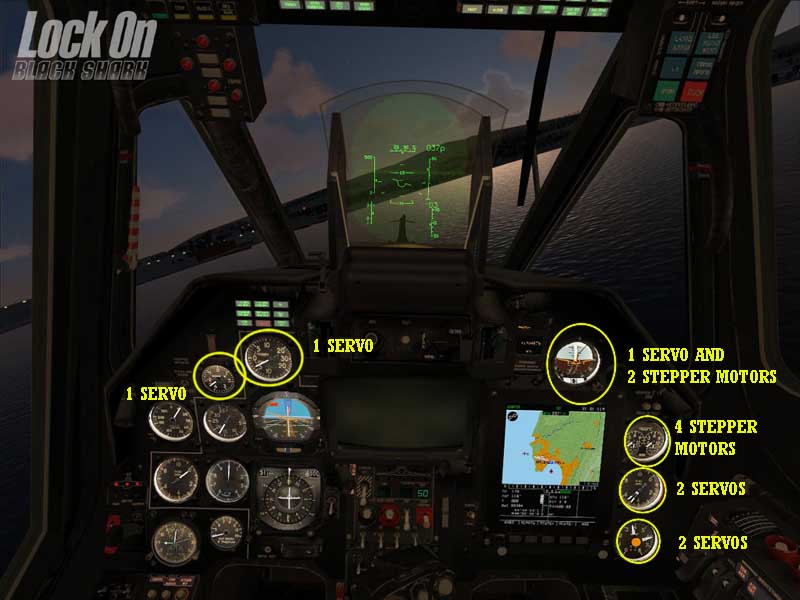
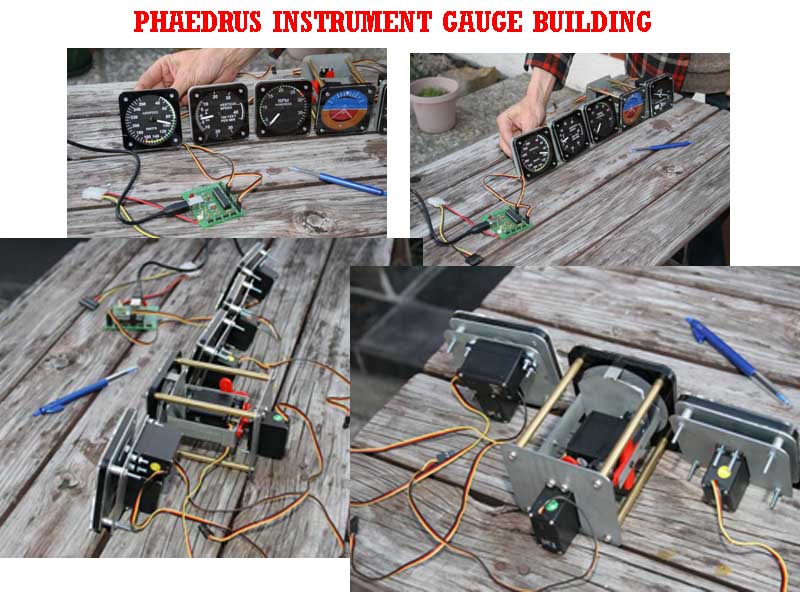
You are more right than I whish to think of.. And especially since I do most of my Pitbuilding after dark (after 1630 up here north), Shaking is a problem..:megalol: I use these boards that (no surprise I guess) also comes from opencockpits..! [ATTACH]199[/ATTACH] For some of the inputs.. [ATTACH]198[/ATTACH] For the outputs.. If you want a general idea of what these cards can do for you check out the link: http://www.andare-ing.com/uploads/Iocards_catalogue.pdf And here's a fellow IOCard user who has buildt he's instruments almost exactly like I am. I just love how simple gauges can be made with the USB Servos card.. And this guy really managed tp balance simplicity and rigidity in his gauges.. WELL MADE DUDE..! [ATTACH]201[/ATTACH] ( http://www.opencockpits.com/modules.php?name=nuevasfotos&numero=9999999999 ) Here's the link to the gallery..... Allthough I am only building the four gauges to the far left and two on the rightside of the front panel right now. The rest will (hopefully) be run by gauge "LO Virtuel Panel" or "Gauge Composer" or the software I bought from simmeters (..whitch doesn't seem to be real practical to use if you ask me..) [ATTACH]200[/ATTACH] I have the mechanics made for the gauges from my previous project (while I dreamed about the day BS would be released). But as of now I have no faceplates for them. If you want drawings I can post those, but they're really so simple to build just from getting the basic idea of the pics.above..
-
Uuuuaaaah..! I have started building now..!
Triggerhappy69 replied to Triggerhappy69's topic in Home Cockpits
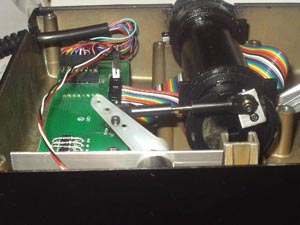
Oh you will my friend... you will see the first "real-life" picture later tonight.. I have just made the "box thingie" that houses the switches. And as soon as I get out of my suit and tie I'll get started on sanding it and beveling the corners.. First edition is made out of 8mm fibre plates ('cause my own CnC router isn't finished yet, and there was a 2 month waiting for a repair dude to come fix the EMCO CnC mill we have at my neighbours house..) They actually had the nerve to ask if We could have it delivered to them... and the damn thing weigh 6 tons..!) :megalol: -
Uuuuaaaah..! I have started building now..!
Triggerhappy69 replied to Triggerhappy69's topic in Home Cockpits
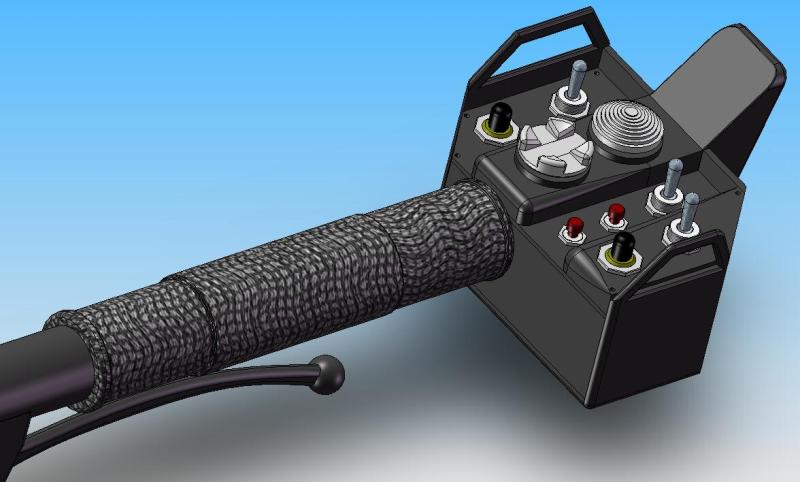
Collective assembly Here's an update.. [ATTACH]194[/ATTACH] I'll make the the collective stick brake functional..
-
Uuuuaaaah..! I have started building now..!
Triggerhappy69 replied to Triggerhappy69's topic in Home Cockpits
All my controller cards come from www.opencockpits.com . I have played around with these for a while now, and as far as being cheap and easy to connect, they are really great.! And you can start out simple, and then add more IOCards for servos, 7-segment displays, stepper motors, LCD displays, and so on and so on.. As of right now I have a Master Card, a USB Keyboard card (for an in cockpit keyboard), a servos card (to run the gauges next to the AFIS because I can't find any practical way to project them to a monitor behind the AFIS. And for the APU Rpm gauge) and breakout board cards to ease the connecting of wires to the mastercards. ..I am making a schematic that shows the general layout with connections and cards as we speek.. If you want I can post it here as soon as it's done? -
Uuuuaaaah..! I have started building now..!
Triggerhappy69 replied to Triggerhappy69's topic in Home Cockpits
4-way switches will be from Thrustmaster.. Ordered from theyr spare parts departments. Yup mate..! Youre quite right..! I'll look right into those.. Also I am in the prosess of making a simple design for the 3-way and 4/5-way switches for the panels.. More on that later.. -
Uuuuaaaah..! I have started building now..!
Triggerhappy69 replied to Triggerhappy69's topic in Home Cockpits
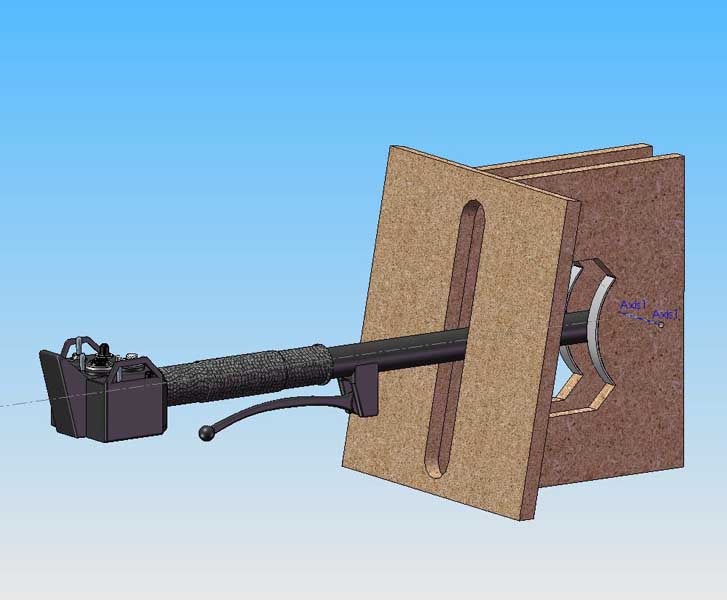
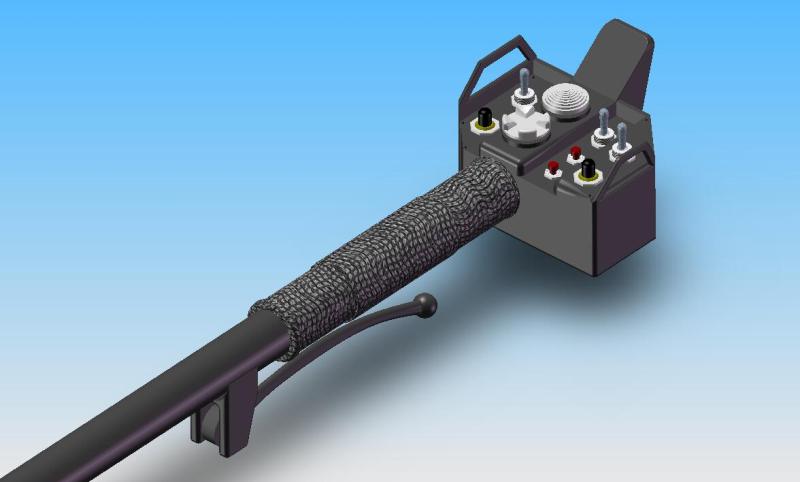
KA-50 Collective almost done ... Just waiting is boring. So I took the time to finish the Collective drawings. It's made from of the shelf parts, apart from the switch-box.. Pics as soon as the paint dries..! [ATTACH]190[/ATTACH] [ATTACH]191[/ATTACH]
-
Producer's Note _ 2- ABRIS.wmv (?)
Triggerhappy69 replied to Weta43's topic in DCS: Ka-50 Black Shark
LMAO..! :megalol:.!! ....... hey... who said that..! I know I heard something..!? Oh well.. I wonder where he hides he's pipe..!? It must be here somewhere..? I'll just have a look around now that nobody is paying attention to me.. .... Am I writing this down..? Oh Crist..! Now they can read my mind to..! -
Not that off topic as you might thing ...
Triggerhappy69 replied to urze's topic in DCS: Ka-50 Black Shark
Probably to make an attachment for Cougar to fit the Collective Add-On that he's made I guess..? Wich I BTW think is really cool..! Saves you A LOT of fiddling arround making your own.. Let me know when they're for sale mate.! I'll buy one.. -
heli chair with collective and 7-speed usb gearbox
Triggerhappy69 replied to G3's topic in DCS: Ka-50 Black Shark
all I can say is... WOW..! .. I just love it whenever I see something complex and apparently difficult to make, comes together as simple and clean as this..!:thumbup: My hat goes of for you mate..! Good design, well made and most of all it seems to take the stressload of frantic "gaming"..! I especially like the way you worked out the angles of the bellkranc's for the collective.. -
hehe wrong APACHE version announced for DCS?
Triggerhappy69 replied to Pilotasso's topic in DCS: Ka-50 Black Shark
..LMAO..! :megalol: Brilliant mate... Just friggin' brilliant..!:thumbup: -
Something like this? PDF Files with all the measuments for different ones from Mason..: [ATTACH]169[/ATTACH] [ATTACH]170[/ATTACH]
-
I hope I didn't come across wrong here.. The mod by Cubpilot is well thought through, well produced and machined and most of all, I have never heard ANYTHING but how it improves the accuracy and resolution and general feel if the Cougar.. And as I pointed out earlier (hmmm.. or did I forget to do so..? To bad I cant read my own previous post while writing this). If it was more available and not so expensive woth local taxes and P&P, I would have had one myself... However I guess I'm just one of those guys who like to figure things out for myself..:music_whistling: I suggest that instead of asking him to give away he's own trade secrets we start looking for the Sencors ourself.. I know that if I had a business like say... Coca Cola.. I wouldn't like everyone to bug me about the ingrediences of the drink, just because they really really liked it.! He's made a damn good mod, and we should respect that, don't you all agree.? Well as seen in the pics my setup looks kinda like CRAP compared to the ready made ones. And they should look better to.. But hall effect being a non-physical-contact way to change the resistance, you really don't have to spend hours lining axles up with center and all that cosmetic stuff.. As long as it returns (and I have to point out that I am not talking in the 0,001mm scale here) to the same center, It will be a helluva lot more presice that your arm probably is anyway. LoL.. But Leafer..? Seven of them..? What are you flying around in anyway..:joystick:? Ps. The most rewarding about modding my Cougar isn't even the improved preformance.. It's all the cool things I have learned about Hall Effect Sencors. Questions like "How they work, and why?", "What can they do for me?", "Why is the president of Peru?", "Who invented liquid soap?". All questions now answered.. to some extent..:smartass:
-
.. I join ranks and salute you on your birthday Wags.:thumbup:
-
Yup..! looks familiar.. I probably would have tried them if I could find them over here. As far as the advantages compared to using "DIY" sencors I really can't say for sure.. not having tried it I mean..! But if the resolution and physical size is adequate for your joystick I would at least try one out and see if it works.. It would take away all the "damn I must find a way to attach the bloody magnets without them slamming together all the time" problems.. By plug-n-play I mean Hall effect sencors that wouldn't require aditional mounting-brackets to be made, and pushrods and/or bellcrank being fittet.. Just remove the potmeters and install the sencors.. (sigh.. Wouldn't that be nice.. and kinda' boring to.. LMAO):cry:
-
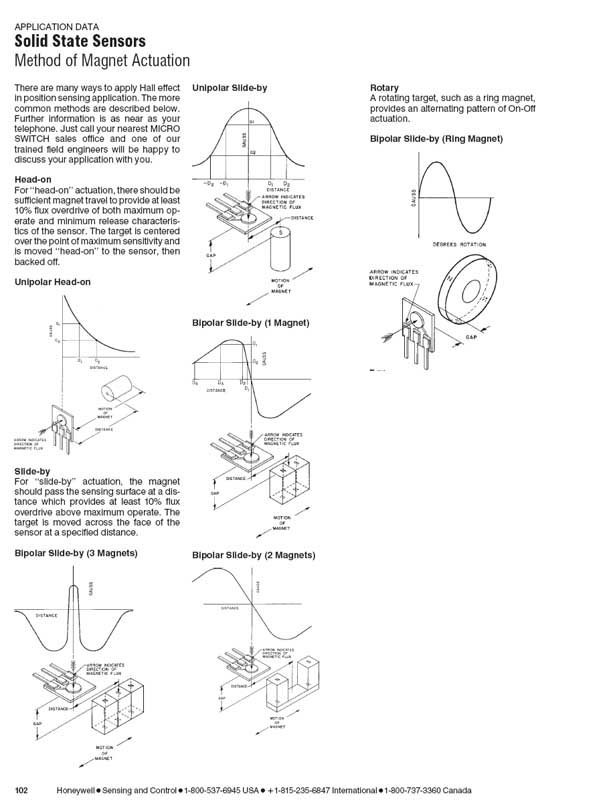
Yes most definately.. And no.. Absolutely not..!:cry: Yes, because if you find one that fits in the same slot as the original Potmeters it's a "plug-and-play" job to mod your joystick. No, because I have a hard time believing that you actually will find this Rotary Hall Effect Sencor (RHES for short). Important things to remember when checking this is how many degrees of travel the RHES is buildt to use. The ones I came across would need some kind og "pushrod and bellcrank" sollution and have a purpose buildt attaching made to fit it into the joystick. [ATTACH]157[/ATTACH] If only I could find out what type sencors "Cubpilot" uses for hes mod.. They seem to be an easy fix! Pricy, but well worth it I guess.! http://www.cubpilotshangar.net/ The "DIY" sollution with a SS490 Series style sencor only problem is that it takes up so LITTLE space that it might seem a bit fiddly to work with. Also... Compare the price between the two sollutions.. We're talking 15$ US for the DIY mod complete with all parts, and 115$ for just the RHES (at least here in Norway).. Links to Hall Effect "plug and play" mods: http://www.vkb-flightsimcontrols.com/produkt/mars.php?PHPSESSID=13041abf378030ea875aac386aeca778 http://www.cubpilotshangar.net/ http://www.checksix-forums.com/showthread.php?t=91587 Stick Extension mod for Cougar (look halfways down the page): http://forums.frugalsworld.com/vbb/showthread.php?t=74728&highlight=extention
-
Thanx a lot mate.. Just glad to help fellow simmers..:smilewink: Let me know if you need more info or pics.. Sharing info is the only way to improve..!
-
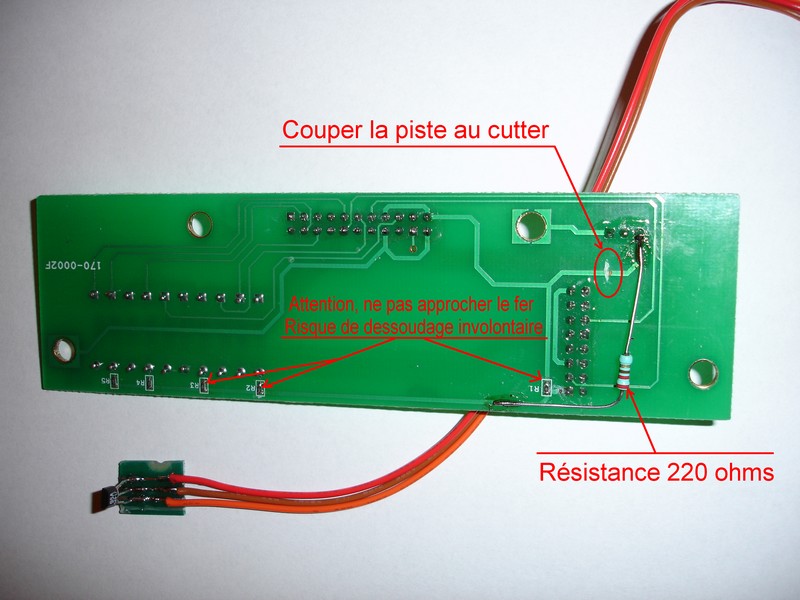
So true , so true mate..! Allthough the Cougar Throttle DOES have to have a resistor added as shown in picture: [ATTACH]156[/ATTACH] Also check out this thread to get a complete intro on how to mod your cougar to hall effect sencors.. http://www.checksix-forums.com/showthread.phpt=132677&highlight=hall+cougar Excellent work by "NN Apache"...!:thumbup:
-
.. But consider the scenario where we can have a group of AH-64 working with theyr scouts OH-58D Kiowa and all the tactical fun we could implement into online flying..! That would give tactical squad training a whole new dimention.. Not to speak of four Blacksharks and an Alligator on a group... Drool...!
-
... StOp you gUys.. PleAse STOP..! I aM droOling so muCh my keYboard jUst sHorted..!!
-
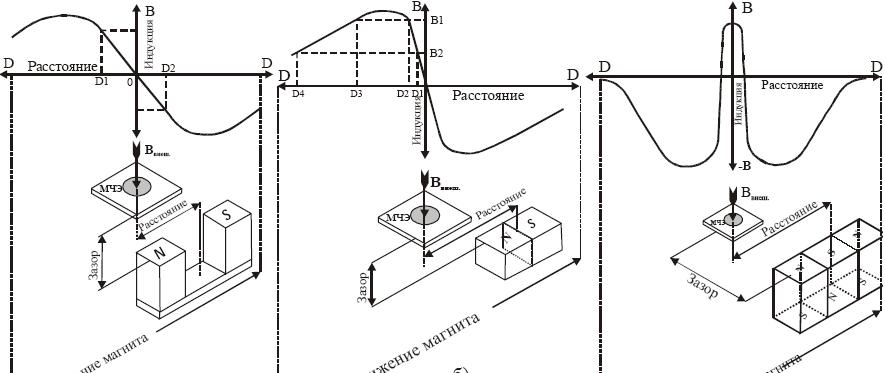
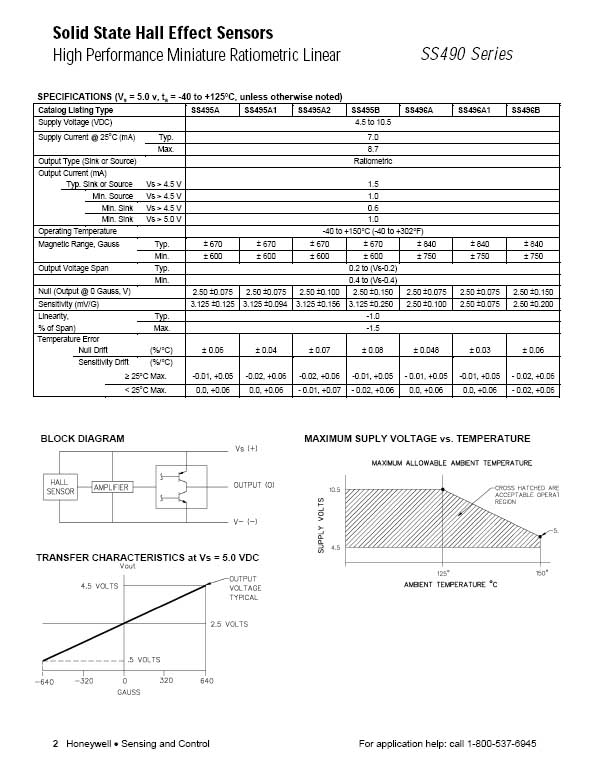
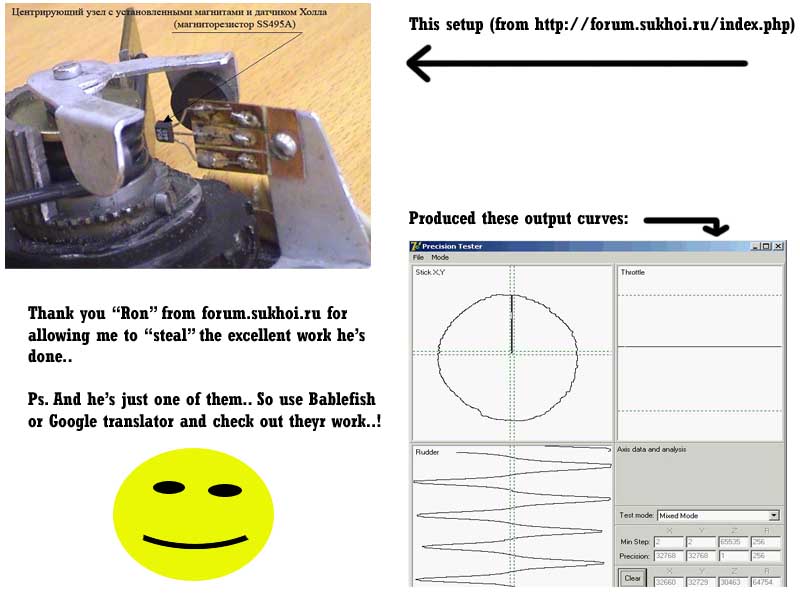
Adapting it to my pot signal was actually a matter of reading.. I know..! But my sqaudmates can vouch for me when I say that I had everything buildt and monuted in my Cougar for ages. But the damn thing wouldn't work..! And the I read this dokument: [ATTACH]150[/ATTACH] It became quite clear to me that my Cougar wouldn't read the sencor as a left-center-right (0v-2,5v-5v) motion when i set it up like this (not my picture.. got it from a russian forum that ROCKS when it comes to modding Cougars) It read it as a left-center-left motion (5v-2,5v-5v).. [ATTACH]155[/ATTACH] With the magnetic field running through the hall effect sencor at a perpendicular angle. The volt range went from 5v to 0v and back to 5v again.. But after just turning it 90 degrees (and changing from SS495 sencors to SS495A1 that have higher resoluton), I finally could make it read a curve that was 0v-2,5v-5v. LINEARITY ISSUES: [ATTACH]151[/ATTACH] The beauty of hall effect sencors (other than the fact that they're dirt cheap) is that you can have almost whatever curve you want just by changing the way the magnetic field flows through the sencor. Or by simply using other types of magnets.. (ring magnets with N-S-N-S 90 degrees to eachother on the ring). ..Or exponential curves by using a strong magnet on one side and a weaker on on the other side (like the first curve on picture above only exchange one of the magnets for a stronger one) ..Or even wavelike curver by letting the sencor be moved linear over a band of magnets glued with alternating N-S-N-S-N-S next to eachother.. Longer and higher waves can be achieved by gluing magnets in N-N-S-S-N-N-S-S-N-N pattern.. [ATTACH]153[/ATTACH] There's no simple answer to anything these days.. An I guess I got a little carried away here:music_whistling:.. Honeywell's own specs for the SS490 Series are self explanatory.. So the answer to linearity is HELL YES.. They can output a linear signal (at least over the range and angle of movement your joystick has)...! [ATTACH]152[/ATTACH] ... Now did I get a 100% linear output in the setup I chose for my Cougar..??? - The Cougar has a range of about 30 degrees of movement arround the center. So I would say that the "feel" I get after modding it to hall effect certainly is A LOT MORE PRECISE AND LINEAR that any potmeter I have tried... - Mathematicly the curve should not be 100% linear though it's whole range. But since I am rotating the fields flux through the sencors center and only using 30% of it's range it's well within the "flat area" of the curve as seen above... - Also I always fly with 2-3% centerpoint trim becuase the cougar stinks at centering precise. And even more so with the stick-extention.! And I also use a little exponetial in my HOTAS Setup Curve. So (damn I gotta stop going on and on and answer the man) I guess my answer would be that No, I haven't bothered doing real presice and consequent testing thaI can produce for you here.. But I know a LOT of others have done so, and I just took theyr word for it..!:thumbup:
-
Rudder Pedals and Hall Effect Sencors I swear to rudder pedals that are at least 50cm wide.. Anything less just makes my feet go tired and cramp up..! [ATTACH]145[/ATTACH] This setup is buildt in an evening with parts from any hardware store. I have since the picture added hall effect sencor for the rudder pedals (and my Cougar) and as far as being exact and linear its all a question on how you move the sencor in it's magnetic field. The SS495A sencors will output 0v-2,5v-5v if you let the field pass through it length wise..! (see picture of Cougar further down). And if you opt to go for a sencor with high resolution like the SS-495A1 sencor it's as precise as the mechanics will allow it to... [ATTACH]146[/ATTACH] See.... It's all made from parts that you find anywhere.. [ATTACH]147[/ATTACH] Here's my Cougar with the Hall effect sencors and magnets installed.. This HOTAS is excellent for modd's like this. I can at any time just remove the hall-effect sencors and magnets and install the potensiometers again in 10 minutes.. Ps.. Nordic..! That has got to be one of the sweetest and coolest all-round setups I have seen.. Question for you though.. Where did you find gas dampeners without springs in them? I have been looking all over for those to put in my KA-50 Pit's pedals..?
-
Uuuuaaaah..! I have started building now..!
Triggerhappy69 replied to Triggerhappy69's topic in Home Cockpits
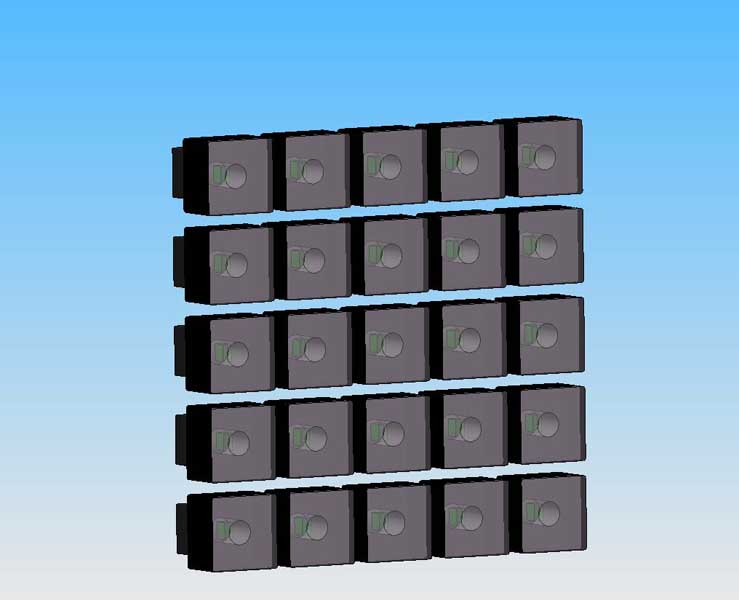
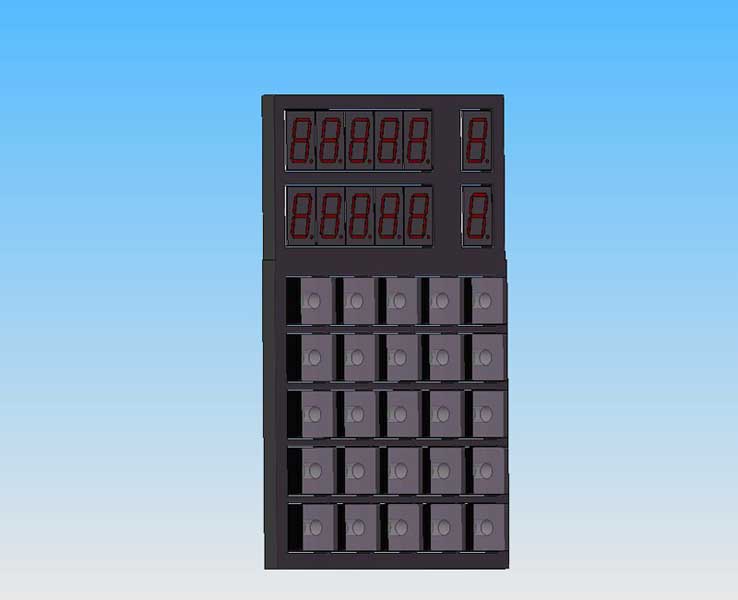
Panel planning .. started planning the layout for the right lower panel now..:music_whistling: It will use some cheap 10x10mm push-buttons I have ordered from RS Components. And they will have a 15x15x14mm piece of plexyglass glued on top of them. Then a print of the selective button, followed by a 15x15x2mm plexy-glass piece glued on top. A 6mm hole will be made in the bottom piece to let the incorporated LED in each button light up the buttons text. And the sidewalls will be painted black to avoid light escaping through the sides. [ATTACH]128[/ATTACH] The 7-segment displays are 12,3x19mm and cost next to nothing. And it all will be controlled by my cards from Opencockpits.. [ATTACH]129[/ATTACH]
-
Uuuuaaaah..! I have started building now..!
Triggerhappy69 replied to Triggerhappy69's topic in Home Cockpits
... Aaaahhh... I almost forgot..! I still wonder about that "pocket" at the front of the ejection seat..? Anyone have an idea what is's for..? (other that to attach the ejection hadle)? -
Uuuuaaaah..! I have started building now..!
Triggerhappy69 replied to Triggerhappy69's topic in Home Cockpits
...Pitbuild update 03.november 2007... Todays update.. Only Pictures as of now.. I'll elaborate on it later.. [ATTACH]118[/ATTACH] .. Yes..! That is me grinning here..! [ATTACH]119[/ATTACH] Seat back might seem a bit high, but I'll make a temporary seat-cushion tomorow and see if it needs to be lowered a bit. [ATTACH]120[/ATTACH] Qiute pleased with the proportions now . I buildt new front lower panels tonight because the old ones were to long (or at least I thought they were..) [ATTACH]121[/ATTACH] The setup without me in it.. Another thing I'll start tomorrow is to make the floor... [ATTACH]122[/ATTACH] The new Left front lower panel ready for the fuel cut-off and rotorbrakes handles.. Well that's all for today folks.. More updates tomorrow if all goes well. My plan for tomorrow is: 1. Make a seat cushion, and check the hight if the seat backside. 2. Start making the "floor" and designing the pedals. 3. Make a new upper frontpanel (the angles are not right, and I need to make room for monitors to project the instruments on). 4. Start working on the Collective stick. (Obviously I need to do this after making the seat cushion). :cry:
Triggerhappy.jpg.f3afb70458b0534348b2f329cee841f7.jpg)
Triggerhappy02.jpg.488c0765b9d63e0c203aa21bcc0da651.jpg)
Triggerhappy.jpg.27823e92ebfa1f990369f100db3b8a46.jpg)
.jpg.e1a5df2132236ed63442c875d0ebd1da.jpg)
.jpg.f680de2fc0694830166958b19665a429.jpg)
.jpg.3735c665336459c95c997eeffa31a7cc.jpg)
.jpg.facb707faf30b0473714a84a0563ee09.jpg)
.jpg.639cc7bed383224adcb4c5a7263fcdf7.jpg)