bradmick
-
Posts
401 -
Joined
-
Last visited
Content Type
Profiles
Forums
Events
Everything posted by bradmick
-

reported Trim with slip indicator always nose left?
bradmick replied to MstrCmdr's topic in Bugs and Problems
The crab angle is still 2.4 times the actual aircraft value, it is known and been reported. -
Yup, I still fly and teach folks how to fly the big rig. All my knowledge (like @Raptor9) is first hand, and not gleaned from a book with zero practical application of the books concepts and explanations.
-
Bottom line. Regardless of hardware, push the dang button. Either put an input in and then push the button (and perform appropriate stick recenter it procedures based on special options selections) or push the button, make the input, release the button (and perform appropriate stick recenter procedures based on special options selections). Yes, with the hold modes OFF you can “bump” the force trim, I.e. performs short press after making a micro adjustment of the controls, this will not lead to a SAS saturate (except for heading, depending on conditions, wind direction and magnitude) because you haven’t commanded the holds to hold anything. Once you bring the hold modes on, you need to press and hold, fly to the desired state, and then release the force trim button. The reason you have to do this with the hold modes on is because you need to center the SAS so it has its full authority when you let go of the force trim switch at the desired flight control position. The force trim button updates the FMC and the hold modes when they’re on what they should hold. There are no more words in the English language to explain this. This is how it works, this is the logic and interaction required regardless of if you have a stick that centers or a stick that stays in a position on its own. Push, the dang, button.
- 55 replies
-
- 11
-

-

-
You still have to update the FMC on that position by pushing the force trim release button.
-
24May23: Added LMC Redux video
-
How to stabilize TEDAC\TADS image in the moving helicopter?
bradmick replied to solus's topic in DCS: AH-64D
This is how you use it in the real aircraft. This video is pre current patch, but the procedure is correct. You, the gunner establish a manual track. Start in the widest FOV possible first, begin continuous lasing (don’t let go of the laser trigger), turn on LMC on, adjust the slew rate, step in a FOV, adjust, so forth and so on. As someone with an ungodly amount of hours using the real tads, this is how it works. Practice, follow my procedure to the T and you’ll be fine. https://youtu.be/IQ5R5b0PnIY -
correct as is FLIR medium zoom slew speed seems way too slow
bradmick replied to FalcoGer's topic in Bugs and Problems
Feels fine to me, and I've got 3300hrs worth of use with it...so uh...there's that. -
19May23: Added Hovering Turns, Force Trim Use, Hold Modes Enabled vs. Active
-
correct as is FLIR medium zoom slew speed seems way too slow
bradmick replied to FalcoGer's topic in Bugs and Problems
Concur. There is no medium FOV in the DTV. -
17May23: Added Points and Routes video. Allergies were kicking my butt a bit, apologies for the raspy voice at points.
-
15May23: Added Cold Start video...better late then never.
-
cannot produce and please provide track file Keeps turning over
bradmick replied to pmaura's topic in DCS: AH-64D
https://youtu.be/tVOLz3vqhbQ -
23Apr23: Added "My method of using the trim..." Note: I used Instant Trim in this video because I forgot I had switched from Central Position trimmer mode to do a compare/contrast video at some point. I decided to just roll with it because I had already hit record. My brain took a little while to adapt to how Instant Trim handles versus Central Position, but the work flow would still be the same except I would be letting go of the stick to allow it to recenter immediately after pressing the force trim button. Also, I got really tired of trying to type all of this out, because it kept getting miscontstrued or viewed through an absolutist lens. Hopefully this clears some things up.
-
You understand that ALL helicopters of a conventional US design with a counter clockwise main rotor react this way, right? So the same inputs would more or less be required. Control rigging, center of gravity, if there’s any kind of transmission tilt to the left, size and authority of the tail rotor, etc will all cause variations. Also, skids vs wheels makes for a huge difference in ground handling as well, especially if those landing gear struts are collapsible (which the Apaches are) So I’m not really sure what your intention is with that statement. And at the same time, the statement is correct, it's not like a huey, because the huey has fixed skids and no SAS or hold modes. The apache has wheels with struts and the SAS, these all interact in different and interesting ways with the aircraft as well while bringing the aircraft up to a hover. It's also a lot heavier aircraft as well.
-
20Apr23: Added "What you should be doing..." video
-
[MT] Disconnecting power makes right MFD TSD Video stick
bradmick replied to FalcoGer's topic in Bugs and Problems
How are you shutting down the helicopter during repair? The correct sequence is APU - On Power Levers - Idle or Off (when apu on advisory is displayed, if you really wanna be accurate, engines come off after 2 minutes ate idle) APU Off - After engines are off The only time the generators will ever kick offline outside of an improper shutdown is if you droop the rotor (slow it down) so much that it trips the generators off. There’s zero reason to ever have to interact with the generator reset switches. If you do a proper shutdown procedure, does this still manifest itself? -
I genuinely think people believe flight model changes have happened because they’ve actually gotten better at flying it. I think people had this idea that the Apache was going to be like the Ka-50 and basically fly itself. Well, the Apache is not that and it doesn’t. You have to actively fly it. It takes on average 300 to 400 hours of actually flying the helicopter to get really comfortable with it, or at least to be comfortable enough to be in charge of it. It’s a very demanding aircraft, it requires an enormous amount of skill to fly. Pardon my bluntness, but I think a lot of internet pilots thought they’d master it in no time, because of their legendary video game sky god abilities. Reality is a cruel mistress. So when people make absolute claims about a flight model change in the absence of any factual evidence, it makes me laugh. The reality is you’ve probably just gotten better from hours of practice.
-
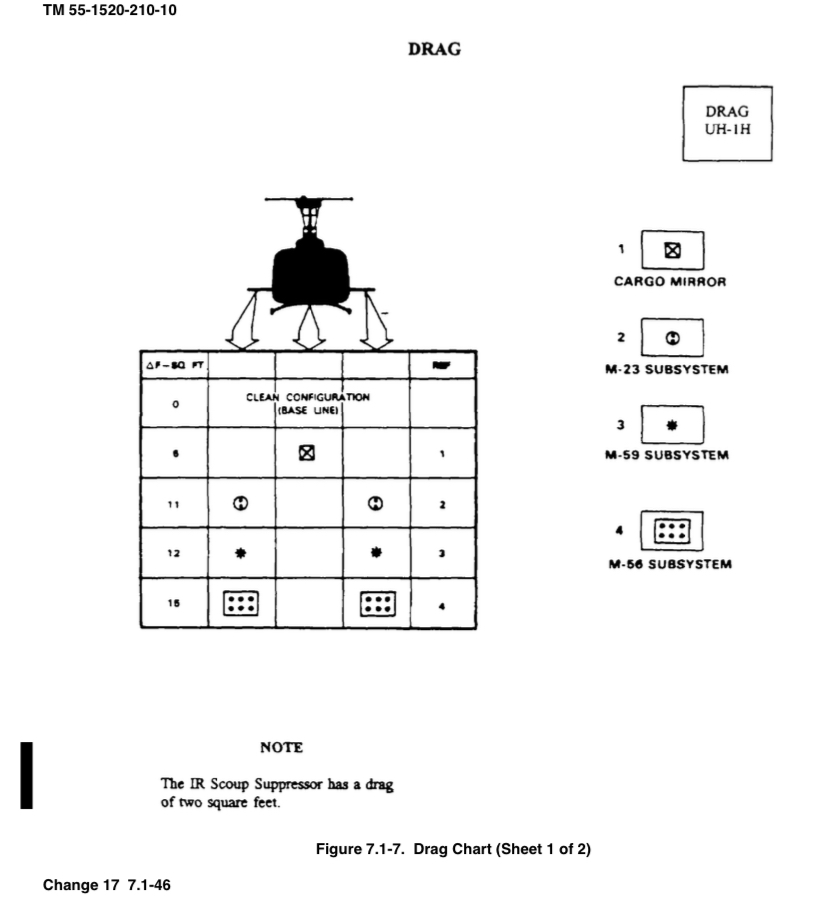
What was your configuration for those different weights? What components were on the aircraft? All of your stuff is moot without that information. The baseline for the charts is a slick aircraft, and then you have to add the IR suppressor because that's installed by default in DCS. Without knowing what the external configruation of the aircraft is, the data you're presenting means nothing. The only way you can get to 9500lbs is by loading all the external stores on the bird, which will effect drag. However, how do i account for the rocket pods and mini guns plus the external hardpoints? That info isn't available. So until you tell me what your actual aircraft configruation is, and that it's standard across every test (which should be slick...and then because of DCS, add the 2 square feet for the IR suppressor) your data doesn't mean anything.
-
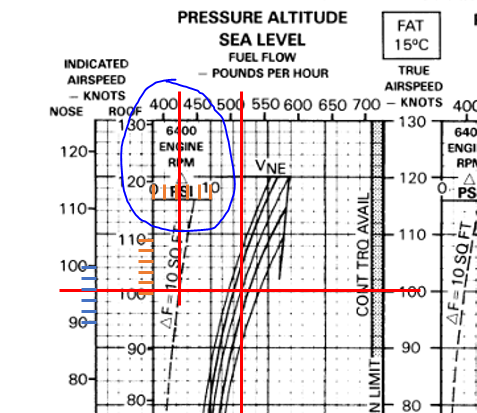
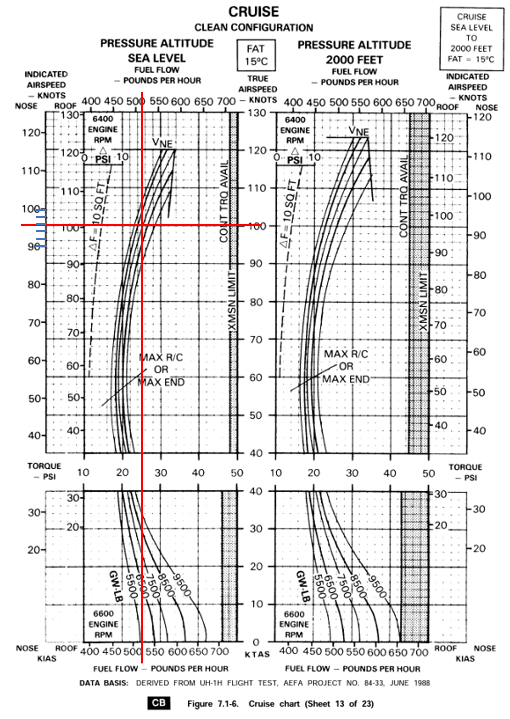
Now I understand the confusion, my bad. Using the inner scale on the left side of the page, she's about 5 knots slow. I also sat down and adjusted my base torque value taking into account the IR suppressor, which adds 2 square feet of drag. Per the manual, you use: change in area / 10 * Delta PSI this worked out to: 2 sq ft for the suppressor / 10 * ~4.5 Delta PSI = 0.2 * 4.5 = 0.9 Base cruise torque was 25 psi, so this takes us up to 25.9 which is about 30 psi. At 30 psi, she's about 5 knots slow. That's not half bad. Again, this is for a slick configuration.nullnull

- 46 replies
-
- 1
-
-
- uh-1h
- performance
- (and 1 more)
-
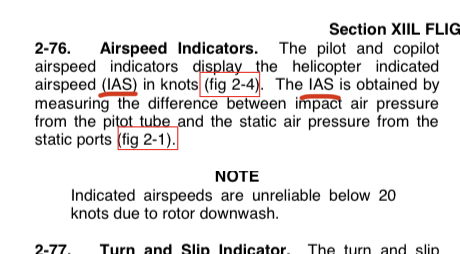
The airspeed indicator is in indicated airspeed. The roof mounted pitot tube doesn’t matter. The true airspeed column is there for the e purposes of filing flight plans, but the aircraft flew indicated airspeed, this is why I used and referenced indicated airspeed. I work off the references I can find and that meet the forum rules for posting. I did 7500lbs because to get to 9500lbs I needed to have the pylon mounts and weapons. To ensure the conditions matched the chart, I went to the closest GWT I could and met the cruise chart configuration assumptions. If you’re going to do an accurate test, you need similar conditions/configurations which is what I did because the baseline configuration is the slick configuration.
-
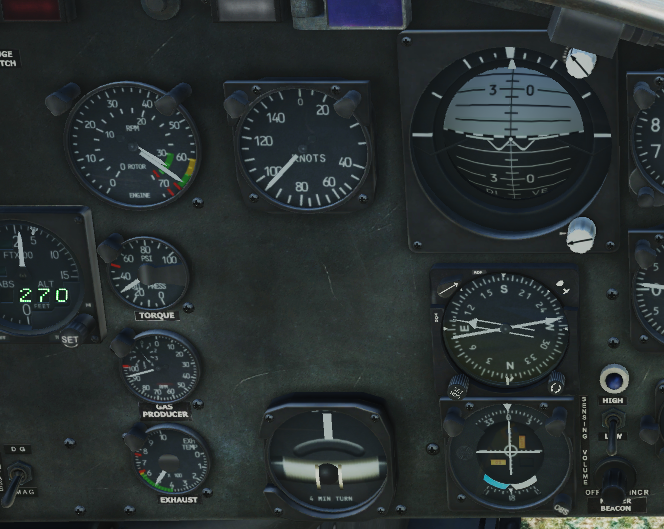
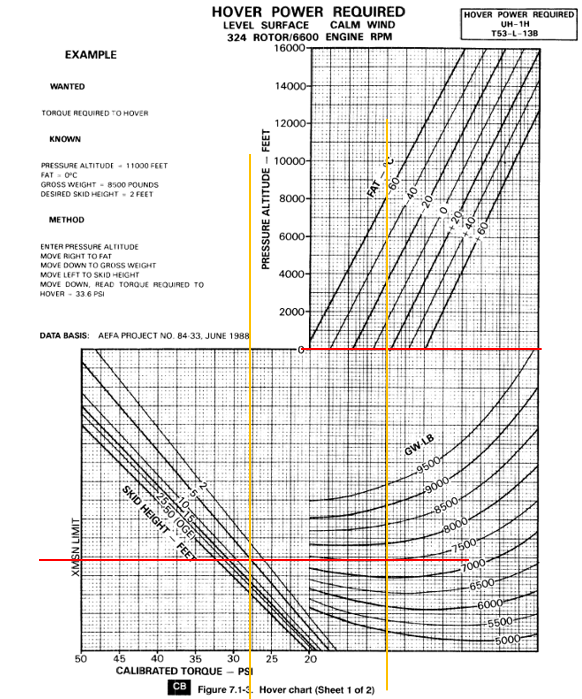
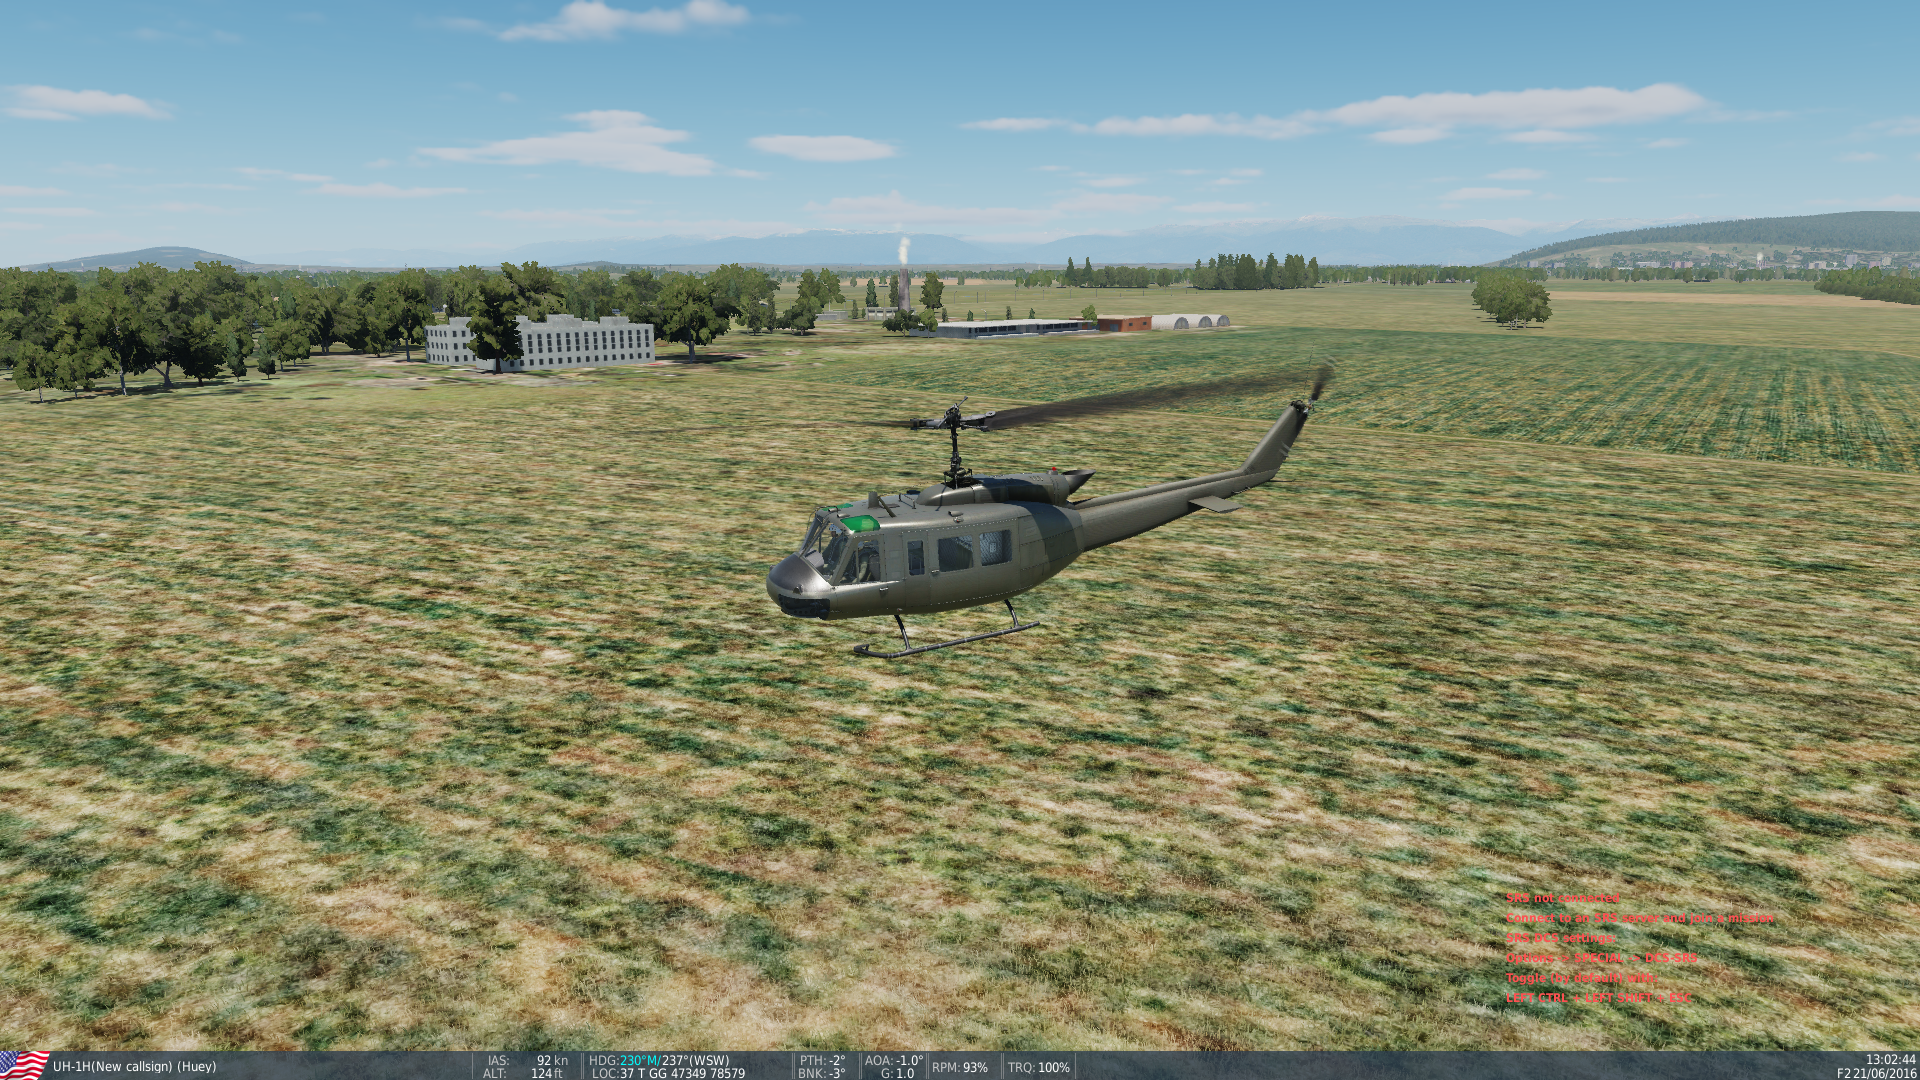
I would like to respectfully rebut the above. For reference, exhibit A, it is dated 1988, but is distrobution A. The below screen grab is from page 37 of this PDF: https://www.uh1ops.com/_files/ugd/9f78cd_60998a9ed26b4cbe8a65351e9cc076e9.pdf Using the correct Chapter 7 for CB (as was referenced in the original posters post) I took the charts and based on 7500lbs, "slick" (i.e. no hardpoints): 15 degrees celsiuus, Sea Level 5 foot hover torque of 25.5 psi 100KTAS (96kts IAS) torque of 25psi I then set this same configuration up in DCS and flew it. At 5 foot in DCS I found the helicopter to hover at appx 25.5 PSI, which is pretty dead accurate with what I calculated. I then accelerated until to 100kts, and noted i was pulling about 30 psi of torque. I reduced torque until I got to around 25.5 psi and found I was at about 94 knots. I'm pretty sure the airspeed guage is indicated airspeed, so that puts me within 0.5 psi of torque and 2 knots of airspeed from the reference. This would also be really, really close to reality as well, enough so that I could safely say your assertion is way, way off. The primary error that led to the entirety of the discussion being invalid is that the primary refrence was the airspeed operating limits chart out of chapter 5, which is the Vne chart for the helicopter. It tells you the fastest you're allowed to go for the input conditions. This is why there isn't a torque associated with it. The shaft horespower equation, which good for approximating things, doesn't take into account all the various other factors that effect performance of the aircraft, so i'd be careful in it's use. It can definitely get you in the ballpark, but it's typically off by a fair amount. Attached are the various supporting screen shots and chart references to support my statements above. My first image is the Distrobution Statement from the reference doc. The next is the hover chart for a composite blade helicopter. Next is the torque value from DCS at 5-foot. Next is the cruise chart for SL and 15 degrees C followed by the cruise torque and airspeed in level flight. Finally I provided a picture of my configuration.
- 46 replies
-
- 5
-
-
-
- uh-1h
- performance
- (and 1 more)
-
How to see locked targets on the helmet mounted sight?
bradmick replied to Galwran's topic in DCS: AH-64D
This is why good front seaters operate the tads with it slaves to GHS…so they are heads out and spatially aware of where to look “outside”…because they’ve already “caged” there brain to “ look over your left shoulder”. Bad front seaters try and do everything with the tads alone. They also tend to get violently ill too (in the real bird anyway), because they never align their heads with the aircraft’s direction of travel. This is why the hdu video is super important….but most folks would rather turn that off…which is dumb. -
How to see locked targets on the helmet mounted sight?
bradmick replied to Galwran's topic in DCS: AH-64D
The heading to where the tads is looking is represented by the /\ (open chevron) icon on the heading tape. You know at all times where it's looking, not only that, but you also have the sensor bearing on the TSD. If you need to look 'where the cursor is positioned' go POINT > STO and cursor select the map on the TSD, make that point your acquisition source, and voila, you're done. We've given you several options. Go practice with them, figure out which works. Every aircraft is pretty nuanced in how it operates, it's about learning those nuances and establishing a workflow that works best for you. Cool thing is, there's usually 2 to 3 ways to accomplish a singular task in the aircraft. Addendum: A good pilot will *always* have the TADS as their acquisition source so all they have to due is fly the helicopter to the cued LOS reticle. The cueing dots around the LOS will tell the pilot which direction to steer. ALL the SA tools are there. Not sure where the issue lies here. -
How to see locked targets on the helmet mounted sight?
bradmick replied to Galwran's topic in DCS: AH-64D
Store the target, make the target your acquisition source. Now your cued LOS reticle is the point.