MacThai_75
-
Posts
174 -
Joined
-
Last visited
Content Type
Profiles
Forums
Events
Everything posted by MacThai_75
-
I was going to post this in the the general discussion section, but although I certainly 'am' interested in any changes it may have made to DCS, I'm more interested in if the new Win 10 Anniversary update has impacted DCS VR in any way, as well. I forced the update on my non-gaming PC (Settings - Updates and Security- check for updates) and other than it having an issue with my Gadgets (it automatically notified me that it needed to do a repair, and asked if I want to to have Win repair it ... which it did with no problems) it appears to be working just fine on this PC. So ... has anyone done the Anniversary update (either forced or via the roll-out) on their gaming PC? If so ... any negative issues, or positive benefits with DCS VR? :)
-
I don't doubt that you have problems, but your situation fortunately doesn't automatically happen at age 40 to 'most' people like you indicate it will. As far as "unhealthy hardware race going on in the community", shouldn't that opinion have you using an etch-a-sketch and drawing birdies flying about, as opposed to sim flying some seriously unhealthy death dealing combat aircraft on a sinister modern PC system? Your argument seems a little "fox that cut it's tail off" ... and a bit 'everyone should stop at my level of technology' hypocritical to me ...
-
I'm 65 and although I normally use reading glasses, I have no problems using the CV1 with no glasses at all. 2D simulation is dying fast, and is almost completely obsolete. Although the press dubbed 2016 the year of VR, it is admittedly just a bit premature to say that, but it is the very near future of all simulation, and the difference between an old Atri game and current flight and racing sims, but now in 3D with real life tracking! :)
-
.. and no need to use very significant funds, time and skill to build a scale cockpit for only one single aircraft or one single vehicle, that takes up a lot of space in your home. That 'no longer needed aspect' alone will compensate for needing to buy newer headsets as they become come available, making our current batch obsolete. And the same for the upgrades to your PC when required, as well as leave enough coin to pay for a cool hydraulic enabled, 6Dof motion seats that can be used for multi types of VR aircraft and vehicles ... with probably even enough left over for a Big Mac! ;) The cool thing 'will be' an altered/merged reality 4K headset that allows you to hit a MOM button on your throttle/etc. to see the keyboard in the headset , and/or just use an improved LeapMotion type device integration, making the keyboard a moot point altogether.
-
Only when flying X-plane, which I sincerely wish had a VR plug-in for it. :( But even 'if' ... it's certainly no DCS! ;)
-
I agree, the Orion update really improved my LeapMotion too. Also, the calibration is really important to get it to track/work well. Since I'm using the CV1, my monitor is my 90" Sharp flat screen TV, so trying to use it to do the calibration was pretty much hopeless. So to get a good calibration (above 90 needed with Orion) I just used a large mirror (as LM suggests) and that made a 'big' difference in how well it works in FSX. If it can ... and ever does get effectively integrated with DCS it would 'very' helpful. But it seems that if looking to see which will fill faster by "hoping in one hand and ..." well ... you know the rest. ;)
-

Can we please get a fix for F10 view in VR
MacThai_75 replied to Jabbers_'s topic in Virtual Reality
I'll join in the list of BFFs too! :) (I was going to say "in the Rolodex of friends", but that would have exposed me as having a born-on date that's ... expired) :( -
Yeah, not for DCS yet/ever, but it has been improving for FSX/P3D and etc. with it's updates. But IMHO: still only slightly less cumbersome than using a mouse when wearing VR. I got my LM for $20 delivered, and feel it was worth the investment to be dragged along with its update/upgrades, towards a time when this technology will be perfected and fully integrated in VR/AR/MR.
-
Forget Oculus Rift. Introducing Intel Project Alloy..
MacThai_75 replied to 5e EVC Chappy's topic in Virtual Reality
Oops ... I meant I'm looking forward to Magic Leap ...but I'm also watching Intel's product too, hence my brain fart typo. :juggle: [ame] [/ame] [ame] [/ame] -
^^^^ Bravo for that nescafe! :thumbup: :thumbup: :thumbup: IMHO: That's really what's needed. Somebody that has one and can let TD do a 'real' test with the sim he wants to use it with. Good for you for making the offer!! :clap_2: :clap_2: :)
-
Forget Oculus Rift. Introducing Intel Project Alloy..
MacThai_75 replied to 5e EVC Chappy's topic in Virtual Reality
looks like a Sony Project Morpheus version of the CV1/Vive with a somewhat advanced ~$20 (on sale) LeapMotion ... but much more coin if it appears at the projected price. For the time being I'll use the CV1, and I'm kinda liking Intel's Altered Reality (that they call Merged Reality) device. The good thing is that we are on the apron of some big things to come, and IMHO ... it's all good! :) -
Well, at the price difference between a decent tracking headset setup and the Cv1, I agree you should try it first. I have to think that the negative trade-offs that are inherant in VR versus monitors (like awkward mouse and keyboard use, God rays, and etc) might make the positive aspects that normally, and (to me) significantly outweigh those negatives, a moot point if you can't get the 3D factor. But once gain, I do strongly agree with Rico, that the only true way to know for your particular situation is to make every attempt to try it first in an environment that allows you some time with it, to see how it will or will not work for you.
-
I'm keeping my eye on development of 3D printers that use sintered metal. But for the time being ... you still need to machine the finished product for any precision fit and finish. The most used/useful machining tool I have is the mill. It's fairly easy to do set-ups by using a machinist vice to hold the work piece, and a good quality keyless chuck instead of collets, and with a tilting rotary table, it does a lot that can duplicate a lathe, if not needing max accuracy. BTW: a decent X/Y cross slide mill vice for a good quality drill press, can work as a mill, and with some tooling and imagination ... also as a vertical lathe for small pieces by holding the work piece in the press' chuck and using the cross slide to hold the cutting tool. See: https://www.amazon.com/Cross-Slide-Drill-Milling-Machine/dp/B00L5RZ6MO/ref=sr_1_3?ie=UTF8&qid=1470590372&sr=8-3&keywords=cross+slide+milling+vise Before I got my lathe and mill, I used that method to machine many different things including lower receivers for AR15s. The combo machines are a bit of a hassle to use, because the real work in machining is doing the set-up to do the job, and the system to hold the work piece. For most hobbyist stuff I would recommend a high speed (up to 2K+ RPM) 7X14" lathe from many different sources, like this one: https://www.amazon.com/Precision-Milling-Infinite-Variable-2500RPM/dp/B00TXW5DKI/ref=sr_1_18?ie=UTF8&qid=1470591813&sr=8-18-spons&keywords=Bench+top+mini-+mill&psc=1 And a separate bench top mill-drill with a rectangle/square tube column like this: https://www.amazon.com/PM-25MV-Milling-Machine-With-Stand/dp/B019JB7XDM/ref=sr_1_3?ie=UTF8&qid=1470591632&sr=8-3&keywords=Bench+top+mini-+mill Both for at, or even less coin than an equal quality combo, but much more versatile, and a lot easier to work with. :)
-
Yeah, the lathe and mill are the high lights of it , but i also have a plasma cutter, bead blasting cabinet, a wire feed mig/tig and stick welder, and a few other metal working tools. I'm up in the California Sierras, just outside the south entrance to Yosemite NP, and if I need something for either an emergency, or something that just isn't commercially available, I can typically make it ... but more times than not, if it's not an emergency, or something not simple, it's really just easier, faster ... and many times even cheaper ... to just buy it. But having the option is nice. :) Here's a shot of the mill and lathe ...

-
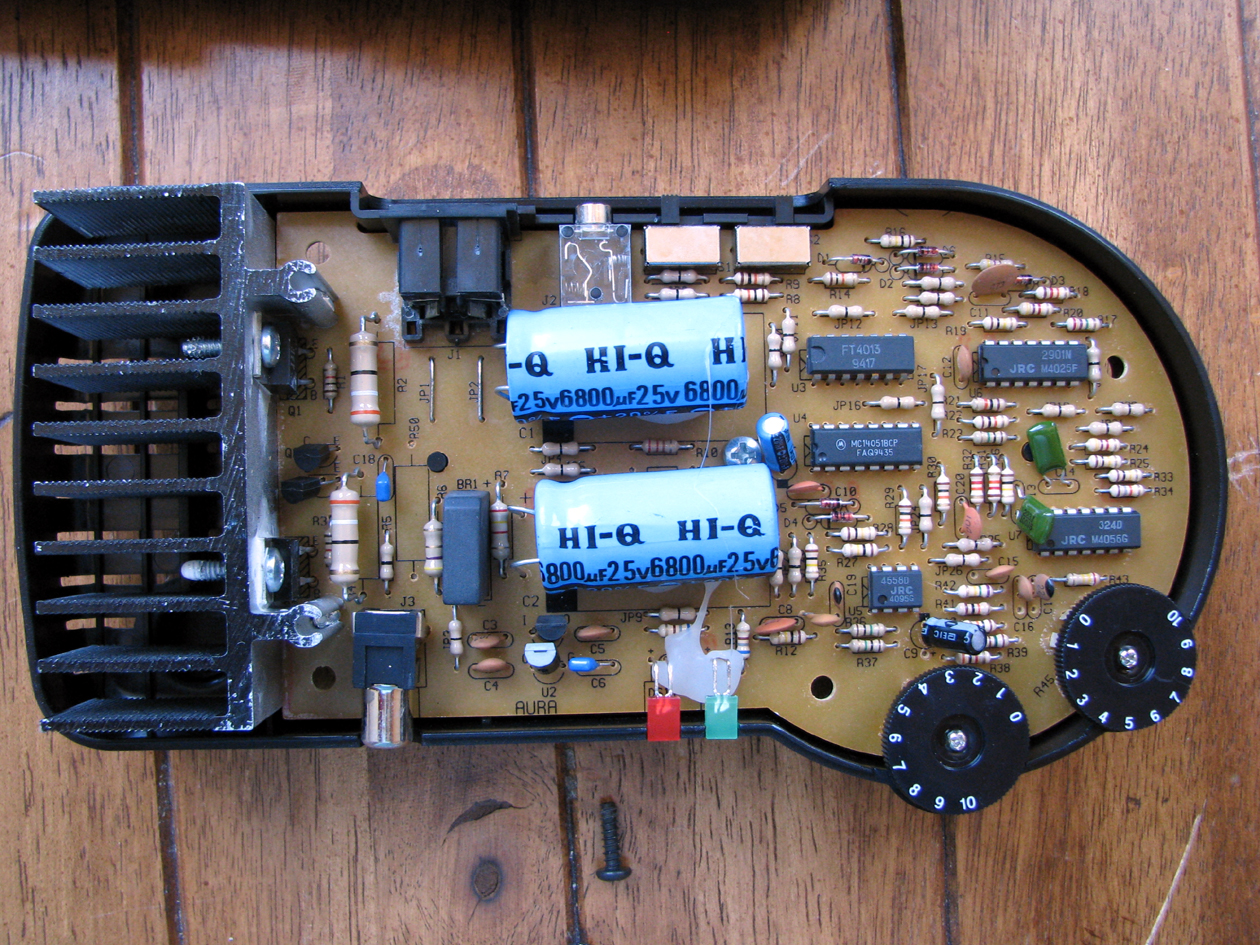
BTW: Here's a shot of the Aura Interactor's controler/Amp's insides. It uses a TIP41B NPN, and a TIP42B PNP for amplification. So the amp operates push pull, and that provides the punch to the transducer. They can be seen mounted against the substantial heat sink at the left of the photo below.
-
I just ordered 1 of these on Amazon for under $15 delivered. It can be worn as either a back pack or front mounted, but since I already have two ButtKickers in my dual purpose (flight and racing) VR cockpit mounted under the seat and under the pedals (see the "Maybe a new Sub Forum Thread???" thread here http://forums.eagle.ru/showpost.php?p=2866602&postcount=9 ) and after reading about SimVibe's ability to direct and adjust individule LFE channels to specific locations in a sim cockpit depending on transducer placement, I decided to order one of the Aura Interactors to check it out as a possible for gutting, and using it to enhance my VR cockpit's directional tactile feedback. This is a link to the SimVibe software site. http://simxperience.com/en-us/products/simvibe/simvibesoftware.aspx My intent is to exploit SimVibe's directed signals to better mimic tactile sensation to specific areas of my dual purpose VR cockpit. I got the Aura Interactor today, and proceeded to give it a try in back pack mode ... and was impressed with what it can do @ $15! Then I proceeded to tear it apart to see what it had inside. :) It's a robust tactile transducer, that measures ~3.7 dc ohms, so most assuredly a 4 ohm impedance device. I know I can get transducers for just a bit more than the Aura Interactor, but it comes with it's own interface controls, amplifier, admittedly 'dated' adapters, and power supply. All I needed to do was wire it up to tap into the LFE channel of my sound system (I simply used a phono to RCA Y adapter). This is two pic's of what the transducer looks like. I ordered 3 more and will move my two ButtKicker LFEs to under the seat, placed as wide apart as possible, then add two of the Aura Interactor transducers under the pedals, also as wide apart as possible, and two inside my cockpit's seat back. If interested in giving these a try at $15, here's the Amazon link... https://www.amazon.com/gp/product/B00004UA1I/ref=ox_sc_act_title_1?ie=UTF8&psc=1&smid=AQFCLL3K97KGV If out of stock (they had 6 left after my last purchase) they are also for sale on eBay starting at under $25 delivered. http://www.ebay.com/sch/i.html?_from=R40&_trksid=p2050601.m570.l1313.TR1.TRC0.A0.H0.X.TRS1&_nkw=Aura+Interactor&_sacat=0
-
That looks very interesting! I can see exactly what you mean by it providing the feedback force and increased fine control needed for the helis. I have a machine shop in my garage (I'm going to make up my own cyclic/throttle stalk) but your post got the juices are flowing. :) Yup, the TM WH JS does come stock with a bit more twist to it than I liked too. So after I mounted mine on the 4" ABS cap, when I set that assembly on the two 4" ABS pipe stubs, I set it at the angles that I felt were most comfortable for both center, and then for the right side mounting, then drilled the holes and tapped them for the knobs that hold the "cap modified JS" assemblies to the two stubs, setting custom angles for each position. Thanks for the suggestion on the stick extension! :) When I make up my cyclic/throttle I'll also make up an extension like you have, and a shorter center 4" stub to get the proper height for the JS when in heli mode. I'll have to remove the steering wheel to comp for the extra movement, but that's just twisting off the back ring and it pops right off on the TM 300RS wheel ... so still "no tools needed to convert". :) Good Stuff!! :)
-
Thanks emolina! It's really fortunate that the the Thrustmaster Joystick and Shifter are so easy to mount to the 4" ABS sewer components. The 4" ABS stuff is the perfect size for them, and that's the key to make swapping the different mounting positions a possibility, without having the need for a lot of specialized tools to fabricate that up... nor does it take lot of skill to make it all! ;) For a both a dual purpose VR cockpit, that can so easily be converted from racing to flight, and then to also have an easy means to go from a center, to right side mounted joystick ... the 4" ABS sewer pipe and caps make it doable for anyone, or any VR cockpit build. I'm going to get another TM joystick, and then remove/reverse the 4 springs for helicopter flight (as many have advised for better heli control) and mount it to another 4" cap so I can swap it into my VR CP. :)
-
This is the evolution of my cockpit which started life as a OpenWheeler racing CP that I got off eBay for $300 delivered. This is what it looked like when I first assembled it with a G29 wheel/pedal set. Then I got all Thrustmaster gear, built the PC in my sig, and added a swivel base to the seat, installed 4" casters to the front and back sections, installed two ButtKickers, built the side cabinets, added the center JS mounting system, and made the chair base so I could swivel the seat. The entire seat section unplugs (mechanically and electrically) and separates from the pedal section, for easy moving and storage. These first pictures are before I finished up the internal wiring for the controls (see later pix below). This is with the seat in racing mode ... with the seat slid all the way forward. The racing pedals are in "F1 racing position" and the flight pedals are well clear and below the seated person's legs. The center mounted joystick and it's mount are removed ... This is a shot in flight mode with the seat slid all the way back to allow proper use of the flight pedals and with the joystick in the center position ... Here's a shot of the seat swiveled in flight mode,with the center mounted JS ... This is still swiveled, but with the JS mounted on the right cabinet ... Here's a shot showing the moved TM throttle USB cable. It goes down through the hole I made in the metal base, and into the left side cabinet, then over to the powered USB hub in the right cabinet ... Here is a shot of using the left side cabinet (with it's door removed) for storing the gear shift when in flight mode in an AC that uses a right side JS (like the F16 etc) ... Here is the TM shifter mounted on an ABS 4" sewer pipe cap. I just removed the TM base, and then made the needed holes in the ABS cap to be able to mount the shifter to the cap. TM shifter on 4" sewer cap detail ... Here's the JS mounted on the right cabinet for AC that use a right mounted JS... I just mounted a piece of 4" ABS sewer pipe into the top of the right cabinet, and then drilled through it with a 4" ABS sewer cap on it. Then I tapped threads into the pipe stub holes, and made the holes in the cap just slightly larger so I could use two thumb knobs to secure the assembled JS onto the stub, with the cable for the JS passing down into the right side cabinet, and getting plugged into the USB hub ... Here's a shot of the short pipe section I made form 4" ABS sewer pipe and a cap to mount the JS in the center position. This is mounted to a plate that extends under the seat and is removed by a knob inside the bottom of the tube ... This shows the knob that is used to secure or remove the center JS mount without the need for tools ... Here's a shot of the right side cabinet with the door off, showing the powered USB 3.0 Hub and the 4" ABS sewer pipe stub that mounts either the TM stick shifter or the TM WH JS ... This is the rear under seat mounted ButtKicker LFE transducer ... A shot of the front under pedal mounted ButtKicker LFE transducer. These transducers have a 300W RMS amp for each one ... And a shot of the wheeled keyboard, mouse and CV1 VR sensor rack. I just hacked up a cheap keyboard rack I got off Amazon, and added a small drawer to hold the extra 'stuff" like the CV1 remote and etc. The side cabinets were built to look sort'a "avionic like" ... and I mounted them on rails that go over the sliding seat rails, with some fairly hefty metal cross stringers, they slide back and forth with the seat, and I can also place my full weight on them. So by putting my right or left hand on the back section of either cabinet tops, I can easily check my 6. ;) The mounting holes in the 4" ABS sewer cap for the JS are drilled front to back. Once I had drilled the ones for the center mount, I used the holes in the cap to mark the proper place to drill the right side cabinet's 4" ABS stub (also front to back) so I could drill and tap them for a tight no slop fit. That left me with a bit of a quandary when drilling the holes in the 4" ABS cap that I was using to mount the shifter to, because I had no way that I could see to reliably mark the holes from the inside (using the threaded holes for the JS in the cabinet stub) for drilling the holes in the shifter's ABS cap. So I simply drilled the shifter cap and the cabinet stub side to side, and that made it easy. The ABS caps originally fit too tightly on the sections of 4" ABS sewer pipe, so I had to sand the section that the caps fit over, to get them to be snug, but not so tight that is made swapping the JS and shifter out. All the 'front to back cabling' is routed through inside the section of telescoping square metal tubing that connects the front wheel/pedal section to the rear seat section, and the cabling has plug-in connectors under the seat section by the rear seat ButtKicker. The base plate for the Pro Combat pedals has Teflon furniture sliders mounted under it, so its easy to make minor placement adjustments of the entire CP once it's in place. I still have some wiring clean up I need to accomplish in the pedal area, and I need to make up a bulkhead panel in the right side cabinet front end, for the keyboard/mouse/sensor cables to plug into .... for a cleaner set up. Parting shot .... Oooooh, nightglow! ;)
-
Very nice work emolina, and well executed! :) A perfect dual purpose VR cockpit! I did a very similar thing with my dual purpose VR cockpit, and removed the weighted base plate for the TM WH throttle, dropped the cable down through a hole I made in the primary base, and mounted it on a small cabinet. On my TM JS I removed the base and made up a mount that allows me to move the JS from the center position to the right side, to mimic different AC. I'll get some pics of my dual purpose VR-CP posted that show how I made it work without the need for any tools, and that demo going from center JS to right side JS, and from flight to racing, by simply sliding the seat back and forth (as in any car) and re-positioning the wheeled keyboard/mouse rack. In other news ... Guys ... I took the liberty of changing the title to my initial post and if it's felt I have gone astray of the VR topic, or made this a thread that is supposed to be in the regular cockpit sub-forum, then I'll understand if it gets moved. Personally, and as indicated ... I think it's significantly more VR related than what the main fare in the CP sub-forum is, and primarily belongs in it's own sub-forum ... or at least here in the VR forum, but I sincerely don't want to step on anyone's toes. :)
-
Thanks emolina, I was starting to think I may have left an uninvited object in the punch bowl. :pain: It becomes even more of a different thing if you also use your flying VR cockpit as a dual purpose cockpit ... like for both flight and racing. That said, my idea :idea: seems to be not all that too well received. So .... :pilotfly: ;)
-
Congrats on CV1! Since you already got great answers to your question, I'll add to the mix here and say that when doing the lens spacing adjusting, play around with the actual placement of the CV1 on your face while doing the spacing adjustment. Getting the sweet spot on it's positioning is really important, and will help a lot when doing the lens spacing routine, as well a make a huge difference in the image quality, and will provide a larger FOV that has a quality image as well. It won't actually increase the FOV, but it will make the images look better over a larger area ... if that makes sense. Just kick back and experiment a bit making slight lens spacing adjustments and face placements to get the sweet spot for you. You'll find that once learned, it really becomes second nature to automatically place the CV1 at that sweet spot when putting it on. Also, be sure that when making lens spacing adjustments that you push the little knob up (as per instructions) and don't just slide it. Sliding it without pushing the knob up will apparently wear on the detents.
-
Yeah, all 'real' fighters currently in service need to be retrofitted with Voice Attack! ;)
-
Being fairly new here (and consequently "who the heck am I to start suggesting stuff") I'm a bit timid about posting/suggesting this. But when I go to the Cockpit section of these sub forums to look at how people have used clever methods to build their VR cockpits, or when I consider posting about a cockpit build that's for VR ... it just seems totally out of place amoungst the works of art seen on the CP sub-forum, while at the same time it's maybe also not considered completely 'on topic' in the VR sub-forum (because of the fact that there already is a forum for cockpits). :) IMHO: A VR cockpit really has little relationship with the full scale replica CPs of any aircraft, and is sorta like hanging an iPhone snapshot next to a Van Gogh. They're just a different beasts altogether. Also, I kinda get the feeling that after all the excellent and hard work that the replica guys do, it's possibly inviting a bit of discontent to start discussing the features/benefits of a VR cockpit, as it can easily look as being somewhat provocative to guys that spent a lot of time, hard work, and money on their replica builds, if only because of the unemotional attributes of the written word making it seem so. So, I'm suggesting that (preferably) there be a new sub-forum for the discussion for VR cockpits, or at least the allowed and encouraged discussion of them here, with the official description of the VR sub-forum mentioning that inclusion. Once again, IMHO: A VR cockpit fits in it's own sub-forum ... or at least in the VR sub-forum's discussions, much better than in the current overwhelmingly replica oriented cockpit sub-forum.
-
Well if making a wish .... I'd add tactile feedback gloves that work like LeapMotion (but much better) and provide the sensation of turning knobs/flipping switches/and basically grabbing things. Or better yet ... entire tactile body glove ... but then I might get distracted on the Porn sites and never cyber-fly again. :doh: