Leaderboard

Popular Content
Showing content with the highest reputation on 01/12/09 in all areas
-
ModMan 7 is available and introduce the possibility to add a new skin slot automatically ! the easy way (aka user friendly) to add new skin slot is now available for users Skin artist you have only two things to do 1- making(use ED tools) the .CDDS file and packing it in the modman ZIP package 2- Making a skin.lma7 text file and packing it in the modman package To pack it, you must use the new button in the Mod Maker windows asking you for a skin.lma7 file ONLY ONE skin in a ZIP/RAR file Here is a skin.lma7 example (same as included in the skin sample) [skin] file = Bazar\World\Shapes\KA-50.skins argument = 70 otherfile1 = Bazar\World\Shapes\KA-50-BLADE.skins otherfile2 = Bazar\World\Shapes\KA-50-NOSE.skins otherfile3 = Bazar\World\Shapes\KA-50-TAIL.skins otherfile4 = Bazar\World\Shapes\KA-50-WING-L.skins otherfile5 = Bazar\World\Shapes\KA-50-WING-R.skins l1 = material = {"KA-50-lamp", "Standart", "KA-50-PAINT24-DEF-02.bmp"}; l2 = material = {"KA-50-PAINT1", "Standart", "KA-50-PAINT24-DEF-01.bmp"}; l3 = material = {"KA-50-PAINT1_M", "Standart", "KA-50-PAINT24-DEF-01.bmp"}; l4 = material = {"KA-50-PAINT2", "Standart", "KA-50-PAINT24-DEF-02.bmp"}; l5 = material = {"KA-50-PAINT3", "Standart", "KA-50-PAINT2-DEF-03.bmp"}; l6 = material = {"KA-50-PAINT4", "Standart", "KA-50-PAINT24-DEF-04.bmp"}; l7 = material = {"KA-50-PAINT5", "Standart", "KA-50-PAINT24-DEF-05.bmp"}; l8 = material = {"KA-50-PAINT6", "Standart", "KA-50-PAINT24-DEF-06.bmp"}; l9 = material = {"KA-50-Vtulka_met", "Standart", "KA-50-PAINT24-DEF-02.bmp"}; l10 = material = {"SOPLA_KA-50-PAINT3", "Standart", "KA-50-PAINT2-DEF-03.bmp"}; l11 = material = {"KA-50-gear-rubber", "Standart", "KA-50-PAINT24-DEF-05.bmp"}; l12 = material = {"KA-50_ST-rm_paint1", "Standart", "Ka-50_St_Paint2.bmp"}; l13 = material = {"KA-50_Lifting_rotor_mast", "Standart", "KA-50-LRM-24.bmp"}; l14 = material = {"KA-50_LRM_Part", "Standart", "KA-50-LRMpart-24.bmp"}; l15 = material = {"KA-50_LRM-CENTRE", "Standart", "KA-50-LRM_centre-24.bmp"}; l16 = material = {"KA-50-LRM_B", "Standart", "KA-50-LRM_B-24.bmp"}; l17 = material = {"KA-50_BORT_NUMBERs", "Standart", "empty.tga"}; l18 = material = {"KA-50_Turkey_Numbers", "Standart", "TactNumbers-USAF-black.tga"}; [color_scheme] country = {B2A43A73-E650-49B0-98B9-F67A53DA95FD} cnt_unit = {3457BB1E-523F-4C24-BBEA-58D028623F05} color_scheme = {3448843E-09C4-4DF3-8A7A-2707AE267519} color_name = ModMan7 test sample - Digital camo file = Scripts\Database\helicopters\Ka-50.lua file is the path to the main aircraft .skins file Argument is a key identifying skin list in a .skins file (ie : Ka-50.skins file) otherfile# (# is number) is the path to the alternate .skins file used for aircraft damage. country and cnt_unit are key identifying some sections in db_countries.lua file color_scheme is a key you must generate for each skin you create. color_name is a a name you give to your skin note that it's working also for other planes and helicopters ! just set the 'file = ' values (and others useful values) a GUID key generator is available in the modman Option window but you can use any GUID key generator utility. !!!! the KEY GENERATOR IS NOT WORKING AT ALL on some PC !!! so use this ONLINE key generator: http://www.somacon.com/p113.php this key is used for this line in skin.lma7 file : color_scheme = {3448843E-09C4-4DF3-8A7A-2707AE267519} (replace with you own GUID key) each skin must have an UNIQUE GUID key, so you MUST generate your own GUID key ModMan will add automatically the skin entries in the .cfg .skins and .lua files (and will remove it during uninstall) ModMan will also calculate the skin index automatically for users, you will have only to install or uninstall the skin mod You can now add all the upcoming skins from artists as new skin slot (if they package it in the good way) Don't install anymore skin mods overwriting ie: ka-50.skins, ka-50.lua , db_countries.lua and config.lua and so on. Wait for a an updated package using SKIN.LMA7 feature package. (you may contact your beloved skin artist) you can download ModMan 7.1.1.0 here http://www.checksix-fr.com/bibliotheque/index.php?Fichier=5767 7.1.1.0 ------- - When adding a Ka-50 skin, entries from skin.lma7 will be also added automatically to the KA-50 *.skins damage file for other aircraft you need to specify the filelist in skin.lma7 file (see DCS_new_skin_slot.doc documentation) - DCS_new_skin_slot.doc documentation updated 7.1.0.9 (hotfix) ------- - When adding a skin with index number even (ie: 2.0, 3.0) , the skin will be now added properly 7.1.0.8 (hotfix) ------- - Fix an obvious bug in file management system about some hang during mod scan/install process (ie: for 'A-10-1.0.zip' lockon mod from simmod) you can download ModMan7 skin sample here (it's a VikVaughan's skin) http://www.checksix-fr.com/files/modman/ModMan7_skin_sample.zip Others ModMan7 skins compliant with new format Italian Army by Ciniko http://www.checksix-fr.com/files/modman/ModMan7_Ka-50_Italian_army.zip download mirrors are allowed, don't ask for ;) best regards Skypat ps: this is working only for DCS products, not for lockon2 points
-
Hi all, no it's not a Fighter Pilot:Operation Red Flag but a completely new Discovery Channel documentary on Red Flag. Check it on Youtube, comes in 8 parts: http://www.youtube.com/results?search_query=Red+Flag+thunder+at+Nellis+Discovery&search_type=&aq=f2 points
-
Vet sim pilot here as well, when I got this simulation I was 100% satisfied. Maybe there is a new generation of sim expectations floating around on this board (complaints of only 25FPS), but I never expected the trees to be collidable. I tend to hide behind hills and buildings for my missions and never once though of ducking it behind a few Pines. Reality or not. But for a few bucks, there are a handfull of those who want the entire world simulated, regardless of CPU resources, memory limitations and last but not least, software development time and costs. They want the FPS friendly simulation with thousands of solid trees, Line of Sight computation and Coolidability without any performance hit. Seen this for decades. You want collidable trees, but then people will complain about 10 FPS and wandering why they can't place units in forrests. Or not being able to designate targets between two trees because there's an invisible collider box blocking the laser. Or complaining why player helicopters collide with trees but AI doesn't and asking for collision detection for every object in the game to level the playing field. Or the guy colliding through trees he didn't see, because his graphic settings are tuned down. I've seen complaints of people not being able to land on water and trains. I've had the "simulation sickness' before, where you don't want ANYTHING to spoil your feeling of "really being there". But truth be told, you're not there, it's a simulation made for entertainment and curiosity. That's why this industry is so small, to simulate something, you have to simulate it ALL and sacrifice NOTHING. It's an addicitive sickness, and I've found that in order to truly enjoy a piece of affordable, repeat..affordable, software, you have to be willing to let go of the desire to check for every rivet to be in the "right" place, EVERYTHING to work just like in real life. Come on..relax a bit and have some fun for once. God bless the developers for making this available to civilians like us and responding so professionally. P.S. in regards to the "new Engine", I wouldn't wait for anything else anymore, I would enjoy what you have..which is an exceptional peice of software.2 points
-
Instead of having a bunch of threads for my little cockpit build I though I'd make a combined one to post updates in etc Here are the two previous threads: http://forums.eagle.ru/showthread.php?t=32054 http://forums.eagle.ru/showthread.php?t=32392 Update: I've been working on the targeting panel and the collective head during Christmas, both are now fully functional. The collective plate + thumbjoy etc will be painted black (or maybe I should just let the bare aluminum show and just paint the plate). I use the analog thumbjoy to slew the Skvhal sensor, makes it much easier to be precise with the senor. Below are some pictures of the collective head and the targeting panel + links to some youtube videos. Some new vids on the targeting panel and the collective head. /Oakes1 point
-
Hello ladies and gents, I have added all default keyboard shortcuts to the cockpit tooltips. The file can be found here. Since a lot of people might skip the readme file in there, I am posting it here too. Enjoy! WARNING: This was only tested with the English release of DCS: BS, version 1.0, with the option COCKPIT LANGUAGE set to English. I cannot guarantee it will work with the Russian release, or that it will work with the English release with COCKPIT LANGUAGE set to Russian. OVERVIEW ------------------------------------------------------------------- This readme is organized in the following fashion: - INTRODUCTION - HOW TO MODIFY TOOLTIPS YOURSELF - EXISTING ISSUES - INSTALLATION INSTRUCTIONS - CONTACT INTRODUCTION ------------------------------------------------------------------- Hello and welcome to the world of tooltips! The files in this download were created to add the default keyboard shortcuts to the in-cockpit tooltips that DCS: Black Shark is capable of showing. The reason I decided to do this was simple. I do not own a HOTAS setup (or at least, not yet), and am therefore forced to either use the mouse to click through the cockpit, which I like quite a bit, or to use keyboard shortcuts. For the vast majority of the time I spend in the cockpit, I use my mouse pointer to click on things, but I find that sometimes, especially in the heat of battle, I do not have the time to look around for a switch, never mind move the pointer over it and click it. For these moments, I wanted to learn some of the existing keyboard commands. In reading through the DCS: Black Shark forums (http://forums.eagle.ru/forumdisplay.php?f=72) I bumped onto a message where someone suggested it would be great if keyboard shortcuts were added to tooltips, so i set out to see if it was possible, and the rest is, as they say, history. Here we are. When I polled the members at that forum to see if anyone else would be interested, I got some very positive feedback, and so decided to make this public. At the same time, though, some people brought up really good points and ideas. One of the good points was basically "Well, if the tooltip only shows when your mouse button is over a switch or knob, then what good would this be? Just click on it already!". That's very very true. The intention of this package is not to move your cursor over a switch, read the keyboard shortcut, then use that. It is to help memorize what that shortcut is, so that after several usages of the same switch, by seeing the key combo repeatedly, you will recall it from memory. So, I guess you could see this as a study guide. HOW TO MODIFY TOOLTIPS YOURSELF ------------------------------------------------------------------- I do not intend for this to be a closed effort, and welcome help and questions at any time. I am also showing everyone how they can customize their own tooltips for the benefit of the community. Black Shark itself has a very open architecture, and so in that same spirit, here's how to do this editing. All cockpit tooltips live in a file called clickabledata.lua. This is a text file, written in the lua scripting language (http://www.lua.org). If you are not familiar with editing lua files you should proceed with caution. Information and tips on editing lua files can be found on the above referenced forum in threads such as this: http://forums.eagle.ru/showthread.php?t=35627&highlight=editing+lua First things first: Make a backup of your original file. Copy it to anywhere in your computer you will remember, or keep it in the same directory under a different name. Either way, you need a backup copy because it is not hard to change things by accident and break some or all functionality of DCS: Black Shark. I use Notepad++ to edit them, as the default Windows Notepad will corrupt such files when saving them. Using a proper text editor program, open up clickabledata.lua, which is located at ....\Eagle Dynamics\Ka-50\Scripts\Aircrafts\Ka-50\Cockpit. The first 13 lines or so are default information. The data we are interested in starts at around line 15. In my file, lines 14 and 15 are: -------------------------------------------------------------------------------- -- CPT MECH This is a section header used to organize this lua file into chunks. Each tooltip is on a line of its own. Look right after these two lines, on line 16, and you'll find our first tooltip, in the following format: elements["GEAR-PTR"] = {class = {class_type.TUMB,class_type.TUMB}, hint = LOCALIZE("Gear lever (G)"), device = devices.CPT_MECH, action = {device_commands.Button_1,device_commands.Button_1}, arg = {65,65}, arg_value = {direction*1.0,-direction*1.0}, arg_lim = {{0.0, 1.0},{0.0, 1.0}}, updatable = true, use_OBB = true} As you can tell, this file does more than identify tooltips, but we're not interested in the extra info, all we are looking for is the text inside the quotes, right after the "LOCALIZE" tag. In the above case, it is the following: "Gear lever (G)" The text within these quotes, also referred to as a string, is what will show in the tooltips in the simulation. You can write pretty much anything you want, although some characters are treated differently by lua. For example, if you wanted to print a percent sign, %, you cannot simply add that sign, as lua will recognize it as an operator. What you have to do here is to "escape" that character. This is a programming technique that consists of simply prefixing the special character with an "escape" command. In lua, that escape command is the backslash, \, so in our previous example, if you wanted to add a percent sign to the tooltip right after the word "Gear" you'd simply write it like this: "Gear \% lever (G)" lua has a list of special characters that would need this escaping technique when used in a string. Here they are: " ' [ ] % \ You may be thinking "Wait a second, one of those special characters is the backslash itself!". Yep, that's right. Why? Well, easy enough, what if you wanted to print a backslash into a string? Simple. Like all other special characters above, just preface it with a blackslash. So, if we wanted to add a backslash in between the words "Gear" and "lever", we'd do the following: "Gear \\ lever (G)" If all of this is not making sense, take a look at the lua website I mentioned above, and read around in the forum. Let's continue. If you are looking for a specific tooltip, you can search this lua file with your editor's search function for some keywords, or scroll down through it looking for the proper section. Once you have located it, change the text inside the quotes right after LOCALIZE, save the file, and you're ready to go. EXISTING ISSUES ------------------------------------------------------------------- I ran into a couple of decisions during this effort, as well as some limitations. They are/were as follows: 1 - To avoid confusion I did not use "-" or "=" in between key presses, such as "LShift + G", since sometimes keyboard commands involve the signs "+" or "-". Key presses are simply separated by a space, so the previous example would be "LShift G". 2 - Brackets (either [ or ]) seem to be a problem. In lua, you can "escape" a bracket inside a string or, in other words, tell lua the bracket is not part of opening or closing an array, and is just to be printed as text, by prefixing it with a backslash (see HOW TO MODIFY TOOLTIPS YOURSELF above). I have tried this and still get what looks to be just the upper part of a bracket once in the tooltip. It could be due to my resolution, video card, video drivers, BS itself, or all of the above. If you can resolve this issue, or if you don't have issues at all, please let me know. In my testing, it seems that prefacing a bracket with a backslash did not make any difference, they printed the same way on screen with or without backslashes. Just in case, every bracket I used in tooltips has been prefixed by a backslash. 3 - I could not find keyboard shortcuts for the following, some due to the fact they are "No Function" switches and probably do not have shortcuts. If you know them, please contact me. WALL PANEL - Radio equipment datalink SA-TLF power switch - 1st fire warning sensors group BIT - 2nd fire warning sensors group BIT - 3rd fire warning sensors group BIT - Reducing gear box oil pressure indication selector - Sling load Auto/Manual - Latitude selection rotaty (it is misspelled as "rotaty") - North/South latitude selection FORWARD PANEL - SHKVAL Optics adjustment AUXILIARY PANEL - ATGM Temperature selector - Unguided rocket and gun pods ballistics data settings selector - Systems BIT selector - Control computers BIT switch - Self test system push-button - Emergency INU alignment switch - Stabilisation and indication of hanger cable switch - Video Tape Recorder switch OVERHEAD PANEL - Windshield washer fluid switch - Brightness 4 - For rotating knobs that had two different keyboard shortcuts, one to rotate clockwise, the other to rotate counterclockwise, yet only one tooltip, I added both commands to the same tooltip. I prefaced the clockwise rotation shortcut with the letters "CW", and the counterclockwise one with the letters "CCW", or "DECR" and "INCR" for knobs that decreased or increased settings such as brightness, or "DOWN" and "UP" for rotaries with such motion. 5 - I did not have time to test all keyboard shortcuts. If you find any mistakes, please contact me. INSTALLATION INSTRUCTIONS ------------------------------------------------------------------- 1 - Backup (or move to another directory) your original clickabledata.lua, located at ....\Eagle Dynamics\Ka-50\Scripts\Aircrafts\Ka-50\Cockpit 2 - Replace it with the clickabledata.lua file from this package 3 - Make sure that in DCS: Black Shark, under OPTIONS | GAMEPLAY you have TOOL TIPS checked on CONTACT ------------------------------------------------------------------- You can contact me at fabiomiguez@gmail.com Enjoy learning these keyboard shorcuts! Best regards, Fabio Miguez1 point
-
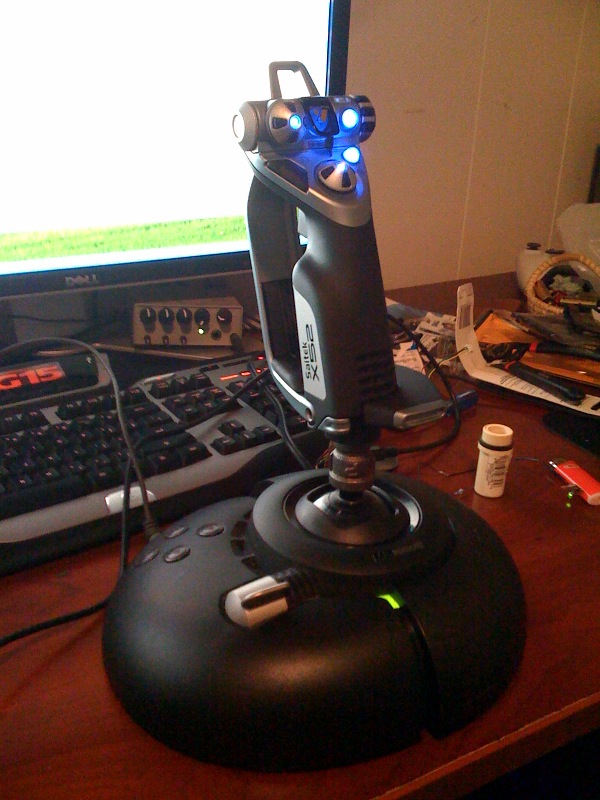
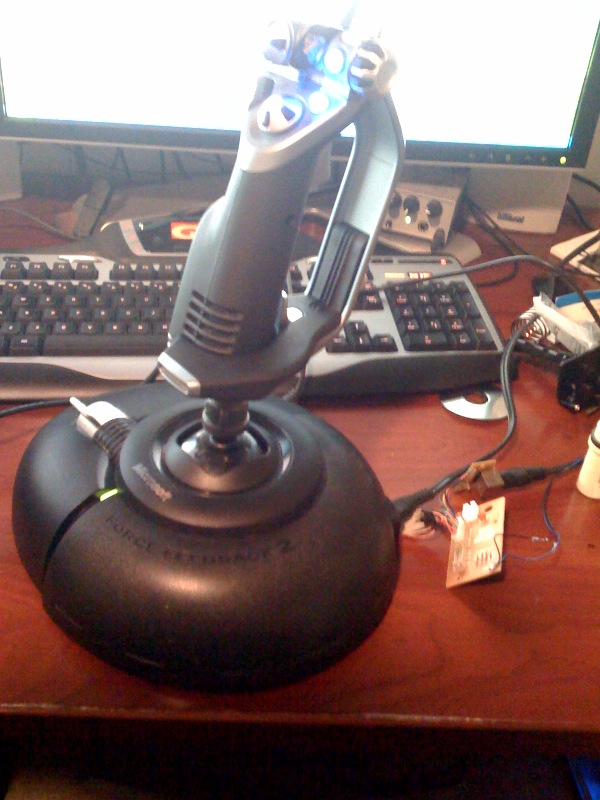
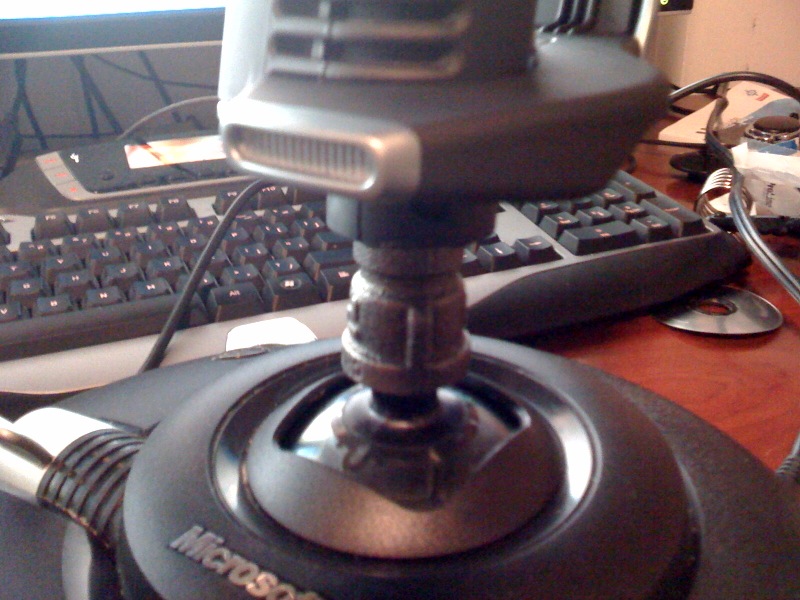
Welp, I have the stick I always wanted. Obviously inspired by Urze's awesome stuff! It was pretty straight forward... the only tricky part was mating the two shafts together... I ended up using a pipe coupling and epoxy... that and splicing all the wires back together on the lead from the x52 handle was a pain. Other than that, though, smooth sailing. It shows up as two sticks now (2 usb connections) axes from the MSSFFB2 and buttons from x52. Except for the rudder... that still comes from the x52. Chris
 1 point
 -
The announced the V-model at first. But then showed some work in progress screenshots of the P-model cockpit. And when I asked Wags said they hadn't decided yet. So that's how it stands currently :)1 point
-
I'd rather read 10 crossposts than having a "forumpolice" like you in here! The manuals is a mass to read and small notes are often hard to find when they are not indexed. Either help or just keep quiet.1 point
-
Sorry for the lack of updates :( I had a major crash months ago and lots of mod-related files were damaged. I've been working on recovering them and carrying on with the mod. Here are some minor updates: What I have ready so far (custom pilot skins not shown but they are there): Latest work on the Su22: Some aircraft I had already completed will have to be done again from scratch, but I'm happy to see not everything was lost :thumbup:1 point
-
Ну вот такая вот трава на этом случайном поле. Обратите внимание, что поле вихревое (вихри случайные... спутный след пока не прикрутили. :)) http://forums.eagle.ru/showpost.php?p=524675&postcount=603 Естественно, что вид картинки еще и от высоты зависит.1 point
-
8 shkval slew directions in the cyclic button assignments page ;)1 point
-
The manual is a pdf, pdfs feature search for keywords, no need to ponder through the manual yourself. If a bunch of keywords don't give you the wanted results, search the forum, then post if nothing turned up. No member with common sense will flame you if you say you couldn' find something about your problem in the manual and the forum.1 point
-
Yeah, it's a real shame that one of the world's most produced aircraft used in many armies of the world received poor tribute from ED. I always missed it world of LOFC, but considering the fact that none of the countries in the Black Sea region use it no more might justify it's absence. But, like I said at least we could use it for drone shoot out! ;)1 point
-
Most likely becuase as seasoned gamers.... We realise that a lot of items are not described accurately or at all in some games. Its a valid question and asking here is sometimes quicker than scouring a manual - the poster said they have already missed it once It may be a way for a poster to get an answer to a question as well as introduce themselves to the communities. Give him a break guys and be civil.:doh:1 point
-
The best way to get out of VRS is never to get in it in the first place. Try to limit your decent rate when your airspeed is <60kmph or so. VRS is loss of lift due to descending through your own rotor wash which happens due to a combination of descending and low lateral airspeed. Getting out of VRS requires not descending through your wash anymore. You could stop descending except you have a dramatic loss of lift in VRS so that's out. The practical way is to get the heck out of your wash by getting some airspeed. I know it sounds suicide but the first thing you must do in VRS is pitch down, power up, and get some airspeed up and sail into clear air.1 point
-
try set "fullScreen" to false1 point
-
Your are welcome !! Let me know how things go. Rep points never hurt :thumbup: Your Samsung 2443BW is a TN panel. Read here Thank you, Monnie1 point
-
It's all relative Keeping in mind de Broglie's wave-particle duality of quantized matter, as well as Schrödinger's wave equations. Then, realizing some variability as to the quantum state of missiles by application of Heisenberg's principle of uncertainty we can see that the desired effect of missiles traveling through the launching body is quite possible. Since the wave state of the Flanker at time of missile release and rocket motor firing causes the wave equation of the Flanker to differ from the higher total energy state of the missile, thus allowing a high velocity particle (the missile) to travel through the slower velocity particle (the Flanker). Here, we see the slow speed particle, expelling high energy particles: Next, we see the slow speed particle offering little or no resistance to the high energy particle: The next two views show the high energy particle emerging through the low energy particle. This is highly conclusive proof that the quantum mechanical effects of tunneling are indeed preserved within the physics of LOFC. I'm sure they did this to prevent stupid gamers :smilewink: from flying through their own missiles at launch by turning off collision detection at close range, but nevertheless, adds to the "game"-ness of Lockon. :(1 point
-
Ч/б отлично вышел. :) А можно красный как у терминатора? :)1 point
-
Again, I do not agree with the doctrine you are simulating here, but it is designed that way and I understand why. You don't pass within feet of the enemy, in your helo, and just let them go. You try and kill them before they try to kill you. If we are talking passing within 2-3 KM of each other, then I understand your doctrine and would agree with it, but we are talking passing right by each other, close enough to High Five each other.1 point
-
http://www.avsim.su/files.phtml?search=26&sopt_mode=or&folder=0&sopt_title=1&sopt_desc=1&sopt_author=1&sopt_fname=1&minrating=1 point
-
1 point
-
Didn't you post this same thing at SimHQ. Smells like trolling to me. If I wanted to post on 2 sites I'm going to. If you don't like it, don't respond. Simple. Now move on.1 point
-
Get real. Don't cause more work than needed.1 point
-
Андрей, проблема скорей не в "черноте" ночи как таковой, а в отсутствии в ночное время каких-либо источников освещения, влияющих на общий уровень освещенности: Луна, звезды, крупные города, аэродромы, отраженный свет в случае сплошной облачности... Это все фигня. Оветление текстур земли - лажа, неправильно это. Физика голосованием не решается. Или же узаконим Пи=4? Ведь расчеты упростятся.1 point
-
in fact you can ;) put all your files in a new "mynewtextures.cdds" file (use ED tool to do it) then in your graphics.cfg file, just add: highFolder = ".\\Bazar\\TempTextures\\"; common = ".\\Bazar\\Terrain\\Surface\\mynewtextures.cdds"; common = ".\\Bazar\\Terrain\\Surface\\LandTexturesBMP.cdds"; common = ".\\Bazar\\Terrain\\Surface\\LandTexturesTGA.cdds"; like your cdds file is the first in the list, lockon will look at your .cdds file before going to others cdds files ;) if you make a .cdds file, i can make a modman package which will install your mod automatically and will add also automatically the .cfg entries for users best regards Skypat1 point
-
ну я так и понял, но все равно стрелку героя надо дать:D вот еще забавный вид из кокпита он же с наружи)1 point
-
Windows 7 preliminary testing Windows 7 Preliminary testing in BlackShark has some very interesting results! Remember the run I posted above for 3.06 GHz? Well, no need to go look up there for it. . .here it is: Windows XP E8400 @ 3.06 GHz (speedstep enabled) DX9.0c 2x1Gigs of PC8000 RAM at 850Mhz, 8800GTS (G92) at stock clocks 178.24 drivers Frames: 16232 - Time: 480193ms - Avg: 33.803 - Min: 5 - Max: 61 The following is the same run, but in Windows 7 (64 bit), with DirectX11, all other settings the same ( more than 2 gigs of RAM doesn't appear to make a difference in BS): Windows7 core 0 E8400 @ 3.06 GHz (speedstep enable) D11 2x2gigs PC8500 at 850Mhz, 8800GTS (G92) at stock clocks 178.24 drivers Frames: 13802 - Time: 480225ms - Avg: 28.740 - Min: 7 - Max: 60 So that's not so great. . .at this point it's not looking very good for Windows 7. . .but it's supposed to run like a better version of Vista, which supposedly is strong in Black Shark. . .so what gives? Ahhh, the CPU affinity trick you say?? Well, lets see if that makes up the lost performance! For this run, settings are the same, only I enable both CPU cores in the taskmanager: Windows7 core 0+1 core E8400 @ 3.06 GHz (speedstep enabled) DX11 2x2gigs PC8500 at 850Mhz, 8800GTS (G92) at stock clocks 178.24 drivers Frames: 21729 - Time: 480340ms - Avg: 45.236 - Min: 23 - Max: 62 So umm. . . can you say AWESOME?!??!!!?! Not only did I get the lost performance back, but I set something of a record for this benchmark on my machine! If you take a look at my previously posted Windows XP run at the same settings the best I managed was - Avg: 42.185 - Min: 10 - Max: 62 and that was overclocked to 3.9 GHz!!!!!! Even my runs at 3.960GHz with 2x2Gigs of PC8500 RAM at 1100MHz, only averaged: 44.439fps in XP. . .so simply running Windows 7, and using both CPU cores gave me .8 avg fps better performance at a stock 3.06 Ghz than at nearly 4.0 GHz in 32 bit Windows XP!! I can't wait to see what it does at 3.96 GHz!!! Well, yeah I can, I need to sleep now that it's 6:30 am!!!! :music_whistling: [Edit to add the results from the 3.96 GHz runs] Windows XP 32 E8400 @ 3.960GHz 2x2Gigs of PC8500 RAM at 1100MHz, 8800GTS (G92) at stock clocks vSynch and triple buff on on 178.24 drivers Frames: 21281 - Time: 480107ms - Avg: 44.439 - Min: 10 - Max: 63 Windows7 (64) core 0+1 E8400 @ 3.960GHz 2x2Gigs of PC8500 RAM at 1100MHz, 8800GTS (G92) at stock clocks 178.24 drivers vSynch ON Frames: 26647 - Time: 480074ms - Avg: 55.506 - Min: 27 - Max: 62 Windows7 (64) core 0+1 E8400 @ 3.960GHz 2x2Gigs of PC8500 RAM at 1100MHz, 8800GTS (G92) at stock clocks 178.24 drivers vSynch OFF Frames: 28235 - Time: 479994ms - Avg: 58.823 - Min: 32 - Max: 93 Impressive results no? Under the same conditions I had an increase of 11.1 frames per second better on average when overclocked to 3.96 1100MHz DDR2, and 14.4 frames per second better when vSynch and triple buffering are forced off in the driver control panel (the normal way in which benchmarks are run). Perhaps most impressive is the minimum fps. . .they are almost as good as the average fps at stock clocks!!!! My track really killed the fps in a flew places on XP, but with 7, and both CPU cores, that's gone!!!!! Also, I am using drivers that are not technically compatible with WIndows 7 in the interest of running the same driver as I'd used previously. Next I'll try the driver MS suggests, and perhaps the 185 series beta that shows big gains in many titles.1 point
-
Do both? Overclocking doesn't cost anything the last time I checked.1 point
-
:D Ohhhh yes it is :harhar:1 point
-
28 декабря 2008, в 22:30 МСК состоится совместное выступление ВПГ "Украинские соколы" и ВПГ "Беркуты". Выступление приурочено ко дню рождения UVAF и ВПГ "Украинские соколы". Мы планируем одновременное выступление двух ВПГ с последующим сбором групп в одну. Программа насыщена множеством интересных маневров и очень плотная по времени (около 45 минут). Сервер ВПГ "Беркуты": Адрес сервера: server.berkuts.ru Порт: 10308 Пароль сервера: будет написан в TeamSpeak. TeamSpeak ВПГ "Украинские соколы":Адрес сервера: 217.20.175.190 Пароль сервера: без пароля. Трек, записанный сервером и РО, будут выложены после выступления. Количество зрителей будет ограничено 50. Во время выступления зрителям НЕ рекомендуется:- Входить или выходить из миссии, так как это может вызвать лаг сервера и испортить выступление; - Пользоваться чатом; - Делать скриншоты (возможны лаги). Вы сможете сделать скриншоты после выступления при просмотре трека; - Отключаться и подключаться к TeamSpeak серверу без необходимости. Немного советов:Скачайте и установите скин самолета ВПГ "Украинские соколы" (UkrFalconsSkin.rar). Скачайте и установите скин самолета ВПГ "Беркуты". Выступление можно просматривать через любые камеры LockOn, но мы рекомендуем камеру F11 на аэродроме Раздольное, так как именно эта камера позволяет показать идею выступления во всей красе. Мы надеемся, Вам понравится наше выступление!1 point
-
I think I understand where your frustration comes from. Step one: Stop sucking :D Ok, ok - no rotten vegetables please! Let me explain a bit how the stages are created. Each stage is created out of mission template. Meaning, for each stage a 'master mission' is made, which is modified to create the 4 missions of that stage. This is why things look the same. If you are losing say, stage 3 and being thrown back to stage 2, but you always win stage 2, you will 'flutter' between those two stages and things will seem the same because each of the 4 missions in those stages was made with each template's master mission. While it would have been possible to include far more missions in the stage, unfortunately Wags only has so much time on his hands. :) I have two suggestions for you, and I strongly suggest you do it in this order; believe me, it may sound boring, but you'll be so busy trying to fly correct parameters you won't notice. 1) Practice steady flight with your heli. Do some standard 15, 30, 60 deg bank turns one by one, and try to do them such that your nose doesn't bounce, and your altitude remains level - including after the rollout (you don't have to get it exactly perfect, but don't accept huge deviations, ie more than say 10m). 2) Practice rolling out within a few degrees of desired heading. 3) Practice maintaining altitude and speed in a turn. 4) Practice getting the heli to stop in a hover where YOU want. 5) Practice spotting good hiding spots and flying to them and hiding in them. Master these one by one, then take on the oil campaign. Do it deliberately and with a lot of premeditation and you'll do ok. Don't worry about the time it takes - if you find yourself doing the above wrong and getting bored, just put a few rockets into something, then resume ;) Don't accept suck!!! Another thing to consider, and this is an idea from Wags in fact - you can add more missions to those stages yourself, and players could make the campaign truly ... big and very dynamic feeling. Just try to take care missions that are in the spirit of the campaign (ie. pick one out of a stage to use as a template, then modify it to create your own mission, etc) in order to maintain a consistent feeling. Mind you you can move forces etc around as much as you like, since the system is very open. The Grand Campaign spans 26 stages with four missions each with the set up as described before: One defensive mission (if you scored 0-50% in the mission you just flew) Two success missions (51-84%, which one you fly is chosen randomly) One 'kicked ass' mission (85-100%) You could obviously add a lot more missions to each category. In addition, in each mission ADA units are on Random triggers. A lot of artillery (Self Propelled, and MRL) are also mostly on random triggers as well. The only exception is if the unit/group is a mission target. Each stage has a front line location which is denoted in the briefing screen as well. This campaign was created to be a bit more challenging at the simulation level to challenge more experienced players - so I would also recommend you play with some of the options like invulnerability, infinite ammo etc - to balance things out against your current skill level.1 point

-
Recently Browsing 0 members
- No registered users viewing this page.