xxJohnxx
-
Posts
1382 -
Joined
-
Last visited
-
Days Won
4
Content Type
Profiles
Forums
Events
Everything posted by xxJohnxx
-
It is also called "SAU Recovery"-mode. It can be used to recover the aircraft from a uncontrolled flight situation as a last try effort. Additionally it can used as a heading/altitude hold autopilot.
-
Hi guys, Thanks for your feedback! I always love to fly in bad visibility/clouds, using navigation aids and a bit of guesswork and then actually arrive at the point I intend to arrive at. ;) Having the head down in the instruments kinda simulates that to some extend! Keep up your good work as well! I am not sure if everyone agrees on the accent, but thanks anyways! :thumb up: Trying to keep it as understandable as I can. Additionally to the great explanation Corrigan provided, there are some more uses: For example, let's say Batumi doesn't have a RSBN station. However, you want to fly there in bad weather. Now, you can go ahead and measure the heading from say Senaki to Batumi on the map. Then, when you fly over Senaki, you set your RSBN needle to that heading, and fly the radial outbound. Even if there is a lot of wind and you have no visibility you will end up exactly over Batumi if you follow that radial. But as Corrigan suggested, the manual gives a lot more stuff to do with radials. You can also read up on "VOR radials" in the internet, which probably will give you some good usage examples as well. Additionally a lot of approaches and departures in civil aviation are flown using RSBN (VOR) radials. While normally they are flown by using GPS, crews normally tune into the RSBN (VOR) frequency as well, just if their GPS or similar systems fail. You twist the desired heading knob to the heading you want to fly the towards the station/away from it. You can not use the RSBN radials to fly past to either side of the station, you have to fly over it. Best regards, John
-
A lot of aircraft do that, especially without aileron trim. On a more realistic controll device, with less recentering force it und would be hard to notice I guess.
-
There is no autoland with the autopilot. It can fly a part of the approach for you, but it is not designed to land the plane for you. On the SAU Panel, there are 3 green buttons/lights. The middle button/light activates the approach mode and the left button/light activates the flight director approach mode.
-
The horizontal gap appears after you get closer to the target. As you can see, the vertical bars are just at the edge of the screen, meaning that you are quit far out. The dynamic launchzone (gap in the horizontal bar) appears once you get closer.
-
Thanks for your response! I have a logic in place that checks for completely empty recordings and hides them. However, I will have a closer look, and see if it crates files that only contain the data titles such as "Time" and, if empty, hides them as well!
-
Have a look here: http://forums.eagle.ru/showthread.php?t=130332
-
Hi, Thanks for your feedback! Could you, by any chance attach one of those corrupted files to your post? I would like to have a look at that! Thanks very much! John
-
Version 0.0.3 released Hi, Again, thank you for your input guys! In version 0.0.3 I fixed some bugs that could occur in certain situations. I also started and tried to address the crash on startup some users where having. Please let me now if this version fixed your problems. Download version 0.0.3: http://www.blumen-huschle.at/John/SARPP/J-SARPPV0.0.3.zip Changelog: - Fixed crash when adding several graphs to the secondary axis when there where more than 2 units on the primary axis. - Tried to address startup problems. Added a menu to manually set path to Saved Games/MiG-21/SARPP-folder. Updated userguide: After opening the programm add one or several graphs by clicking on "Add Graph" (1). Now, select the SARPP-log which you want to view from the list (2). By default the last log is displayed. Now select which data you want to view on the "Primary" (3A, left axis) and "Secondary" (3B, right axis) to view. You can make as many selections as you want, however you must select at least one option from the primary axis for the graph to be displayed. Once you made the selections, click on "Draw Graph" (4), and the graph will be drawn. You can repeat this process as many times as you want. You can also "re-draw" the same graph again, or remove it alltogether. Your feedback is appricated! Thanks, John
-
This is not a bug, this is a feature! The landing gear doors would collide with the bomb loaded on the central pylon. Therfore the groundcrew removes the landing gear doors. This is correctly modelled. ;)
-
This is very strange as well. Can you try to move it to a diffrent location?
-
Thank you for your feedback! I will start to investigate.
-
Thank you guys for your feedback! As you requested, a video about using the RSBN and PRMG System of the MiG-21! It is quit long, so I added links to certain parts in the information box below the video. There you can also find the mission file for download if you want to try that route yourselfe! Enjoy! John
-
Maybe this is of some help:
-
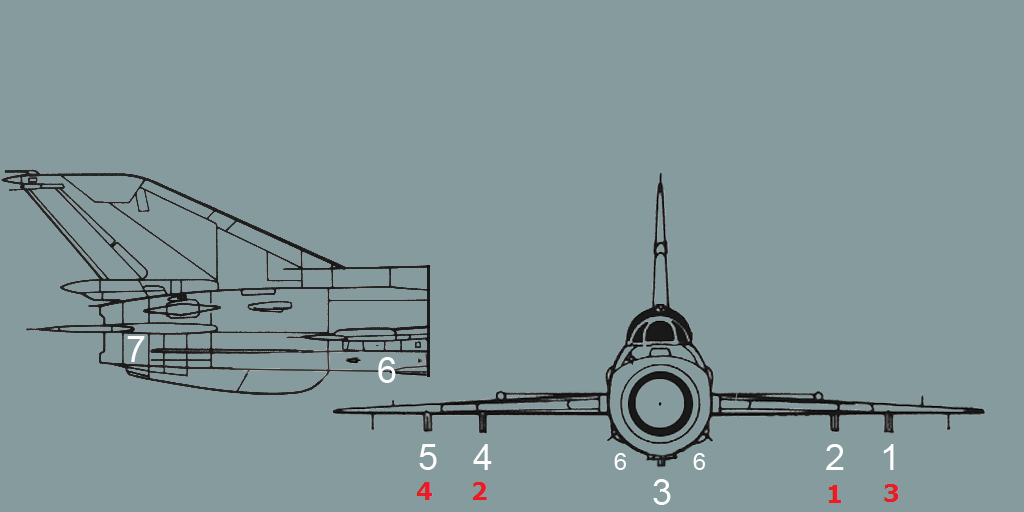
However, looking at it again I noticed that these pylons disagree with the actual weapon selector switch. I added the station numbers according to the wapon selecotr switch here:

-
Yes, in the folder: DCS World\Mods\aircraft\MiG-21BIS\ImagesGUI there is the file called MiG-21.png which shows where which pylon is located on the aircraft.
-
Darkwolf do you have the .NET 4.5 Framwork installed? If not, you can get it from here: http://www.microsoft.com/en-us/download/details.aspx?id=30653
-
Version 0.0.2 released Hi, Thank you for your input guys! I made some adjustment and tried to implement some of your suggestions and while it is not perfect yet, I think it got better! However, your feedback counts! Download version 0.0.2: http://www.blumen-huschle.at/John/SARPP/J-SARPPV0.0.2.zip Changelog: - No binding to a single chart anymore. The user can open as much charts as he wants. - Added the possiblity to load up two (or more) diffrent SARPP-Logs, which allow for direct comparison. - Added labels for both, the X and Y axis. - Added tags for the graph-lines to better identify which line represents which value. Updated userguide: After opening the programm add one or several graphs by clicking on "Add Graph" (1). Now, select the SARPP-log which you want to view from the list (2). By default the last log is displayed. Now select which data you want to view on the "Primary" (3A, left axis) and "Secondary" (3B, right axis) to view. You can make as many selections as you want, however you must select at least one option from the primary axis for the graph to be displayed. Once you made the selections, click on "Draw Graph" (4), and the graph will be drawn. You can repeat this process as many times as you want. You can also "re-draw" the same graph again, or remove it alltogether. Your feedback is appricated! Thanks, John
-
1. Yes! 3. No, there is no way to slew the pipper with the radar. Neither can you range for the gunsight. The only external source for the pipper are the IR missiles, which will move the pipper over the target.
-
The gunsight does not have radar ranging for Air-to-Air gunning. It is calculating lead for the fixed distance of 300m.
-
Hi, As with the Sabre I am doing a couple of tutorial videos for the MiG-21Bis, starting off with how to use the Air-to-Air missiles: Air-to-Air missiles: RSBN Navigation: Radar: RSBN + SAU Landing: NDB Navigation: RWR and Flares: RSBN Big Box Approach: I will update this post with new videos from time to time. If you would like to see a specific tutorial, please leave a message below! Best regards, John
-
Version five available here: click Hi, Since reading about the modelled SARPP in the MiG-21, I was playing with the thought to programm a little software to display the stored data. While beeing busy flying the MiG since release, other members of this community have had the same thought (talking about the nice pySARPP from laxentis). Therfore, after Saturday worth of coding, we now have to SARPP Data visualizers. J-SARPP is programmed in C# and, in it's current version is a very early draft of what is possible with the data that can be gathered from the recorded SARPP Logs. Download: www.blumen-huschle.at/John/SARPP/J-SARPP.exe - Version 0.0.1 www.blumen-huschle.at/John/SARPP/J-SARPPV0.0.2.zip - Version 0.0.2 www.blumen-huschle.at/John/SARPP/J-SARPPV0.0.3.zip - Version 0.0.3 www.blumen-huschle.at/John/SARPP/J-SARPPV0.0.4.zip - Version 0.0.4 www.blumen-huschle.at/John/SARPP/J-SARPPV0.0.5.zip - Version 0.0.5 [Recommended] Updated userguide: After opening the programm add one or several graphs by clicking on "Add Graph" (1). Now, select the SARPP-log which you want to view from the list (2). By default the last log is displayed. Now select which data you want to view on the "Primary" (3A, left axis) and "Secondary" (3B, right axis) to view. You can make as many selections as you want, however you must select at least one option from the primary axis for the graph to be displayed. Once you made the selections, click on "Draw Graph" (4), and the graph will be drawn. You can repeat this process as many times as you want. You can also "re-draw" the same graph again, or remove it alltogether. One last thing: This is a very early version. I am planning to implement quit a lot of features over the next few weeks, if you guys show intrest! If you have any feedback, questions or anything else, please leave a message below or send me a PM! It would be very appricated! Thank you very much! John
-
Thanks for your work, very appricated. When you are at it, do you might consider to add the missing rearming/refuelling keybind as well?
-
I am not sure yet if you then, in the simulation, would have to dial up the level yours. I think, from what I have read so far, if you add an external tank, ground crew will set the right fuel level for you. However, when you refuel, you have to set the new level yourselfe!