bradmick
-
Posts
401 -
Joined
-
Last visited
Content Type
Profiles
Forums
Events
Everything posted by bradmick
-
The phase doesn’t have anything to do with points display. The main thing you need to adjust are your SHOW page options on the top level TSD page. Should be on T3 or T4 or so. You can customize what options are displayed between the NAV and ATK phases to declutter the TSD.
-

reported Trim with slip indicator always nose left?
bradmick replied to MstrCmdr's topic in Bugs and Problems
So you’re saying I should go repaint the Sistine chapel, got it! -
No, it’s not. The force trim maintains the pedal position, the heading hold system captures and attempts to hold the heading of the aircraft when the system was “updated” by the pilot pressing the force trim release button. If you’re on a 360 heading it will attempt to hold that 360 heading. Apply left pedal greater than the values cited by raptor and heading hold will disengage until you go below those thresholds, after which point it will capture that heading and attempt to maintain it. So if you did a 90 degree left pedal turn and stopped at 090, it will attempt to hold 090. Assuming a no wind scenario, your force trimmed pedal position will be the same as it was when you were holding the 360 heading.
-
You misunderstand the system. You still have to trim the pedals. It will try to counteract main rotor torque as much as possible within it's 10% authority...that will quickly saturate because the main rotor puts out a LOT of torque. Once trimmed it will work to hold the heading within the limits of it's 10% authority. You have to actively fly the helicopter to a 'trimmed state' for the system to be effective. That means you still have to do helicopter stuff, after that it'll do it's best to help you. But you have to fly the helicopter.
-
reported Trim with slip indicator always nose left?
bradmick replied to MstrCmdr's topic in Bugs and Problems
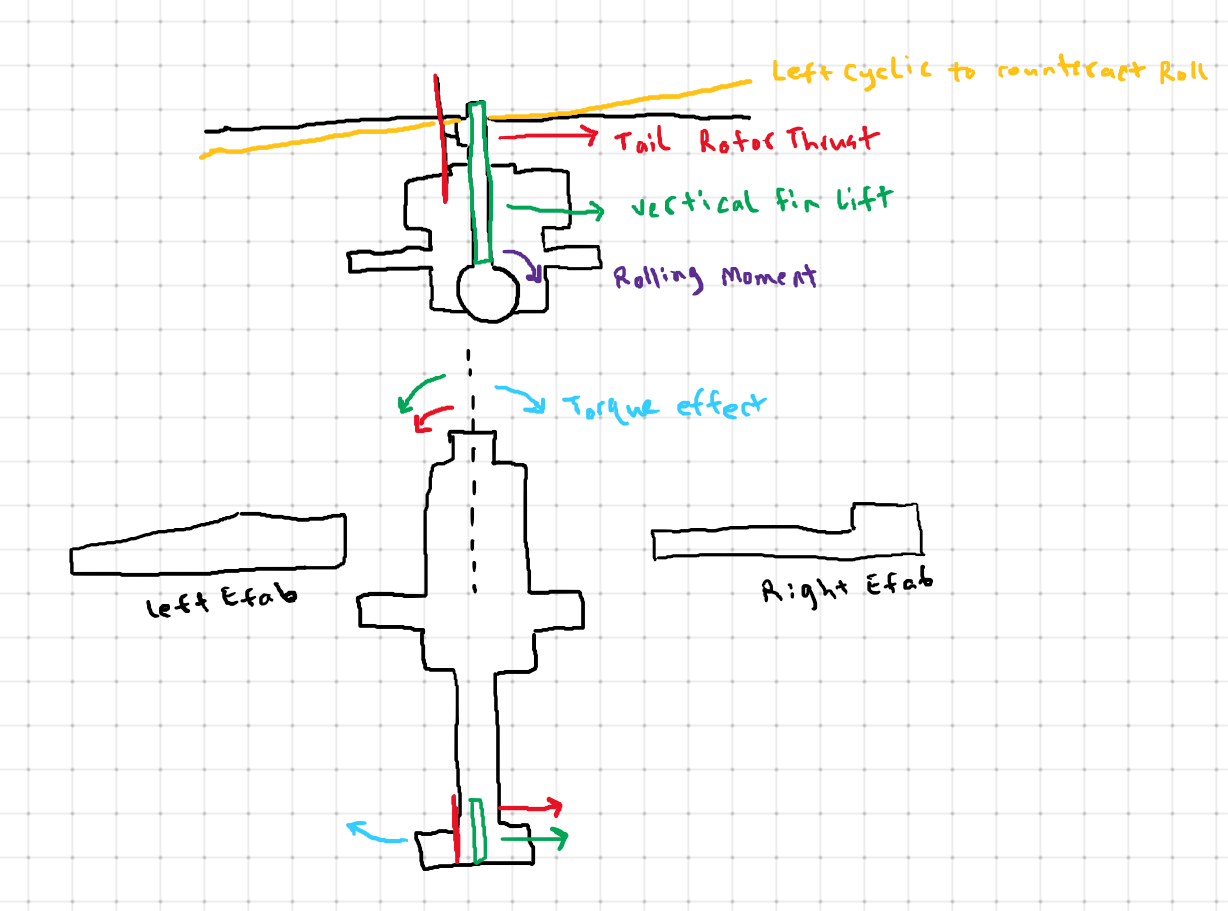
Here's a quick diagram of the major forces and things going on with the aircraft. You have the main rotor torque effect which is counteracted by the tail rotor, not only that but we have a high set tail rotor too. You then have vertical fin lift which is slowly offloading the tail rotor. Both of these combined will work to cause a rolling moment in the aircraft which has to be counteracted by applying left cyclic. The left efab is also more streamlined than the right efab (so the pilots can more easily get into the crewstations). This causes a differential in lift between the two sides of the helicopter. There are gurney flaps on the stabilator that help to offset this a bit. Translating tendency (tendency of the helicopter to drift in the direction of tail rotor thrust, or to the right for the AH-64D) doesn't go away in forward flight. You're always going to be compensating for it. Not only that, but the main rotor torque also mixes into the equation also. Bottom line: It's complicated. And all of the forces diagramed out combine to cause the aircraft to fly with a slight yaw offset, even in no winds.
- 76 replies
-
- 10
-

-

-
reported Trim with slip indicator always nose left?
bradmick replied to MstrCmdr's topic in Bugs and Problems
The yaw offset (difference between the FPV and headtracker (nose of the helicopter)) is always there, even in a no wind situation. The yaw offset is currently approximately double what it should be for a given airspeed. At 40 knots the VV and FPV should be centered in the head tracker with a centered trim ball, at 70knots the the fligh path vector circle will enclose the right chevron of the head tracker with the trim ball centered, at 90 knots the tip of the 'left wing' of the flight path vector will be touching the right tip of the head tracker. This equates to roughly 0 degrees yaw offset at 40 knots, 5 degrees yaw offset at 70 knots and 6 or so degrees at 90 knots. At 150 knots the yaw offset is around 10 degrees. All of the above is in a no wind scenario. So the aircraft can absolutely be 'in trim' (aerodynamically, ball centered), but still have a small degree of sideslip. This isn't unique to the apaches, all helicopters fly with some degree of yaw offset. The difference is, you have symbology now to show you that it's happening, where as before it was a subconscious thing in the background you just accounted for. So, bottom line: You will always have a yaw offset even in zero winds. -
Moved from Force Trim ------------------------------- I’m a big fan of the central position trimmer. It mirrors actual force trim procedures with one caveat: you don’t recenter the stick in the aircraft. But the procedure is the same. 1. Press and hold the force trim interrupt 2. Move the flight control to the desired position 3. Let go of the force trim interrupt while simultaneously letting go of the stick to center the joystick. Alternatively: 1. Move the flight control to the desired position 2. Perform a short press and release of the force trim button then immediately let go of the flight controls to center the stick The other thing to work on is making “millimeter movements” on the flight controls. You’ll want to make large movements to set the initial fight control positions, and then use “pressure/counter-pressure” with your fingertips to maintain position. If you’re finding yourself fighting the trim. Then perform a short press of the force trim release button to adjust the flight control reference point. the other thing to remember with the central position trimmer is that it WILL lock out the axis trimmed until you recenter, so if you keep pressing the pedal or holding the cyclic in position, you won’t be able to fly at all until you center the controls. In summary, the mantra: Interrupt (the the force trim), set (the flight control in the desired position), release (the force trim and flight control to center) interrupt, set, release. Hope it helps! New pilots to the Apache struggle hard with this too, so don’t feel bad.
- 58 replies
-
- 19
-
-
-
correct as is Range set to auto - no confirmation on the MPD?
bradmick replied to sirrah's topic in DCS: AH-64D
Nope, whatever was last set in the MANRNG window on the WPN page will stay. You will see the A for auto in the range and range source (RRS) of the high action display (HAD) only. The field of regard will change. It gains additional vertical tick marks (indicating 90 degrees since the tads has a 120 degree azimuth range) and moves at half the speed of the PNVS. -
The D - Disengage, disengages the Attitude and Altitude hold modes after they've been turned on. That's all it does. It doesn't reset or release the force trim. In fact, force trim doesn't auto center at all on it's own, you have to move the flight controls (because it's a magnetic brake that holds the flight control in position). There is no 'trim reset' in any helicopter that i've flown that magically centers the flight controls, this would be a terrible idea in a real helicopter. The real Huey does't have it, the Lakota doesn't have it, the Apache doesn't have it and neither did the TH-67. The trim reset won't help, understanding the theory behind how the trim in the sim works and what it's trying to replicate in the age of non forcefeedback sticks is what'll help.
-
6Dec22 Edit: Added individual links to the videos in addition to the playlist. Added Autorotation video. 4Dec22 Edit: Added playlist to YouTube videos covering these topics and removed broken track files. Playlist: Individual videos: Ground Taxi Hover Level Acceleration Takeoff Rolling Takeoff Limited Power Takeoff VMC Approach Rolling Landing Deceleration to an OGE Hover Navigation and Trim Terrain Flight Simulated Single Engine Fly-Away Power On Autorotation Climbs, Descents and Turns Performance Page Flight Controls: Pitch Attitudes and NVS Techniques: Things to Avoid and Maneuvering Slope Landing: (Out of Date) To LMC or Not to LMC... What you should be doing... (Out of Date) My method of using the trim... Note: Normally I fly central position trimmer, but I completely forgot that I had swtiched to Instant Trim to try out and talk about for a comparison video...So in this video I'm using Instant Trim and my brain definitely didn't like it. Oh well, nothing like doing it live, amiright? Points and Routes: Note: Allergies are real, apologies for the raspiness of my voice at points. Hovering Turns, Force Trim Use, Hold Modes Enabled vs. Active LMC Redux Note: With the new patch, the TADS now operates like in the real thing, this video is more of an addendum to my previous video: To LMC or Not to LMC... than an outright replacement. More a reinforcement of the technique presented in the previous video. Datalink Setup Settling w/ Power, Vortex Ring State, Rotor Droop and Power Limited Approaches
- 58 replies
-
- 41
-
-
-
On my warthog I gave it bound to my CMS switch, my thumb naturally rests there. CMS forward is trim release, left attitude hold, right altitude hold and back holds disengage. I map all my trimmers there because of how my setup is….setup, lol
-
Yes, and also no. It’s more about setting the position of the flight controls to enable an easier transition to the hover. You hold the force trim interrupted and set the flight controls (aft and left cyclic, left pedal) to their initial positions for a stable hover. This does have the benefit of keeping the SAS sleeve centered. Once the aircraft is light on the wheels and ready to lift, the benefit is the system has full authority to assist you in maintaining a stable hover. You could just as easily not touch the force trim and work against the magnetic breaks until off the ground, heading hold is still enabled. Then once at a stable hover, short press and release the force trim. Release and center your controls to capture the flight control position you were holding.
-
Moved to: https://forum.dcs.world/topic/296437-ah-64d-takeoff-track-files/?do=findComment&comment=4924709
-
Just want to point out that the “pressing and holding the force trim release for 3 seconds” is only applicable if the SAS is “saturated”. Saturated means the SAS has run out of authority. It doesn’t enable anything. The key thing to understand is every time you interrupt the force trim, you’re commanding the SAS to recenter itself and give it back it’s “maximum authority”. Pressing and holding for three seconds does not enable (turn on) the system. Just gives it its full authority again.
-
Recorded the following track file. In it I perform 3 high/low-g's, I ensure a FLT > SET page is displayed in order to display the G-Meter. Before each sequence I reset the G-meter to ensure i'm hitting the marks of 2G and 0.2G. You can see the aircraft violently rolls left in each low-g situation, where she remain stable about the roll axis. rollDepartureTest2.trk
-
I can confirm this. Back when we used to do High/Low G's we would perform an initial aft cyclic pull to achieve +2.0G +/- 0.2 G and then forward cyclic looking for +0.2G +/- 0.2G. The maneuver was initiated at 130knots, during both the aft cyclic pull and forward cyclic pull the aircraft was stable in roll. Currently in the existing FM, the aircraft will depart from controlled flight with a high speed forward cyclic application, which is definitely not the expected behaviour.
-
The center aux should be off by default The laser should be off by default The primary lighting knob should be off by default The doppler should be on. One of your three was correct.
-
Not really, my last update is listed and I deleted the single device version. I’ve had zero issues testing, and all the functions I have on there I use, and anything that’s not I don’t. I can pan the cursor on the TSD, cursor acquisition easily, and use the tads no problem also. The third party software requirement is I suppose the only downer. I might go back and rework the HOTAS only option, but given how well the HOTAS and XBOX controller solution has worked, no real need to at this stage. The setup I’m running mirrors the aircraft as close as devices allow, so it’s pretty comfy to me. My flight controls are for flying and my controller is my tedac analog.
-
Rogue Trooper I feel like you need a hug. Do you need a hug? I won't give you the hug, but we can probably arrange for that to happen.
-
It is being done right. And let’s be real, you wouldn’t know if it were right or wrong anyway.
-
This is dumb. Centers fine. So is left or right.
-
Hate to break it to you, but the documentary Firebirds was hugely wrong about that whole eye dominance thing. And yes, it’s right eye only in the bird. The us army is also super cheap, the idea of binocular HDUs or whatever isn’t repugnant, they’ll just never spring for that option because of the expense, and retraining requirement…which is also expensive. Maybe later, who knows.
-
reported Trim with slip indicator always nose left?
bradmick replied to MstrCmdr's topic in Bugs and Problems
The helicopter will crab in a zero wind condition. The high mounted tail rotor causes a rolling moment that has to be compensated for with lateral cyclic or transmission tilt. The Apache also has a non-symmetrical profile with the EFABs. Additionally you have the vertical fin which is also going to impart a rolling moment on the fuselage as well. The sum of all of these forces cause the helicopter to fly with a slight yaw offset. The big difference here is that the Apache has the flight path vector which illustrates this phenomenon. Winds will increase or decrease this yaw offset depending on the strength and direction of the wind. Bottom line, it’s normal. I wanted to add that the Apache only has forward transmission tilt and not sideward. We get to compensate with cyclic. -
So the reality is manufacturers say one thing, but then reality sets in and the aircraft gets a vote. I’ve timed many a 10 round burst over my time and the burst completes between 1 to 1.1 seconds or so. This puts the actual fire rate around 600 to 550 rpm. Herein lies the problem with doggedly sticking to “but the book says”! It rarely mirrors reality.