VladimirSputnik
-
Posts
71 -
Joined
-
Last visited
Content Type
Profiles
Forums
Events
Everything posted by VladimirSputnik
-
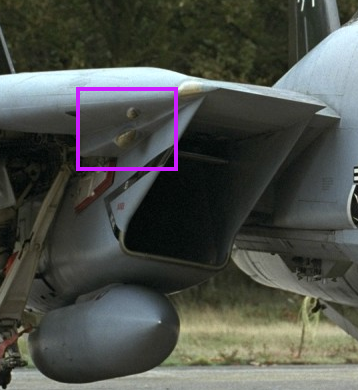
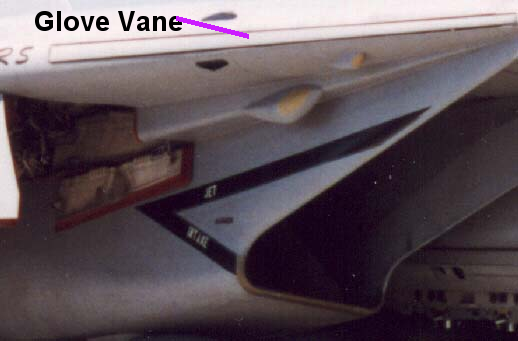
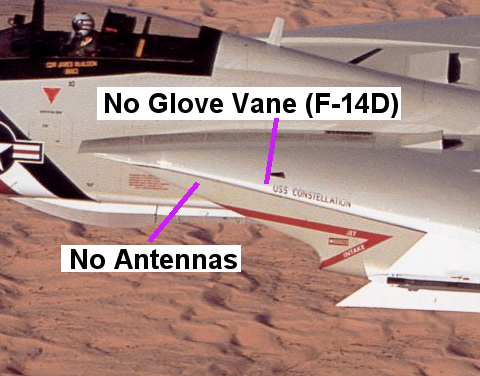
One not so often seen difference is the ALQ-126 Mid & High-Band antennas under the gloves on the F-14B (and as I understand some late F-14As). I do not see them modeled in DCS though. This and the chin fairings are the major visual differences between the F-14B and F-14D (latter also has faired-over gloves when F-14B still has the glove vanes, albeit bolted shut). F-14B:

-
investigating Manual error - Reject Setup (pag.435)
VladimirSputnik replied to Tusky's topic in Bugs and Problems
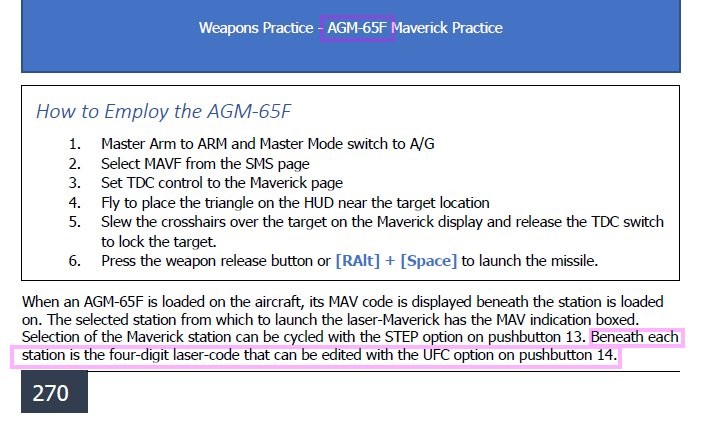
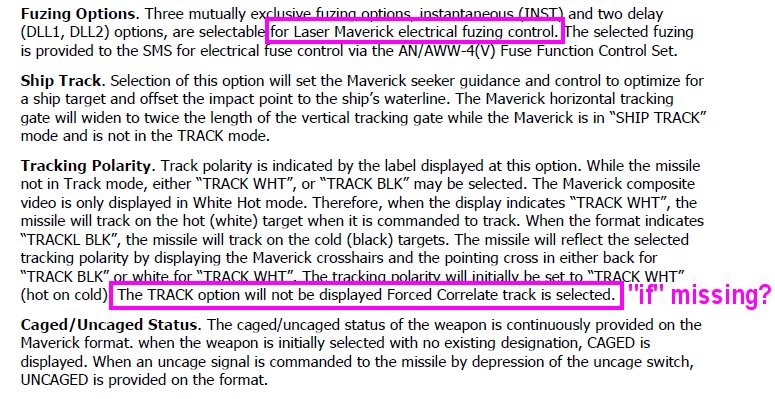
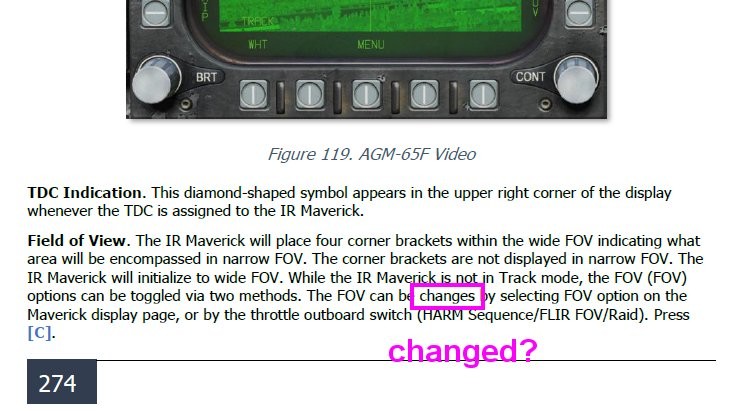
Found a few typos and errors under the Maverick section: There should be no code for AGM-65F AGM-65F section on p274 typo only
-
Thanks
-
Does anyone know what the binding [Navigation Lights] does? The "NAV" lights are controlled by the Position light switches. I have all the lights covered with bindings but I keep on finding this one in the list and see no change anywhere when I press it. Nor do I find any reference to it in the manual. [RCtrl + L] is the keyboard binding
-
Since 2.7, Auto-Hover is almost impossible
VladimirSputnik replied to Jags1041's topic in SA-342M Gazelle
Also see "Gazelle ...what is needed to get the auto hover kicking in!?" page 2 for auto-hover issues related to incorrect parameters or settings. -
See "Gazelle ...what is needed to get the auto hover kicking in!?" for resolving auto-hover issues related to incorrect settings and parameters
-
Gazelle ...what is needed to get the auto hover kicking in!?
VladimirSputnik replied to Frag's topic in Polychop-Simulations
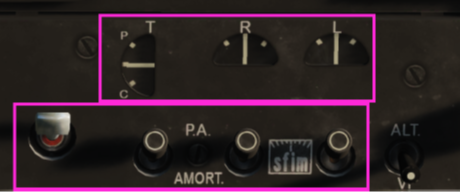
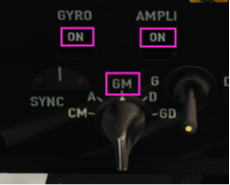
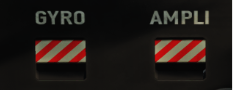
AUTO-HOVER STRUGGLES RESOLVED After numerous attempts and utterances not normally acceptable in front of my mother I figured out why auto-hover sometimes work and sometimes not: (Basically a summary of above inputs and some fault-finding on my part) {If this had been mentioned in detail earlier I apologise for stealing someone's thunder} Fault finding when Auto-hover fails to engage when within the required flight parameters (< 18km/h, roll& pitch <30°, VSI <60): 1. Autopilot Master switch [Autopilot Master] on the cyclic may have accidentally been pressed which disables the system. To check if it is on or off, look at the autopilot roll, pitch and yaw indicators at the bottom right of the panel. The needles should be pointing around the centre positions and not off to one side like no power is applied (see pic below). In addition, the 4 Autopilot switches have to be "up" as shown below [Master On/Off] [Pitch On/Off] [Roll On/Off] [Yaw On/Off]. 2. Gyro has to be in the GM position (situated to the right of the TV sight and left of the lighting panel). I had a binding on my controls for the [Gyro Knob +] switch and sometimes in haste pressed it twice which takes it out of the GM setting. So see if it is set correctly the two windows under GYRO and AMPLI must read "ON" and not cross-hatched as shown below: Correct indication in GM Gyro OFF - cross-hatched Simply select GM and wait ±60s (60s is a very long time when under fire so it is useful to add these two checks to your FENCE IN checks before attempting to engaging the enemy. Once these two situations are in place the auto-hover [Auto-Hover Toggle] should work like a charm if within the flight parameters and you will, like me, realise you were not actually that bad at hovering Hope this helps.
-
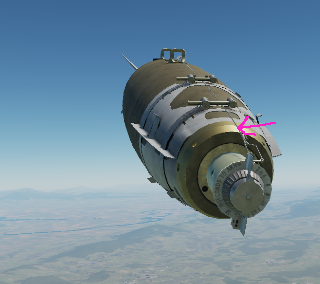
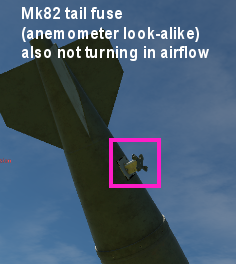
JDAM fuse wire still attached after release I have noticed that when releasing Mk-82s with N/T setting the arming wires are pulled on release, but there is no animation for the nose fuse (no windmilling) or the tail fuse (anemometer look-alike device). Once the wires are pulled the blades turn in the airflow in order to arm the bomb according to the setting. In addition, dropping JDAMs I noticed that the wire actually remains in the nose fuse and thus cannot arm. Still the bomb explodes on impact. It would be nice to have animations added for these older fuses (and at least have the correct indication on the JDAM). Regards
-
Mission reqested push time vs in game time
VladimirSputnik replied to Razor18's topic in A-10C 16-2 Red Flag Campaign
Set PAGE knob (on CDU) to OTHER and press FSK [NAV] (underneath display on CDU) On the screen select TIME Nellis seems to be GMT -08:00:00, thus under []LCL ADJUST type 800 on the scratch pad and press the OSB next to []LCL ADJUST Press OSB next to []LCL ADJUST again to make the "+" a "-" This gives you local time on your clocks, but it seems the waypoints' DTOTs were placed in Z time (GMT) and thus will be inaccurate for Time steering. You can adjust each WPT individually by subtracting 8 hours What should normally fix this is to adjust the ROLEX: shown on the same TIME page as []DTOT ADJUST Theoretically you can adjust this also by changing it to -080000, but it did not work for me. Still trying to get behind the logic in DCS A-10C. However you can manually adjust your push point DTOT under WAYPOINT page to your push time to at least get the local time correct and get accurate time steering. Alternatively to get to the TIME page is to press [FUNC] on the UFC and then [2] (NAV) On your MFCD CDU page simply press TIME and do the same as above.- 1 reply
-
- 1
-

-
Formation Lights: White lights on fuselage?
VladimirSputnik replied to Nealius's topic in DCS: A-10C II Tank Killer
Much appreciated, thanks -
Why runway start on Mission 9
VladimirSputnik replied to Ftrdoc's topic in A-10C 16-2 Red Flag Campaign
Line-up card should have all the info since it is what would have been discussed in the Briefing or some info regarded as standard info. It is as if you walkout out to the aircraft and conducted a cold start. You just "spawned" into the cockpit just prior to take-off. I suppose it is the prerogative of the campaign writers to shorten the mission time a bit. Taxiing at night has its dangers and this mission can become a bit long sometimes, so do regular fuel checks otherwise you may end up running out of fuel. TGP in the dark desert to lock up tanks for the MAVs: Talk to JTAC with Comms menu on FM radio and he will (after your 9-liner readback) send you the location of the hostile convoy (visible on the TAD). Simply press Wilco OSB and hook the small red triangle on the TAD (TAD must be SOI). Then make the hooked triangle your SPI and slave your TGP to the location (do not waste time since the convoy is moving and that location will eventually be further and further away from the convoy as it is left behind with them moving the whole time) Alternatively you can cheat a bit and look at the F10 map and manually create a waypoint with the convoy's location. Make a WPT some distance ahead of the convoy's mean line of advance and by the time you are done programming the vehicles should be visible in the vicinity. -
Formation Lights: White lights on fuselage?
VladimirSputnik replied to Nealius's topic in DCS: A-10C II Tank Killer
NACELLE LIGHTS The Nacelle lights are co-located with the White "Formation" light on the spine but faces aft in order to illuminate both the engine nacelles (essentially the intakes). I believe it is useful for boom operators during night in-flight refueling to know where the intakes are when they operate the refueling boom. These lights are on the same circuit as the refueling slipway receiver lights and controlled by the RCVR LT knob (situated on the panel to the front left of the throttle). With Pinkie Switch AFT, the nacelle lights seem to be at a fixed setting, but the receiver slipway lights can still be adjusted with the RCVR LT knob. With Pinkie Switch FORWARD both are adjustable. It does not make much sense to not be able to switch off the white "formation" lights (on the spine and underneath the cockpit as well as the logo lights illuminating the tail number) since the strips of formation lights are designed to not be visible from a distance. The two white lights seem to defeat the purpose. Maybe these lights are not as bright in real life. The logo lights on the tail fins kind of makes sense since it might be useful to know if you are formating on the correct aircraft when radio silent at night. I wonder if a real A-10 driver would be able to shed some light on this. [ I also could not find a circuit breaker to extinguish the white lights ]
-
Formation Lights: White lights on fuselage?
VladimirSputnik replied to Nealius's topic in DCS: A-10C II Tank Killer
NACELLE LIGHTS The Nacelle lights are co-located with the White "Formation" light on the spine but faces aft in order to illuminate both the engine nacelles (essentially the intakes). I believe it is useful for boom operators during night in-flight refueling to know where the intakes are when they operate the refueling boom. These lights are on the same circuit as the refueling slipway receiver lights and controlled by the RCVR LT knob (situated on the panel to the front left of the throttle). With Pinkie Switch AFT, the nacelle lights seem to be at a fixed setting, but the receiver slipway lights can still be adjusted with the RCVR LT knob. With Pinkie Switch FORWARD both are adjustable. It does not make much sense to not be able to switch off the white "formation" lights (on the spine and underneath the cockpit as well as the logo lights illuminating the tail number) since the strips of formation lights are designed to not be visible from a distance. The two white lights seem to defeat the purpose. Maybe these lights are not as bright in real life. The logo lights on the tail fins kind of makes sense since it might be useful to know if you are formating on the correct aircraft when radio silent at night. I wonder if a real A-10 driver would be able to shed some light on this. [ I also could not find a circuit breaker to extinguish the white lights ] -
I noticed after the patch the fuel pumps are already switched on after spawning. Seems aircraft has been tweaked a bit, must wait for engine 1 to complete start cycle (light out on warning panel), otherwise No 2 will only reach 40% or so and gets stuck.
-
Mission 6: No Marshall Comms?
VladimirSputnik replied to Y0UNGBL00D's topic in F/A-18C Raven One Campaign
Kneeboard in Aircraft does not have CH 10 Marshall listed, but it is present in the PDF file in the campaign folder -
Marshalling wands for the plane directors
VladimirSputnik replied to DrBackJack's topic in Wish List
Also noticed deck crew do not have shadows cast on the deck. Could be a setting I've missed as well. Still, awesome concept with the Supercarrier, thanks a lot. -
I found that sometimes it works and sometimes it doesn't causing me much frustration. This worked for me: as soon as it does not want to engage and I am sure my parameters are in limits, press Autopilot Master in the category "Pilot Stick" (not the one "Master On/Off" on the console next to the autopilot pitch, roll, and yaw switches, but the one on the stick). Works like a charm after that. Worth a try.
-
Gazelle ...what is needed to get the auto hover kicking in!?
VladimirSputnik replied to Frag's topic in Polychop-Simulations
I found that sometimes it works and sometimes it doesn't causing me much frustration. This worked for me: as soon as it does not want to engage and I am sure my parameters are in limits, press Autopilot Master in the category "Pilot Stick" (not the one "Master On/Off" on the console next to the autopilot pitch, roll, and yaw switches, but the one on the stick). Works like a charm after that. Worth a try. -
Auto Hover and auto collecting not working for me
VladimirSputnik replied to Simon1279's topic in SA-342M Gazelle
I found that pressing the button AUTOPILOT MASTER under category "pilot stick" once, it tends to activate the AH. Worth trying because this thing has caused me liters of headaches. And of course your autopilot master, pitch, roll and yaw switches must be switched on for AH to work.