Doughguy
-
Posts
631 -
Joined
-
Last visited
Content Type
Profiles
Forums
Events
Everything posted by Doughguy
-

A neues Gwand für die Dora! - Hi Res Textures for the Dora
Doughguy replied to Doughguy's topic in DCS: Fw 190 D-9 Dora
Some lazy slave labour worker might have sabotaged the screws and not properly aligned the jigs? No seriously. all pics ive seen had differntly arranged screws. See above. Yes. -
A neues Gwand für die Dora! - Hi Res Textures for the Dora
Doughguy replied to Doughguy's topic in DCS: Fw 190 D-9 Dora
Regarding zoom see peachmonkey. Ill defo redo the cockpit but later. Ill wrap this up soon. Exterior first. Then ill dish out the jg301 as a beta to gather feedback etc. for improvements. Once that is there ill update, do the interior parts like wheels, gearbay etc. And release the template so that its all neat and tidy. Then ill take care of the cockpit. As you could read on the last pages im really pressing this as i simply want to move on, knowing how i operate. Just dont wanna turn cold on it. Once the base stuff is done i can/will dish out more versions as a "defenders of the reich" pack. Just for the giggles. Thats the rough plan. Regarding id ed implements this idk. I dont mind on my end really . However some portions of the textures are made from samples of free texture pages of which im not so sure if they permit their textures bein "sold", even if these are cut up, streched, dyed et etc. But im no lawyer. Also filesize is a thing... it jumped from 2k per texture to 4k each. One diffuse map is 20mb. The rouhhmat textures 40mb each. Double that for the normals. The jg 301 pack stands at about 1.2 gig now. It puts me already in hard spot where i have to simply recombine textures for more variations. Real franken doras. -
A neues Gwand für die Dora! - Hi Res Textures for the Dora
Doughguy replied to Doughguy's topic in DCS: Fw 190 D-9 Dora
Yes no shtonks gonna be possible. -
A neues Gwand für die Dora! - Hi Res Textures for the Dora
Doughguy replied to Doughguy's topic in DCS: Fw 190 D-9 Dora
Been a bit sick lately, so no posty posty. Texture files are getting confusing.. forgot to flip normal map Y channel, now its poppin. Also forgot the surface scratch layer and the larger mud splotches. fixed some other things along the way. first test of the stressed skin on the normal map, albeit dont wanna overdo it as the skinl never looked too "bumpy" telling from pics. Madness.Really. -
A neues Gwand für die Dora! - Hi Res Textures for the Dora
Doughguy replied to Doughguy's topic in DCS: Fw 190 D-9 Dora
Schameless picture dump. Having a glas of wine and having some LUA fun... 12 Staffeln of JG.301 in combinations, subdivided into 3 groups. Each Group and Staffel has its corresponding color code. Plus 4 Stabs Gruppen. Not sure if overkill? y/n/delete? There´s some fixing that needs to be done on the patterns with some seams showing too much, or front and aft fuselage having mismatching colors on the rear wing filet (albeit small).. Also, i think ill scratch / dull down the serialnumber like on the stabs texture set, so its not as unique. 500 xxx production batch it is. last digits werent always readable on pics... so.. Need to fix some missmatching stencils and add bit more variety to each set, eg yellow circle on gun cowl, MW50 label variants and such. -
A neues Gwand für die Dora! - Hi Res Textures for the Dora
Doughguy replied to Doughguy's topic in DCS: Fw 190 D-9 Dora
Stab pattern done. Noticed some small errors ill fix in the coming days. Also changed the 9. Staffel textures a bit and added leading edge touch ups. -
A neues Gwand für die Dora! - Hi Res Textures for the Dora
Doughguy replied to Doughguy's topic in DCS: Fw 190 D-9 Dora
Variations variations Made basetextures for I, II and II Gruppe JG.301. Stab will follow soon. Textures are made in such way, that each Staffel will look different. Contrary to my previous post, it indeed is possible to reference other liveries via lua. Albeit im a bit restricted by my color choices due to how the textures / uvw´s are layed out. Oh well... cant have everyything.. Atm the JG 301 hast 12. Staffeln. Mix and Match will take place once Stab is done. There is a IV Group, with a blue bar on the tailband, but that group only sported 109s afaik. -
A neues Gwand für die Dora! - Hi Res Textures for the Dora
Doughguy replied to Doughguy's topic in DCS: Fw 190 D-9 Dora
Another interesting image ive come across. It appears the leading edge was painted in the same color as the drop tank, right to the feet of the man standing infront of the dora. it appears to be darker compared to a RLM 75. RLM 81 perhaps?
-
A neues Gwand für die Dora! - Hi Res Textures for the Dora
Doughguy replied to Doughguy's topic in DCS: Fw 190 D-9 Dora
Did the ETC 504 rack and external fuel tank today. Not sure about colors tho atm. The ETC 504 rack was supposedly painted primarily in RLM 76 light blue, but theres instances or grey violet RLM75, or even RLM 66 interior grey, which i chose. Your call. -
A neues Gwand für die Dora! - Hi Res Textures for the Dora
Doughguy replied to Doughguy's topic in DCS: Fw 190 D-9 Dora
Adjusted the roughness. Added a camo variation for jg2. And had a first shot at the normal map. I noticed that i totally forgot about plyons and fueltank..... gotta work on those.. -
A neues Gwand für die Dora! - Hi Res Textures for the Dora
Doughguy replied to Doughguy's topic in DCS: Fw 190 D-9 Dora
Cheers guys. Ive tweaked the roughness a bit. Struggled with the normal map today but turned out to be just a spelling mistake in lua... thx to @Magic Zach lending a helping hand. Ill try to take care of the normal map now and finally get on with the skin stressing ive been pushing around for a while... Atm, i kinda lack luster taking care of the gearwells as that whole part is such a mess to tangle with and theres not enough ref i have atm. Ill save that for future update, cause i notice like motivation is deminishing and i really wanna get this done. A contributing factor is the fact that theres some unforseeable cutbacks i didnt thought about when i planned out my jg26 project. Well, it looks like i cant really do what i wanted due to dcs´ limitations on how it handles files. Namely, i cant eg. reference a texture from another livery, so id have to copy said texture and put it in another livery.... if wanted to do every staffel of jg26, filesize of the whole pack would be gargantuan and one end up with 15x the same normal map (Well 60, as theres four of them), when all that would be necessary would be to change the bort numbers colors, as each staffel basically is identified by just that. Bummer... So... what now? I guess ill just finish the template first and then retex the original dcs liveries for the dora. The one thing i wanna do is make one generic staffel of each jg then. Ill still end up with alot of double textures eventually... but well it is what it is... But if anyone knows a way around said problem im all ears! -
A neues Gwand für die Dora! - Hi Res Textures for the Dora
Doughguy replied to Doughguy's topic in DCS: Fw 190 D-9 Dora
Yup, as said above. i also believe it was brushed/dull, alluminium compound of some sort. Was just a quick test to try how the PBR in DCS works. The metal will be adjusted accordingly. -
A neues Gwand für die Dora! - Hi Res Textures for the Dora
Doughguy replied to Doughguy's topic in DCS: Fw 190 D-9 Dora
PBR Material Set Up Test. Not sure how matte RLM paints were and also think the metal used was of a brushed type rather than high gloss polish like on the e.g. Mustang. Makes it pop nicely tho. Making the paints more matte will help make the oil and fluid spills pop more. -
A neues Gwand für die Dora! - Hi Res Textures for the Dora
Doughguy replied to Doughguy's topic in DCS: Fw 190 D-9 Dora
Small test i did today: Numerical System for the Doras flown by Members of the Stab. Was a bit fussy work adjusting the size of the digits and finding the right spot the the chevron. Had to copy paste screens from the model viewer and do some alignments. But works like a charm! Of course, only if you use single digits. If you get higher than 9, it´ll throw of the effect and one digit will be displayed over the chevron. JG.26 Stab didnt use the chevron but only the beams. Easy. -
A neues Gwand für die Dora! - Hi Res Textures for the Dora
Doughguy replied to Doughguy's topic in DCS: Fw 190 D-9 Dora
Cleaned and fixed the exhaust residue so theres no seams... Also forgot about the radiator flaps. Dirties them up and gave em some abuse -
A neues Gwand für die Dora! - Hi Res Textures for the Dora
Doughguy replied to Doughguy's topic in DCS: Fw 190 D-9 Dora
German La$$es wiv drrrty A$$e$ Bit the bullet and made the downwash texture seamless and fluid. Just to realize ive produce a large seam on a dumb place cause i forgot a mask. Also fixed the group beams as the outline is cut off at the tailband. Reduced chipping considerably in not overly exposed areas and added a paint-up around gun ports as an option. Redid the top camo parts for a late war demarcation line. Ive paid attention on the lowering and rising curves imitating the different angles a spraygun would be held when paintin the surface. Means, downcurves have a sharp edge as the gun is held 0°. The up strokes are angled and thus result in a smooth curve. The effect is subtle but visible. Snippet of the actual texture. About an 8th of its size. -
A neues Gwand für die Dora! - Hi Res Textures for the Dora
Doughguy replied to Doughguy's topic in DCS: Fw 190 D-9 Dora
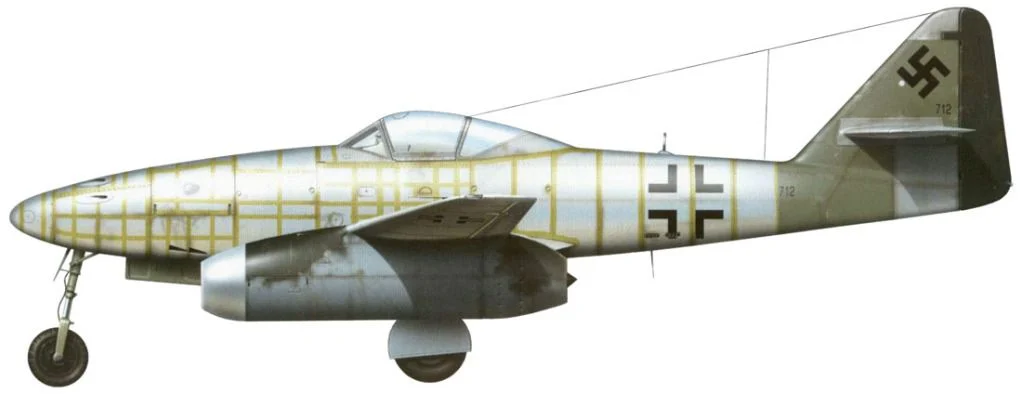
Added the Leading Edge and Panel Gap Filler / Putty similar to ME 262 pics in RLM 99 It also breaks up the overal metal chipping a bit that i still need to tone down a bit. Small test of JG.4 tailband and insignia. Started to block out of the inside parts like flaps, gearwells, scoops, intakes, cabels etc. Bit tedious since i have to locate where they are on the map and some parts simply are overlapping.... which causes some inconvenient oddities... Added wood texture for some access panels as an option. However, i hope i can start workin on the roughmats soon. -
A neues Gwand für die Dora! - Hi Res Textures for the Dora
Doughguy replied to Doughguy's topic in DCS: Fw 190 D-9 Dora
oh lawd he commeth... think i just settle on RLM 02 for anything inside... Ah yes... and also ive wasted a good hour repainting the very same disruptive pattern on the wings, instead of the opposite pattern.. cause i´m an idiot. Anyway.... some small update.. The effect of the layerd chipped paint is subtle but its there. Ill reduce the ammount of bare metal chips tho. Bit too much if i look at rl pics. Redid the fuel labels hand painted the letter (cause ...) The Auf Zu markings on the hatches seem to be embossed telling from real world examples, so i´ll have to take this into account for the normal map later on. Also adjusted the dirt /grime color to a pale-grey-ish muddy tan. Looks quite good without havin to adjust opacity or do blending with layer styles in ps. Late war flaps color block-out. -
A neues Gwand für die Dora! - Hi Res Textures for the Dora
Doughguy replied to Doughguy's topic in DCS: Fw 190 D-9 Dora
Hm. My reasearch to that color is as fruitful as on the RLM 83. I cant really find any hard evidence that this color was actually of a certain color value. Does Crandalls book contain a swatch? On the subject of primer, my idea stems primarily from following pictures below when i dug around on the subject of wings being puttied on the dora. Now, the rendition of the me 262 profile is subject for debate (i dont want to get into cmyk, rgb and chromatic values of fotos vs pc stuff etc), the sheer color similarity is striking. The hatch part is of an A8s outer wing gun cowling. Dark is the brown RLM 81 and the light the late 76 AND/OR Primer. Ive read (please forgive me as i forgot were, eventually it was TOCH), that the RLM colors were applied on bare metal and on the wing area bein sanded down, resprayed, rinse and repeat. Furthermore lookin at profiles and pictures and a bit of reading it appears that front half of the botton wing and whole top were "primed" with one and the same color. Which could be RLM 75, 76, or 81(whatever shade) directly late in the war. Then a respective disruptive pattern would be applied. Now, my funny head had an idea, that turned out some others had aswell: Eg on the brown RLM 81 "base prime" of the wing RLM 76 is applied, going against the book. Respectively RLM 75 and on top of that the darker RLM 81 (AND in tandem OR RLM 82) Why? Save time and resources. Especially in the later stages of the war, when top surfaces werent even painted in RLM 81+82 combo anymore. It would be less time consuming and also less complicated. Now, my mad brain transfered this on the late RLM 76 / primer topic. Like some mad german brass in a cubicle thought: Ok, light blue is getting scarce and is visible on the ground like a scots ar$e in a searchlight, but we still have tons of that "primer" (that we dont really use much anyway), so why not use that? Also, there is a page in one of Crandalls books i could scavange from a passed internet auction ( i lowlife..), that shows very similar markings on the engine cowling shining through like depicted on the 262. But heck knows... i´m no expert,maybe had one too many pints and am open to bein educated. So in that respect, i´m quite curious how that RLM 99 is supposed to look.
-
A neues Gwand für die Dora! - Hi Res Textures for the Dora
Doughguy replied to Doughguy's topic in DCS: Fw 190 D-9 Dora
On a different note since i'm preparing to retexture the inner structures lile gear wells etc. Does anyone know, if those parts were painted in RLM 02 or left in bare metal? Only parts ive seen that are left bare are parts of the flaps. Some insight would be cool as i do not have all the literature on the dora and from what i have info is rather sparse. Also ive come to the conclusion that the yellow greenish "late" RLM76 or so called RLM 99 is just a primer that was used all over the fuselage and parts of the wings to save paint. Further more having underestimated a ginormous texturefile and the sheer scope of accompanied jg26 textures for each of its staffeln so i thought about creating a basic pack of 1 group and its 4 staffeln for those jg's that flew the dora and create a "generic" dora pack. Think "defenders of the reich" or so. My idea would be to create 1 texture set (4 diffuse maps etc) for eg 1./jg2 etc and only change the bort numbers to represent each staffel. So no retex for each staffel in general. For a different group, id have to change only one diffuse map since the tailband and group markings are in the same spot anyway. Spec and normal and the rest of the diffuse map wouldnt change. Id add a texture set for stabs maschinen for each group as a little extra. Would mean alot of trade offs as in "historical accuracy" (which isnt achievable anway imho) and not so much variation of each jg., but would cut down filesize quite a lot. Id do the jg26 pack anyway but thatll take a bit longer and i want to hear what people think about that. So its either a small variation but across the board or large variation on a spot. I want to refrain from doing individual machines. that id leave to others. Its not difficult to do all of the above but time is the main factor. Thoughts? Suggestions? -
cannot reproduce Fw-190A8 - MG 151 gun overload jam
Doughguy replied to Marduk879's topic in Bugs and Problems
I had a similar "issue" with the dora when in a dive i deployed starting flaps which enabled me to pull some tight g curves. That broke my guns. -
A neues Gwand für die Dora! - Hi Res Textures for the Dora
Doughguy replied to Doughguy's topic in DCS: Fw 190 D-9 Dora
Will be a template. Albeit a rather big one as a single file. Right now its a whoppig 4 Gig of disk space... Diffuse only. One factor that contributes to the filesize sure is that fact that i create alot of templates for possible patterns, eg on the wing undersides. So one only has to activate a wanted layer and pic a color. -
A neues Gwand für die Dora! - Hi Res Textures for the Dora
Doughguy replied to Doughguy's topic in DCS: Fw 190 D-9 Dora
Been quiet a bit lately. Havent done much work to show off apart from adding jg4 and jg6 waistband templates. My main work currently consists of cleaning up the layer mess the current workfile is and reorganizing the layers to creat a nice and coherent template. Means i have to redo alot of masks, and plan layer groups and folders,so they can be masked properly.. tedious work. But itll pay off in the end, cause i dont want a bare metal chip layer stuck ontop of everything thing going, but real subtractive work so each paint layer can be adressed (think corsair with the bare metal, oxide primer and paint layers showing on the worn of areas). -
A neues Gwand für die Dora! - Hi Res Textures for the Dora
Doughguy replied to Doughguy's topic in DCS: Fw 190 D-9 Dora
Corrected the jg 301 group marker. added jg2 tailband template but will have to slim it down cause uvw´s.. enlarged the swastika Also some more dirt blockout. -
A neues Gwand für die Dora! - Hi Res Textures for the Dora
Doughguy replied to Doughguy's topic in DCS: Fw 190 D-9 Dora
some fixes. @DB 605 cheers! yeah ive applied some masking to the bottom dirt, having the focus of this around the wheel areas and towards the rear fuselage. thats where all the grime kicks up and such. as doras flew alot from improvised airfields. still have to match colors a bit and blend the sides downwashed dirt with the bottom dirt... ive kept the chipping minimal. most little specks are around where debris on start / landing would kick up, and of course areas that are handled alot like cockpit, hatches etc. will look into it tho mate. thing is, i kinda have to settle for something. filze size is huge. 5 gig for the working file. 20mb for a single diffuse map and you need 4 of them. plus 4normal and 4 spec/roughness maps. So in the long shot it want to change whats absolutally necessary when doing other versions, like eg, only the diffuse maps and the rest will stay the same. there sure were some doras that got delivered in pristine condition but were shot downon their first combat mission, but where´s the fun in that