Doughguy
-
Posts
631 -
Joined
-
Last visited
Content Type
Profiles
Forums
Events
Everything posted by Doughguy
-

A neues Gwand für die Dora! - Hi Res Textures for the Dora
Doughguy replied to Doughguy's topic in DCS: Fw 190 D-9 Dora
Time to dirty up the dora. Started adding dust and grime. Bottom is bit too much for my likin, gonna tone it down. Redid the labels to be more readable. Added JG 301 tailband template and group markings....as you can see...HEAPS OF UVW FUN! -
Sorry, indeed. Was on the move.
-
Try to stick to procedures. 190s dont like to slow down so you have to think ahead. Heres how i do. Once i approach the airstrip depending on how safe i am and height/speed etc. Descend to about 300meters airspeed 300kph. Set throttle to idle or use rudder and opposite direction stick to utilise the full fuselage as a airbrake. Fly parallel to the airstrip with wingtip just about touching the runway. Fly along the runway until your tail passes the end / touchdown point of the runway. Lower flaps fully and gear. Ata should read about 1.7 1.8 ish as itll give you constant speed. Now turn into the runway. If done right your speed will bleed alot because of the sharp turn and your height shouldve dropped to about 250kph. Now aim with your reticle for the end of the runway eventually with the first vertical mark below the center cross and keep steady. Dont let the anton let you distract from bucking around. Give gentle corrections. If the general course is right its all good. Watch speed and descent rate. Latter shouldnt be 2 or higher. Ideal is about 1.5ish. Dont pull up if you descent to quick but increase throttle. Try to keep landing speed ro about 180. 200 is already too fast. 150 is touchdown speed! The tricky part is the flare just before t/d. Ive crashed on so many occasions after perfect descends just because i was to fast or too high. Its an experience thing tho. Try to memorize how the distance to the ground looked judging from when youre static on ground. Right before the flare you set your speed to idle 1.2 ata and pull back gently at a speed of about 150. If all done right shell dump on the ground and now you pull back on the stick full to lock the rudder. It too me a few tries but using the crosshair as a visual aid helped alot.
-
A neues Gwand für die Dora! - Hi Res Textures for the Dora
Doughguy replied to Doughguy's topic in DCS: Fw 190 D-9 Dora
Evening doodle Some surface wear and tear of the paint. cockpit area has most wear along bottom surfaces towards the lowest point and leading edges that get debris going their way. Generally those areas that get alot of manhandling and such. -
Modifying Cockpit graphic models for sim pits?
Doughguy replied to maffoA10's topic in DCS World Tutorials
That would depend on the model / module really, but theyre all in the main directory. Easiest would be to load the cockpit POV model into the model viewer and check what textures are used. Paths to said textures can be looked up from there. -
A neues Gwand für die Dora! - Hi Res Textures for the Dora
Doughguy replied to Doughguy's topic in DCS: Fw 190 D-9 Dora
Well well... started reorganizing and cleaning up the diffuse. Some parts i will discard and redo due to the redone panel and riveting map. Had a go at creating masks for the surface wear and test some brushes. not sure if its too much but as its been shown above that its legit. Also repositioned the fuselage cross towards the aft... so double digit bort numbers now have some more space and also stabs markings will work.. Collecting a lot of pictures of dirty surfaces... preferably white vans and trains... people are giving me looks... Of course... the usual UVWs horrors one has to deal with. -
Modifying Cockpit graphic models for sim pits?
Doughguy replied to maffoA10's topic in DCS World Tutorials
Alpha Channel in textures on anysurfaces that you want invisible. -
A neues Gwand für die Dora! - Hi Res Textures for the Dora
Doughguy replied to Doughguy's topic in DCS: Fw 190 D-9 Dora
It is what it is i guess. Been bit of an ordeal. The Dora really needs a total overhaul as its pestered with issues and ancient ways of creating 3d models that it really hurt to create textures so far... Eg. overlapping UVW´s etc I´m gonna do the stressed skin now. Some reference hunt first. From that point on the normal map will be generated and following masks etc for diffuse etc. -
A neues Gwand für die Dora! - Hi Res Textures for the Dora
Doughguy replied to Doughguy's topic in DCS: Fw 190 D-9 Dora
Last bit for today. riveted and screwd (huehuehue) the canopy. Final touch ups for the riveting and panels tomorrow, then i move on to "stress" the skin... Gotta love them UVW´s... -
A neues Gwand für die Dora! - Hi Res Textures for the Dora
Doughguy replied to Doughguy's topic in DCS: Fw 190 D-9 Dora
Thanks, reflected made a mini campaign. Not sure if its out yet. -
A neues Gwand für die Dora! - Hi Res Textures for the Dora
Doughguy replied to Doughguy's topic in DCS: Fw 190 D-9 Dora
Cheers guys. I´m lookin to finish the panel and riveting work this weekend. It wont be perfect due to obvious limitations the template provides... but i think the result will be nicer. And i also wanna move on since its quite tiresome. The Dora kinda lacks good documentation in that respect and i have to do a lot of research only to find that i have to work with cutbacks cause the template (model) does not fit, or vice versa. I´ve already tried to crank up the brightness/contrast levels to use that texture as a chipping mask for worn edges similar to what crazybump would generate from a normal map. results look promising! Will have to alter the diffuse according to the panel work but that was forseable hence ive done only minimal work in that field. Still havent touched any of the interour and fuselage, gear wells etc.. but thatll be a step after ive done the exterior shell. Small Update: Finished the taping of the contro surfaces. Will have to redo the cloth structure as it was too coarse previously, makin it look like a haversack. Added the base of the antenna, added hinges and fixed various areas. Unfortunately we´ll have to live without welding seams on the supercharger scoop.. Also, ive fixed the rivetin pattern on the flaps. Pretty nifty what one can find on ebay as ref. -
A neues Gwand für die Dora! - Hi Res Textures for the Dora
Doughguy replied to Doughguy's topic in DCS: Fw 190 D-9 Dora
More work... a silver lining... most riveting is done. Canopy and few small things missing. Added the external power supply and flare chute. Started working on the control surfaces with their taped appearances. MG hood has skewed UVWs so i have to omit the horizontal lines on it.. same with the welding lines on the supercharger scoop... *onecanthavenicethings...* -
A neues Gwand für die Dora! - Hi Res Textures for the Dora
Doughguy replied to Doughguy's topic in DCS: Fw 190 D-9 Dora
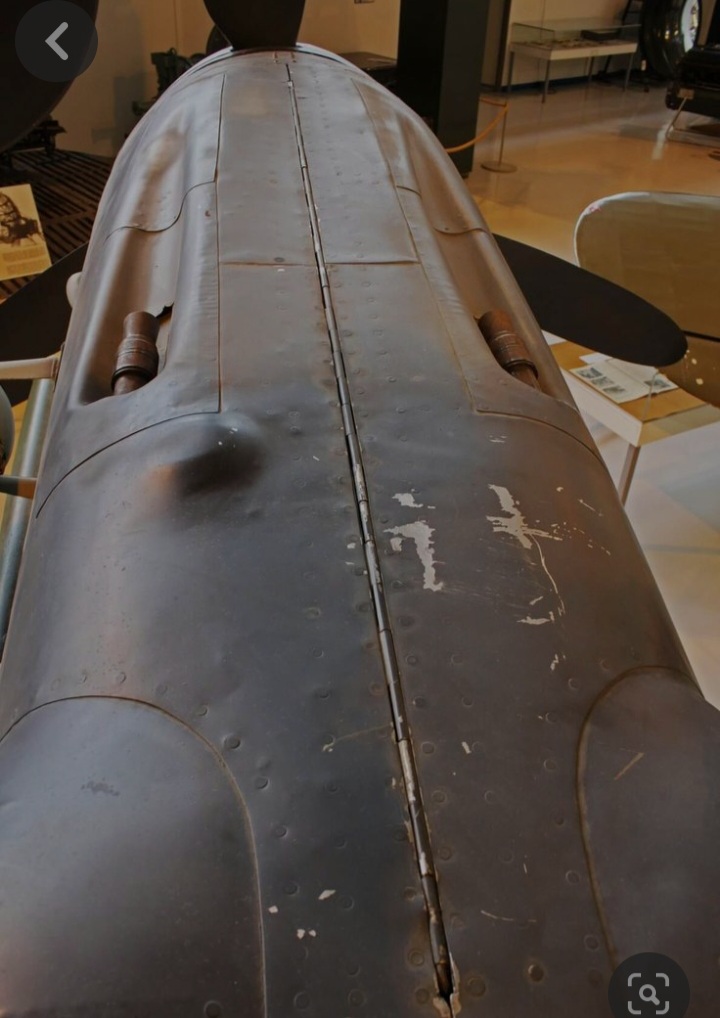
Thx bud. I guess maybe ive explained myself badly. Chipping happend yes but not as an overall even pattern and not as flaky as often portrayed. The rlm paint rather wore off so all the walkways used by crew and pilot were rather prone to abrasion. At least judging by the soft appearence of that respective area. This corresponds with what ive read about rlm paints bein rather fine and chalk like. Us paints applied thickly would crack and chip easily after few hours (what ive read). Same pattern can be observed on the doras albeit less as these were "consumed" rather fast before they could devolp such level of wear telling from the pics ive seen. But some chipping here and there due to debris etc. Yes. Happens but not how its usually shown in games/models. More interestingly it appears that also wings of (at least) some doras were puttied like the mustang, however its not entirely clear to me how. Theres accounts of putty bein used on the front half of the wing, but also just several layers of paint (again front half of wing) which in turn just gets sanded down do gain a smooth surface (there goes my riveting....). Funnily enough that would sort of explain why some doras and antons had the front half of wings painted in the known manner. Also judging from the pics said abrasions (like on the above pic) found on the walk ways appear rather dull and of bright color and uniform appearance under different lightning. So i come to the conclusion that that respective area has been puttied. Also im pretty sure theres a eff ton of dirt and grime on that area.. But its hard to tell or be sure from observations alone given the fact that late machines werent primed at all or even puttied with a dedicated putty anymore. So basicaly all "chipping" and wear would show bare aluminium.. might also be a production run also... but i cant tell... i dont have any of the dora bibles by crandall and japo so if anyone knows, input is highly appreciated. I wanna do this right (as much as possible given the frame ED provides...) .. Thx guys. -
A neues Gwand für die Dora! - Hi Res Textures for the Dora
Doughguy replied to Doughguy's topic in DCS: Fw 190 D-9 Dora
Some more rivetin. Bulk is done. Some adjustments, which unfortunately are a real pita due to the skewed UVW´s... Means, if i find good ref, i cant really apply it. So the Dora Tex will just be a fancy look-a-like... Some panels still have to be corrected. Eg, removed the first aid panel/hatch, as i couldnt find it on any ref pics. Some hinges have to be corrected etc. -
Quote from Robert Forsyths book Fw 190D-9 Defence of the Reich 1944–45
-
Would be nice, however, the AI would be a major PITA as it would fly just like during the day.
-
to some extend yes.
-
A neues Gwand für die Dora! - Hi Res Textures for the Dora
Doughguy replied to Doughguy's topic in DCS: Fw 190 D-9 Dora
Some interesting things ive come across during todays research seassion while getting home. As ive read the RLM colors are rather chalky and dont chip as much as US counterparts which are rather thick in finish. Also heavy wear as on chipping doesnt seem to occur and appears to be heavily overdone in 3d and modelkits. The RLM colors wore rather down on abbrasion primarily it appears especialy on the wingroots where the usual textures show heavily flaky chipping. However they indeed are dirty af. Already collecting ref pics to use as base for getting dirty with this bird. Pics also show quite well how uneven the panels were and how much warping was going on. Also riveting thats rather uneven.
-
A neues Gwand für die Dora! - Hi Res Textures for the Dora
Doughguy replied to Doughguy's topic in DCS: Fw 190 D-9 Dora
Pic of said Blue 12. You can easily make out some different colored patches and the mg housing has a replaced corner in bare metal. -
A neues Gwand für die Dora! - Hi Res Textures for the Dora
Doughguy replied to Doughguy's topic in DCS: Fw 190 D-9 Dora
Hi. Thx. Ive skimmed some literature and studies photos. Im no expert but you have to keep in mind its 44/45. Situation is dire. Rlm colors used as available. No primer used on aluminium surfaces but just thin layers applied by unskilled force labor workers. Very few veteran pilots left. Young pilots fall like flies in their new machines. So field repairs -if even necessary as losses were high and write offs a regularity- would devise anything the mechanics could get their hands on. So any color that somehow matched the original color. Primer or not. Or just left bare metal. Some holes might be just patched up with cloth patches like seen on the 190 gear covers. Other parts were cannibalized and cut to fit and riveted. The late doras and kurfürsts were real frankensteins. At least thats what ive gathered. So anything goes. Best documented example is fw190d9 blue 12. -
[4K TEXTURE OVERHAUL, WIP] Magic's Modified Mustang Makeup
Doughguy replied to Magic Zach's topic in DCS: P-51D Mustang
Yup same approach i do. I just skipped redrawing lines as placeholders and just used exiting literature and photographs as guides. You need some adjusting here and there and i work panel by panel with some rough guiding lines so panels and rivets align but it works quite well. However, since the Mustang and Dora vary a lot from their real life counterparts its hard to follow said photographs so the in case ofthe Dora its gonna be some b@stard child of a focke wulf.. Think same case should be with the Mustang Yeah adjusting mismatched gaps across UV islands is easier since you can just select a point of each shape and accurately adjust it by movin it with the arrow keys on the keyboard. However it wont help with jacked UVW´s... if they´re faulty.. they´re faulty. You coult compensate but imho it just not worth it if its barely visible. The Dora suffers from skewed ,faulty and poorly laid out UVW´s alot... -
A neues Gwand für die Dora! - Hi Res Textures for the Dora
Doughguy replied to Doughguy's topic in DCS: Fw 190 D-9 Dora
Cheers bud. Half the job or even more is just observation. So gathering ref pics like a magpie on crack is what i do. -
A mate of mine is using twist for rudder aswell. He has problems with breaks tho as cause they rather need an axis input.
-
[4K TEXTURE OVERHAUL, WIP] Magic's Modified Mustang Makeup
Doughguy replied to Magic Zach's topic in DCS: P-51D Mustang
Feel your pain with the dotting man since i do a 4k retex of the dora myself. Good work so far! As a note tho: If you´re going to use this map as a base for a normal map, make sure that some panels/parts overlap and are situated over the main panels. Usually renders in a not so visible line around said part. Usually its the wing filets and such. For that i work off of a grey base and adjust the protrustion of the panels/parts by either darkening or highlighting said part. It´s pita working in that old skewl way especially if you have skewed uvw´s.... so yeah cant help it but make the most of it.