jay43
-
Posts
696 -
Joined
-
Last visited
Content Type
Profiles
Forums
Events
Everything posted by jay43
-
A most excellent addition to your missions I need to group up they ripped me to pieces on the way in lol.
-
Thanks for the links guys. Ok just a heads up 14hrs ago I did the above and its still working fine well it still had charge even though it was just below 4v, it appears when the voltage has dropped that low the lights must be weak as the cam picks up movement but its jittery. So changed bat and still good.
-
Right guys this is super easy even for the novice its taken me all day to fathom it out that included taking a board of watching you take stuff apart misses for lunch lol gotta keep em sweet. You need a 5v bat, now as I have hacked many controllers I have spares the ones I have tried that are confirmed as working my end are the one from a PS3 DS3 controller its output is 4.99v stable not sure how long the charge will last which doesn't bother me as I can charge them through the old pcb from the controller which even though its parts have been stripped its still charging happy days. Next DON'T CUT THE WIRE WHILE THE TRACK CLIP PRO IS PLUGGED INTO YOUR COMPUTER did I say that loud enough. You can also now remove the cam from the adapter on that lead and plug the cam direct without the lead you just cut. You will need to keep the plug on the bat unless you know another way to charge it safely I haven't got that far yet. The plug on the bat will take jump wire pins so no probs there just solder the wires from the track clip pro to the ends of your jump wires and slot them into the bat the right way round black to black red to red its as easy as that. Find a way to attach it to your head set or head or where ever you have it for complete wire free playing. The beauty of the bat is its very light weight its not like adding 4 AA's to your head the weight is a fraction of those. I am going to leave it switched on and report back after watching a few movies time now here in the uk is 19:30 lets see how many hours the bat holds its charge for its at 4.99v at the moment.
-
Right guys this is super easy even for the novice its taken me all day to fathom it out that included taking a board of watching you take stuff apart misses for lunch lol gotta keep em sweet. You need a 5v bat, now as I have hacked many controllers I have spares the ones I have tried that are confirmed as working my end are the one from a PS3 DS3 controller its output is 4.99v stable not sure how long the charge will last which doesn't bother me as I can charge them through the old pcb from the controller which even though its parts have been stripped its still charging happy days. Next DON'T CUT THE WIRE WHILE THE TRACK CLIP PRO IS PLUGGED INTO YOUR COMPUTER did I say that loud enough. You can also now remove the cam from the adapter on that lead and plug the cam direct without the lead you just cut. You will need to keep the plug on the bat unless you know another way to charge it safely I haven't got that far yet. The plug on the bat will take jump wire pins so no probs there just solder the wires from the track clip pro to the ends of your jump wires and slot them into the bat the right way round black to black red to red its as easy as that. Find away to attach it to your head set or head or where ever you have it for complete wire free playing. The beauty of the bat is its very light weight its not like adding 4 AA's to your head the weight is a fraction of those. I am going to leave it switched on and report back after watching a few movies time now here in the uk is 19:30 lets see how many hours the bat holds its charge for its at 4.99v at the moment.
-
Looking here http://forum.naturalpoint.com/forum/ubbthreads.php?ubb=showflat&Number=49418&page=1 It appears some people have already done this there is even a mention in the thread of DCS so come on who has done it share your findings with the community so we can all have it wireless. A simple tutorial will do please. What I would like to be able to do is remove the clip from the 3 point module and permanently fix it to my headset as the clip part is its weak point with a simple battery connection.
-
4 AA's should do the trick i'm thinking.
-
On amps I am picking up 0.01
-
Ok so before the resistor it 4.99v and after its 4.09v.
-
That's a sweet set up nice thanks for sharing gives me some ideas I especially like the knight rider lights on the system quality.
-
Did anyone have any luck with Teensy programing, I am using Teensy 3.0 at the moment for another project for PS3 which I have working now. So just out of curiosity what do you need Teensy to do and I will see what I can do.
-
Those are looking very professional infact I would say they are better than the real thing contact Fairchild see if they want to place an order lol. I will as soon as I get my pit fabrication under way top marks Glider.
-
I too like the shakes it gives that nudge, hey you if ya don't pull on that CP we are going down. Could do with toning down just a tad not to much I feel it can sometimes be a little aggressive on you and feels like the whole thing is about to implode on you in mid air.
-
The thing that's been on mind for a while with this clip is why the damn wire, so I just peeled back the foam padding and it appears there are only 2 wires there red and black red has a resistor attached which now leads me to believe there is no data passing through these wires just power. I'm going to test it with my metre as I would prefer it wireless, I bet it only uses 5v or there about I will post my findings.
-
It is I have just made a keyboard for my other gaming exploits, I used it to stick cherry mx keys in a shape and format comfortable for my hand allowing for minimum finger movement across all 4 fingers using 12 keys. When it sets it sets like a neoprene rubber very stiff with barley any flex at all. And the best thing it bonds to anything porous and non porous surfaces.
-
I haven't had mine more than 6 months and it broke. I fixed it using Sugru I would suggest anyone who has the pro clip do the same even if its not broken as this stuff would reinforce it check it out the future needs fixing and this is stuff to do it with. https://sugru.com/
-
Great video seen it on history but just had to watch it again just wish the history channel would get their facts right as to the build up of the war and when it started I suppose you can't fit everything in to a 45 minute presentation.
-
So far so good then. I did get the odd micro stutter which I think is cause the 40g SSD is slightly old and not running the 6gb write speed I could be wrong but that was what I had in mind to change.
-
Remember its still in beta phase at the moment so we are not on the final release yet.
-
I would suggest you read this and follow PeterP's mod instructions lots have and it works a treat. http://forums.eagle.ru/showthread.php?t=96116
-
Don't give up so easily Laura I to have been in the same boat here but the community are all very helpful in pointing you in the right direction. All it takes is some time and a little patience from yourself. I have absolutely no experience with PC's what so ever apart from the obvious day to day tasks for work when it comes to integrating software and programing I at a loss and scratching my head. PeterP has some very good mods for this game along with his very precise tutorials on what to do where when and why. Stick with it the rewards are very satisfying.
-
Think I got it right now....
-
I thought that at first but my file size is less than 9mb so it should be ok strange. Plus it plays seamlessly at 55fps stable no lagging or micro stutters.
-
I know messed that up didn't I doh lol I was in the process of removing it but it appears I can't sorry if you have come here I did not mean to waste anyones time please remove topic.
-
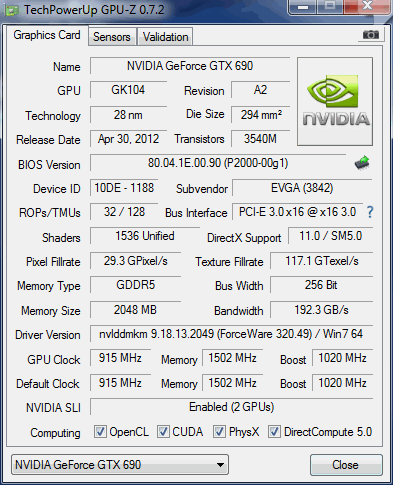
Ok think I got it right now so here's my system specs I think as I copied everything word for word from my Asus system tabs if there is anything missing please give me a heads up. I am not experiencing any performance issues to my knowledge, I don't even know what any of the info I am posting even means, but was just curious if there were any areas I could maybe improve on. As follows, MB Manufacturer - ASUSTeK Computer INC. Product - P8Z68-V PRO Version - Rev 1.xx BIOS Manufacturer - American Megatrends Inc. Caption - 11/09/2012 Version - 3603 CPU Manufacturer - Intel Caption - Intel64 Family 6 Model 42 Stepping 7 Name - Intel ® Core ( TM ) i5 - 2500K CPU @ 3.30Ghz Socket - LGA 1155 Family - 6 Model - A Stepping - 7 Ext. Famuily - 6 Ext. Model - 2A Instructions - MMX,SSE,SSE2,SSE3,SSSE3,VT-x,SSE4.2,AES,AVX,EM64T Cache L1 data - 4 x 32 KB L1 Inst. - 4 x 32 KB Level 2 - 4 x 256 KB Level 3 1 x 6144 KB Cores - 4 Threads - 4 SPD Slot # 2 and Slot #4 as below Type - DDR3 Module Size - 4096 MB MaxBandwidth - 800 MHz Manufacturer - G Skill Intl Part Number - F3 - 12800CL9-GBXL Serial Number - blank Week/Year - blank Timings Table JEDEC#1 JEDEC#2 JEDEC#3 JEDEC#4 JEDEC#5 JEDEC#2 JEDEC#3 JEDEC#4 JEDEC#5 JEDEC#6 JEDEC#3 JEDEC#4 JEDEC#5 JEDEC#6 XMP-1600 Frequency - 457MHZ 533MHZ 609MHZ 685MHZ 761MHZ 533MHZ 609MHZ 685MHZ 761MHZ 838MHZ 609MHZ 685MHZ 761MHZ 838MHZ 800MHZ CAS#Latency - 6.0 7.0 8.0 9.0 10.0 7.0 8.0 9.0 10.0 11.0 8.0 9.0 10.0 11.0 9.0MHZ RAS#to CAS - 6 7 8 9 10 7 8 9 10 11 8 9 10 11 9 RAS#to Precharge - 6 7 8 9 10 7 8 9 10 11 8 9 10 11 9 tRAS - 16 19 22 24 27 19 22 24 27 30 22 24 27 30 24 tRC - 22 26 30 33 37 26 30 33 37 41 30 33 37 41 40 Voltage - 1.5V 1.5V 1.5V 1.5V 1.5V 1.5V 1.5V 1.5V 1.5V 1.5V 1.5V 1.5V 1.5V 1.5V 1.500V Cooling CM - 690II Advanced Power Supply OCZ ZX SERIES 80 PLUS GOLD Drives Intel SSD's - 120g with OS on Windows 7 64bit HP, 40g with DCS game on soon to be changed to a 120g HDD - ST310005 24AS SCSI Monitor - Samsung M230x3 triple set up GPU - EVGA Nvidia GTX 690 multi GPU enabled PhysX settings Auto GeForce GTX 690(B)

-

New Graphics Card Buying Advice
jay43 replied to rayz007's topic in PC Hardware and Related Software
I got the 690 to run my triple set up no problems to report runs fine but I am not a technical guru I just got it to run DCS.