Hempstead
-
Posts
473 -
Joined
-
Last visited
Content Type
Profiles
Forums
Events
Everything posted by Hempstead
-
Ya... Power over Ethernet. It's a standard that is build into PoE capable switches to carry power over certain wires in the Ethernet cable. The receiving ends have to split the power out. This way, you can skip the power wire to your Ethernet-to-USB-C adapter. So, one Ethernet cable in, and that's it. Obviously, you need an PoE capable Ethernet to USB-C adapter. I have one capable of the required 60W. Note that, PoE capable switches are not cheap.
-
Has anybody tried PoE?
-
Note that I was fully prepared for multi-week tuning sessions, but all I did was updating the firmware to the latest, and changing the Memory Bus Speed from Auto to 3,200MHz, as Auto resulted in 1,600MHz, so I forced it. Of course, after Win11 Pro installation, update to the latest drivers from Asus Driver Hub (to be turned off, as there is an RCE reported, and supposedly fixed), Windows Update to the latest, and Nvidia App/driver to the latest as well, the usual. That is Joe-Six-Pack achievable. It passed an one hour CPU + RAM stress test... There is not much point in running a 48-hr burn test I used to do on gaming rigs. They are not file servers. And I have had it up for about two+ weeks with multiple DCS/MSFS 2024 sessions, without a problem. I don't turn off my machines. It hasn't crashed once since. Also, before updating the firmware to the latest, it was very unstable. So, that tells you that the firmware improved quite a bit during the several months Asus made the board, and it being shipped to my hands. The "problem" at least seems fixable with firmware updates (plus the DIMMs improved; there is a good reason why I paid premium for Crucial/Micron DIMMs; they are more conservative and rigorous in what they claim, unlike some Asian startups.). So, whatever you "heard" on the Internet about 4x DIMMs being unstable is probably outdated, at least for this particular motherboard. And since this firmware is an AMI... I am speculating that all the AMI firmware equipped motherboards would be fine. Just speculating.... unconfirmed. The salient point I am telling you is that there are reports that 4x DDR5-6400 DIMMs are workable now, and I have replicated the result, easy. So, now you get an expanded baseline with 4x DDR5-6400 DIMMs. There is, of course, always some risks involved building your own PC, and be the manufacturer of your own PC. What's the failure state of taking a well known good baseline list, change one thing and one thing only, the 4x DDR5-6400 DIMMs in this case, and push? The worst case scenario is that the 4x DIMMs are unstable, no matter what frequency I set it to, and it corrupts my SSD. All I have to do is taking out 2x DIMMs, and perhaps tuning down the memory speed. All I lose is a bunch of time, and perhaps $200 worth of RAM, which I could either resell and recover some money, or use them in another computer. Risk, sure, not that much, really. All good clean fun, anyway. If you are building your own PC, and you don't have 40 years of PC building experience under your belt, then take a confirmed well known good list... and build just that. If you are more adventurous, take a baseline list, change one thing and one thing only and push. Nobody says you can only push once. You are welcome to push n times. I'd like to know your n-pushes and results though. Me? I am here for the games... I pushed one time... and I won... I wanna play some more games.
-
Watch this.
-
Just passed OCCT CPU + RAM stress test for one hour with flying color (and I have been flying DCS and MSFS 2024 with it for about 2 weeks). The CPU Tdie temperature never went over 60ºC, staying at around 58ºC (core temps were at some cool 32ºC). RAM temp was at about 42ºC. That's 32x logical cores going full blast at 100% for an hour. System Spec: Motherboard: Asus ROG Crosshair X870E Hero CPU: AMD Ryzen 9950X3D RAM: 4X Crucial DDR5-6400 DIMMs, 128GB (not on the MB QVL, but Crucial site confirmed the compatibility) SSD: Crucial T705 4TB Gfx Card: PNY RTX5080 OC AIO Cooler: Asus Ryujin III 360 Power Supply: Seasonic Prime PX-1600 All fans are Noctua NF-A14x25 gen 2, the AIO has 3x Noctua NF-A14x25 gen 1 (very quiet) Note that, the T705 SSD is a PCIe gen 5, and so is the gfx card running with PCIe gen 5. The T705 does run hot... 50ºC at idle. I am thinking about adding a fan just for it. But a gaming rig's SSD workload is not very high. It's very bursty but not very much sustained load. I would agree that the X870E had a very rocky start with PCIe 5, particularly with RTX5000 cards when it just came out. And it also had some trouble with DDR5-6000+ RAM and 4x DIMM at the beginning. When I first got the system up and running, it was very unstable... but as soon as I updated the motherboard with the latest firmware from Asus. It was rock solid, except Win11 and Nvidia driver still has that problem of once the screen blanks it won't come back, including the installer of Nvidia driver Nvidia App itself. I RDP into it, and it won't come out of the blank screen when I logged off RDP. But other that, it's been rock solid. JayzTwoCents was just testing DDR5-7800 (unstable) and -7600 (stable) for his 9950X3D rig today. -6400? Right... Of course, YMMV. And.... BTW... I didn't change a thing in BIOS. Didn't bother tuning anything.... yet. You have to establish a baseline before you push the envelop.
-
Keyboard and mouse, where to put in my pit? https://blog.hempstick.org/2025/06/where-to-shove-my-keyboard-and-mouse.html
-
I have 4 sticks of DDR5-6400, 128GB, on an Asus X870E Hero, Win11 Pro. It was very unstable... until I burned the newest firmware on the motherboard. It's..... kind of stable now. Not sure if it helps DCS at all. I have no baseline to compare it with other than I can get 45fps min. < 1,000' agl, and 90fps > 1,000' agl in Germany map, or any map, with a Quest Pro, and a PNY RTX5080 OC.
-
F-16 front panel 10 degree fixing quick connect adapter, and keyboard/mouse tray. The great thing about this extrusion build is that you get to "invent" all kinds of stuff to attach to it. https://blog.hempstick.org/2025/05/10-degree-quick-connect-adapter.html
-

XRFrameTools: performance measurement for OpenXR
Hempstead replied to actually_fred's topic in Virtual Reality
Hey Fred, I am getting a CTD upon switching to VR in MSFS 2024, with the following error message in event viewer. Once I uninstall the XRFrameTool, I no longer gets the crash. Let me know what I can help to get you the dump or any info you need to track this down. I like the XRFrameTool quite a bit! I want it back! Faulting application name: FlightSimulator2024.exe, version: 1.4.20.0, time stamp: 0x00000000 Faulting module name: XR_APILAYER_FREDEMMOTT_d3d11_metrics64.dll, version: 0.2.0.139, time stamp: 0x680e99b7 Exception code: 0xc0000005 Fault offset: 0x0000000000033f84 Faulting process id: 0x9208 Faulting application start time: 0x1DBC79C4DE92F20 Faulting application path: C:\Program Files\WindowsApps\Microsoft.Limitless_1.4.20.0_x64__8wekyb3d8bbwe\FlightSimulator2024.exe Faulting module path: C:\Program Files\XRFrameTools\lib\XR_APILAYER_FREDEMMOTT_d3d11_metrics64.dll Report Id: 213bbfaa-26ef-4f64-86ec-6598ee3354f9 Faulting package full name: Microsoft.Limitless_1.4.20.0_x64__8wekyb3d8bbwe Faulting package-relative application ID: App -
@Qcumber Thanks for testing & publishing these. My new gaming rig is very similar to yours, except a slightly higher spec. that really doesn't matter to DCS. Saves me a lot of time tuning this stuff!
-
It's been one of the most difficult builds I have ever had since the 1980s. It's all down to the combo of Win11 & Nvidia driver, a 9950X3D + RTX5080 build. It's not unheard of to have to reinstall the OS multiple times for a build, and I had a share of them. The difficulty this time is that it just crashes without leaving an OS event, except a dump. Now, unless you are an MS Windows engineer with access to their source code, which some of my neighbors probably do, the dump file is useless to us. So, I am reverted back to Asus motherboard QCode and guess. The blank screen randomly, even with the latest Nvidia driver just released 2 days ago didn't help. In fact, the latest just crashed the OS. Hell... the damned Nvidia App crashed the OS while installing the latest GAME READY driver! And then the OSD wouldn't work, etc. etc. There were even an AMD and ITEC USB update failed to install, etc..... until I did the Window cumulative update twice! So, somethings got patched once, and twice, and the order of the patches/drivers installation matters! WTF??? I have never seen crap like this since the 80's! I have finally stabilized it... but it's been a shooting in the blind affair.... and I don't like that. Anyway, if you are going this way, I advise that you install Win11, patch everything to the gill, and install "all other" drivers before you do the Nvidia thing. Some of you might argue that this is the "right" order of installation... not really... depending on how you get here. In the olden days of Windows installation leaving you with default 640x480 VGA resolution, and some of their stupid pop up dialog box were longer than 480 pixels... the very first thing you do after the OS is up is to install new gfx drivers so you can see the dialog boxes' entirety! Plus, usually the gfx driver was the least troublesome one to install. I mean, it has to work, or you see nothing and nothing can be done... until recently that is.
-
And the news/rumor making the round is that Nvidia might be increasing the prices of gfx cards! Not sure how true that is, but the PNY 5080 OC card I got for MSRP is now listed by the same retailer for USD$200 more than I paid.
-
Finally got all the parts of my 9950X3D + PNY RTX-5080 OC + 128GB RAM machine, brought it up and seemed stabilized. And got some DCS modules installed with minimal setup. Jumped into an F-16 on both Mariana and NTTR maps. Texture and Terrain Texture both set high, DLSS on, QuadView on…. Quest Pro device res. set to the highest, 90Hz, PD 1.0. Got pretty much 90fps all around. Have not done much testings yet, like with a lot of explosions, AH64, F-4E etc. yet. But, the first impression is very smooth and very little to no stuttering.
-
Fixing TPR onto the carpet floor
Hempstead replied to VR Flight Guy in PJ Pants's topic in Thrustmaster
I used to use a piece of marble designed for rolling croissants. Bolt the rudder pedals to the marble, as long as the marble is heavy enough it won’t move around. You can get it cheaper from HomeDepot and the likes. A piece of chopping board will do too. The good thing about wood is that you can easily add some “nails” facing downward to “grab” the carpet. -
DCS World on Linux Mint
Hempstead replied to foreign life's topic in PC Hardware and Related Software
Irony of irony. Quest 3 runs a version of Android OS.... i.e. a Linux. -
https://www.hempstick.org/download/manual/Hempstick-UserGuide.pdf, pp. 34.
- 1 reply
-
- 2
-

-
Yippee! I got my hands on a 9950X3D at MSRP, sorta! All I had to do is flew to Taiwan, walked into the first shop off the escalator in the infamous/famous KwangHwa Market and asked about it. OK OK, I have some business to do in Taiwan. So I thought I’d give it a shot. That market hasn’t disappointed me since the 80’s. With the RTX 5080 I already have, I can finally start ordering other parts for the new gaming rig.
-
Man... in VR, I just look at F4, and my FPS tanks to like 10fps. Gives a new meaning to the phrase "What are you looking at?".
-
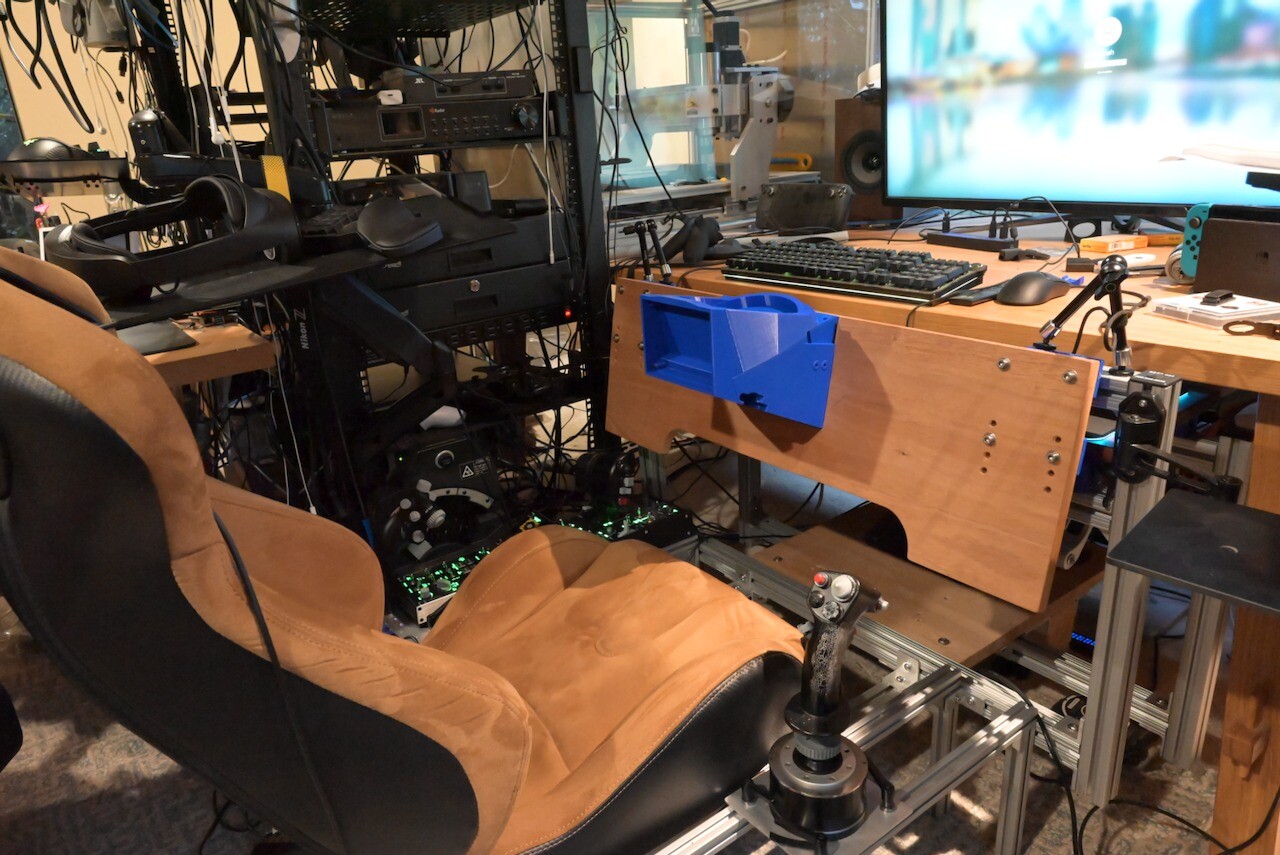
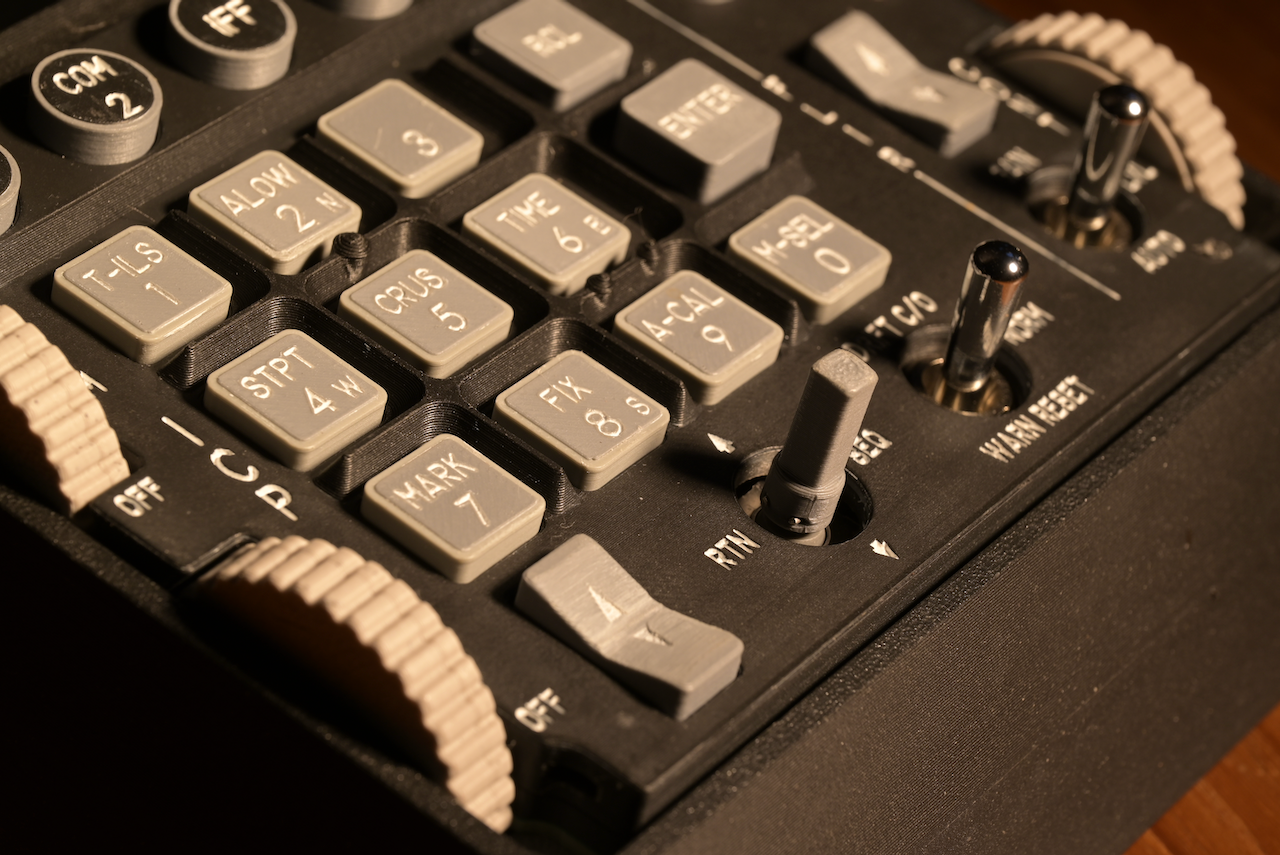
That's not that much extra space than an office chair in the picture below (the rudder is still under the table). You indeed would need slightly more space than with just an office chair, but not much considering you also need space to move the office chair in/out, and for you to get in/out of the chair etc. My "VR pit" basically occupies that "free space" needed for an office chair and causes some inconvenience for my real office chair right behind it (I just have to slide the "pilot chair" forward and fold it for using my real office chair). And I build it in place. Of course I have a garage full of machine tools to cut the extrusion and brackets etc. But the building of it is right there in place. I have no "passage" space to maneuver it to that position if I build it somewhere else. Admittedly, it's a bit cramped building it in place, but it's doable. But now I do need some extra space to get in/out of the pit on the right hand side. The trouble with a "pit" like this is that without the office chair... how are you going to play regular desktop games... or PS5/Switch games on monitor? My solution is to make the front panel easily replaceable. So I can quickly take down the F-16 front panel, and slot in a driving wheel board, or a sliding keyboard/mouse tray, in 3 minutes. Most of the connectors are just cheap home made aluminum L-brackets with drilled holes. And the connectors/adapters for the adjustable parts of the replaceable front panels, board, trays are simply 3D printed. Also, the previous 3D printed ICP picture I showed... The ICP was right out of the printer and laser, no sanding. The two rocker switches, you can't iron them, so they were printed without, and then sanded. You can see the huge difference between non-ironed/sanded vs ironed-right surfaces.

-
I have the Unobtainium, an RTX 5080 card. But I don't have a computer to put it in.... yet. Still waiting to get my hands on a Ryzen 9950X3D... *sigh*.
-
-
1. You could get the surface almost perfect by ironing the top..... the parameters require a bit tweaking (mine are listed below). 2. I would suggest not print the text. I found the best result is to laser the text/graphics, and then paint with Acrylic paint. It is possible to print with multiple color and the laser to expose the underlying layer but that is quite wasteful with printers like Bambu. Check out this page, https://blog.hempstick.org/2024/05/icp-letter-painting-dobber-analog-wheel.html Of course, the disadvantage is that you need a laser engraver. Common doide laser doesn't work well with clear PLA, but works well with colored PLA, particularly works very well with black matte PLA. Bambu X1C, try the following parameters for PLA Matte, 0.2mm Strength @BBL X1C profile. Ironing Type : Top Surfaces Ironing flow : 15% Ironing line spacing: 0.1mm (the rest stay with default of the profile) Sparse infill density : 100% Sparse infill pattern : Rectilinear You don't have to use 100% infill... but if you are going to laser engrave deep for white paint... it could easily poke through the top layers, and into the void... Plus, with panels... you aren't saving too much filaments nor time by using 25% infill. PS. Ironing takes a loooooooong time... but trust me, it's worth it.
-
AVR Pit (Augmented Reality cockPit). https://blog.hempstick.org/2025/03/avrpit-augmented-virtual-reality-cockpit.html
-
Some refinements of the Mini-Hall joystick mechanical design. https://blog.hempstick.org/2025/03/mini-hall-joystick-refinements.html
-
Mechanical prototype of the mini-Hall Joystick completed. Video of it installed on my bronze cast F16 TQS. https://blog.hempstick.org/2025/02/mini-hall-joystick-new-mechanical.html