DeepDrummer
-
Posts
470 -
Joined
-
Last visited
Content Type
Profiles
Forums
Events
Everything posted by DeepDrummer
-

The Big Show SpitFire IX campaign
DeepDrummer replied to 71st_Mastiff's topic in User Created Missions General
That is a perfect amount of time to read the book if you feel so inclined. -
What Sort Of Missions Do You Design For Yourself?
DeepDrummer replied to Tinkickef's topic in User Created Missions General
I made a bunch of crossings in Normandy and am currently enjoying a "Big Show Campaign" mission from time to time. For my tastes in order from most favourite to date are: Persian Gulf Caucus Nellis Normandy I could never limit my Spitfire to Normandy. I mostly fly the Spit although I keep buying aircraft for some reason. I think it would be nice to not populate the maps with period correct items but instead allow the Mission creators to populate the map with whatever is available to the developers and us paying customers. I.E. take out Jets parked at Airports when props are the thing. Let us park our own background static aircraft only. Limiting the maps to the default to be period correct parked aircraft only is a mistake. We should be able to create our own flight age anywhere in the world eventually. That would be the real icing on my cake. Delivering supplies over the Canadian Rockies in a C-47 heading for Alaska and then hopping in Aircraft heading into battle around Tomorrow Island and Yesterday Isle would be amazing. Someday... I looked at Moose. Very interesting. I can see that project being looked at in my future. Thanks for the idea. Indeed, making missions forces an awful lot of flight time, a bit of pulling out hair, a touch of neglecting household chores with small periods of great satisfaction. Often heard: "I just have to test this first". ;) -
The Big Show SpitFire IX campaign
DeepDrummer replied to 71st_Mastiff's topic in User Created Missions General
+1 I am really enjoying the reality aspect of this Campaign. I am almost halfway through the book as well. It presents some very good insights on procedure of operating the aircraft as well as being an amazing account of the events of the time. It's the best book I have read , at the suggestion of the creator of the Campaign, in 30 years. It is a dream come true on top of a dream come true. Many thanks to the creator of this Campaign. Nicely done! -
What Sort Of Missions Do You Design For Yourself?
DeepDrummer replied to Tinkickef's topic in User Created Missions General
I really enjoy making missions and campaigns myself. I usually finish one campaign a week. They are improving each time. This week was a mix of ground targets and bandits as well as bomber escort and defense of Nellis from incoming bombers. I am just learning to dogfight at this point. I have done a ton of high altitude max range missions although nowadays I prefer shorter missions with action almost immediately. This week It's basically a "clear the bandits and attack the bridge" type of thing. Last week it was racing through Dubai with ground targets and bandits. I prefer landscape with mountains or buildings these days for my missions. The eye candy is nice. I also make a "friends are coming over" mission weekly which takes into account that friend's skill levels are low and the time for allotted flights is about 20 minutes (during the break between hockey periods). In short they need to be fast (Air start) easy (I set up one switch as my buddy's switch to turn on everything required) and it must be fun. I am gradually learning to dogfight better. I am early on in that learning curve. For some crazy reason, I enjoy the problem solving, controller profile creation and mission making as much as the flying. It lets the imagination soar. -
I really have flown them all over the years. Once you learn the general aviation stuff, it can get boring. It is more about learning flight rules and procedures in a lot of cases. The whining that occurs in those sims. If things aren't exactly right...Wild. It gets to just making flight plans and hitting an Auto Pilot button in some cases although the challenge to get there is entertaining for a while. DCS World in my humble opinion has the most realistic aircraft and flight models. I can definitely see a market for civilian model transport aircraft which were used for Relief and Military use in the time period and locale. I would fly a C-47 all day long and definitely create missions and campaigns around it. With some twin engine props in the rumour mill for future DCS, there is enough hope to keep me happy here. Bringing her in with nasty weather with a cargo of life saving supplies has a nice ring to it. I wouldn't get overly excited about the whole commercial/General aviation world. They are so opposite, I would suggest not using the DCS World Name on it if you go that route. We all need to understand that in the development of things like DCS world, often GUIs and procedures and tools are developed to enable their creation faster and easier. Adding new aircraft becomes easier and easier once the systems are in place. Throw all that into the rumoured "gaming" version and make lots of money so we can spend more on the Combat side in the more maps department. Win/Win
-
SC
-
I keep coming back to my Spitfire although I enjoy all 3 warbirds I own and my jets rarely. I am really enjoying "The Big Show" Campaign which, to play, Normandy is required. Personally, I Love new maps and in the end they are all worth having. Nevada is nice nowadays as is the Caucus map and The gulf map is a work of art and improving. Most days I only fly my Spitfire. It's just my personal dream come true. No regrets buying any warbirds but my Spitfire is my go to bird.
-
Good points for sure. I am always a week or so behind the beta and so I never really know if things are issues anymore. Is the sun through everything still a thing? I am super envious of you getting to sit in an MKV. Enjoy! Regardless of gauges, the subtle engine sounds remind you of a lot of things. It's kind of like what the motorcycle dealer said to me when I commented on the lack of a tachometer. "Just listen to her and she'll tell you what she needs". He was right. No need. The spitfire engine sounds do tell you a lot in DCS as well. I watched a video yesterday of a Spitfire with the guage mod. It did look rather nice. Whatever it was is what it should be in my opinion. I too hope for more but not at the expense of realism. I hope you get to the bottom of it. Bring a little flashlight to introduce light into the glowing needles to see if they hold light on their own. That is the big question I think. Please let us know how it goes.
-
A couple dozen mouse clicks using the GUI can produce that or exactly 907 lines of hand written code like this: <HidCommand1> <EventName>Pitot Heat OFF</EventName> <IsSequence>False</IsSequence> <Layers>1 32</Layers> <Delay>-1</Delay> <Comment> </Comment> <EventsNumber>2</EventsNumber> <StartTrigger>0</StartTrigger> <StopTrigger>0</StopTrigger> <CurveType>0</CurveType> <Lower>0</Lower> <Center>0</Center> <Upper>0</Upper> <Trim>0</Trim> <Curve>0</Curve> <Zoom>0</Zoom> <Rotate>0</Rotate> <AxisIsReversed>False</AxisIsReversed> <AxisIsRelative>False</AxisIsRelative> <XPosition>50</XPosition> <YPosition>50</YPosition> <HidEvent0> <DeviceNumber>-1</DeviceNumber> <Name>L_CTL</Name> <HidType>1</HidType> <EventType>3</EventType> <ActionType>1</ActionType> <ControlIndex>224</ControlIndex> </HidEvent0> <HidEvent1> <DeviceNumber>-1</DeviceNumber> <Name>p</Name> <HidType>1</HidType> <EventType>3</EventType> <ActionType>1</ActionType> <ControlIndex>19</ControlIndex> </HidEvent1> </HidCommand1> <HidCommand2> <EventName>Nav Lights OFF</EventName> <IsSequence>False</IsSequence> <Layers>1 32</Layers> <Delay>-1</Delay> <Comment> </Comment> <EventsNumber>2</EventsNumber> <StartTrigger>0</StartTrigger> <StopTrigger>0</StopTrigger> <CurveType>0</CurveType> <Lower>0</Lower> <Center>0</Center> <Upper>0</Upper> <Trim>0</Trim> <Curve>0</Curve> <Zoom>0</Zoom> <Rotate>0</Rotate> <AxisIsReversed>False</AxisIsReversed> <AxisIsRelative>False</AxisIsRelative> <XPosition>50</XPosition> <YPosition>50</YPosition> <HidEvent0> <DeviceNumber>-1</DeviceNumber> <Name>L_CTL</Name> <HidType>1</HidType> <EventType>3</EventType> <ActionType>1</ActionType> <ControlIndex>224</ControlIndex> </HidEvent0> <HidEvent1> <DeviceNumber>-1</DeviceNumber> <Name>u</Name> <HidType>1</HidType> <EventType>3</EventType> <ActionType>1</ActionType> <ControlIndex>24</ControlIndex> </HidEvent1> </HidCommand2> <HidCommand3> <EventName>L.H. Dash Lamp Decrease</EventName> <IsSequence>False</IsSequence> <Layers>1 32</Layers> <Delay>-1</Delay> <Comment> </Comment> <EventsNumber>2</EventsNumber> <StartTrigger>0</StartTrigger> <StopTrigger>0</StopTrigger> <CurveType>0</CurveType> <Lower>0</Lower> <Center>0</Center> <Upper>0</Upper> <Trim>0</Trim> <Curve>0</Curve> <Zoom>0</Zoom> <Rotate>0</Rotate> <AxisIsReversed>False</AxisIsReversed> <AxisIsRelative>False</AxisIsRelative> <XPosition>50</XPosition> <YPosition>50</YPosition> <HidEvent0> <DeviceNumber>-1</DeviceNumber> <Name>L_CTL</Name> <HidType>1</HidType> <EventType>3</EventType> <ActionType>1</ActionType> <ControlIndex>224</ControlIndex> </HidEvent0> <HidEvent1> <DeviceNumber>-1</DeviceNumber> <Name>n</Name> <HidType>1</HidType> <EventType>3</EventType> <ActionType>1</ActionType> <ControlIndex>17</ControlIndex> </HidEvent1> </HidCommand3> <HidCommand4> <EventName>R.H. Dash Lamp Decrease</EventName> <IsSequence>False</IsSequence> <Layers>1 32</Layers> <Delay>-1</Delay> <Comment> </Comment> <EventsNumber>2</EventsNumber> <StartTrigger>0</StartTrigger> <StopTrigger>0</StopTrigger> <CurveType>0</CurveType> <Lower>0</Lower> <Center>0</Center> <Upper>0</Upper> <Trim>0</Trim> <Curve>0</Curve> <Zoom>0</Zoom> <Rotate>0</Rotate> <AxisIsReversed>False</AxisIsReversed> <AxisIsRelative>False</AxisIsRelative> <XPosition>50</XPosition> <YPosition>50</YPosition> <HidEvent0> <DeviceNumber>-1</DeviceNumber> <Name>R_CTL</Name> <HidType>1</HidType> <EventType>3</EventType> <ActionType>1</ActionType> <ControlIndex>228</ControlIndex> </HidEvent0> <HidEvent1> <DeviceNumber>-1</DeviceNumber> <Name>n</Name> <HidType>1</HidType> <EventType>3</EventType> <ActionType>1</ActionType> <ControlIndex>17</ControlIndex> </HidEvent1> </HidCommand4> <HidCommand5> <EventName>Gun Safety Lever to SAFE</EventName> <IsSequence>False</IsSequence> <Layers>1 32</Layers> <Delay>-1</Delay> <Comment> </Comment> <EventsNumber>2</EventsNumber> <StartTrigger>0</StartTrigger> <StopTrigger>0</StopTrigger> <CurveType>0</CurveType> <Lower>0</Lower> <Center>0</Center> <Upper>0</Upper> <Trim>0</Trim> <Curve>0</Curve> <Zoom>0</Zoom> <Rotate>0</Rotate> <AxisIsReversed>False</AxisIsReversed> <AxisIsRelative>False</AxisIsRelative> <XPosition>50</XPosition> <YPosition>50</YPosition> <HidEvent0> <DeviceNumber>-1</DeviceNumber> <Name>L_SHIFT</Name> <HidType>1</HidType> <EventType>3</EventType> <ActionType>1</ActionType> <ControlIndex>225</ControlIndex> </HidEvent0> <HidEvent1> <DeviceNumber>-1</DeviceNumber> <Name>/</Name> <HidType>1</HidType> <EventType>3</EventType> <ActionType>1</ActionType> <ControlIndex>56</ControlIndex> </HidEvent1> </HidCommand5> <HidCommand6> <EventName>Gun Sight Master OFF</EventName> <IsSequence>False</IsSequence> <Layers>1 32</Layers> <Delay>-1</Delay> <Comment> </Comment> <EventsNumber>3</EventsNumber> <StartTrigger>0</StartTrigger> <StopTrigger>0</StopTrigger> <CurveType>0</CurveType> <Lower>0</Lower> <Center>0</Center> <Upper>0</Upper> <Trim>0</Trim> <Curve>0</Curve> <Zoom>0</Zoom> <Rotate>0</Rotate> <AxisIsReversed>False</AxisIsReversed> <AxisIsRelative>False</AxisIsRelative> <XPosition>50</XPosition> <YPosition>50</YPosition> <HidEvent0> <DeviceNumber>-1</DeviceNumber> <Name>R_SHIFT</Name> <HidType>1</HidType> <EventType>3</EventType> <ActionType>1</ActionType> <ControlIndex>229</ControlIndex> </HidEvent0> <HidEvent1> <DeviceNumber>-1</DeviceNumber> <Name>L_SHIFT</Name> <HidType>1</HidType> <EventType>3</EventType> <ActionType>1</ActionType> <ControlIndex>225</ControlIndex> </HidEvent1> <HidEvent2> <DeviceNumber>-1</DeviceNumber> <Name>8</Name> <HidType>1</HidType> <EventType>3</EventType> <ActionType>1</ActionType> <ControlIndex>37</ControlIndex> </HidEvent2> </HidCommand6> <HidCommand7> <EventName>U/C Indicator OFF</EventName> <IsSequence>False</IsSequence> <Layers>1 32</Layers> <Delay>-1</Delay> <Comment> </Comment> <EventsNumber>3</EventsNumber> <StartTrigger>0</StartTrigger> <StopTrigger>0</StopTrigger> <CurveType>0</CurveType> <Lower>0</Lower> <Center>0</Center> <Upper>0</Upper> <Trim>0</Trim> <Curve>0</Curve> <Zoom>0</Zoom> <Rotate>0</Rotate> <AxisIsReversed>False</AxisIsReversed> <AxisIsRelative>False</AxisIsRelative> <XPosition>50</XPosition> <YPosition>50</YPosition> <HidEvent0> <DeviceNumber>-1</DeviceNumber> <Name>L_SHIFT</Name> <HidType>1</HidType> <EventType>3</EventType> <ActionType>1</ActionType> <ControlIndex>225</ControlIndex> </HidEvent0> <HidEvent1> <DeviceNumber>-1</DeviceNumber> <Name>R_SHIFT</Name> <HidType>1</HidType> <EventType>3</EventType> <ActionType>1</ActionType> <ControlIndex>229</ControlIndex> </HidEvent1> <HidEvent2> <DeviceNumber>-1</DeviceNumber> <Name>\</Name> <HidType>1</HidType> <EventType>3</EventType> <ActionType>1</ActionType> <ControlIndex>49</ControlIndex> </HidEvent2> </HidCommand7> <HidCommand8> <EventName>Radio Power OFF</EventName> <IsSequence>False</IsSequence> <Layers>1 32</Layers> <Delay>-1</Delay> <Comment> </Comment> <EventsNumber>2</EventsNumber> <StartTrigger>0</StartTrigger> <StopTrigger>0</StopTrigger> <CurveType>0</CurveType> <Lower>0</Lower> <Center>0</Center> <Upper>0</Upper> <Trim>0</Trim> <Curve>0</Curve> <Zoom>0</Zoom> <Rotate>0</Rotate> <AxisIsReversed>False</AxisIsReversed> <AxisIsRelative>False</AxisIsRelative> <XPosition>50</XPosition> <YPosition>50</YPosition> <HidEvent0> <DeviceNumber>-1</DeviceNumber> <Name>L_CTL</Name> <HidType>1</HidType> <EventType>3</EventType> <ActionType>1</ActionType> <ControlIndex>224</ControlIndex> </HidEvent0> <HidEvent1> <DeviceNumber>-1</DeviceNumber> <Name>`</Name> <HidType>1</HidType> <EventType>3</EventType> <ActionType>1</ActionType> <ControlIndex>53</ControlIndex> </HidEvent1> </HidCommand8> <HidCommand9> <EventName>LED 1 OFF</EventName> <IsSequence>False</IsSequence> <Layers>1 32</Layers> <Delay>-1</Delay> <Comment> </Comment> <EventsNumber>1</EventsNumber> <StartTrigger>0</StartTrigger> <StopTrigger>0</StopTrigger> <CurveType>0</CurveType> <Lower>0</Lower> <Center>0</Center> <Upper>0</Upper> <Trim>0</Trim> <Curve>0</Curve> <Zoom>0</Zoom> <Rotate>0</Rotate> <AxisIsReversed>False</AxisIsReversed> <AxisIsRelative>False</AxisIsRelative> <XPosition>50</XPosition> <YPosition>50</YPosition> <HidEvent0> <DeviceNumber>1002</DeviceNumber> <Name>LED1(Throttle)</Name> <HidType>3</HidType> <EventType>2</EventType> <ActionType>4</ActionType> <ControlIndex>1</ControlIndex> </HidEvent0> </HidCommand9> <HidCommand10> <EventName>LED 2 OFF</EventName> <IsSequence>False</IsSequence> <Layers>1 32</Layers> <Delay>-1</Delay> <Comment> </Comment> <EventsNumber>1</EventsNumber> <StartTrigger>0</StartTrigger> <StopTrigger>0</StopTrigger> <CurveType>0</CurveType> <Lower>0</Lower> <Center>0</Center> <Upper>0</Upper> <Trim>0</Trim> <Curve>0</Curve> <Zoom>0</Zoom> <Rotate>0</Rotate> <AxisIsReversed>False</AxisIsReversed> <AxisIsRelative>False</AxisIsRelative> <XPosition>50</XPosition> <YPosition>50</YPosition> <HidEvent0> <DeviceNumber>1002</DeviceNumber> <Name>LED2(Throttle)</Name> <HidType>3</HidType> <EventType>2</EventType> <ActionType>4</ActionType> <ControlIndex>2</ControlIndex> </HidEvent0> </HidCommand10> <HidCommand11> <EventName>LED 3 OFF</EventName> <IsSequence>False</IsSequence> <Layers>1 32</Layers> <Delay>-1</Delay> <Comment> </Comment> <EventsNumber>1</EventsNumber> <StartTrigger>0</StartTrigger> <StopTrigger>0</StopTrigger> <CurveType>0</CurveType> <Lower>0</Lower> <Center>0</Center> <Upper>0</Upper> <Trim>0</Trim> <Curve>0</Curve> <Zoom>0</Zoom> <Rotate>0</Rotate> <AxisIsReversed>False</AxisIsReversed> <AxisIsRelative>False</AxisIsRelative> <XPosition>50</XPosition> <YPosition>50</YPosition> <HidEvent0> <DeviceNumber>1002</DeviceNumber> <Name>LED3(Throttle)</Name> <HidType>3</HidType> <EventType>2</EventType> <ActionType>4</ActionType> <ControlIndex>3</ControlIndex> </HidEvent0> </HidCommand11> <HidCommand12> <EventName>LED 4 OFF</EventName> <IsSequence>False</IsSequence> <Layers>1 32</Layers> <Delay>-1</Delay> <Comment> </Comment> <EventsNumber>1</EventsNumber> <StartTrigger>0</StartTrigger> <StopTrigger>0</StopTrigger> <CurveType>0</CurveType> <Lower>0</Lower> <Center>0</Center> <Upper>0</Upper> <Trim>0</Trim> <Curve>0</Curve> <Zoom>0</Zoom> <Rotate>0</Rotate> <AxisIsReversed>False</AxisIsReversed> <AxisIsRelative>False</AxisIsRelative> <XPosition>50</XPosition> <YPosition>50</YPosition> <HidEvent0> <DeviceNumber>1002</DeviceNumber> <Name>LED4(Throttle)</Name> <HidType>3</HidType> <EventType>2</EventType> <ActionType>4</ActionType> <ControlIndex>4</ControlIndex> </HidEvent0> </HidCommand12> <HidCommand13> <EventName>LED 5 OFF</EventName> <IsSequence>False</IsSequence> <Layers>1 32</Layers> <Delay>-1</Delay> <Comment> </Comment> <EventsNumber>1</EventsNumber> <StartTrigger>0</StartTrigger> <StopTrigger>0</StopTrigger> <CurveType>0</CurveType> <Lower>0</Lower> <Center>0</Center> <Upper>0</Upper> <Trim>0</Trim> <Curve>0</Curve> <Zoom>0</Zoom> <Rotate>0</Rotate> <AxisIsReversed>False</AxisIsReversed> <AxisIsRelative>False</AxisIsRelative> <XPosition>50</XPosition> <YPosition>50</YPosition> <HidEvent0> <DeviceNumber>1002</DeviceNumber> <Name>LED5(Throttle)</Name> <HidType>3</HidType> <EventType>2</EventType> <ActionType>4</ActionType> <ControlIndex>5</ControlIndex> </HidEvent0> </HidCommand13> <HidCommand14> <EventName>Backlight OFF</EventName> <IsSequence>False</IsSequence> <Layers>1 32</Layers> <Delay>-1</Delay> <Comment> </Comment> <EventsNumber>1</EventsNumber> <StartTrigger>0</StartTrigger> <StopTrigger>0</StopTrigger> <CurveType>0</CurveType> <Lower>0</Lower> <Center>0</Center> <Upper>0</Upper> <Trim>0</Trim> <Curve>0</Curve> <Zoom>0</Zoom> <Rotate>0</Rotate> <AxisIsReversed>False</AxisIsReversed> <AxisIsRelative>False</AxisIsRelative> <XPosition>50</XPosition> <YPosition>50</YPosition> <HidEvent0> <DeviceNumber>1002</DeviceNumber> <Name>LED0(Throttle)</Name> <HidType>3</HidType> <EventType>2</EventType> <ActionType>4</ActionType> <ControlIndex>0</ControlIndex> </HidEvent0> </HidCommand14> <HidCommand15> <EventName>L.H. Dash Lamp Decrease</EventName> <IsSequence>False</IsSequence> <Layers>1 32</Layers> <Delay>-1</Delay> <Comment> </Comment> <EventsNumber>2</EventsNumber> <StartTrigger>0</StartTrigger> <StopTrigger>0</StopTrigger> <CurveType>0</CurveType> <Lower>0</Lower> <Center>0</Center> <Upper>0</Upper> <Trim>0</Trim> <Curve>0</Curve> <Zoom>0</Zoom> <Rotate>0</Rotate> <AxisIsReversed>False</AxisIsReversed> <AxisIsRelative>False</AxisIsRelative> <XPosition>50</XPosition> <YPosition>50</YPosition> <HidEvent0> <DeviceNumber>-1</DeviceNumber> <Name>L_CTL</Name> <HidType>1</HidType> <EventType>3</EventType> <ActionType>1</ActionType> <ControlIndex>224</ControlIndex> </HidEvent0> <HidEvent1> <DeviceNumber>-1</DeviceNumber> <Name>n</Name> <HidType>1</HidType> <EventType>3</EventType> <ActionType>1</ActionType> <ControlIndex>17</ControlIndex> </HidEvent1> </HidCommand15> <HidCommand16> <EventName>L.H. Dash Lamp Decrease</EventName> <IsSequence>False</IsSequence> <Layers>1 32</Layers> <Delay>-1</Delay> <Comment> </Comment> <EventsNumber>2</EventsNumber> <StartTrigger>0</StartTrigger> <StopTrigger>0</StopTrigger> <CurveType>0</CurveType> <Lower>0</Lower> <Center>0</Center> <Upper>0</Upper> <Trim>0</Trim> <Curve>0</Curve> <Zoom>0</Zoom> <Rotate>0</Rotate> <AxisIsReversed>False</AxisIsReversed> <AxisIsRelative>False</AxisIsRelative> <XPosition>50</XPosition> <YPosition>50</YPosition> <HidEvent0> <DeviceNumber>-1</DeviceNumber> <Name>L_CTL</Name> <HidType>1</HidType> <EventType>3</EventType> <ActionType>1</ActionType> <ControlIndex>224</ControlIndex> </HidEvent0> <HidEvent1> <DeviceNumber>-1</DeviceNumber> <Name>n</Name> <HidType>1</HidType> <EventType>3</EventType> <ActionType>1</ActionType> <ControlIndex>17</ControlIndex> </HidEvent1> </HidCommand16> <HidCommand17> <EventName>L.H. Dash Lamp Decrease</EventName> <IsSequence>False</IsSequence> <Layers>1 32</Layers> <Delay>-1</Delay> <Comment> </Comment> <EventsNumber>2</EventsNumber> <StartTrigger>0</StartTrigger> <StopTrigger>0</StopTrigger> <CurveType>0</CurveType> <Lower>0</Lower> <Center>0</Center> <Upper>0</Upper> <Trim>0</Trim> <Curve>0</Curve> <Zoom>0</Zoom> <Rotate>0</Rotate> <AxisIsReversed>False</AxisIsReversed> <AxisIsRelative>False</AxisIsRelative> <XPosition>50</XPosition> <YPosition>50</YPosition> <HidEvent0> <DeviceNumber>-1</DeviceNumber> <Name>L_CTL</Name> <HidType>1</HidType> <EventType>3</EventType> <ActionType>1</ActionType> <ControlIndex>224</ControlIndex> </HidEvent0> <HidEvent1> <DeviceNumber>-1</DeviceNumber> <Name>n</Name> <HidType>1</HidType> <EventType>3</EventType> <ActionType>1</ActionType> <ControlIndex>17</ControlIndex> </HidEvent1> </HidCommand17> <HidCommand18> <EventName>L.H. Dash Lamp Decrease</EventName> <IsSequence>False</IsSequence> <Layers>1 32</Layers> <Delay>-1</Delay> <Comment> </Comment> <EventsNumber>2</EventsNumber> <StartTrigger>0</StartTrigger> <StopTrigger>0</StopTrigger> <CurveType>0</CurveType> <Lower>0</Lower> <Center>0</Center> <Upper>0</Upper> <Trim>0</Trim> <Curve>0</Curve> <Zoom>0</Zoom> <Rotate>0</Rotate> <AxisIsReversed>False</AxisIsReversed> <AxisIsRelative>False</AxisIsRelative> <XPosition>50</XPosition> <YPosition>50</YPosition> <HidEvent0> <DeviceNumber>-1</DeviceNumber> <Name>L_CTL</Name> <HidType>1</HidType> <EventType>3</EventType> <ActionType>1</ActionType> <ControlIndex>224</ControlIndex> </HidEvent0> <HidEvent1> <DeviceNumber>-1</DeviceNumber> <Name>n</Name> <HidType>1</HidType> <EventType>3</EventType> <ActionType>1</ActionType> <ControlIndex>17</ControlIndex> </HidEvent1> </HidCommand18> <HidCommand19> <EventName>L.H. Dash Lamp Decrease</EventName> <IsSequence>False</IsSequence> <Layers>1 32</Layers> <Delay>-1</Delay> <Comment> </Comment> <EventsNumber>2</EventsNumber> <StartTrigger>0</StartTrigger> <StopTrigger>0</StopTrigger> <CurveType>0</CurveType> <Lower>0</Lower> <Center>0</Center> <Upper>0</Upper> <Trim>0</Trim> <Curve>0</Curve> <Zoom>0</Zoom> <Rotate>0</Rotate> <AxisIsReversed>False</AxisIsReversed> <AxisIsRelative>False</AxisIsRelative> <XPosition>50</XPosition> <YPosition>50</YPosition> <HidEvent0> <DeviceNumber>-1</DeviceNumber> <Name>L_CTL</Name> <HidType>1</HidType> <EventType>3</EventType> <ActionType>1</ActionType> <ControlIndex>224</ControlIndex> </HidEvent0> <HidEvent1> <DeviceNumber>-1</DeviceNumber> <Name>n</Name> <HidType>1</HidType> <EventType>3</EventType> <ActionType>1</ActionType> <ControlIndex>17</ControlIndex> </HidEvent1> </HidCommand19> <HidCommand20> <EventName>R.H. Dash Lamp Decrease</EventName> <IsSequence>False</IsSequence> <Layers>1 32</Layers> <Delay>-1</Delay> <Comment> </Comment> <EventsNumber>2</EventsNumber> <StartTrigger>0</StartTrigger> <StopTrigger>0</StopTrigger> <CurveType>0</CurveType> <Lower>0</Lower> <Center>0</Center> <Upper>0</Upper> <Trim>0</Trim> <Curve>0</Curve> <Zoom>0</Zoom> <Rotate>0</Rotate> <AxisIsReversed>False</AxisIsReversed> <AxisIsRelative>False</AxisIsRelative> <XPosition>50</XPosition> <YPosition>50</YPosition> <HidEvent0> <DeviceNumber>-1</DeviceNumber> <Name>R_CTL</Name> <HidType>1</HidType> <EventType>3</EventType> <ActionType>1</ActionType> <ControlIndex>228</ControlIndex> </HidEvent0> <HidEvent1> <DeviceNumber>-1</DeviceNumber> <Name>n</Name> <HidType>1</HidType> <EventType>3</EventType> <ActionType>1</ActionType> <ControlIndex>17</ControlIndex> </HidEvent1> </HidCommand20> <HidCommand21> <EventName>R.H. Dash Lamp Decrease</EventName> <IsSequence>False</IsSequence> <Layers>1 32</Layers> <Delay>-1</Delay> <Comment> </Comment> <EventsNumber>2</EventsNumber> <StartTrigger>0</StartTrigger> <StopTrigger>0</StopTrigger> <CurveType>0</CurveType> <Lower>0</Lower> <Center>0</Center> <Upper>0</Upper> <Trim>0</Trim> <Curve>0</Curve> <Zoom>0</Zoom> <Rotate>0</Rotate> <AxisIsReversed>False</AxisIsReversed> <AxisIsRelative>False</AxisIsRelative> <XPosition>50</XPosition> <YPosition>50</YPosition> <HidEvent0> <DeviceNumber>-1</DeviceNumber> <Name>R_CTL</Name> <HidType>1</HidType> <EventType>3</EventType> <ActionType>1</ActionType> <ControlIndex>228</ControlIndex> </HidEvent0> <HidEvent1> <DeviceNumber>-1</DeviceNumber> <Name>n</Name> <HidType>1</HidType> <EventType>3</EventType> <ActionType>1</ActionType> <ControlIndex>17</ControlIndex> </HidEvent1> </HidCommand21> <HidCommand22> <EventName>R.H. Dash Lamp Decrease</EventName> <IsSequence>False</IsSequence> <Layers>1 32</Layers> <Delay>-1</Delay> <Comment> </Comment> <EventsNumber>2</EventsNumber> <StartTrigger>0</StartTrigger> <StopTrigger>0</StopTrigger> <CurveType>0</CurveType> <Lower>0</Lower> <Center>0</Center> <Upper>0</Upper> <Trim>0</Trim> <Curve>0</Curve> <Zoom>0</Zoom> <Rotate>0</Rotate> <AxisIsReversed>False</AxisIsReversed> <AxisIsRelative>False</AxisIsRelative> <XPosition>50</XPosition> <YPosition>50</YPosition> <HidEvent0> <DeviceNumber>-1</DeviceNumber> <Name>R_CTL</Name> <HidType>1</HidType> <EventType>3</EventType> <ActionType>1</ActionType> <ControlIndex>228</ControlIndex> </HidEvent0> <HidEvent1> <DeviceNumber>-1</DeviceNumber> <Name>n</Name> <HidType>1</HidType> <EventType>3</EventType> <ActionType>1</ActionType> <ControlIndex>17</ControlIndex> </HidEvent1> </HidCommand22> <HidCommand23> <EventName>R.H. Dash Lamp Decrease</EventName> <IsSequence>False</IsSequence> <Layers>1 32</Layers> <Delay>-1</Delay> <Comment> </Comment> <EventsNumber>2</EventsNumber> <StartTrigger>0</StartTrigger> <StopTrigger>0</StopTrigger> <CurveType>0</CurveType> <Lower>0</Lower> <Center>0</Center> <Upper>0</Upper> <Trim>0</Trim> <Curve>0</Curve> <Zoom>0</Zoom> <Rotate>0</Rotate> <AxisIsReversed>False</AxisIsReversed> <AxisIsRelative>False</AxisIsRelative> <XPosition>50</XPosition> <YPosition>50</YPosition> <HidEvent0> <DeviceNumber>-1</DeviceNumber> <Name>R_CTL</Name> <HidType>1</HidType> <EventType>3</EventType> <ActionType>1</ActionType> <ControlIndex>228</ControlIndex> </HidEvent0> <HidEvent1> <DeviceNumber>-1</DeviceNumber> <Name>n</Name> <HidType>1</HidType> <EventType>3</EventType> <ActionType>1</ActionType> <ControlIndex>17</ControlIndex> </HidEvent1> </HidCommand23> <HidCommand24> <EventName>R.H. Dash Lamp Decrease</EventName> <IsSequence>False</IsSequence> <Layers>1 32</Layers> <Delay>-1</Delay> <Comment> </Comment> <EventsNumber>2</EventsNumber> <StartTrigger>0</StartTrigger> <StopTrigger>0</StopTrigger> <CurveType>0</CurveType> <Lower>0</Lower> <Center>0</Center> <Upper>0</Upper> <Trim>0</Trim> <Curve>0</Curve> <Zoom>0</Zoom> <Rotate>0</Rotate> <AxisIsReversed>False</AxisIsReversed> <AxisIsRelative>False</AxisIsRelative> <XPosition>50</XPosition> <YPosition>50</YPosition> <HidEvent0> <DeviceNumber>-1</DeviceNumber> <Name>R_CTL</Name> <HidType>1</HidType> <EventType>3</EventType> <ActionType>1</ActionType> <ControlIndex>228</ControlIndex> </HidEvent0> <HidEvent1> <DeviceNumber>-1</DeviceNumber> <Name>n</Name> <HidType>1</HidType> <EventType>3</EventType> <ActionType>1</ActionType> <ControlIndex>17</ControlIndex> </HidEvent1> </HidCommand24> </Events> </HidEvent> </Event2> <Event3>
-
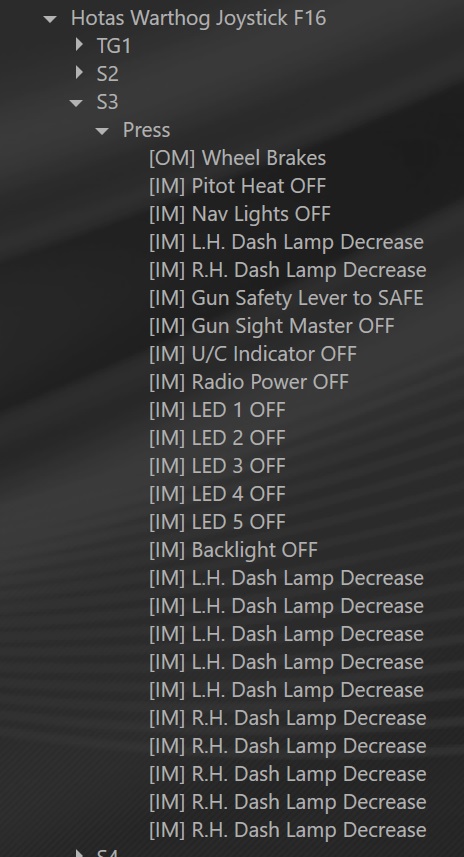
I love Target. It takes a bit to learn but it is pretty darn handy. One gets used to where the buttons are and if logically laid out it is perfect. The sticktion issues are real. I count on buying a stick per year. I fly an awful lot being retired and all. A 3 or 4 inch extension solves the spring problem and suits the warbirds for stick travel nicely. An example of why I like Target is what I did today on my Spitfire script. There is no battery switch in the cockpit although I believe there is one elsewhere. I decided to use Target to make my own pseudo switch by chaining the right number of commands together on one hard to get at switch. It takes some learning and some tough debugging to put together a perfect script with no conflicts but check it out. One press of the S3 button while holding the lever in takes care of everything marked IM and switches them off:

-
+1 The stock lights are fine. I'll take the realism on this one. I bound my left and RH dash light increase and decrease to my left and right up and down of the two black hats on the tm joystick on a layer. It works slick and easy. I also have them turn to most times with other functions. I throw 6 decrease 32 millisecond pulses to each one when I disconnect my imaginary battery power to ensure they are all the way off. They let me inside the ropes but all I they would let me do was reach up and try to snap a shot of the inside through the scratched up original canopy. ALL I got was a reflection of the flash. I would have had to jump through a lot of hoops with the curator to see more. The odd restorer has looked it over. It makes me mad that I didn't pay more attention when I sat in it as a teen. I hated the moment at the time actually. There really is sort of no floor and the only place for your feet is on the pedals. It was a very eerie feeling in a dark cold hanger. Sitting low in a solid metal seat. It was beat to death but it flew there and it has remained original as it was ever since. I liked the Mustang much more in those days. The cockpit of that was a beautiful thing. My heart is in a full wing Spitfire these days. Many predatory birds fly over my shack and all I see is C wing Spitfires .
-
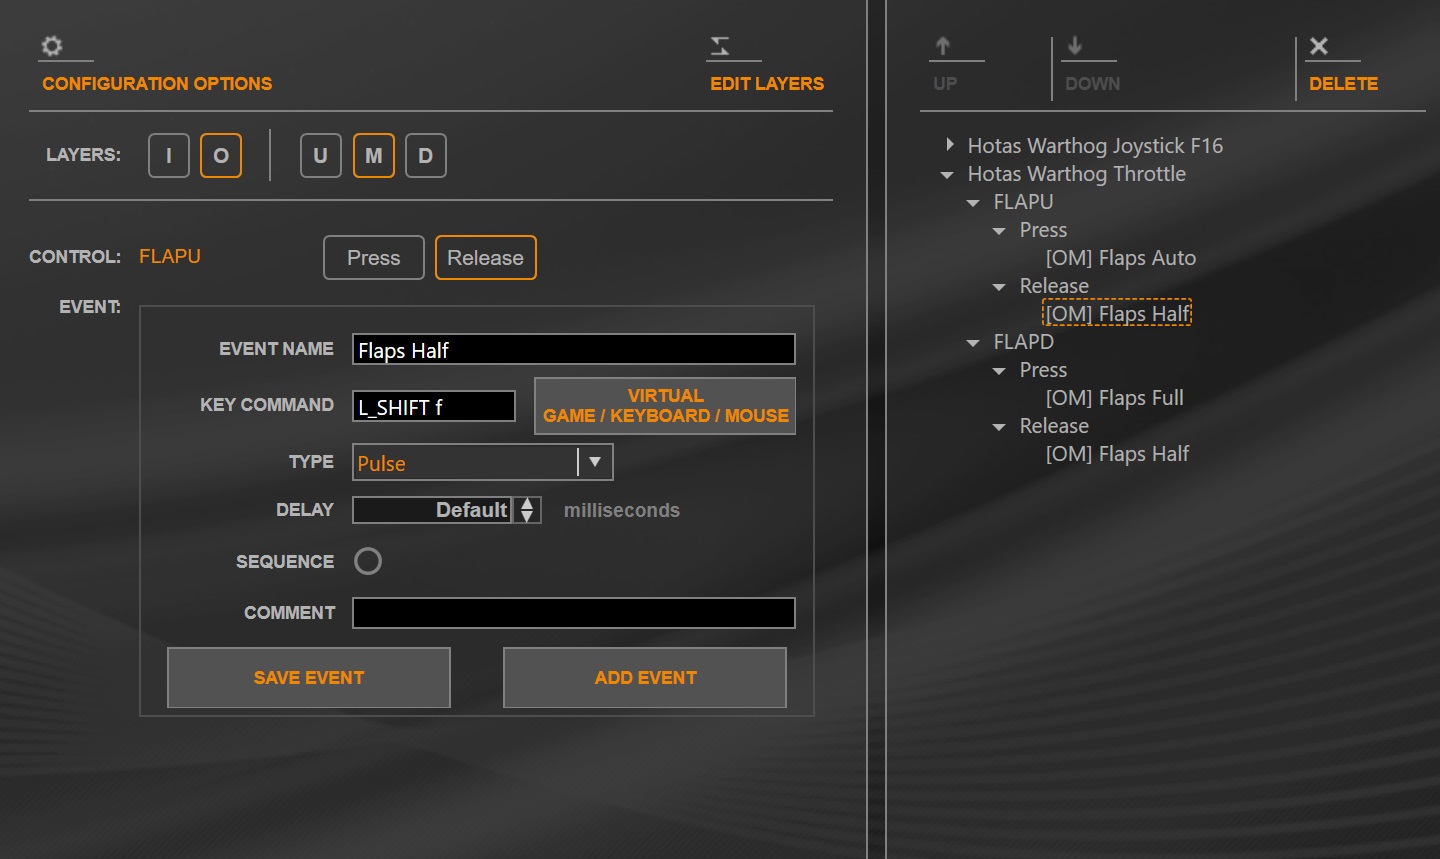
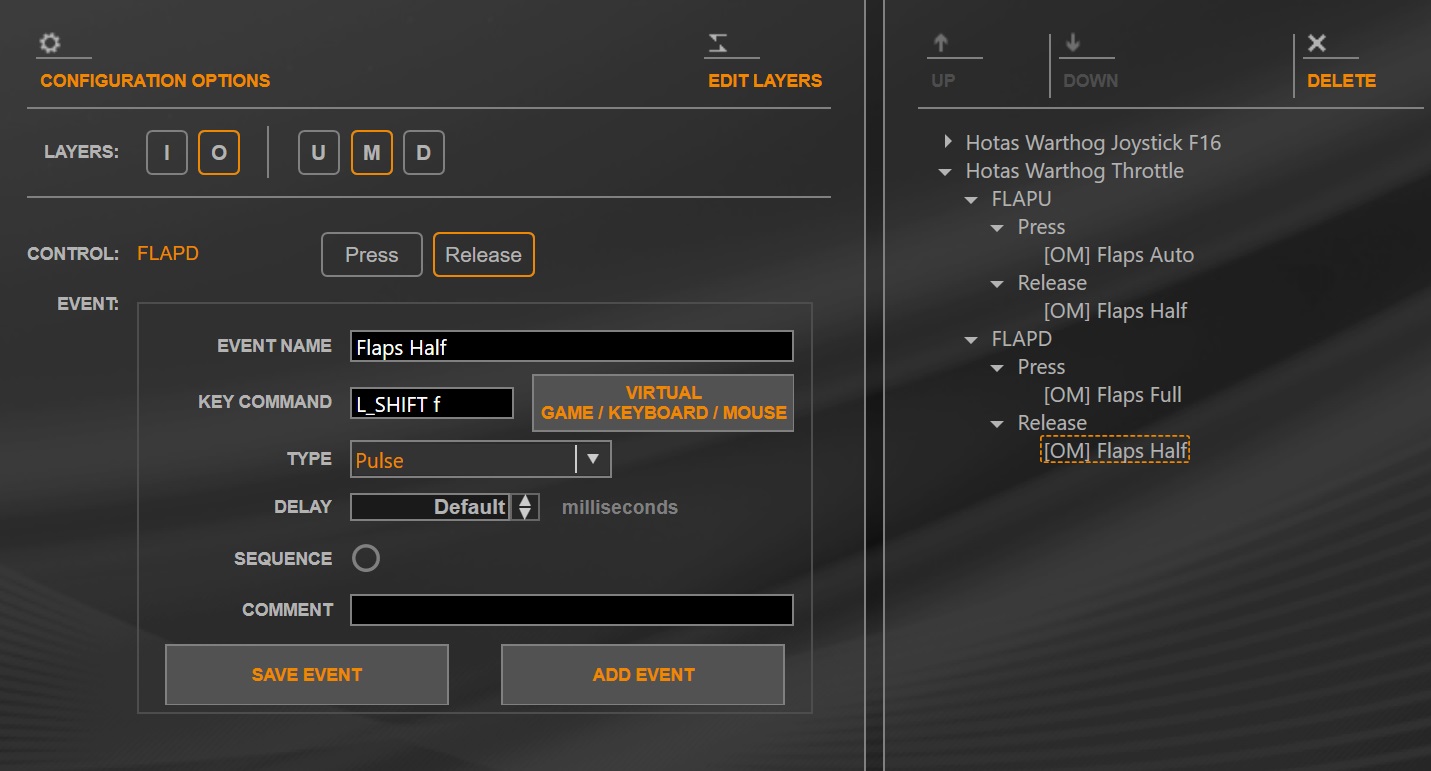
Since target will recognize the center position of the flap switch and most of the 3 position switches as another switch even though there are no actual electrical contacts closed the following works as well. This means one could simply send a pulse assigned directly to the M position of the switch. This way any time the switch is moved to the center position it will send the keystroke. There is no need to use the release method in this case but they both work fine. Just add another entry for the middle position the same as if it was any other switch. This is what I generally do for this type of thing.
-
Sequencing is used when you want to have a switch do something different on each press. I.E. Press a button to lock on and then press the same button again to fire the missile. Not required in this case. Chaining is having a switch perform more than one function with one press.
-
Of course you could open it in the script editor as well for some good examples and eventually go further. Always start it as advanced instead of basic so more will be open to you in the future. It looks like the F18 is going to need some script writing magic for a few functions when they get it finished. By picking advanced it helps some things in the long run. I always try to see if it can be done in the GUI first. It has not failed me yet.
-
Note: other than the A10, I recommend saving that flap switch for your U,M,D modifiers. this triples your available switches although you could assign them anywhere. Add the flap lever for another modifier and tons more are available. This is fairly standard when writing Target scripts. The first thing I do is set the U,M,D and the joystick flap switch as layers. This gives so many options that One can get every switch and control off the mouse and keyboard and onto the stick and throttle. I use the top 3 position switch on the right side of my throttle at the top. DO what makes YOU happy. I am debugging my script for the Spitfire which appears perfect. Open the attached in the Target GUI and a lot of things will become clear. Look in "edit layers" center top of the GUI screen. Spitfire Ultimate Tareget Script.zip
-
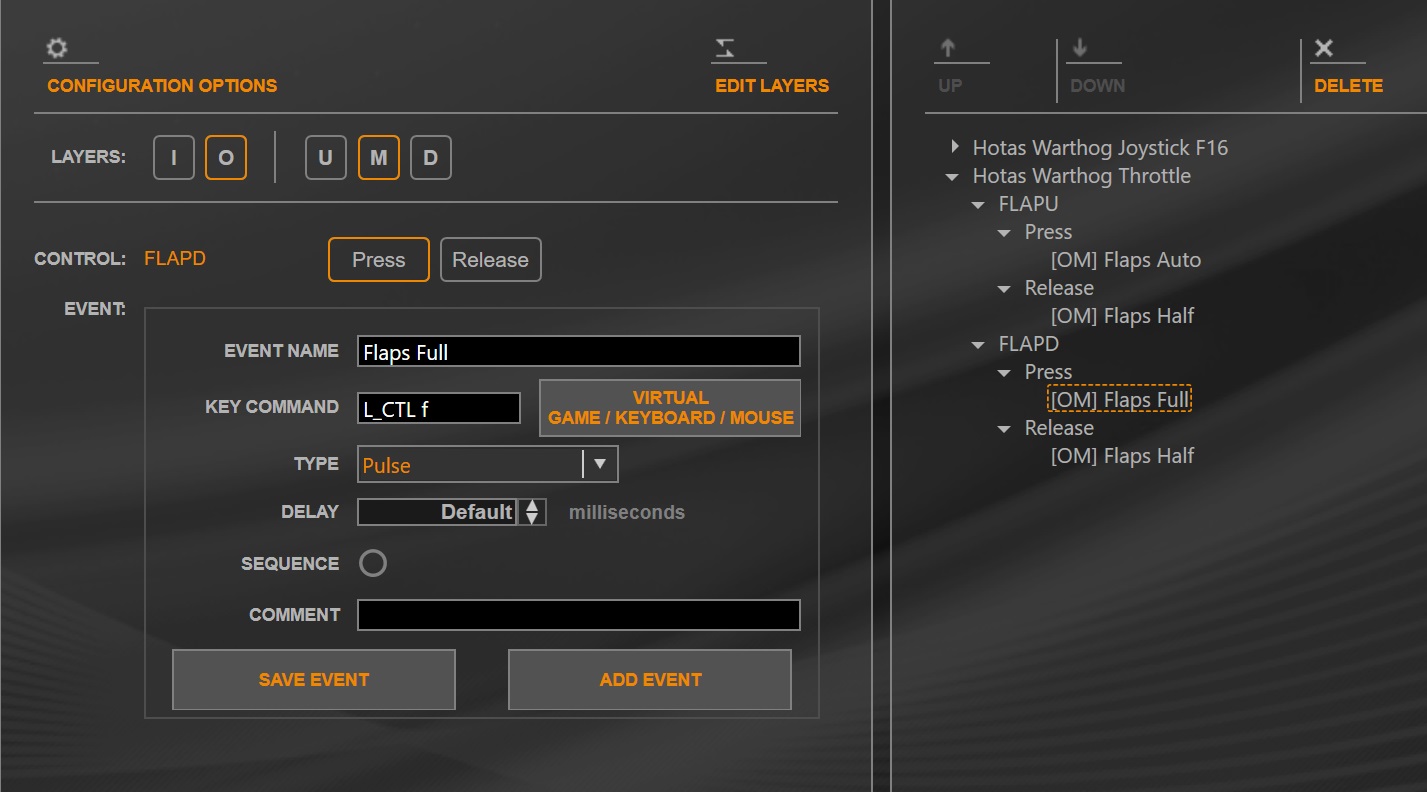
Here are some pics of how to do what you want. Note: my in game key bindings may be different. Use yours. Use the press and release by the control up top and not the ones under "type"
-
+1 RogueSqdn One can run the leds using a target script which requires one to redo the bindings a fair bit since now one has a combined devices and not a joystick and a throttle. I always recommend making a quick script to combine the devices before setting up control bindings. That way one can play with the Leds at will. Turn on an LED with a Press in the type field of the GUI and turn them off with a release. My LEDs for the Spitfire for instance have the 5 lights come on as such: 1. Brakes 2. Gear 3. Flaps 4. Rad Flap 5. Carb Filter Backlight. WEP/MIL
-
If you have the time and patience and need a more power and functionality, start with the script editor and never look back. It is a different and more powerful approach for sure. I am not saying one should not progress to the script. It becomes necessary if only to fix errors sometimes. The only time for me was to take out my modifiers and change them. There is some real power available beyond the GUI. I just think it makes it so intimidating to someone new to Target that they often abandon Target altogether. Maybe Most Coders or script writers or programmers prefer the Script. That is understandable. I have family members that read and write code (in conjunction with GUIs) like I read a book. It is one of the nicest GUIs I have ever worked with and It takes about an hour to understand most of it. It definitely does not do everything but it does absolutely everything I need. Very quickly. Progressing to the scripting, One can even call a lua script from within a Target script, I should think. One can go around in as many circles as one wants to accomplish the same thing. The power is there for those that can look at code for hours on end. Taking an hour or two making a script in the GUI and then looking at that script can cut months off the learning curve. I will put it this way: If you try the script editor and find it is a bit too daunting, try the GUI before you completely abandon Target. Then look at your script. That is the route I took and of course the road leads back to the Script editor (in one instance to remove layers so I could change them as there is no way to do that in the GUI) but it is a lot less bumpy when you get the few concepts that are required for a script for use in DCS down first. All I need is one .fcf file. Others need more. It depends on your pit and your preferences. My question has to be. What does the script editor do for me that the GUI does not? In the attached pic and all my aircraft profiles, The script editor was not required at all. Granted I set all AXIS in game. Discouraging people from using something that works quite fine in the end can discourage people from using it at all and that is a shame indeed since Target brings a lot to the table. Pour over thousands of lines of code looking for an errant comma or drag and drop, point and shoot and go flying. I am just happy folks are using Target regardless of how they write it. I find it a bit of a shame that many don't. Maybe some folks are getting scared off. I will use the script editor when I need to. I don't need to anymore. I never make that one mistake that required it once.
-
That may only available under AXIS commands.
-
The Big Show - My Combat Report Movies
DeepDrummer replied to Sydy's topic in Spitfire LF Mk.IX The Big Show Campaign
I don't think you can pressurize the slipper tank. It hates any kind of negative G as well. Switch to the main tank and see if it happens. You could be near empty by then anyway if you switched to the slipper after takeoff. -
I respectively disagree. Start with the GUI. It is much easier than writing scripts by hand. I have found very few limitations. One will need knowledge of both but script writing just like in the real world today is kept to a minimum using a GUI. Read both the scripting manual and the GUI manual. The three position switches are used as a pulse and return a different pulse any time the switch is moved into a new position. They can be configured similar to anything else. In the TYPE field: Pulses are like a key press. Good for lights and switches. A Hold performs the press and holds it down until you let go. Good for things like adjusting dials, zoom, prime. Best used on momentary push buttons or hats since they are held on until release. If a hold is assigned to a switch, it will hold that function continuously until the switch is moved the opposite way. Switches and holds are risky business. A Press will hold something on until a specific Release is sent. This is best used for things like LEDs which don't affect anything else if held on with a PRESS command. A release releases a Press such as turning off an LED A Press in the "type" field turns on an LED and a Release in the Type field turns LEDs off. too easy. Here is a full Target GUI setup video I made. I have made changes since but it explains a lot of things. I am no content creator or monetized youtube acct holder so be gentle. Just trying to help. I explain the GUI inside out using on youtube here: https://www.youtube.com/watch?v=lhGrbYYmBck
-
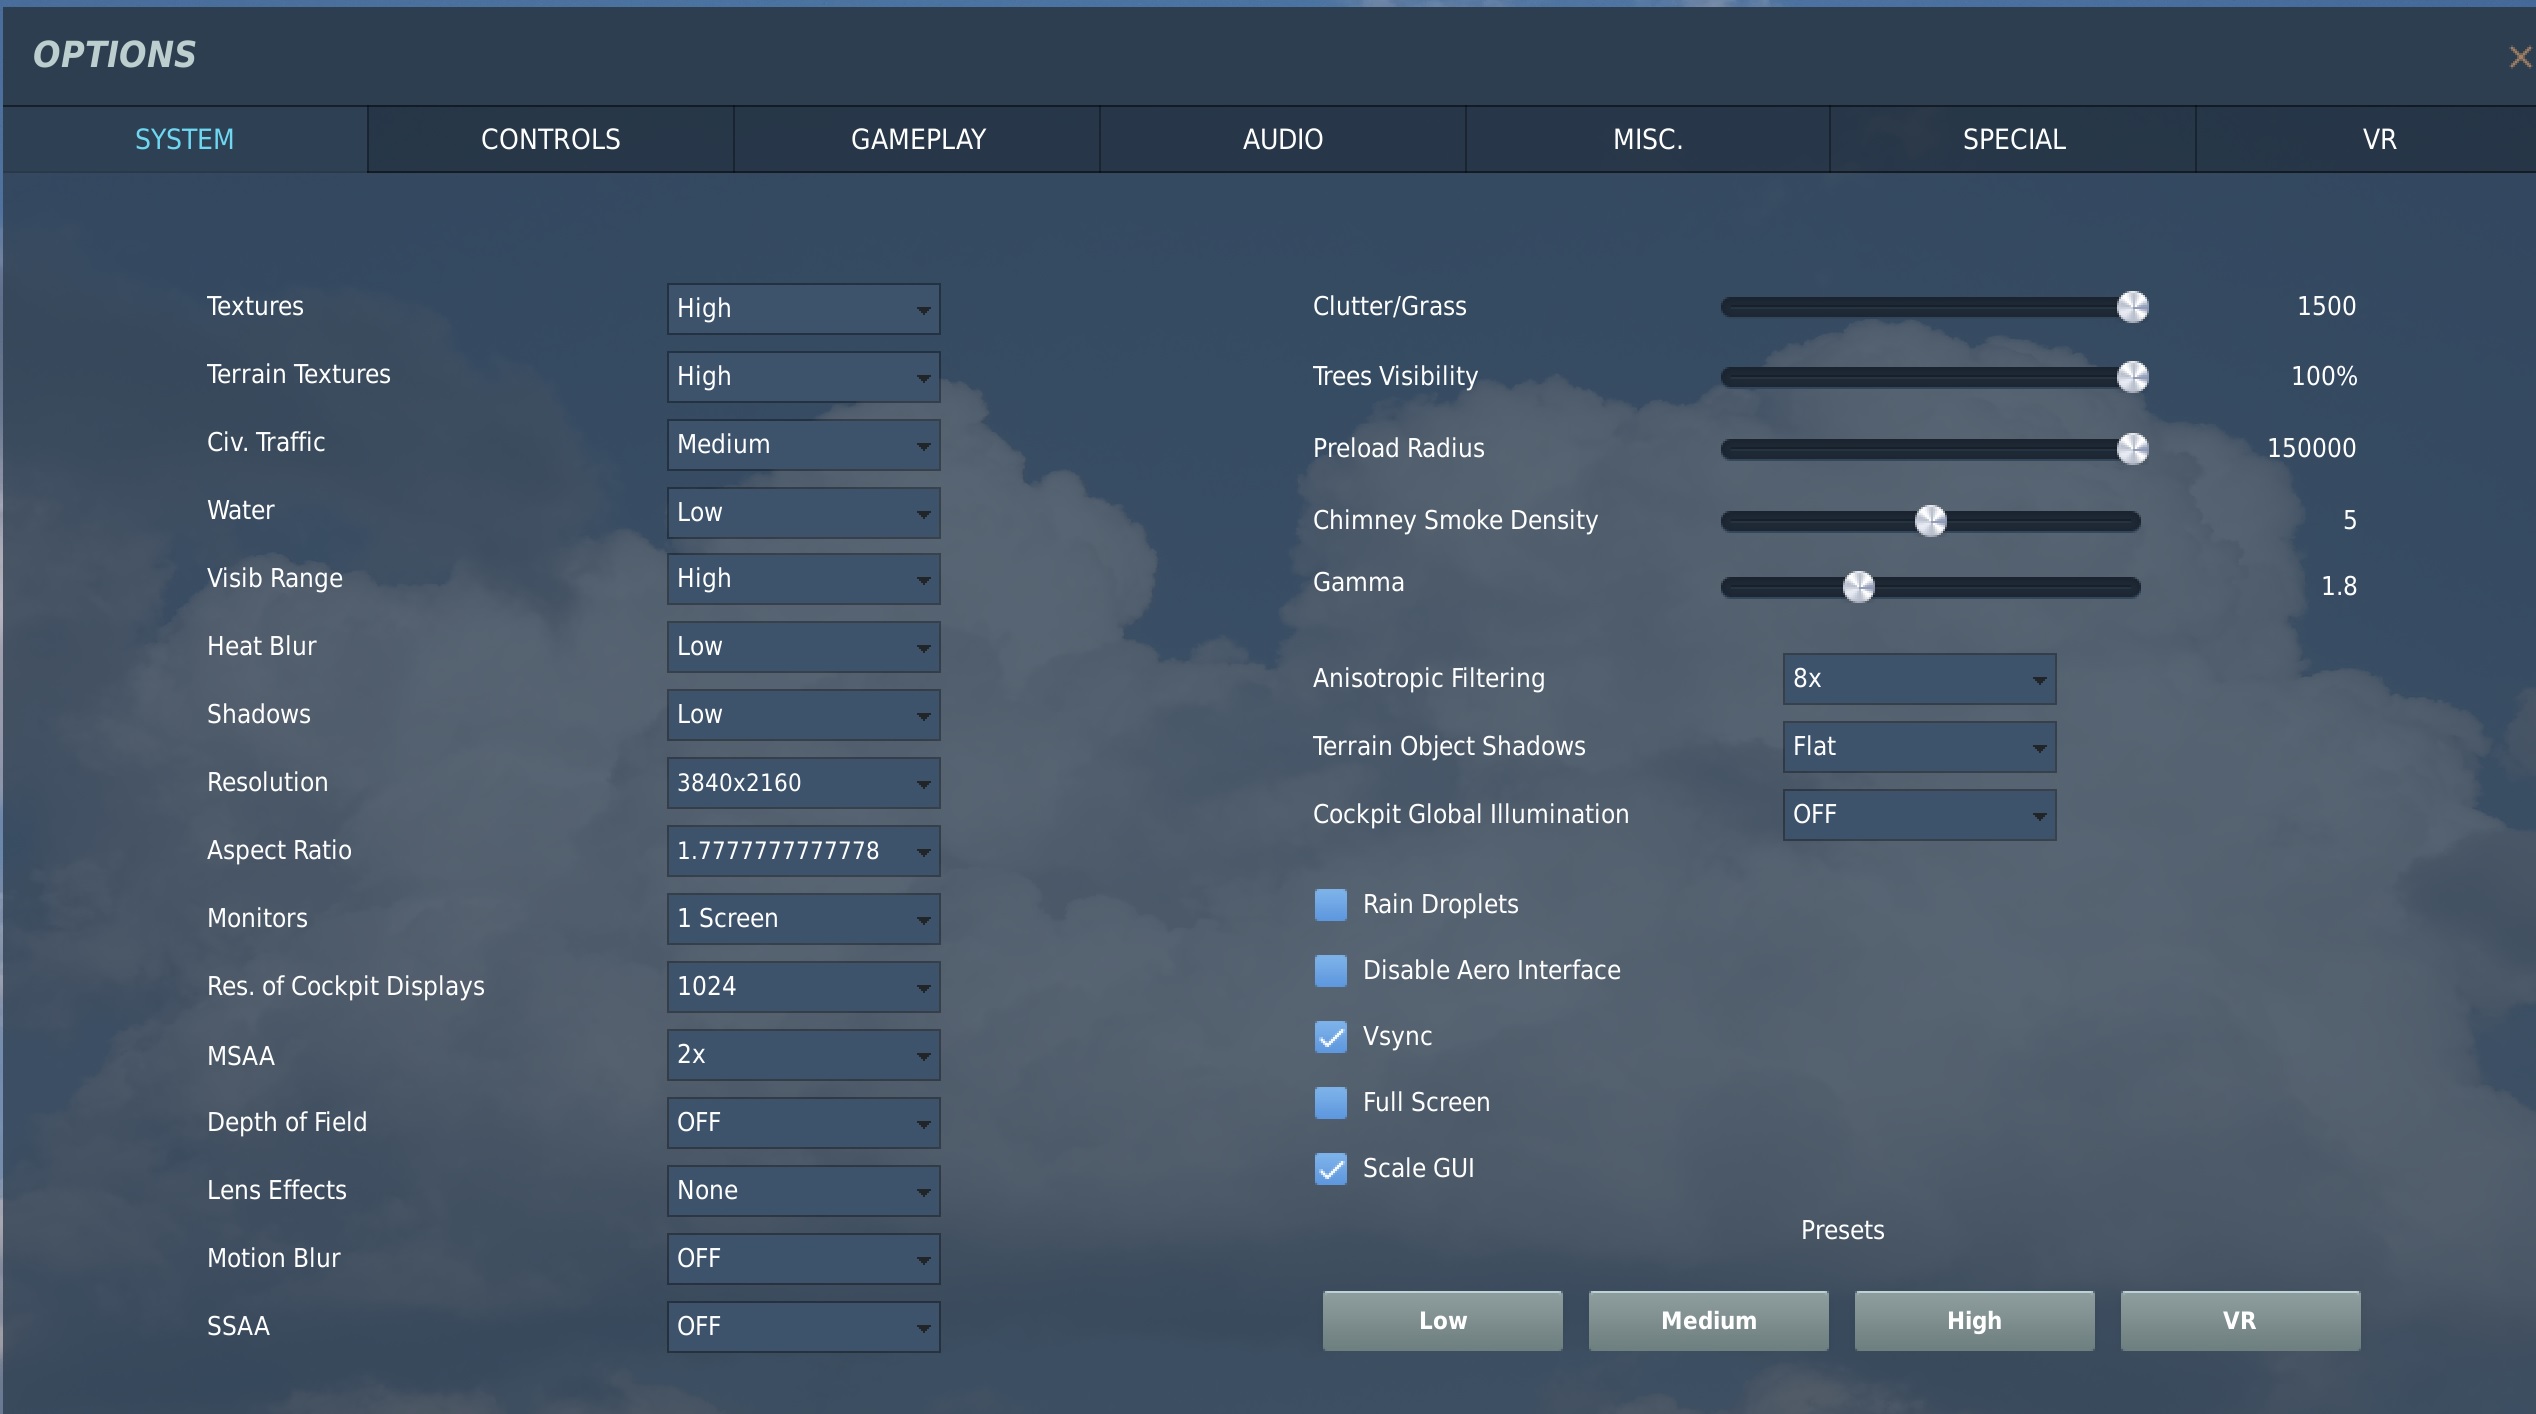
I find ground based vehicles really slow things down when they are moving more than anything else. I have suspended using those in missions for now. I found 32 Gig very beneficial when I upgraded over a year ago. DDR3 My specs are old enough by today's standards but I notice no stutters generally. Someday when My DDR5 equipped 48 Core CPU 4080Ti. No wait. That is just a recurring dream. This is the best I can do and still bounce off the 60 vsync with no stutters in th epic attached.
-
First impressions
DeepDrummer replied to dogsbody59's topic in Spitfire LF Mk.IX The Big Show Campaign
I enjoyed Mission 1 (and lived) and decided to order the book and start again when it arrives at month end or early December. That is going to be a very nice campaign I feel. -
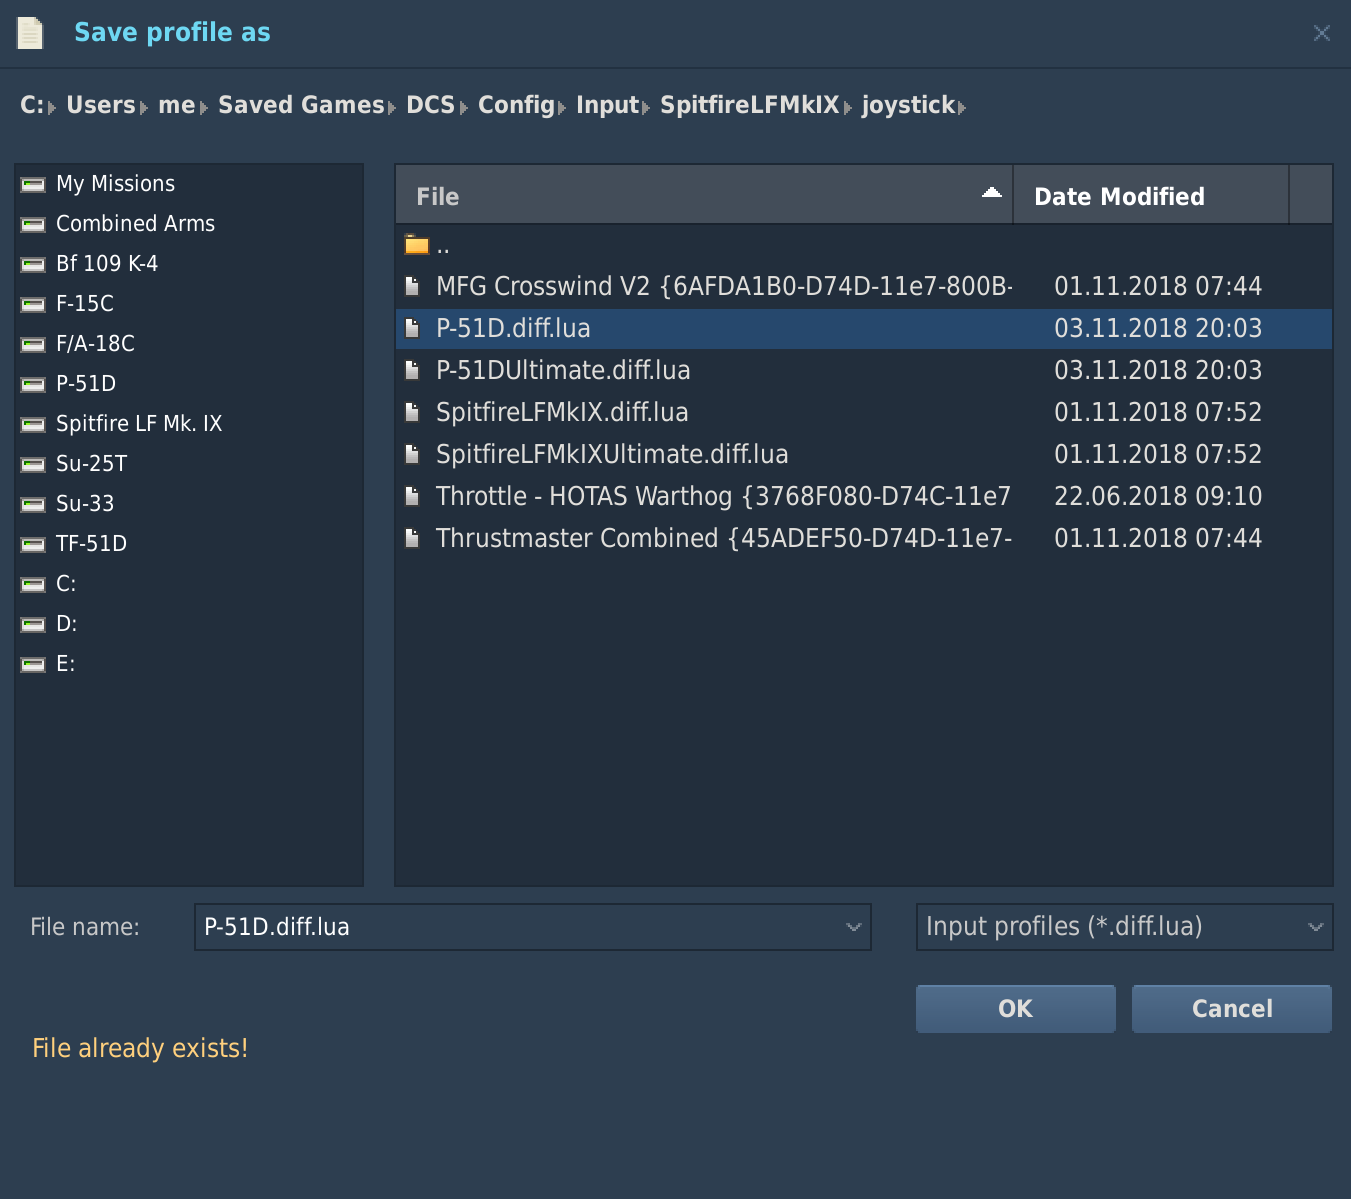
One more important thing I do is save separate copies of my key bindings in game to a different name as shown in case I mess up something there for a quicker recovery:
-
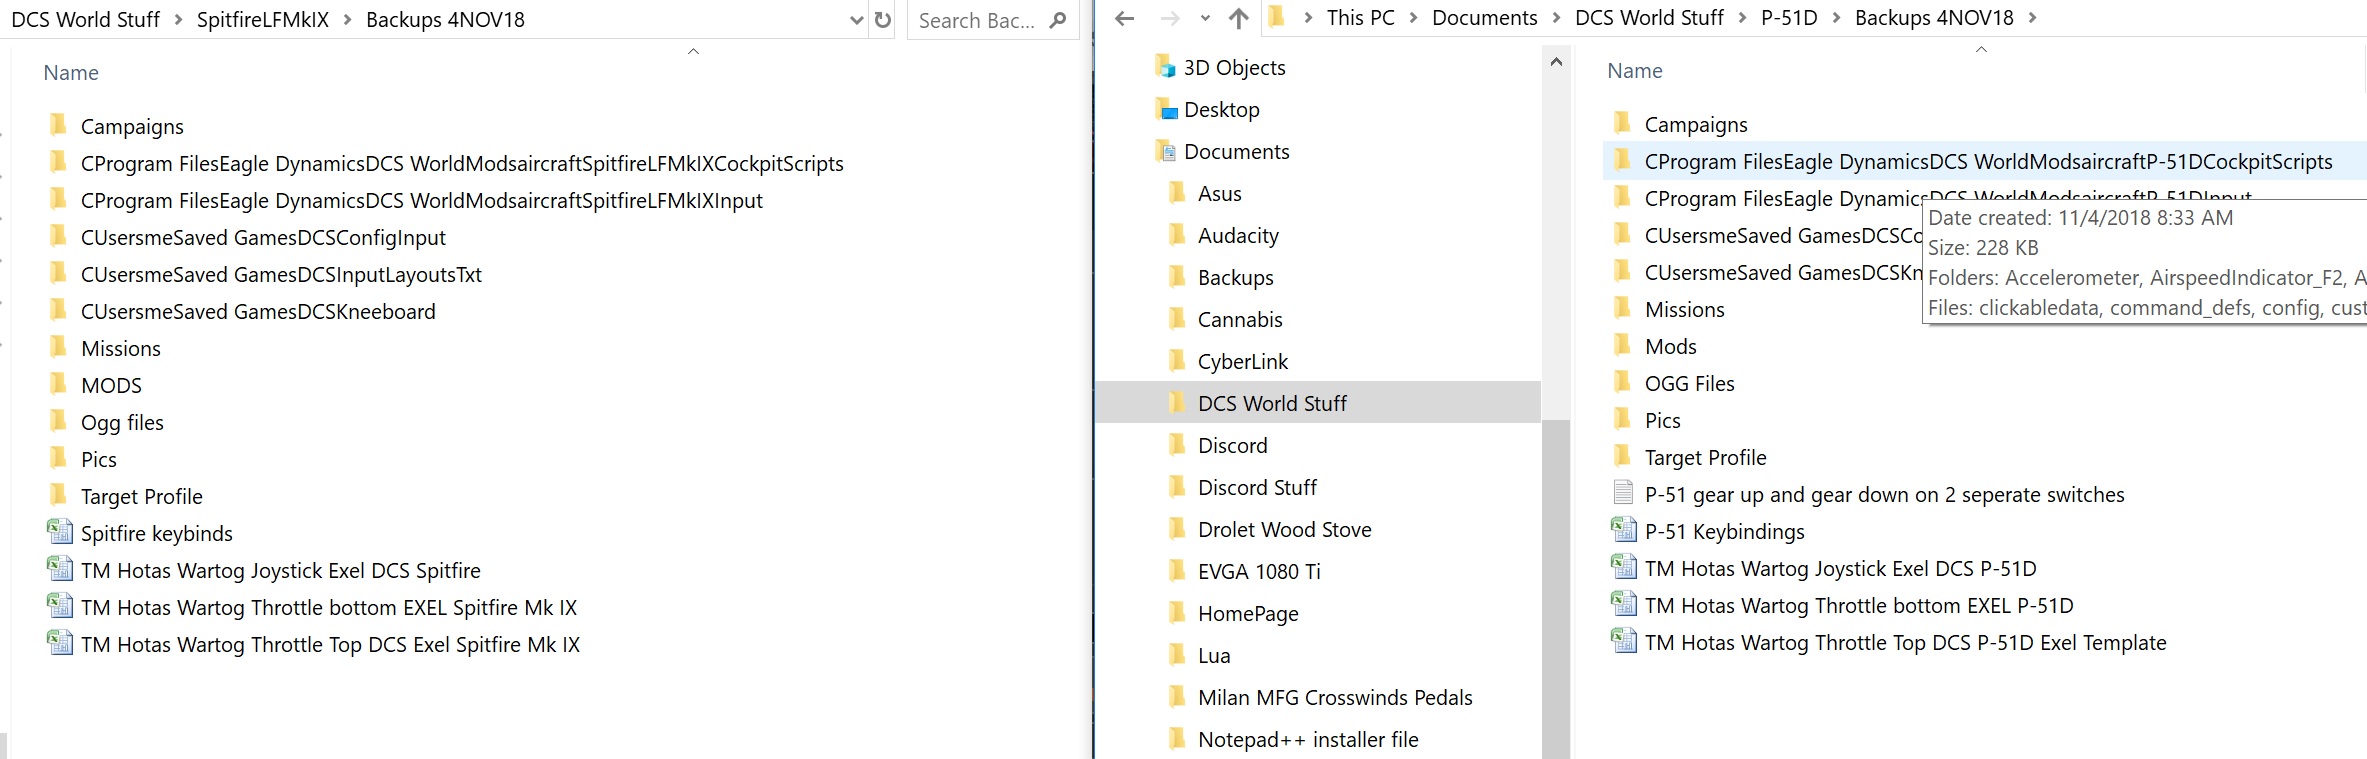
I accidently deleted some templates and was glad I had done a backup after yesterdays extensive work. It is not a matter of IF you will need a backup. It is just a matter of When: I nicely re-organized my backups with folders named as proper paths: