Viper1970
-
Posts
2290 -
Joined
-
Last visited
Content Type
Profiles
Forums
Events
Everything posted by Viper1970
-

Universal military aircraft homecockpit project
Viper1970 replied to Viper1970's topic in Home Cockpits
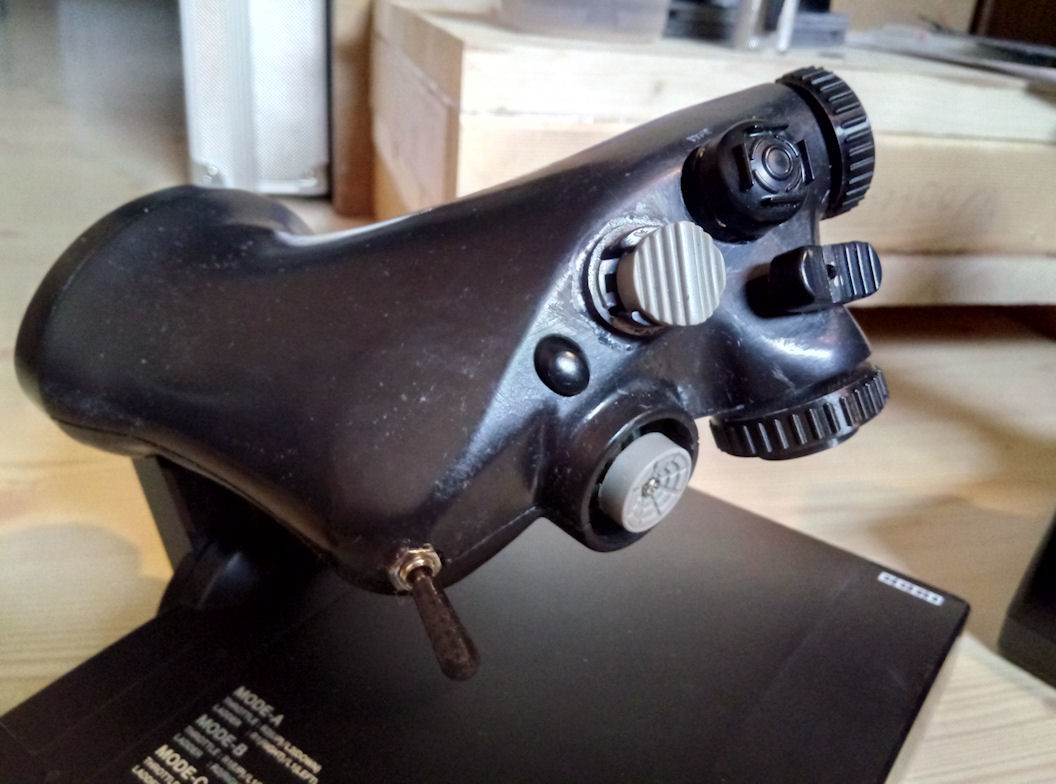
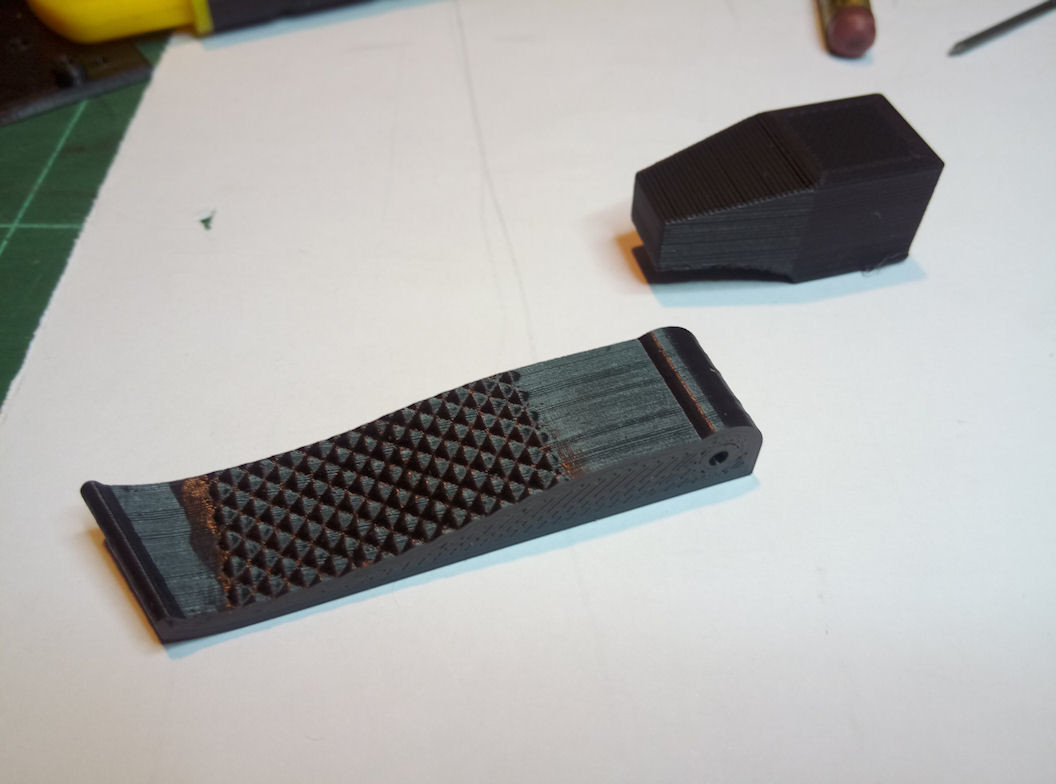
F-16C throttle (Cougar AB/Idle detend) finished .
-
Universal military aircraft homecockpit project
Viper1970 replied to Viper1970's topic in Home Cockpits
The Yoke is done. Not smoothed yet, but the rest is finished. Now the last two bigger parts have to be finished, the Harrier and the Osprey throttle. After this the Cougar handles AB/idle detend has to be finished, the Nozzle lever for the AV-8B and the wing sweep for the F-14 throttle have to be done and then I really finished all I ever want. Slowly the end comes closer . I wanted to have all the 3D parts done first, cause who knows how long things work like they do at the moment. It's always only a matter of time until programs you have to use online did not work anymore as they did before or even will be shut down by the company. Sadly there is no real offline-alternative for TinkerCAD and learning anything else to be able to do such things I've done so far, would take much longer as it took to make all my HOTAS. That's the reason I construct them non-stop at the moment. All other less complex parts for the pit can be done with any other 3D software at pinch or even the traditional way using handcraft tools, but making those grips another way would take ages if I would be able to do them at all.
-
Which layer height did you use? I print my HOTAS parts with a 0.5 nozzle between 0.1 and 0.125 layer height and with a speed of 55mm/s (sometimes even slower). The results are very good for my simple Ender 3 Pro, but it takes ages to finish only one print. A half shell of an B8 Standard grip takes about 17 hours to finish, not to mention more complex parts. Edit: missed the 1 at 17 hours, sorry
-
Universal military aircraft homecockpit project
Viper1970 replied to Viper1970's topic in Home Cockpits
The yoke itself is slowly growing. It's not an exact replica, more a universal one. But it's mostly based on the C-130J yoke. I hope some day maybe we will get also a C-130 in DCS. But there is a very cool mod I can use in the meanwhile and also another civil simulator, where I can fly all those toothless military transport aircraft . A little further now. The orange markings are for 4way POV's and the red are for normal buttons. There will also be two momentary toggle switches (based on normal momentary I-O-I switches with a cap) at the left grip. The black round plate is already a part of the extension and will be mounted at the ball bearing axis. The yoke fits with a square fiiting in this part and will be fixed with two screws to the left and the right, so it is possible to make further yokes in future for this system. and the quadrant I already made a while ago. It has a changeable thrust reverse system, which could be changed between Airbus and Boeing style reversers. For Boeing the big white parts are snapped in and the throttles do not go further as to this parts. For reverse you have to use the reverser levers with the extra potis connected to them. For the Airbus system the orange parts will be snapped in and the throttles will could be only pushed back as far as with the Boeing system, but will aim at a notch in the top cover intead of the stops used for the Boeing system. To pass this notch you have also to pull the reversers, but this time the negative range of the throttle levers is the reverser area. There is also a possibility to lock all four throttle levers together, to be able to move them more comfortable, especially if someone has such small hands like me . At the left side there is a trimwheel and the quadrant has also 6 additional linear and two rotary pots, which could be used for the prop pitch, the mixture, trimming or anything else. There are two I-O-I momentary switches for the speed brake and the flaps.
-
Universal military aircraft homecockpit project
Viper1970 replied to Viper1970's topic in Home Cockpits
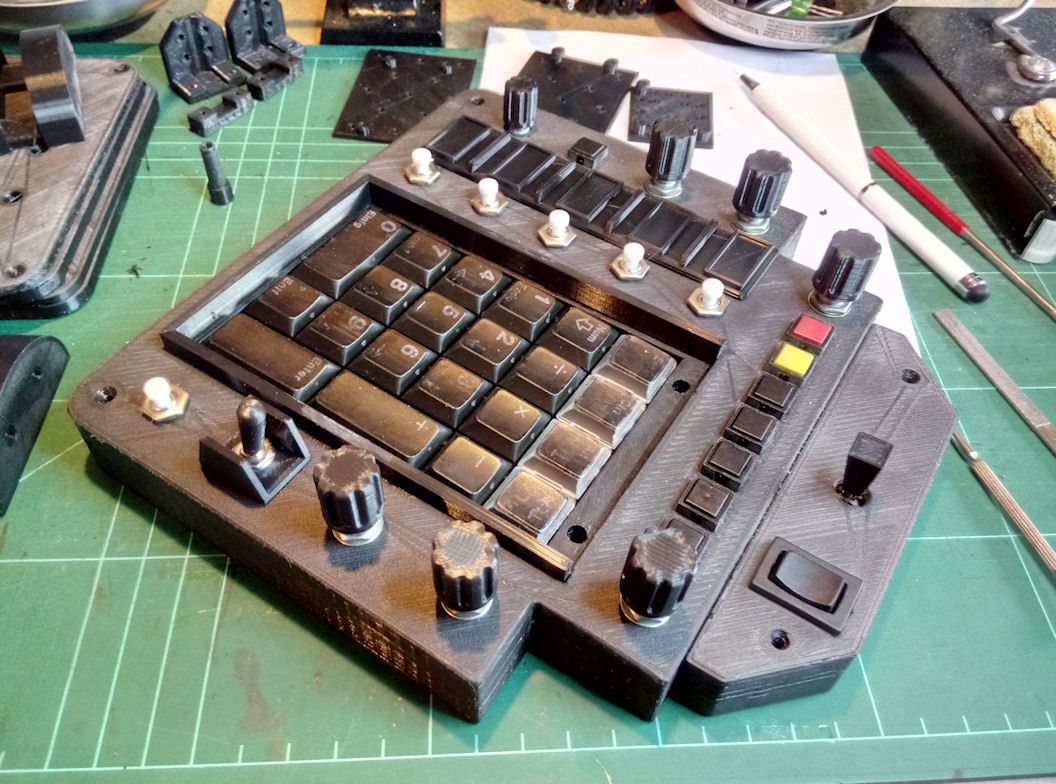
The modified HORI Hotas for my command unit. It's also not ready yet. I used all my not so perfect rest parts for it, like some old buttons and some TM POV's I had lying arround and printed new antenna and range dials. The whole thing still has to be sanded, primed and painted and some switch caps also missing. The antenna elevation and the range use encoders instead of pots here, cause this HOTAS will be interfaced with a Pokeys57U to be able to use it fully programable from Windows 98 up to Windows 10. I did this, because I want to use it with my old retro rigs and simulations like the Jane's series, too. The microstick in the throttle is also fully functional and seperately connected to a codemercs mouse warrior board and can be used as mouse or a thumbstick. Nothing is fake anymore, like it was the case at the original HORI. All inputs are programable and functional. Also added a paddle switch at the stick and an AB/Idle detend at the throttle (detend notch at the baseis still missing). There will be some small panels for switches, buttons and the gear- and hook levers also at this command unit (connected to Pokeys). The front panel can be folded down and pushed under the desk if you want to play other kind of simulations like naval- or tank simulations, where no aircraft panel is needed. The MFD's are old Quickshot Masterpilots, which are still fully functional even with Windows 10, once they are programmed with the MP programmer with the help of one of the retro machines. They will also get functional displays that will work with the modern rigs in the unit. Those will be made out of my old FPV-monitors from my RC hobby, I have still lying arround. They are connectable with HDMI. I also made a very small UFC which will be placed between the two Masterpilot MFD's, also driven by a Pokeys card and an additional programable Cherry numpad, which is even funtional from W98 up to W10. The goal was to be able to play all the simulations of my huge collection from the late 80's until now at this place. The cockpit on the other side, is meant to be the "right" stuff for the more realistic, advanced aircraft and racing simulations. P.S: The chassis of this UFC was printed using a 0.8mm nozzle with a layer height of 0.4mm. I often use a 0.8 nozzle for simple chassis to be able to print those large objects within a relatively small amount of time. For details I use a smaller nozzle or if things have to be very detailed, even the resin printer. After all is printed, I glue the different parts together.
-
Universal military aircraft homecockpit project
Viper1970 replied to Viper1970's topic in Home Cockpits
I'm also thinking of buying two new printers. An Anycubic Chiron and an Anycubic Photon MonoX Bundle with the Wash&Cure Pro. I have no issues with my two printers but the building space is very small, especially the one of the Anycubic Photon (my resin printer at the moment). But also have to admit that I very rarely use my resin printer, cause I hate the whole cleaning after using it. This is really annoying, even so I use water washable resins. But on the other side the detail of resin prints is unbeatable. But you can also get very precise prints with an FDM. I made some switch caps and levers for my command unit (the place beside my pit) and really was too lazy to do them with the resin printer, so I tried it with FDM. I used a layer height of 0.1mm and printed very slowly. The results where incredible. Even the texture at the paddle lever was exactly printed. The switch caps I sanded a little bit with the use of my lathe after printing them. I use one standard stamp I designed and put different hats on this switch-stamp, like one for the landing light, or a round one, or a cylindric one ... My Ender 3 Pro is a little modified and has a second Z axis spindle, driven by a synchronous belt at the top frame of the chassis. The originally design always tends to be inclined in the z axis a bit to the side without the spindel, so I decided to mod it to a dual z axis. I also added a modified layer fan chassis and included two LED's in the wind tunnels to be able to have a better view of what is happening directly at the hot end.
-
Universal military aircraft homecockpit project
Viper1970 replied to Viper1970's topic in Home Cockpits
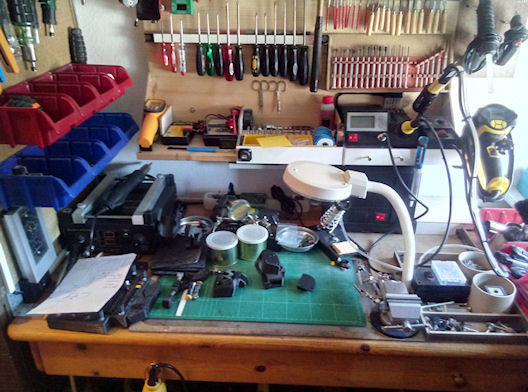
Most of the time it doesn't look like at those photos. Things are lying all over the place and even on the floor . The whole workshop is only 10qm and a lot this space is used for cabinets to be able to place all my parts in them. -
Universal military aircraft homecockpit project
Viper1970 replied to Viper1970's topic in Home Cockpits
The yoke extension is ready now. I added also some adjustable friction plates to the base plate. I hope this will do the job for holding the yoke in position. I will use a grease, similar to nyogel 767A, for all my inputs. This will add very smooth motion even with the use of many printed parts. I don't want to make the things to complex, although I could do more things with aluminum using my little mill or the lathe. At the beginning I thought about doing it this way, but it's a lot easier to print the parts. I don't want to have top notch equipment like many others, I'm ok with plastics and also simple buttons, switches and POV-electronics you can get in nearly every electronic shop, but I want to have the right control for mostly every aircraft I planed to fly in the pit. All this stuff should be affordable. It was still a lot of money (at least for me - never spent so much in this hobby the last decades), but even with all the TM equipment I use for my modding, it's nowhere near the costs that some top notch HOTAS reach. If something breaks, ok, I simply will print a spare part and maybe add some improvements to it.
-
Wow! Excellent work! How long did it take to print all those parts? I'm also doing a pit and also most of it will be printed. Although 3D printing is a wonderful thing in cockpit building, the time it takes to print the parts is one of the annoying concerns.
-
Universal military aircraft homecockpit project
Viper1970 replied to Viper1970's topic in Home Cockpits
The support for the yoke slowly proceeds. It's a real ugly part, but it has to be strong enough and even fitable to the universal base. Also the splitting in printable and screwable parts is not easy. It's one of the most complex things after the Apache collective, I've done so far. I hope I didn't make any mistakes but this will turn out first after the printing.
-
Universal military aircraft homecockpit project
Viper1970 replied to Viper1970's topic in Home Cockpits
Thanks! This is my little workspace with my printer cabinet, where all those HOTAS should be produced. The upper one is an modified Anycubic Photon and the lower one is a modified Ender 3 Pro with Dual Z Axis. I do not have much space in my workshop, so I have to store as much as possible at an as less as possible room. After the last 3D constructions are done those printers will run 24/7 .
-
Universal military aircraft homecockpit project
Viper1970 replied to Viper1970's topic in Home Cockpits
Some progress with the roll axis at the yoke. I still have to match many details and also the whole extension support has to be adjusted for the new mechanics. I use two 55mm ball bearings for the mounting of the yoke. Only one relatively strong tension spring is used now and connected to a steel pin inside the shape of the spring-mount in the gimbal. I will connect the other side to the support and maybe make some different screwings, or something similar, to be able to adjust it's tension. The "gravity" problem, caused by the angled base, that maybe will move the yoke out of center towards the seat, still remains. I also have to find a solution for this problem. Probably I will really use a fifth tension spring mounted to the center console, exactly strong enough to balance the force of gravity with the additional help of the dampers and the springs inside the base. I want to stay the yoke in exact position if you leave it. Two adjustable friction plates, mounted on the yokes pattern on top of the base, could also be a solution for this problem. Maybe I will use all solutions together and also adapt the additional spring to the sticks, but in this case anytime removeable. This could be useful for aerobatic flying. The Blue Angles also use an additional spring system which pushes the stick forward, so you have a constant force to pull. This is better for very precise formation maneuvers. Splitting in printable and screwable parts will be the last thing that is also needed.
-
Universal military aircraft homecockpit project
Viper1970 replied to Viper1970's topic in Home Cockpits
Some bad pics my wife made, of the building of my second pit, I just found (the predecessor of this project - very early stage - some things are hold in place with tape just for testing ). I was very low on money those days, so I had to use used old and cheap equipment for this project. No new TM stuff here, only old used gamport sticks, converted to USB. The only "expensive" equipment I used those days, were the Pokeys boards for interfacing all the switches, knobs rotaries and even the HOTAS. The keyboards, I integrated, were able to be used as seperate programable devices, using HID macros. All the sticks were made out of used TM X-fighter, Suncom Talon and FLCS grips. I also made a little collective out of an Suncom SFS throttle (sadly no more pic found) and an "Franken"-Osprey throttle . The whole pit was made out of expandet plastic slap, covered with thin MDF like plates. Only the ejection seat and the structure was made complete out of wood. The HOTAS were also interchangeable in this project. All MFD's were functional and also the gauges, using one TFT behind the panel and one small TFT for the side gauges. Some 7-segmenters were also planned, but I never finished this. Some parts will now be used again, like some of the grips at my command unit. I thought they are to bad for just lying arround in the cabinet so I decided to make a new, better interchangeable base system also for the com-unit again (some day ) and reuse them with my still beloved retro simulations.
-
Universal military aircraft homecockpit project
Viper1970 replied to Viper1970's topic in Home Cockpits
The yoke is a real problem! After some experiments with the old equipment from my preceding pit, I found out that the weight of it is much too heavy that maybe even with the dampers (which aren't really strong to prevent too much force to operate it) it tends to run slowly out of center towards the seat if you realease the controls. Maybe I must add a fifth adjustable spring facing in the direction of the panel, to compensate this. The roll axis mechanism is also not an easy task. I don't want to use torsion springs here, cause they also have a relatively hard center and aren't very precise in centering. But there is not much space for any other system here. I hope I can place a tension spring mechanism, equal ore close to the one in the old CH yoke, for the roll axis. I angeled the base, cause I don't want to cut out a piece of the bucket seat of this new bought race-rig. So this angeled construction was the only way to get the sticks closer to you, the way they are positioned in the real aircraft, without making a large L-shaped extension. -
Universal military aircraft homecockpit project
Viper1970 replied to Viper1970's topic in Home Cockpits
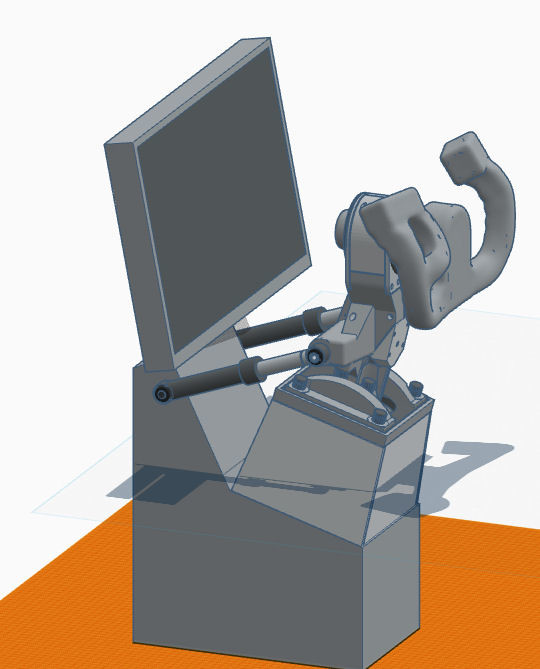
Just experementing with the construction for the yoke. I must use two dampers, one at the left and one at the right side, connected to my center base. Only one in the middle isn't possible. Nothing is near finish yet and maybe a lot will also change again during the brainstorming The dampers should be connected to the yoke extension, an mounted at the console over to bolts, saved only with a split pin. The whole yoke-extension should easily be exchangeable. The room for the legs is a bit tight if the yoke is mounted but for me it is ok. I'm not the tallest guy. Some constructions don't look very nice (in fact they are ugly as hell ), but I have to make a lot of compromises to be able to adapt the universal aim of my pit. It's really difficult to get all under the hood and also in an ergonomic position, so that you are able to operate all the different layouts without any contorted movements. EDIT: Reworked a lot! I've also integrated the panel's TFT (the one behind the main panel, which will be used for instrument and MFD display) in the construction to have a better overview of all the dimensions. The yoke itself is scaled down to 90% now, cause in my pit there isn't enough room for full scale. But it's still 4cm more in width and 2cm more in height as my old CH Flightsim Yoke USB. It's still not ready yet, cause some minor details are still missing.
-
Geil! Sowas wäre doch was für ARMA in Verbindung mit VR. Dann könnte man sogar richtig große Strecken wirklich laufen (müssen).
-
Was mich stört, ist einfach das man das Zeug eben nicht programmieren kann. Dafür finde ich die Preise etwas heftig. 2000€ für ein Equipment, was ich dann nicht konfigurieren kann, bzw. wo nur eine Bodnar oder sonst was drin steckt. Und die Griffe sind auch 3D gedruckt. Wäre mir zu teuer dafür.
-
Universal military aircraft homecockpit project
Viper1970 replied to Viper1970's topic in Home Cockpits
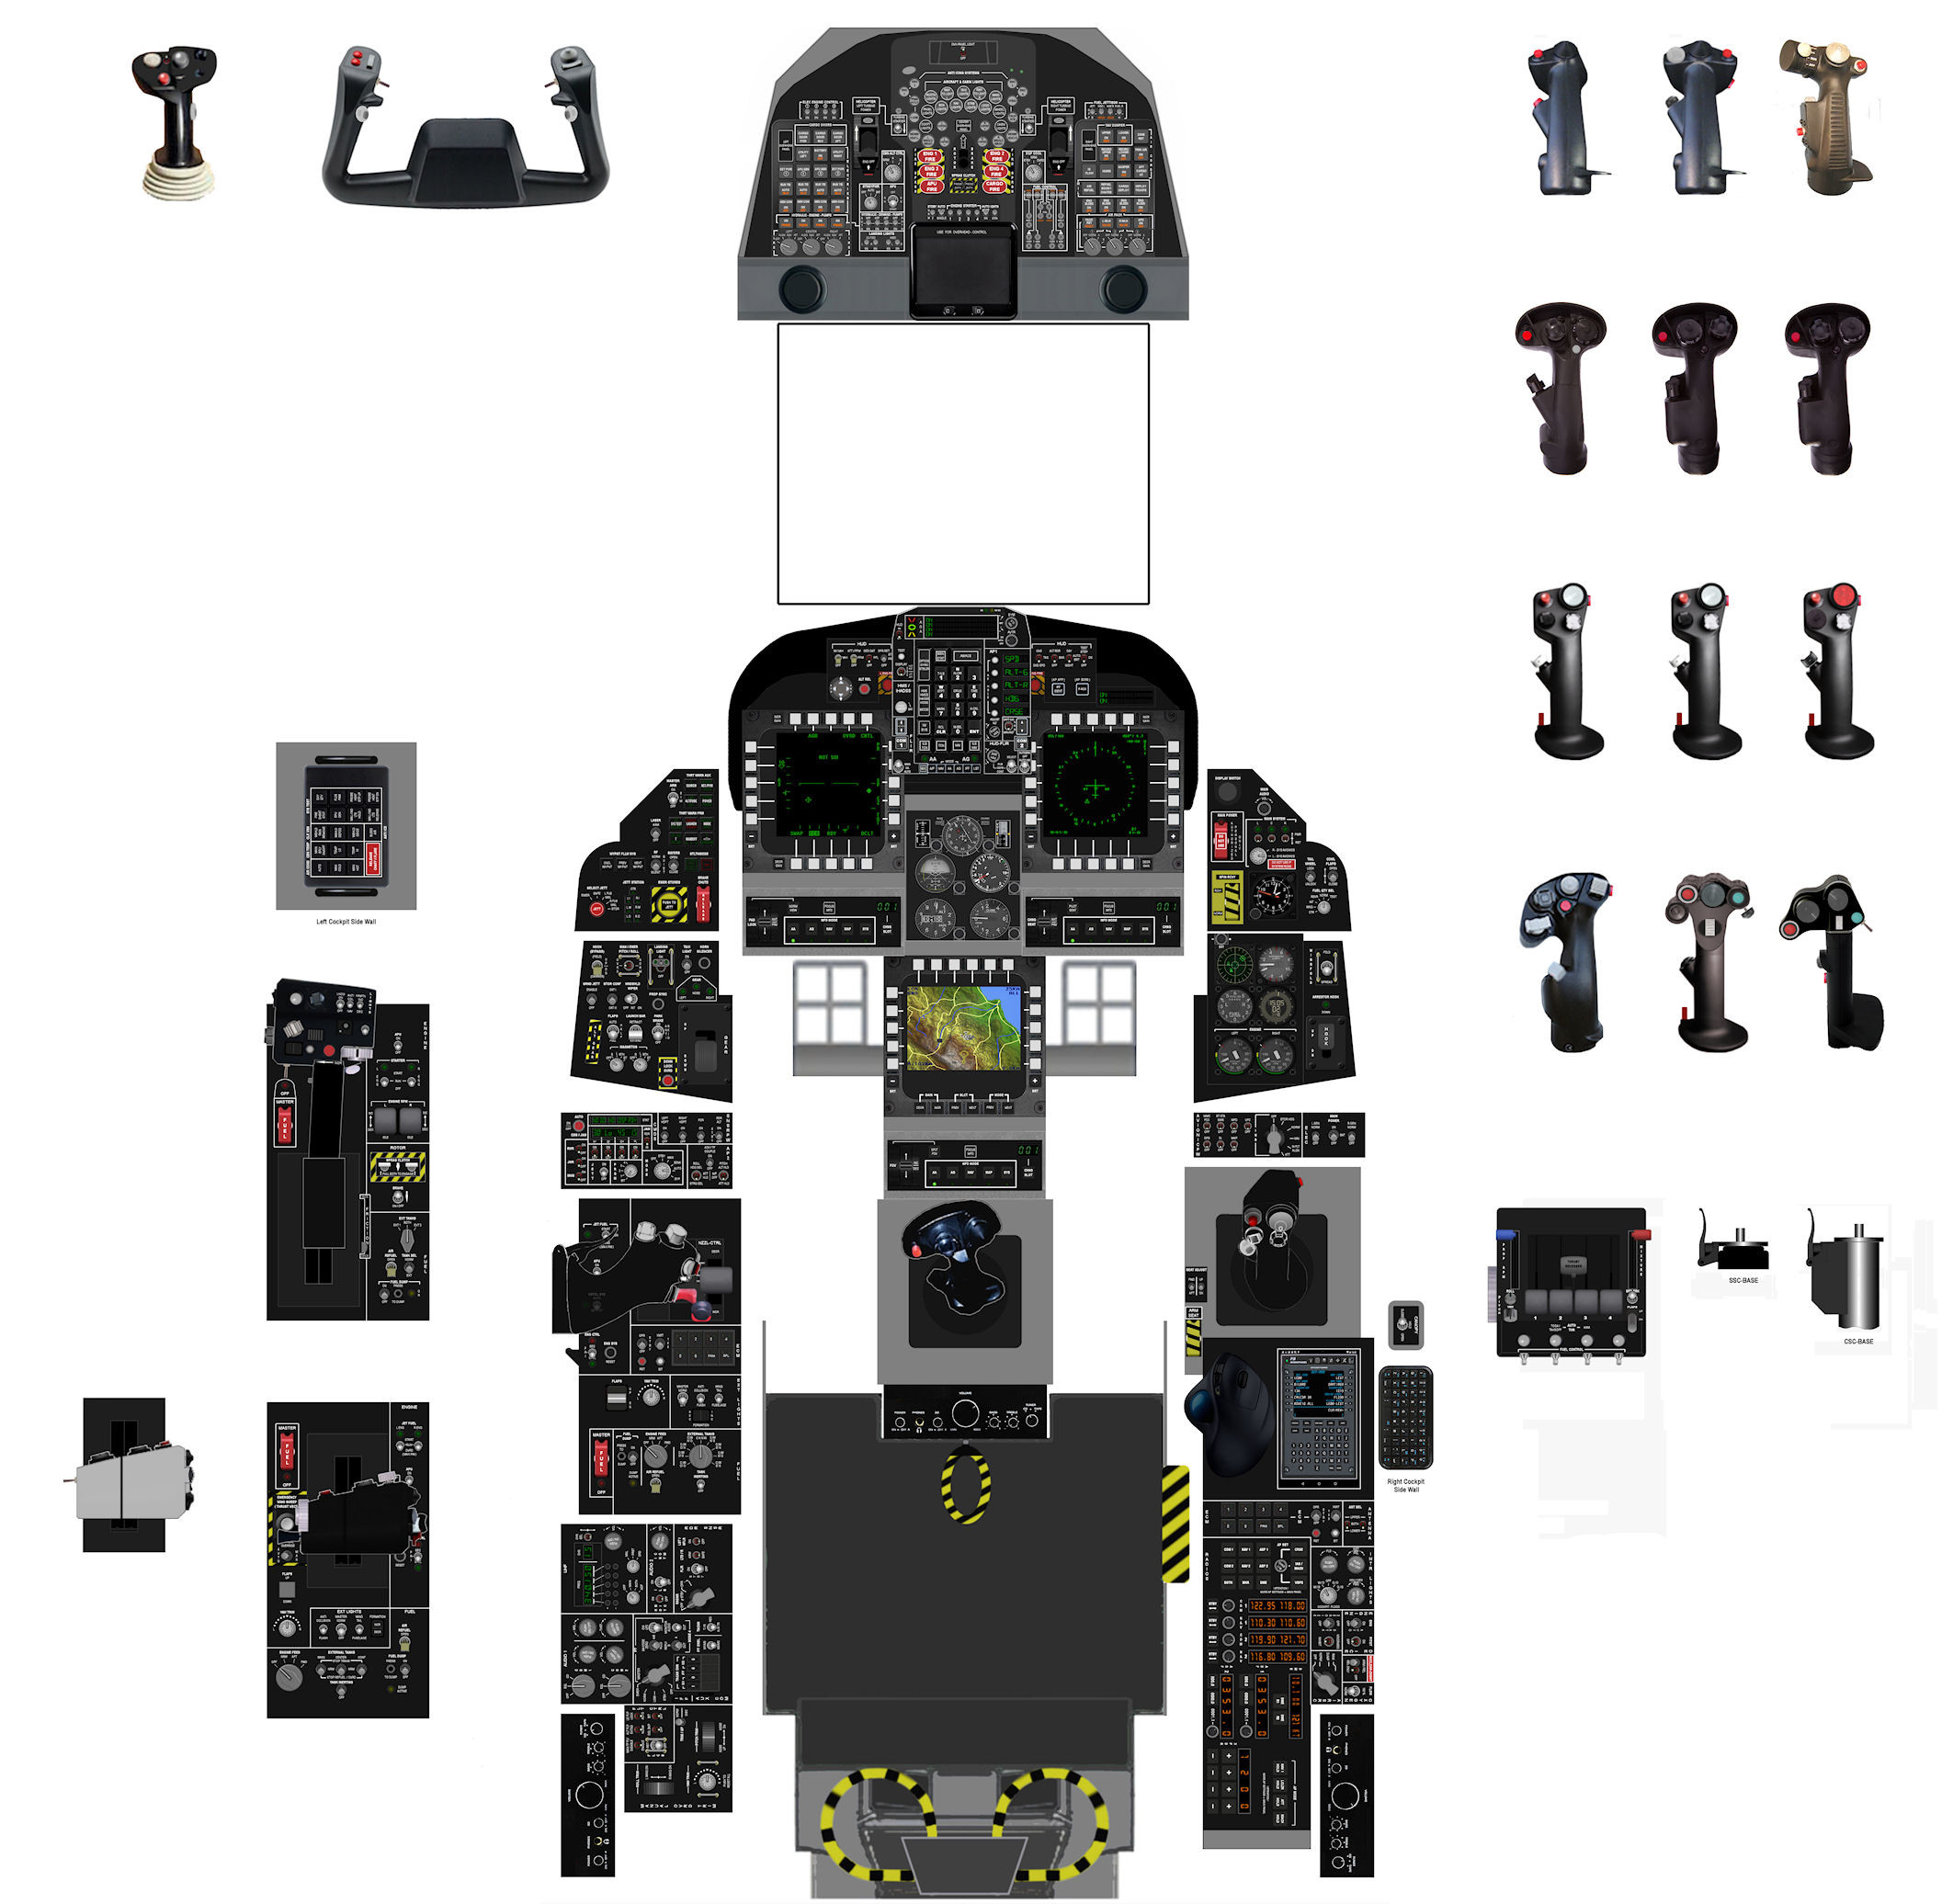
No, saddly no lottery. I had to buy them . I have four Viper and two Hornet grips, two Warthog bases, four Warthog throttles and one complete Cougar. And the Virpil VFX, but all of them will be modded, thats the reason I bought them . P.S: The "universal" pit is the dream of my life and I already started this thing three times since 1998. But every time a new #@! in my life appeared and I had no more time for many years for the project. This time things are really better and I want make it come true now. So I sold all of my other hobby equipment (my RC planes and a lot of other stuff) and put all the money in this project. -
Universal military aircraft homecockpit project
Viper1970 replied to Viper1970's topic in Home Cockpits
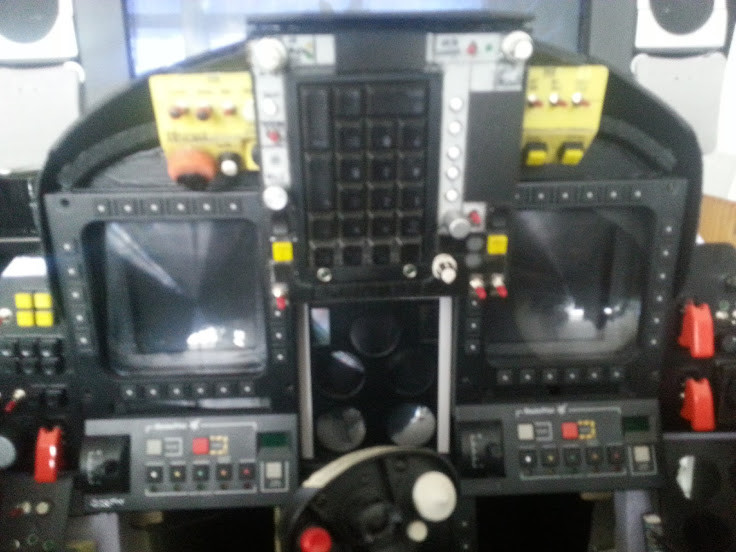
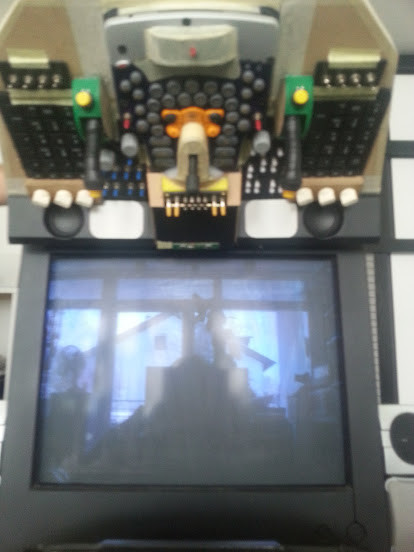
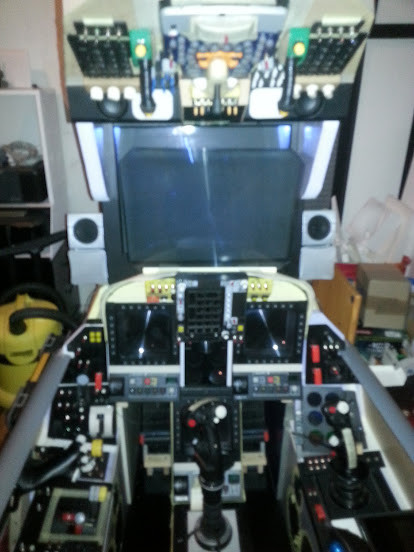
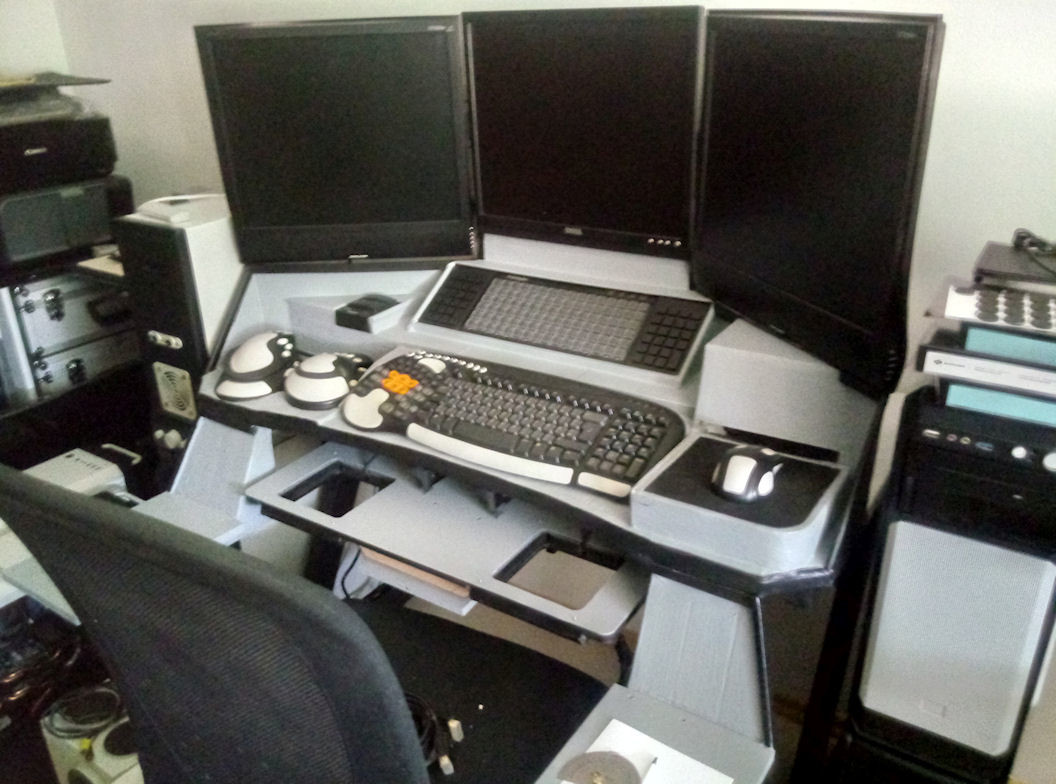
The place where all this HOTAS should work somewhere in future . The desk in the foreground is my "command unit" where I will play tank/naval/infantry and tactical simulations or even my still beloved old retro sims like the Jane's series etc. It has four different PC systems with different OS, which all can be switched between the inputs, the sound system and the monitors. The retro rigs are one AMD K6 400 with a Geforce 256 DDR and a Voodoo I. The second retro machine is a Dual Core AMD Athlon 3Ghz with a Geforce 5950 Ultra and two Voodoo II in SLI, which can run Windows ME or Windows XP in dual boot. The third machine is a Phenom II X6 with a Geforce 1650 (W7) and the last is a Ryzen 7 2700X with a Geforce RTX 2060 (W7/W10 Dual Boot). The Panel can be folded down and pushed beyond the desk. For flying retro sims I have modded a Hori HOTAS (cause I wanted to have something neutral looking at the command unit) which now uses Pokeys cards as electronics and also attached TM TFRP rudders. The Pokeys cards are fully programable and also useable with W98/XP/W7/W10. The panel of the command unit also gets some small consoles and a "universal" UFC (already printed). The pit will get all kind of interchangeable HOTAS systems and also some functional consoles and an overhead panel. The main panels will also be interchangeable and placed in front of the old TFT (which will display MFD's and instruments) on top of my center console, where the modified Cougar base will be placed. They are still in early production . At the moment three versions are planned. One for helos, one for fighters and one for the big birds. No doubled controls will remain in the pit while flying, only the bases will stay in place. It should always be the right control layout for the kind of aircraft you just flying. There is also an option to remove the panel-TFT, which then can be placed at the wall with a wall mount and the mount for the FFB-wheel can be folded out and up after removing the center console, to place the wheel on top of it. The TPR rudders will then be changed against racing pedals. The little wood boxes will be my console boxes. They fit perfectly, have enough room to place switches, dials etc. on top of them and you can put the Pokeys boards inside of them. So you always can reach all the electronics very easily. The pit has one W10 machine with an Ryzen 9 3900XT and a RTX 3090 and the second W7 system for older sims like Strike Fighters 2 or anything else like this is a Phenom II X6 with two Geforce GTX 660 in SLI.
-
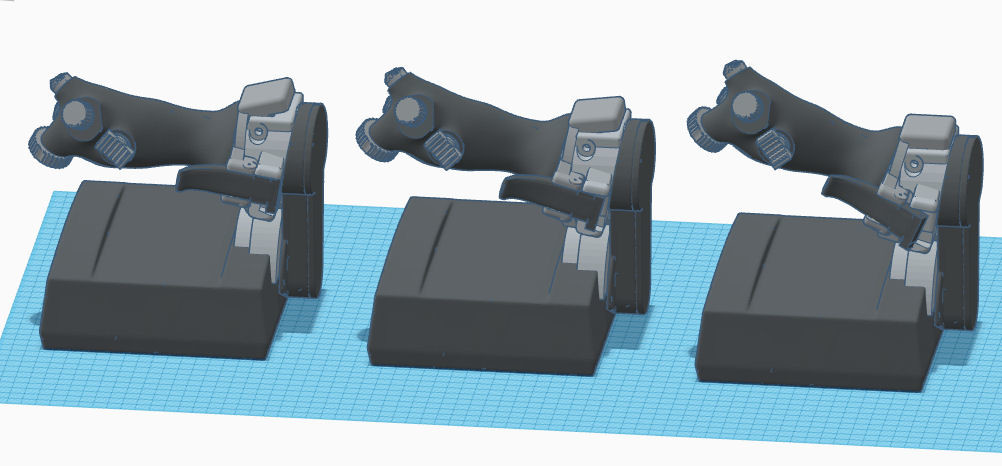
Universal military aircraft homecockpit project
Viper1970 replied to Viper1970's topic in Home Cockpits
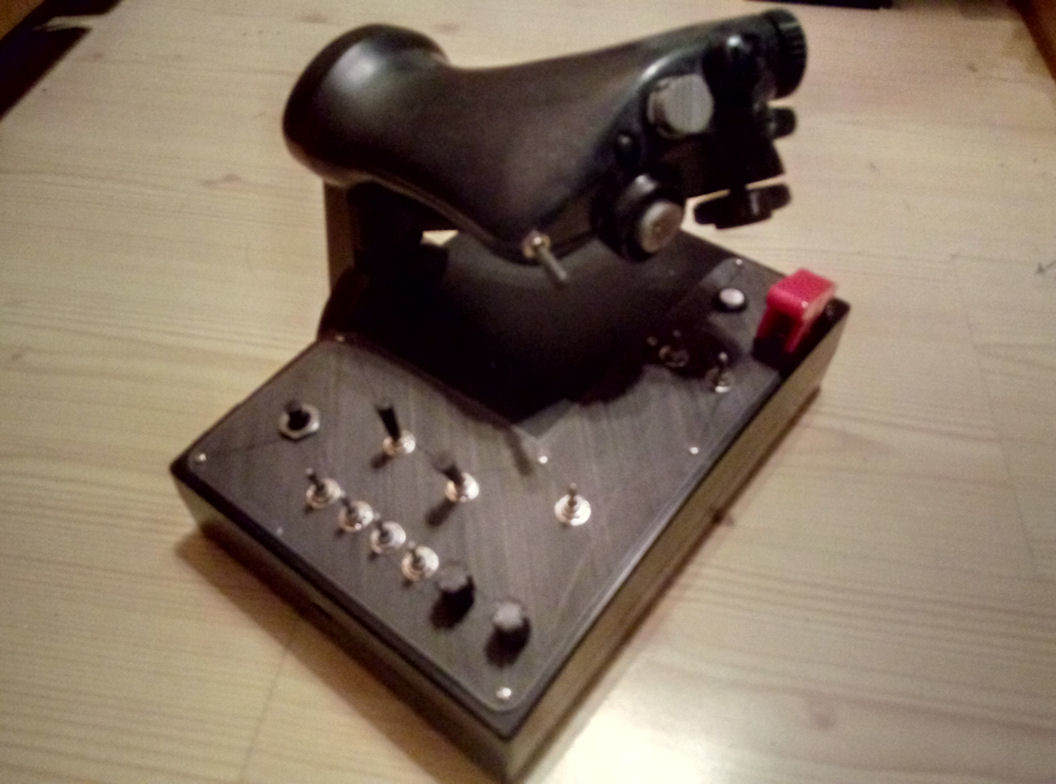
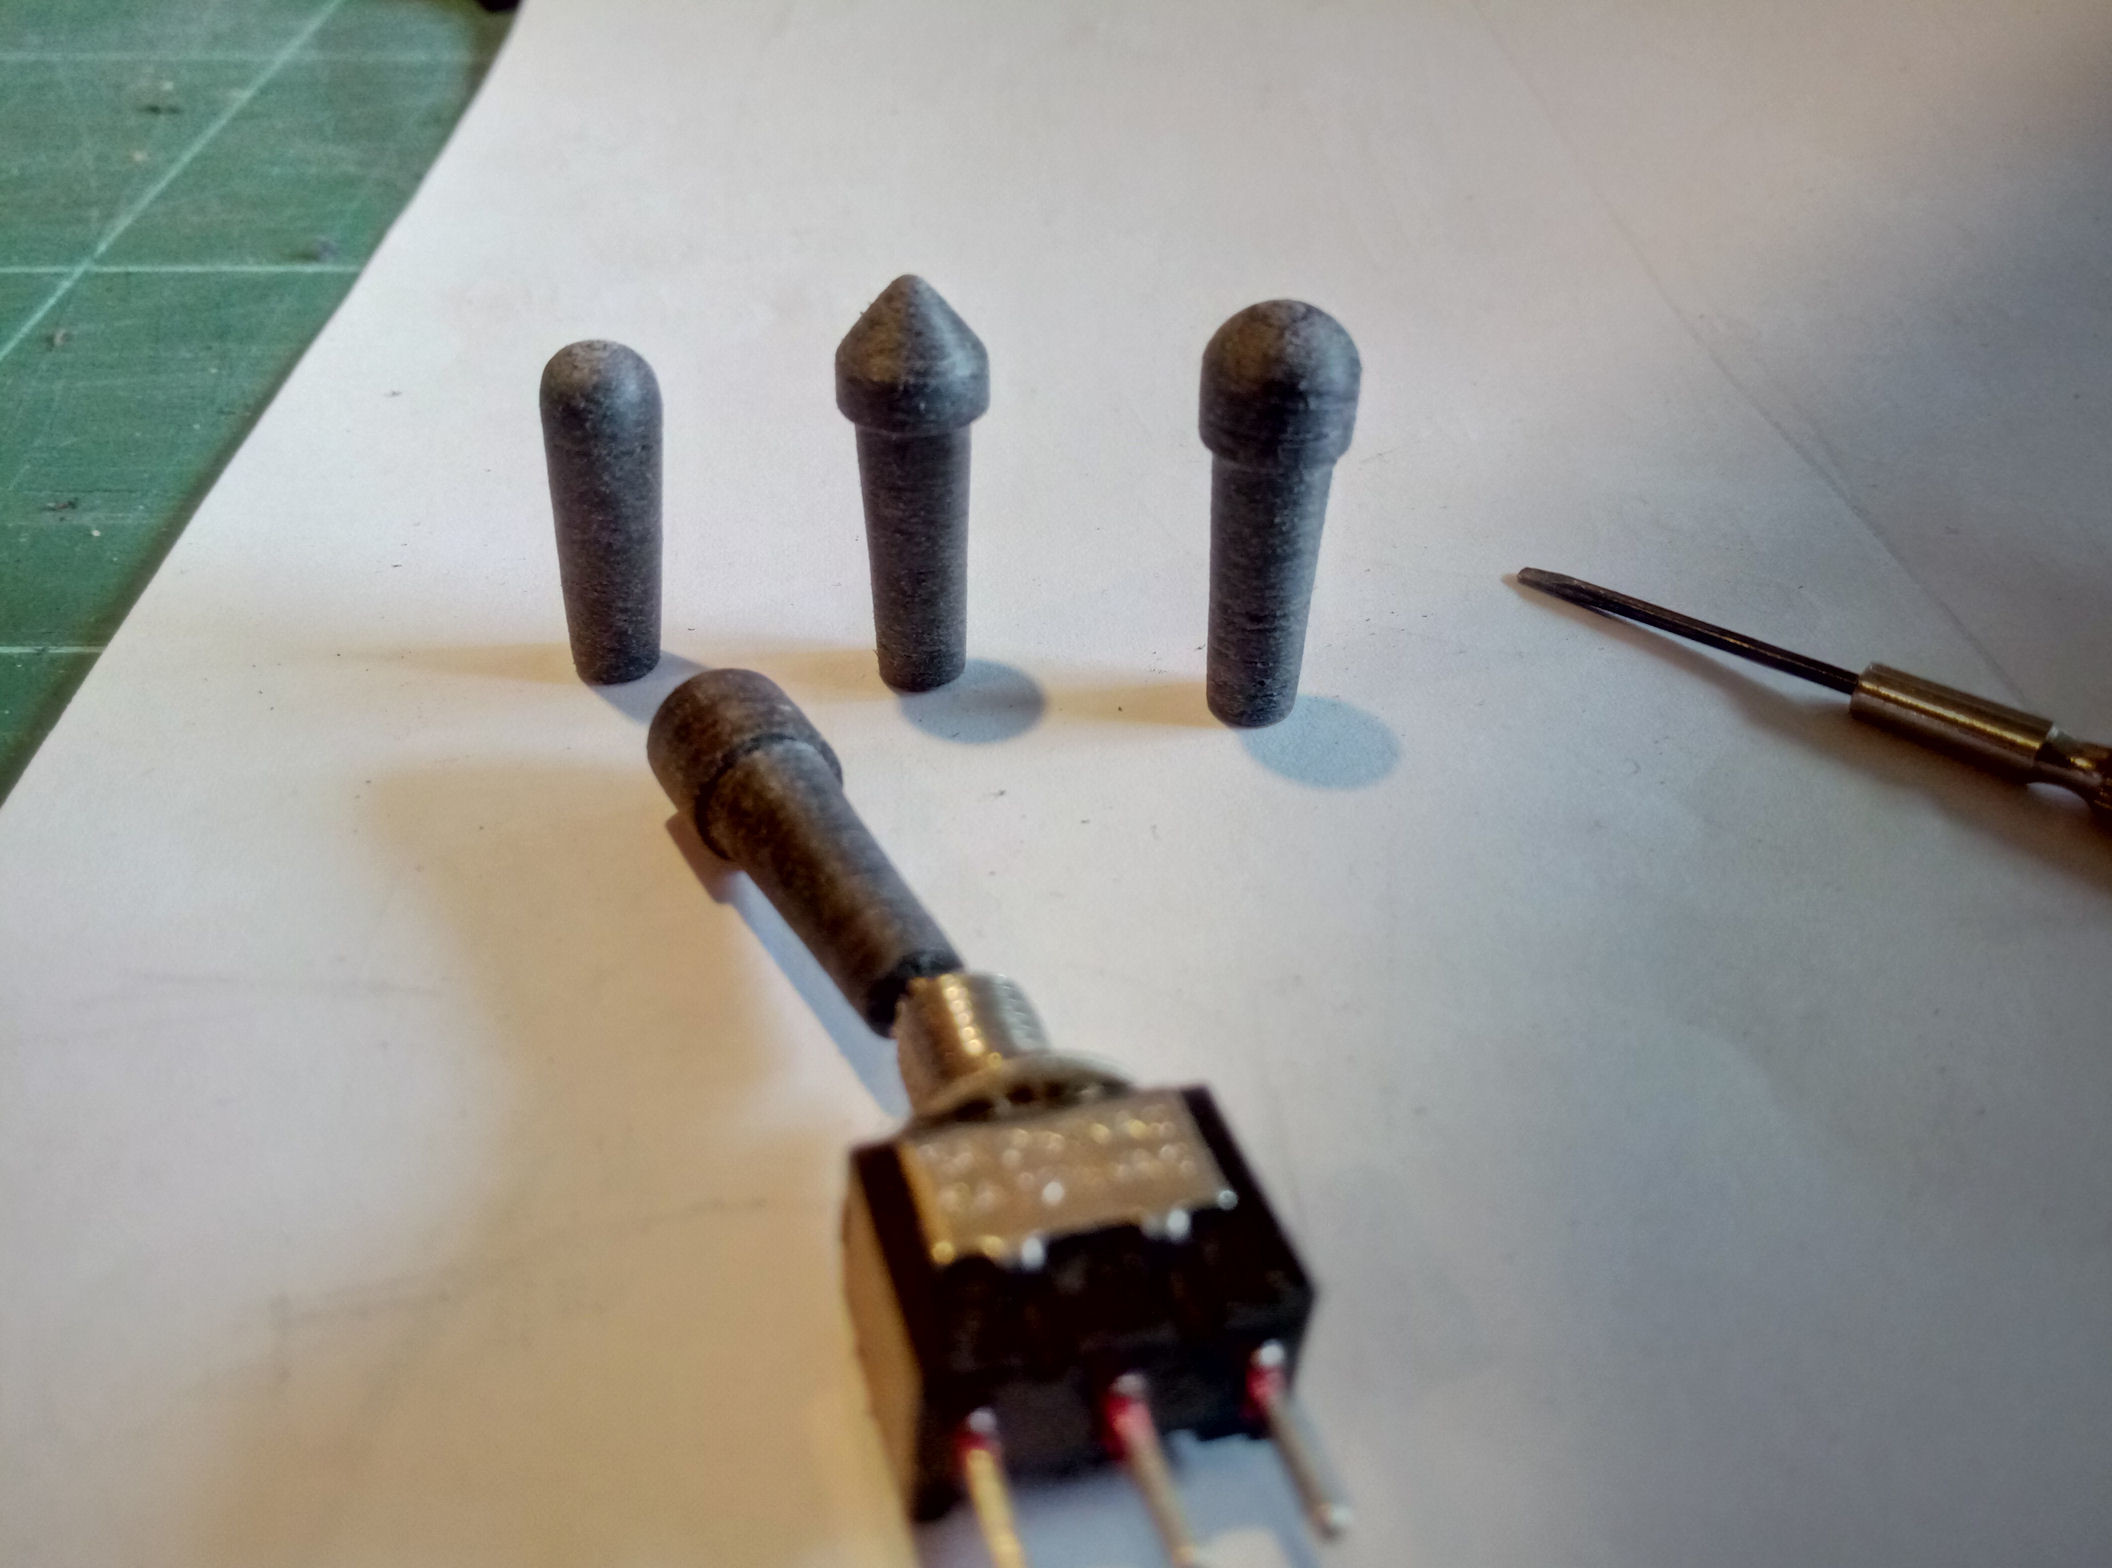
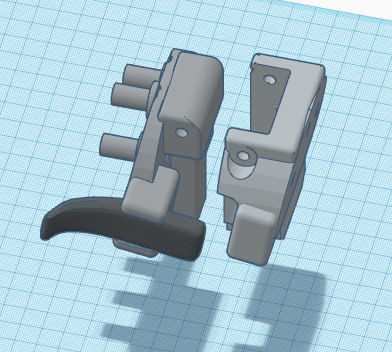
and the F-16 throttle AB/Idle detend. As said before it's also not ready yet. Some minor things still missing, as the main limit stop for the whole grip upwards and the limit for the idle position at the "trigger". But that's not very complex to finish. Maybe I will use an extra LIYY cable which will go out of the grip connector an then into the connector part at the throttle arm, but there is also enough space to make a feedthrough for the original Cougar flat cable. Green: The way you have to lift the handle to go over the AB detend (no Trigger pulling needed here) Red: The way to overcome the idle detend . The pulling of the trigger is needed. EDIT: and made some positioing devices for the extension box. I made two different scopes for every sort of the patterns. One with a smaller and one with a little wider area of movement. The slotted ones are for the yoke, which will get an additional roll axis with a ball bearing. They all will hold in place in the frame on top of the box with 4 neodym magnets. The yoke will also be using different sensors which will be connected to another board, not the Warthog board that I use in the Cougar base for the other systems. One of the remaining original pots of the Cougar will be used for pitch and one in the ball bearing connection on top of the extension where the yoke itself is be connected, will be used for roll. The axis will go to an MMJoy2 Board (Pro Micro). The quadrant uses also a MMJoy Board for the axis. The Cougar base has two different types of sensors at all, one Cougar pot and the Warthog sensor. Maybe I will add hall sensors for the yoke in future but at the moment I will use the pots. The buttons and hats etc. of the yoke will go through the Warthog electronics. I made it like this, cause the Warthog is using a special kind of sensor, not compatible with standard hall sensors, so you could not simply add an additional input like a standard hall sensor or pot for the roll axis sensor on top and switch between the different roll axis sensors. The electronics of the Warthog fit in the Cougar base and do work perfectly also with the Cougar gimbal. I already tested this, but I have to print special mounts. For testing I simply glued the magnet and the sensor in position. There are other unofficial options if you want to use TARGET with anything else like a TM device of course, but none of them really worked for me. I heard it should be possible, but my results weren't really satisfying. But I'm also no electronic technician or a programmer, so maybe there is a solution, but I have to do it the hard way .
-
Und genau da waren die alten HOTAS der 90er um Lichtjahre voraus! Denn was bringt mir die tollste Sim, wenn ich mein Pit oder meine HOTAS nicht vernünftig konfigurieren kann? DCS ist da ja schon gut, gibt noch ganz andere Sachen. Ich möchte so ein Pit halt überall verwenden können, wenn mir danach ist. Sonst würde sich der Aufwand für mich nicht rechnen. Und was mach ich wenn eine Sim wo mein Pit darauf zugeschnitten ist, dann wegbricht und die andere, neue zwar dann toll aber sch... zu konfigurieren? Ich bin da lieber unabhängig. P.S: Und man musste das komplizierte System ja auch nicht verwenden. Konnte auch alles einfach nur auf DX-Buttons gesetzt werden. Aber man hatte die Möglichkeit und das ist der Punkt.
-
Ja, da ist die andere Simulation Lichtjahre voraus. Da geht das alles ohne großartigen Aufwand. und das ganze HOTAS Mapping ist genau der Grund warum ich meine Sachen alle zu TARGET kompatibel haben möchte. Klar geht's wesentlich einfacher mit anderen Boards wie simple DX-PCB's ala Bodnar, aber wenn man eben die Sachen nicht so konfigurieren kann wie man sie bräuchte, weil man bei der Sim im Config Menu an die Grenzen stößt, sind die so gehassten TARGET Scripte schon toll.
-
Universal military aircraft homecockpit project
Viper1970 replied to Viper1970's topic in Home Cockpits
Just creating the frame arround my center base and also found a solution for the yoke problem. Nothing is ready yet, there is still a lot missing. The frame will be mainly out of sheets of MDF. Only the connection parts will be printed. On top of this box (on top of the top with the rounded corners) there should be positioing devices mountable. One or the normal grips and one for the yoke which blocks the roll axis. The white block is the beginning of the yoke extension. I always use already done parts and adapt them for the new needs .
-
Universal military aircraft homecockpit project
Viper1970 replied to Viper1970's topic in Home Cockpits
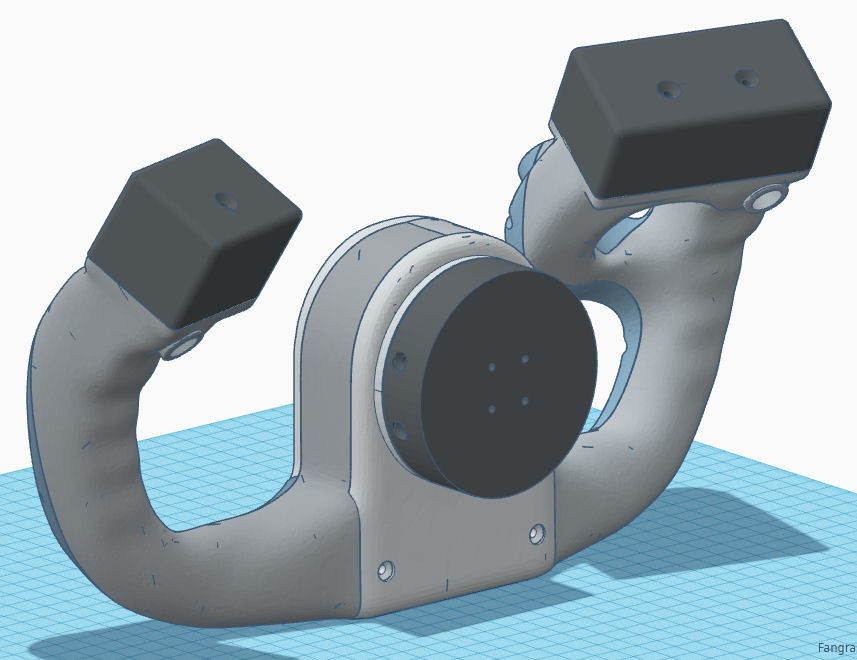
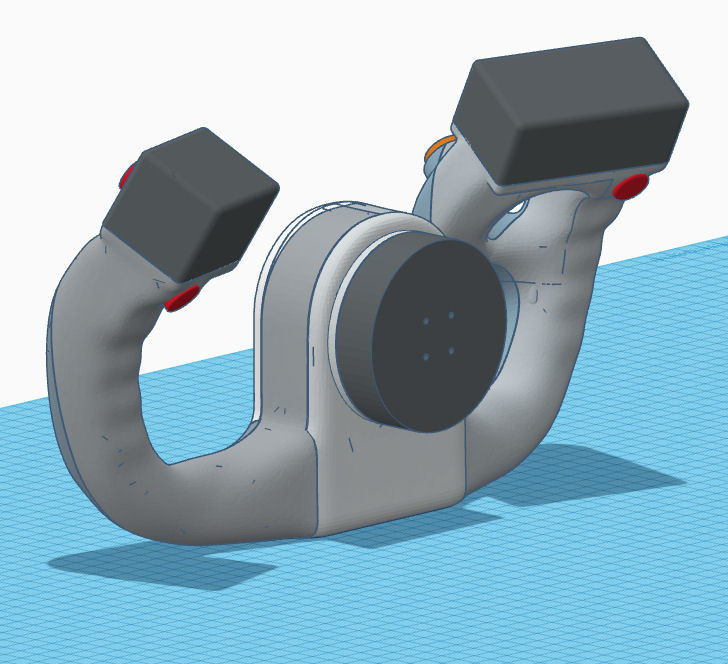
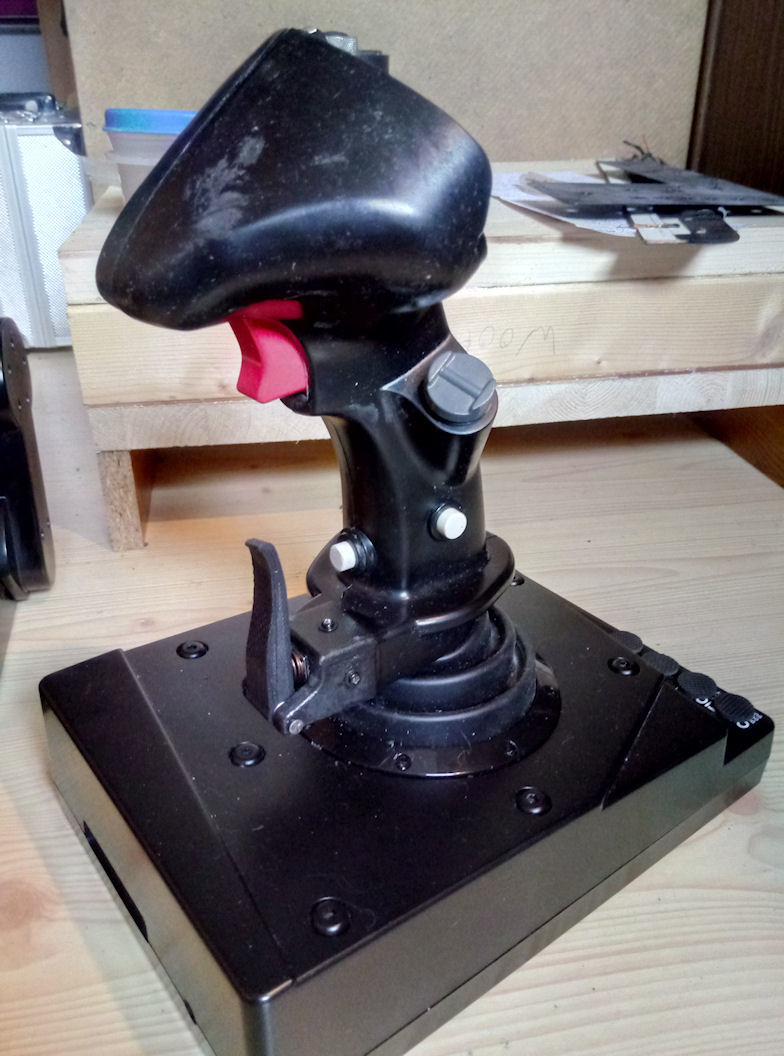
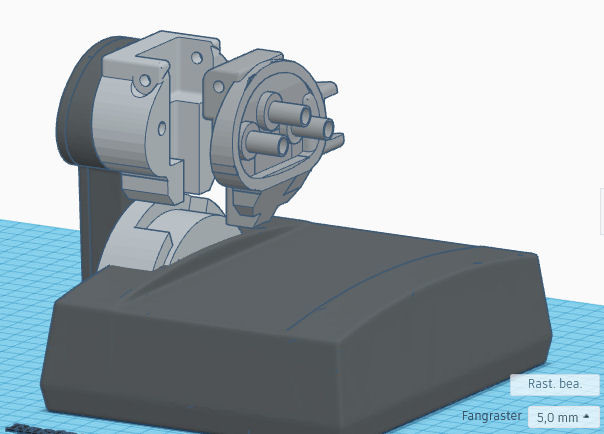
Oh, yes there was another one not finished yet. I think I did too many things and slowly begin to lose the survey . This thing isn't printed yet, just as all the other parts at the moment. But it's mostly finished regarding the construction. I still have to find a clever and mainly stable, printable solution for the "idle-trigger", rather the locking mechanism to prevent the handle to go too far up without pulling the trigger. It's just the design that blocks the handle if you don't pull the trigger that isn't really finished yet. Because my parts are mostly printed I have to find a way to make such things strong enough, so they don't break. I will post a few mor detailed pictures tomorrow, where you could see the mechanics a little better. I do not use a spring here, only the weight of the Cougar handle will do it. I always try to keep things as simple as possible, mainly if the parts are printed to avoid too complex parts. -
Universal military aircraft homecockpit project
Viper1970 replied to Viper1970's topic in Home Cockpits
For the spring connections to the base I will now use simple eye bolts. I considered some adjustable solutions, but at the end all of this is much to complex. I ordered a bunch of springs now and will take a look which of them will do the best job. Frankly speaking, I'm slowly a bit tired of 3D constructions and want to come to an end . Not all will be perfect and many things will also need some post processing or even a complete overhaul, but I'm quiet happy that I was able to find many useful solutions for my universal cockpit concept. I hope most of them will work. The last three big parts now, besides the nozzle lever for the Harrier and the manual wing sweep for the F-14 throttle, are the Osprey throttle, the Harrier throttle and the Yoke. The Osprey and Harrier throttles will simply be mounted on top of TWCS bases and their electronics will be interfaced with the grips. At the Harrier the nozzle lever will be a seperate part, mounted to the base. This shouldn't be such a big problem, but the yoke on top of my center Cougar base with the locked roll axis is much more a problem as I thought before. I didn't respected some details, which makes the locking more complex as I have thought first. I hope I can find a solution for this, cause I don't want to use a seperate base for it. Only the extensions and the grips should be easy changeable and nothing more. This was the idea behind this whole system.