Viper1970
-
Posts
2290 -
Joined
-
Last visited
Content Type
Profiles
Forums
Events
Everything posted by Viper1970
-
Universal military aircraft homecockpit project
Viper1970 replied to Viper1970's topic in Home Cockpits
Reworked and done! I also have made the still missing "Boeing Clips" for the 4 engine quadrant, that will prevent the levers to go into the "Airbus reverse" if the Boeing system is used. Now my last HOTAS part has to be made, the manual wing sweep for the F-14 throttle and the 11 months of construction adventure is finished. Some things still have to be smoothed, especially the last parts I did, but this I will do while I'm already starting to print the first parts. The printing will also take a while .
-
This little pit is so perfect! I love it! All the components are so awesome and practically done. If I had seen it before I started with my command unit, I had used this project as a template. But now it will be a future project for a pit for my son .
-
Universal military aircraft homecockpit project
Viper1970 replied to Viper1970's topic in Home Cockpits
Just thinking about the placement of the helicopter unit in the overhead. Realistically it should be in the left side of the overhead cause the pilot is mostly sitting on the right side. At first I want to place it in the middle to be able to reach it better with both hands, but now I think a placement which is more realistic should be better. For this I have to redo my unit, cause it's to wide to fit at the left side of the overhead. -
Wird wieder nix! Zuviel Arzt-Termine dieses Jahr. Ich hoffe nächstes Jahr gibt's auch noch nen Stammtisch. Da sieht's bei mir besser aus (auf Holz klopf).
-
Universal military aircraft homecockpit project
Viper1970 replied to Viper1970's topic in Home Cockpits
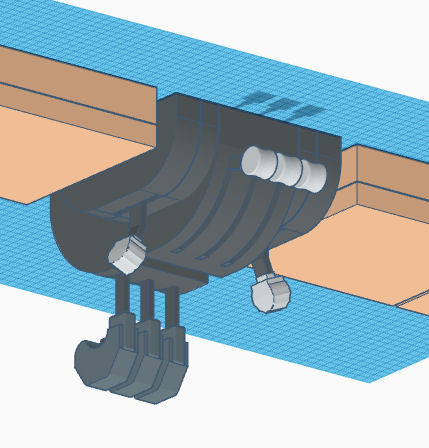
The overhead how it should be mounted correctly. I added two additional levers and will take the remaing knobs of the Logitech quadrant (colors of the original knobs will all change). For the buttons in the back engine levers, I will use 3 functions of the Logitech quadrant (each unit has 6 seperate button functions - the ones of the axis in the reverser segment are only simulated button functions) and fix the wires with cable ties at the levers front. This leaves a rest of nine functions I will also add to the console. Maybe the original 2way buttons on the front console will stay original and the other three I will integrate at another place of the unit. The wires on the front face of the engine levers will also reduce the useable way of the axis a little bit, as they will be installed through the guidance-slot, but thats not a real big deal. P.S: There are three zones for each lever you can program also with button or macro functions, which makes it easy to use it with simulations which aren't use axis for the helicopter throttle controls. The reverser is also programable which gives you four functions on each axis in different positions. The two outside levers will be connected to an analog input of the Pokeys boards each in the overhead (placed in the boxes to the left and right), which is also programable in a very similar way to the Logitech quadrants in case of emulating button functions or keypress. The gap between the quadrants will be filled with a housing. The gap is necessary for the cables, which came out of each quadrant on the backside and it's also better having a little more space between the front and the rear levers.
-
Ich hab meine RC Sammlung aufgegeben. Anders wäre das mit der Hardware für die Flugsimulation jetzt auch nicht möglich gewesen. Behalten habe ich noch zwei Copter, damit ich auch mit meiner Frau ein gemeinsames Hobby habe. Da gehen wir in die Natur raus und können dort dann Filmen bzw. natürlich auch "Fliegen" , weil ich mit der Natur allein nicht wirklich so viel anfangen kann .
-
Wow, this is a real top notch work! I hope I can get it only nearly as good when I'm starting to built mine.
-
Universal military aircraft homecockpit project
Viper1970 replied to Viper1970's topic in Home Cockpits
For the HOTAS I use canabilized TM electronics in separate boxes at the different places, where all my HOTAS could be connected to. I wanted to be compatible with TARGET with all my HOTAS. But for the pit electronics I always use Pokeys56U/57U devices. I was able to get ten 56U at Ebay for a real good price some years ago and after I did my first projects with them, I never bought anything else. I also tried to use Arduino Mega R3 for the pit but the Pokeys offer so much more and aren't so expensive. For the new 57U that I bought, I always took the one without terminals, what makes the boards again more cheap and I also want to have electronical things rather to be soldered as screwed in a terminal, cause of slacked joints. -
Man this guy, one of the best guitar players ever!
-
Universal military aircraft homecockpit project
Viper1970 replied to Viper1970's topic in Home Cockpits
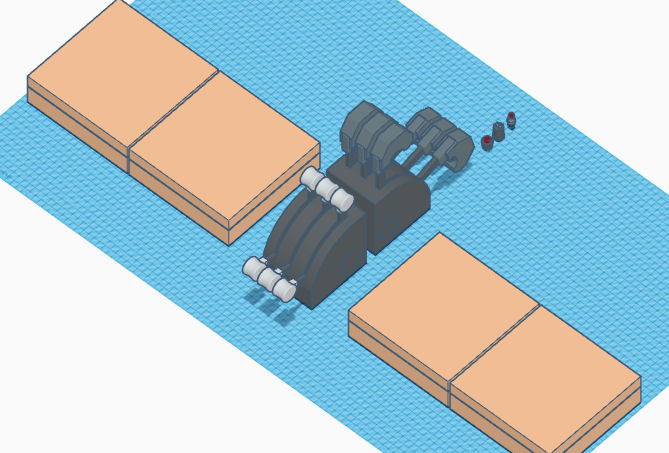
Ok, the work at my helicopter overhead controls can go on now. I use two Logitech quadrants here and only will make some additional grips for the one in front. The backwards one will get the original knobs, but I will shorten the levers a little bit at this one. The wooden boxes at the left and right of the levers, are those boxes I use for my overhead "button-boxes" and also for my side consoles (here mounted on top of old big tower cases with removed face plates lying on their fronts, having a board on the back). They have a hinge and can be opened, so you could pack the electronics inside and put a little printed panel on top which fits all the switches, knobs etc. and the cables just go to the inside electronics. I hope those hinges and the latch are strong enough to resist the operating on the panels. If not, I have to make the lids screwable. The overhead will also get two further analog levers at the left and the right. One will be used as an APU lever and the second is a backup for other functions, which needs a lever. Main goal is to be able to control the CH-53E somehow realistic, which is my absolutely favorite big helo . As it is one of the helos with the most turbines, it should also work for other overhead contolled helos. This shouldn't be a replica of any real thing, just a universal useable overhead control for helicopters. Still very, very early at the beginning P.S: There aren't two sets of levers on every quadrant. This is only for planing, to see where they will stay at the end-positions.
-
Universal military aircraft homecockpit project
Viper1970 replied to Viper1970's topic in Home Cockpits
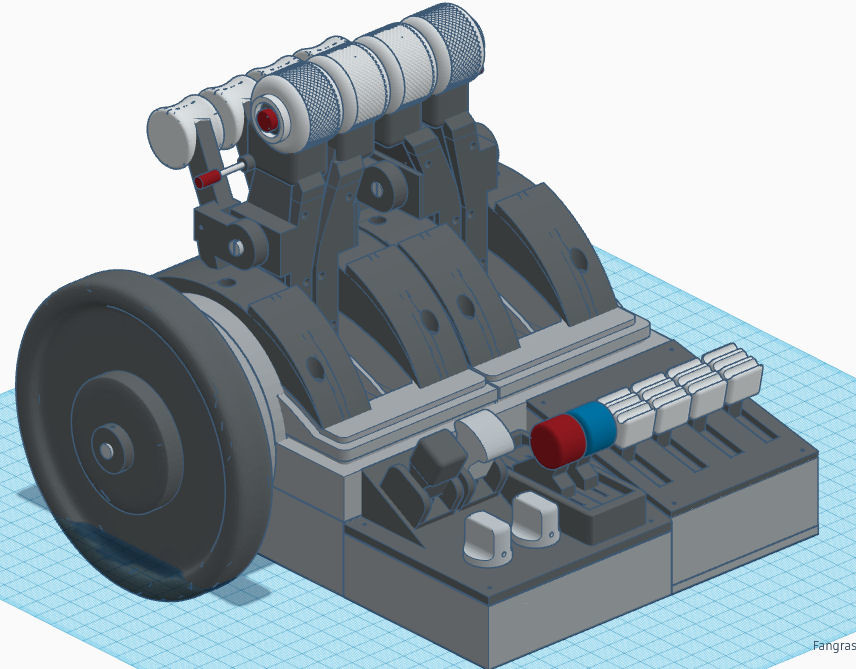
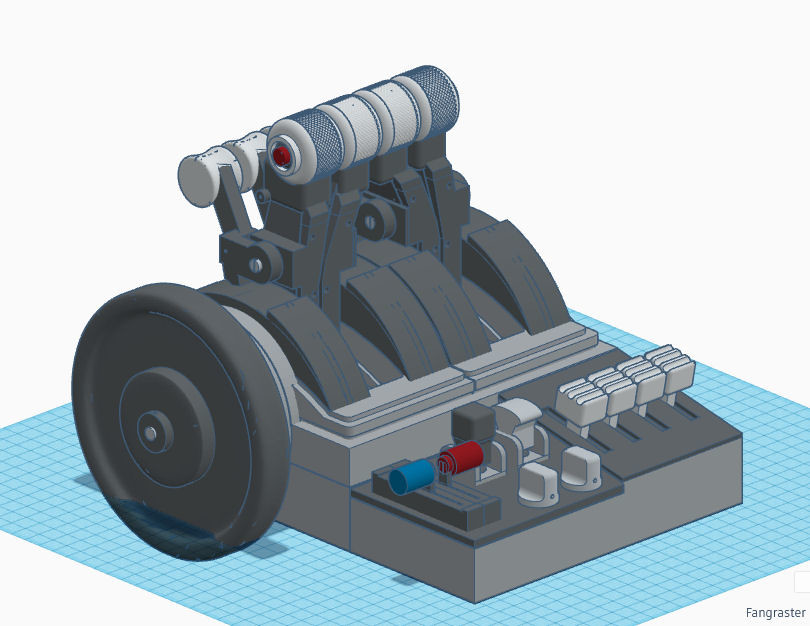
Completely done! Only the splitting of the levers them selves for easier printing is still to do, but they aren't hollow (they have a seperate port with a screwable plate at the back for the wiring) and so this isn't a big problem. The halfs of each lever (splited vertically) will be simply clued together. I just have to find the best point for splitting. I will integrate some holes for small 2mm diameter steel needles in the 3D-lever-halfs, which later will be made out of cutted nails, when I'm sure how to split them. This will position the halfs of each lever exactly before sticking them together, the same way screws are normally used, but the nails are much smaller and could be easier placed on those small lever arms. It's not necessary to be able to split them anymore after printing and so they really could be glued together and perfectly matched with those small connectors. The levers including the knobs on top and also the reversers will be one single part (levers seperated in two halfs) and only painted like they look in the pics. For the reversers a lot of supports will be needed for printing, but due to the layout of the Suncom throttle bases and their throttle guides, no other solution was possible to get the reversers and also the throttle levers near together. I wanted to be able to control all levers comfortably with only one hand (and I have very small hands ). I also integrated a lock to be able to connect the two left and the two right levers together for better dual engine use. In single engine only the inner double lever will be used and for three engine aircraft the outer right will stay unused. The quadrant has a total of 13 analog axis (every thrust levers pot and the matching reverser pots are one axis with serial wired pots) and 8 button functions. I will use two Arduino Pro Micro here and make two MMJoy2 devices out of the quadrant. One with the four throttle and the condition lever axis and one with the elevator-, aileron-, rudder-, mixture- and the additional prop-pitch axis for smaller aircraft.
-
Wie ähnlich das doch überall ist
-
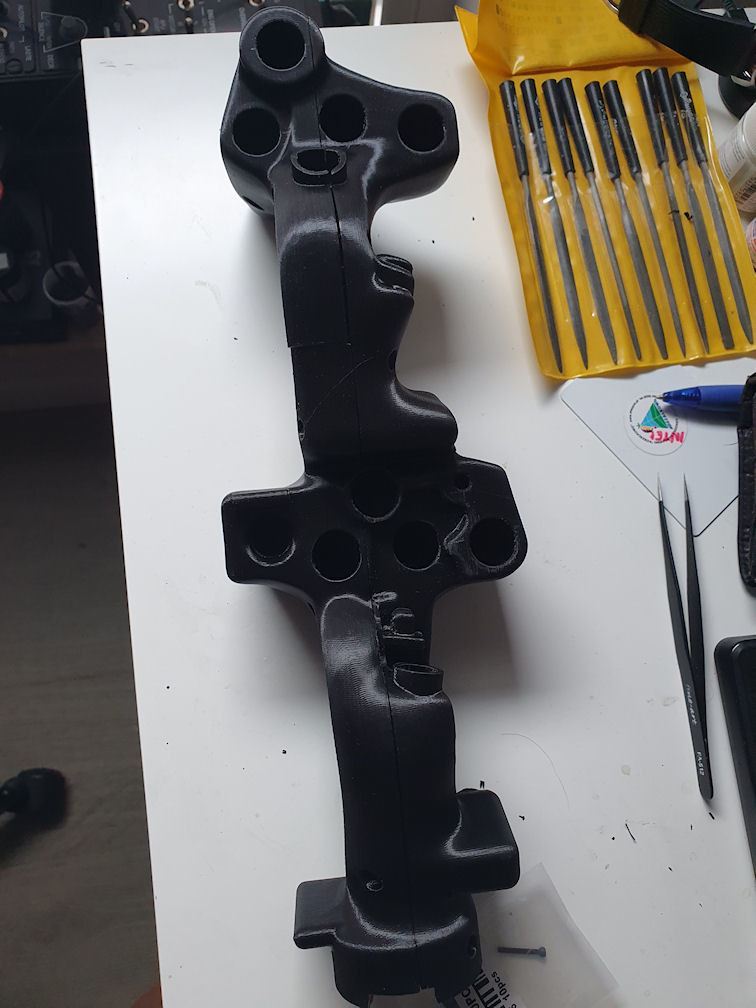
Hannibal, a simple trick with which I started for the TEDAC (I'm mostly use some unconventional methods to come to a solution ) is, I took a front view and a side view of it (was here at the forum somewhere, I think even in this thread) and put the pictures in a graphic program. In this paint program I only marked the shape itself black and the rest white, so that in the end only a two dimensional "shadow" of the TEDAC grips exist. I also removed the shapes of the buttons, switches etc. with the paint program, to have the basic grip only. At this two colored image I did a bit of unsharping to get smoother edges. After this I took Cura (the slicer) and imported that black and white image as a 3D. There are instructions how to use this all over the web. This ended up in having to shapes, one for the side and one for the front view. I took those two shapes, imported them in Meshlab to be able to reduce the Mesh Cura had designed, to an useful size of polygons (Cura makes much to many polys in this case). Then after the reduce of polys, I put it to Meshmixer for smoothing it a little bit, do some error correction and remove the "floor" produced by Cura and also reduced the polys further (300.000 is the limit for TinkerCAD to import). Those corrected shapes I imported in TinkerCad and took the sideview and made a negative out of it. This negative I placed within a big Cube and melted them so I did get a negative form. This negative form I placed over the positive frontview and violla, I had the rough shape of the grip with the relatively right proportion (not dimensions). Make a 2D to a 3D the "Viper-Way" . Not elegant but it has done what I needed to begin with the TEDAC grips. There is still a lot of smoothing, rounding and so on to do for sure, but step by step you get slowly closer to the original.
-
TOP! Jetzt fehlt halt irgendwie noch die Intruder. Ich finde die gehört da einfach mit dazu. Wäre mir persönlich viel lieber gewesen als der EF jetzt erstmal (oder auch gar nicht), aber na ja. Die F-8 kommt auch, fehlt noch die F-4! Damit wäre ich dann, was die Jets angeht voll und ganz zufrieden und bräuchte da erstmal nix mehr (mit der F-15E natürlich) . Aber jeder hat ja so seine Vorlieben .
-
I also really do not understand why there is no company which makes a 3D program, which is a little bit like a hybrid between TinkerCad and Meshmixer. Easy to learn but regardless powerfull enough to make such things as I have done now. This would fit most people and you didn't have to learn an endless GUI with all the functions, where most of them are needless for many of us. And of course, please with the possibility to work fully offline! I hate to be dependent of the internet! What bothers me most on TinkerCAD is that it's running so bad and slow sometimes and you have to reload your projects again and again, cause they aren't fully loaded the first time, especially if things get more complex. This is really one of the most time-consuming factors I had during my work. I could have been finished long ago, if this big drawback wouldn't exist. On the otherside its so simple and intuitive, that I never have to spent any time on fiddeling arround how I could do something, but instead just make it.
-
I really only use TinkerCAD and Meshmixer and do a seesaw between them. The only thing I do in Fushion is to repair a mesh (Meshlab does work sometimes better for repairing - but is even more complicated as Fushion) or let Fushion do a remesh of it to have a finer mesh for smoothing it in Meshmixer. For me it really works this way, also it's not the cleverest solution. TC is easy and simple to understand and I'm able to do all I want without learning a complex GUI and functions for half a year, before I could start to make some very basic shapes. The fine work at the shapes I do all in Meshmixer, which is also not as complex as other programs. Not as easy as TinkerCAD but learnable in a relatively short time. For sure many things are more cumbersome this way and did need much more steps, but for me personal it's more urgent to get my models for my pit done as to learn CAD itself. Maybe I will do this if my pit is ready cause I really enjoy to make 3D models, even though I'm very happy to come to an end now with the model making. A little bit of manual work at the pit will be a welcome change now .
-
Universal military aircraft homecockpit project
Viper1970 replied to Viper1970's topic in Home Cockpits
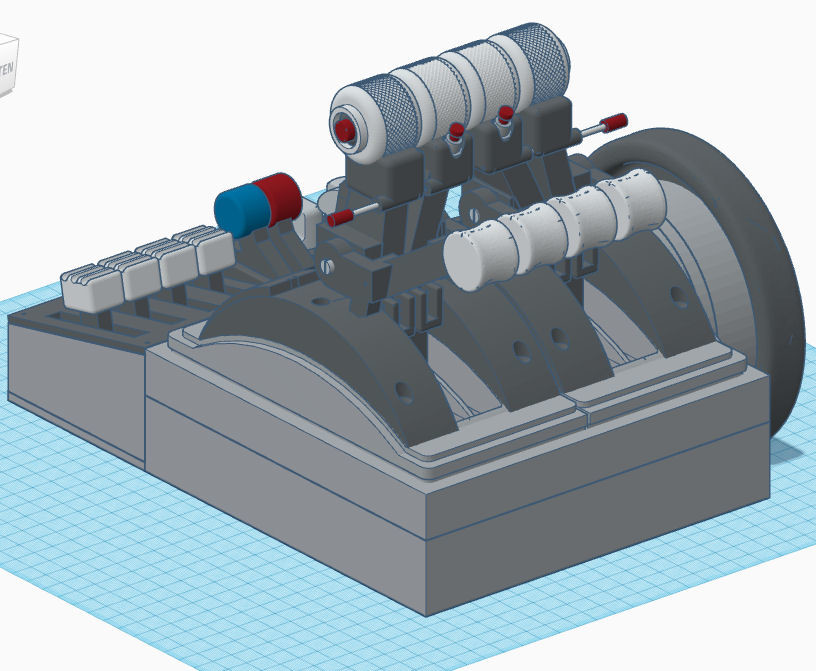
Most work at the quadrant is finished. Nothing what makes a great difference in optics, but some work had to be done to be able to fit all the cables and the springs for the reversers. The two left console levers (red and blue one) will also change at the next step and then the splitting of the throttle levers and some missing screwings have to be done. The colors are a bit more now as it should look like if its finished. After this I go back to the helicopter overhead levers and the last part will be the wing sweep for the F-14 throttle on my Warthog convertion. I hope I'll be ready for start printing all my parts until end of October or at least early in November.
-
Etwas wirklich Perfektes wird man überhaupt nicht finden. Nicht mal die so genannten High-End Produkte sind perfekt. Selbst WinWing hat das Throttle der F/A-18 verkehrt gebaut (Winkel der Ergonomie genau verkehrt zum Original). Die Virpil Sticks, also zumindest der VFX, sind auch nicht so toll. Die Buttons wackeln lose rum, innen sind teils winzige SMD-Micro-Schalter auf die Griff-PCB's direkt aufgelötet, so dass man hier nix reparieren kann wenn der Schalter seinen Lebenszyklus erreicht hat (da ist TM mit seinen separaten Baugruppen deutlich besser), Teile mit Silikon festgebatzt usw. Also auch beim sogenannten High-End ist nicht alles soo perfekt. Deshalb verstehe ich halt diese komplette schlecht machen nicht immer. Der X-56 kostet im Set soviel wie der Warthog Throttle allein. Er ist nicht perfekt, aber auch kein Arcade-Joystick, wie es oft dargestellt wird. Wer damit auch noch anderes ausser DCS oder Flightsim zocken will, also z.B. Spaceflight, ist damit gut bedient. Und oft bekommt man den viel günstiger als der empfohlene Verkaufspreis (momentan eher nicht - schon klar). Ich hab nun schon wirklich so viele Sticks, Throttles, Pedale etc. geöffnet und so gigantisch groß sind die Unterschiede qualitativ nicht (mal von den Bases von Virpil, VKB etc. abgesehen). Im niedrigen bis mittleren Preisniveau nehmen sich die Teile mechanisch nicht wirklich viel und auch die verwendeten Schalter sind oft aus dem gleichen Sortiment.
-
Die extreme Sticktion des TWCS ist überall bekannt und es gibt zig Threads dazu in diversen Foren. Viel mehr als vom Ghosting-Problem des X-56. Sind also wohl kaum meine eigenen Erfahrungen hier. Und auch die TFRP haben dieses Problem, was auch bekannt ist. Ich kann nicht ein Gerät verurteilen und dann was empfehlen, was auch nicht besser ist. Geht es hier um die Qualität oder eine Abneigung gegen X-56? Und der X-52, den du empfohlen hast hat auch das Ghosting Problem.
-
Es ging doch um den Schubweg des Throttle, der im Sommer viel zu leicht geht und im Winter sehr zäh beim X-56. Und dann kommt als Empfehlung der TWCS! Also sorry, aber ich hab 4 davon hier zum Ausschlachten und Umbauen. Der Schubweg des TWCS ist eine einzige Katastrophe und hackt ständig (Sticktion wie bei der Warthog Base - nur viel, viel schlimmer). Man kann das beseitigen mittels speziellem Fett aber out of the Box würde ich den TWCS für präzises Fliegen (Auftanken etc.) niemals empfehlen. Nimmt sich also auch nicht viel dem Button-Ghosting des X-56, dass auch nicht alle haben.
-
Auf https://www.xflight.de und dort unter Simulator/SimLight ist so ein Konzept.
-
Und besser als der X-56? - vor allem das Throttle! Zum Ausschlachten und Umbauen ja ....
-
Seit den End-80ern (ca. 1988 mit F-19 Stealth Fighter) in der Flugsimulation eingestiegen. Erstes Cockpit 1998 und dann immer wieder mal ein Neustart. Aber leider wegen Beruf und Familie nie wirklich Zeit gehabt. So kam es zum reinen "Sammeln" über Jahre hinweg. Dann 2015 der dritte Neustart, aber noch mit der "bösen" Simulation für die Jets und für Helis EECH Allmods (gab ja nix anderes, wenn man US Chopper fliegen wollte). Dann ging es bei DCS mit den für mich interessanten Modulen los, also AV-8B, F-14, F/A-18 usw. Das und die Tatsache dass in der anderen Sim der Focus wieder nur auf F-16 zurückfiel, obwohl zunächst ganz andere Dinge angekündigt wurden, haben mich dann zum erneuten Neustart mit DCS bewegt. Auch weil man hier beides in einer Sim haben kann, also Jets und Helis, war ein Faktor. Die F-16 hab ich natürlich auch in DCS und ich mag sie auch, aber sie hat mich einfach schön langsam etwas gelangweilt, weil sie seit Anfang der militärischen Flugsimulation, in jedem zweiten Simulator der Hauptbestandteil war. Es gibt auch noch andere interessante Jets.
-
Also soo toll ist der Warthog jetzt nicht! Auch der Throttle nicht! Alles Plaste wo es eigentlich drauf ankommt, also die Mechanik. Die Throttle Lever sind komplett Plastik und haben nur ein eloxiertes Coladosen-Weißblech zur wertigeren Optik. Die Base ist halt aus Metall, das war es auch schon. Die Griffe, na ja da scheiden sich die Geister. Ich hab sie weil sie einigermaßen dem Original entsprechen und ich nicht alles drucken wollte, aber vom Feeling mag ich fast Kunstoff lieber. Der echte Hornet Griff ist auch Kunststoff, nur die Viper hat Metall. Und auch der ganze hintere Teil vom TM Hornet Griff ist Plaste. Also wenn man auf die Replik-Optik keinen Wert legt, sind die Logitech/Saitek Sachen völlig in Ordnung und sicher mechanisch nicht schlechter als zumindest Thrustmaster. Virpil hab ich nur den VFX und so toll ist der auch nicht verarbeitet. Innen alles mit Silikon verklebt (Kabel PCB's etc.) Buttons wackeln usw. Ich habe jetzt alle Geräte komplett offen gehabt Virpil VFX, TM Viper Hornet, TM WH Throttle, TM WH Base und sogar den Cougar. Von der Wertigkeit ist meines Erachtens der Cougar noch der beste von allen TM Geräten (außer den Potis). VKB, Virpil (mit Ausnahme vom VFX Griff) und WinWing weiß ich nicht, da ich sie nicht selbst besitze, aber TM ist auch nicht viel wertiger wie der Logitech Stick. Deshalb verstehe ich auch diese extreme Kritik immer nicht.
-
So, meine Apache-Collective ist schon gedruckt worden . Selber hab ich es noch nicht geschafft, kommt aber noch .