Wags
-
Posts
11799 -
Joined
-
Last visited
-
Days Won
59
Content Type
Profiles
Forums
Events
Everything posted by Wags
-
Excellent video!
-
Did you play through the AGM-65E training lesson?
-
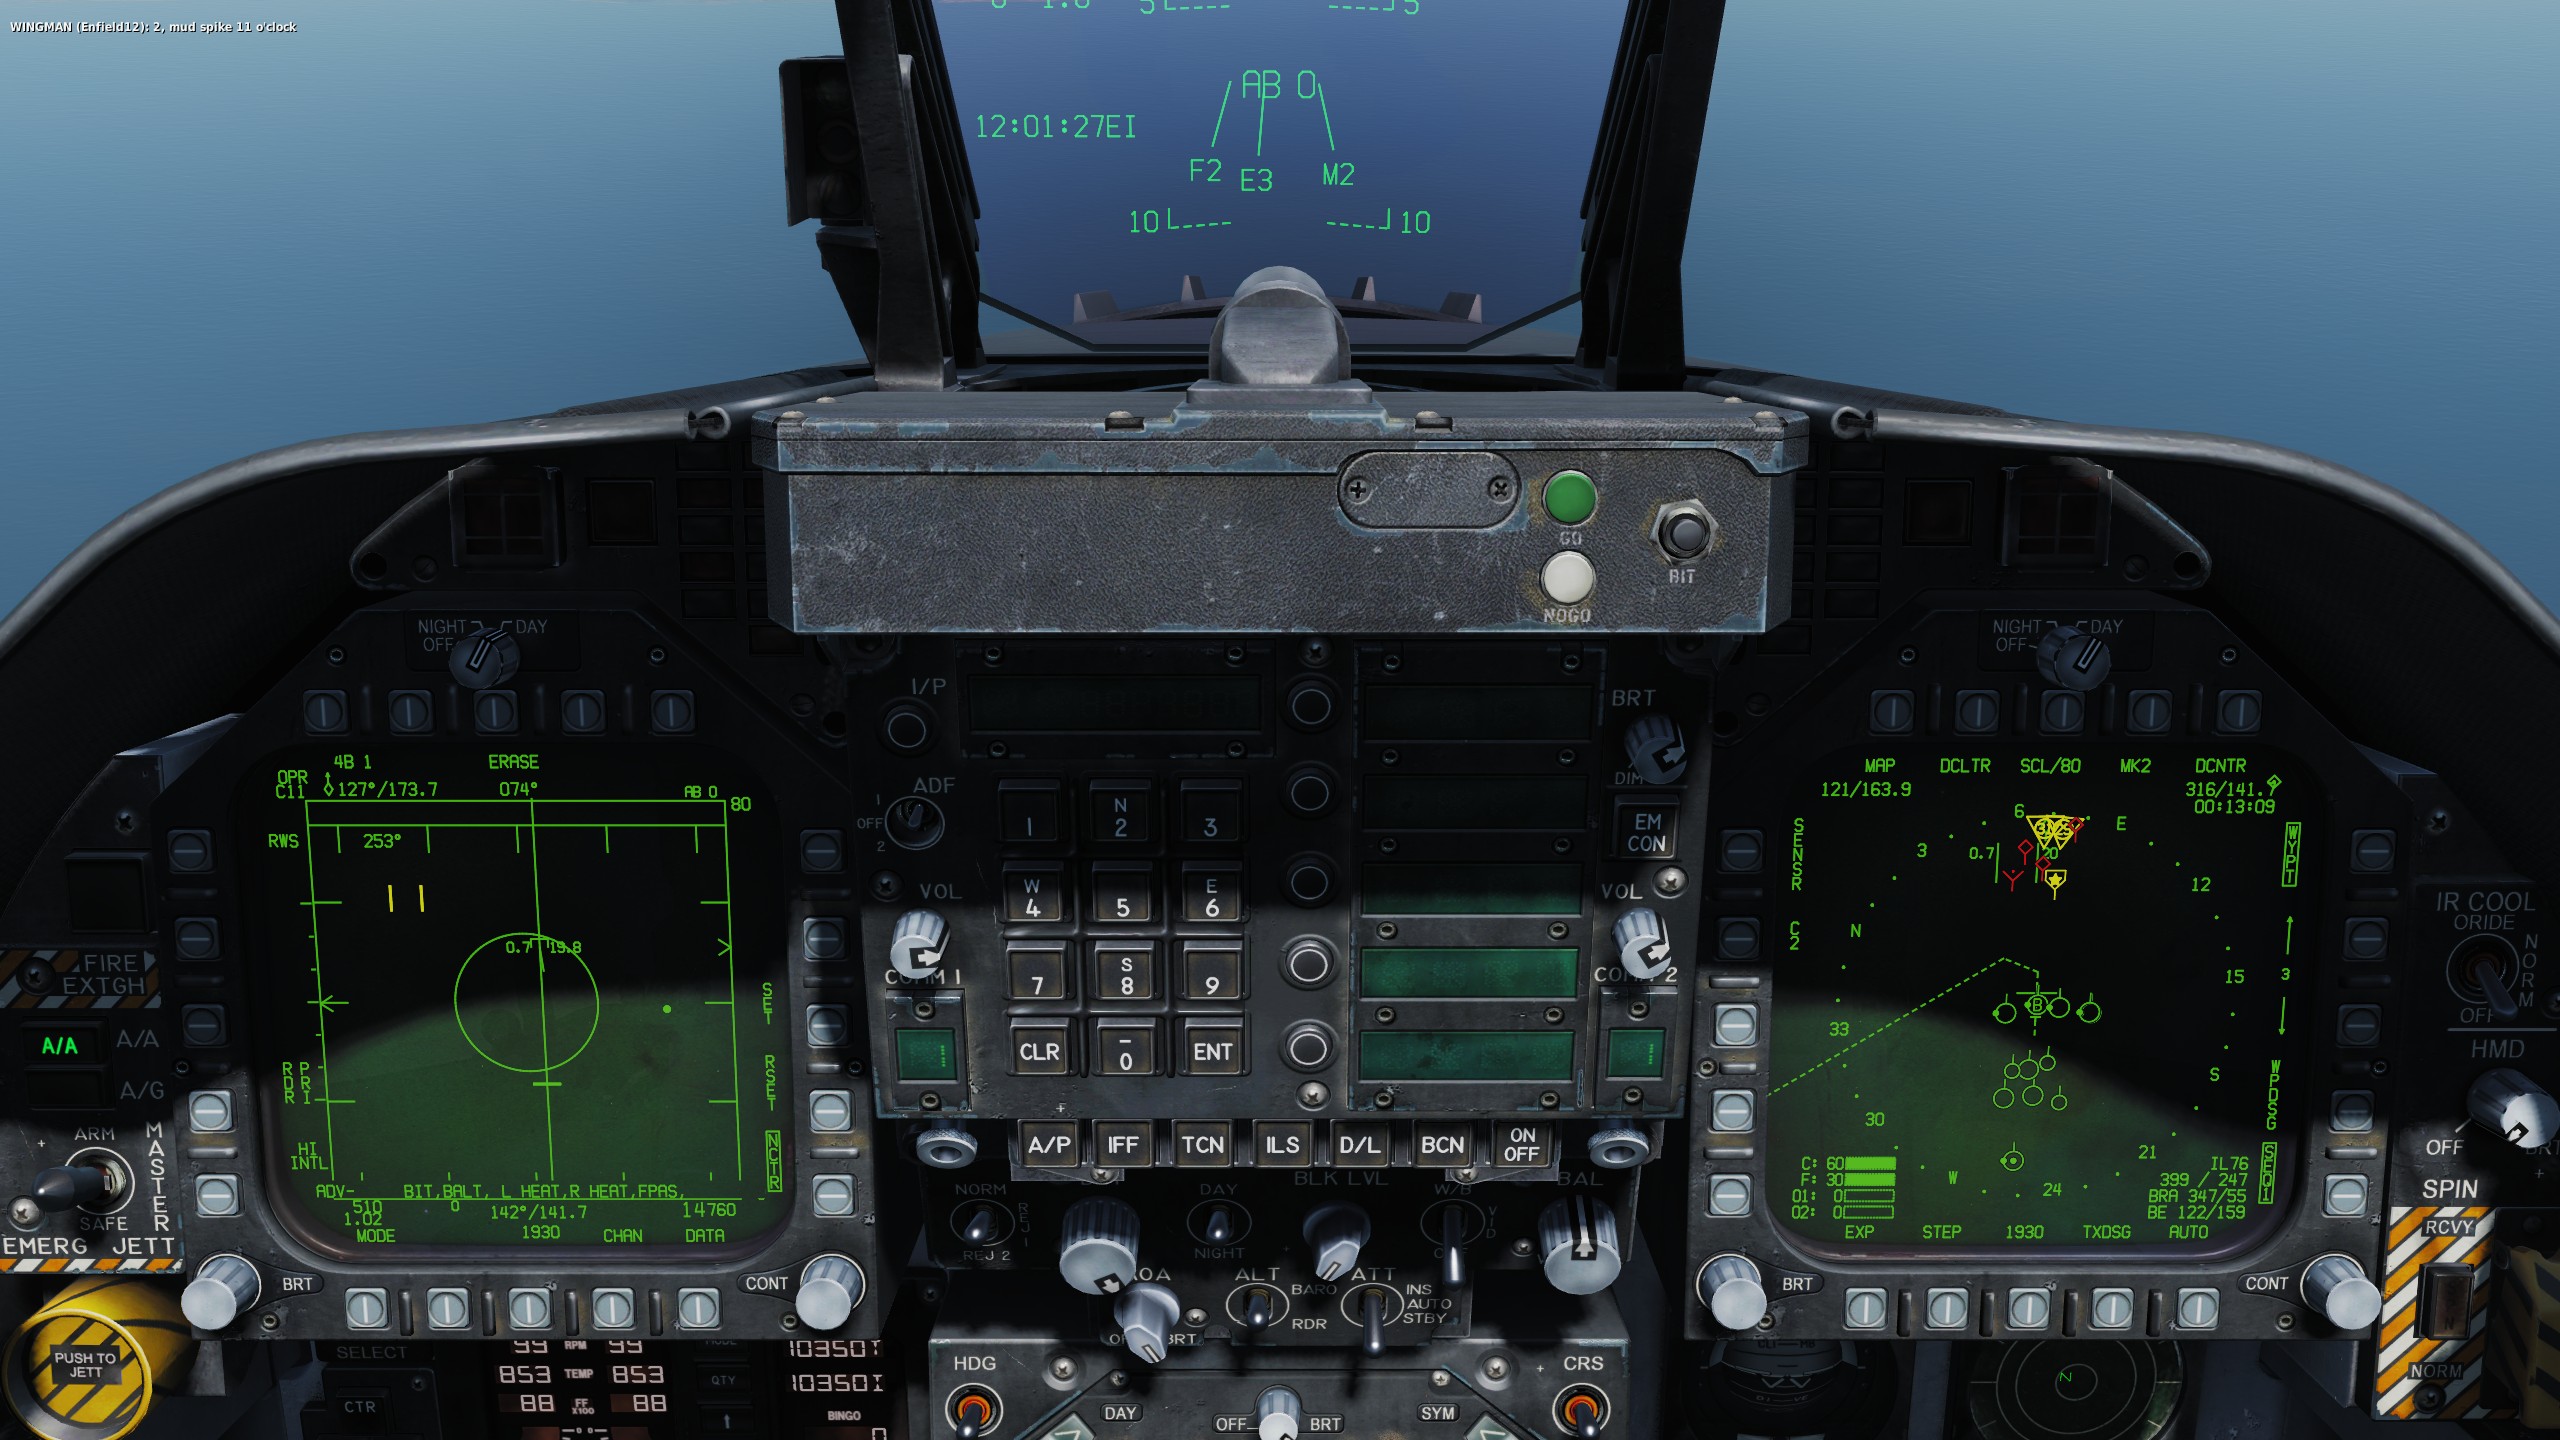
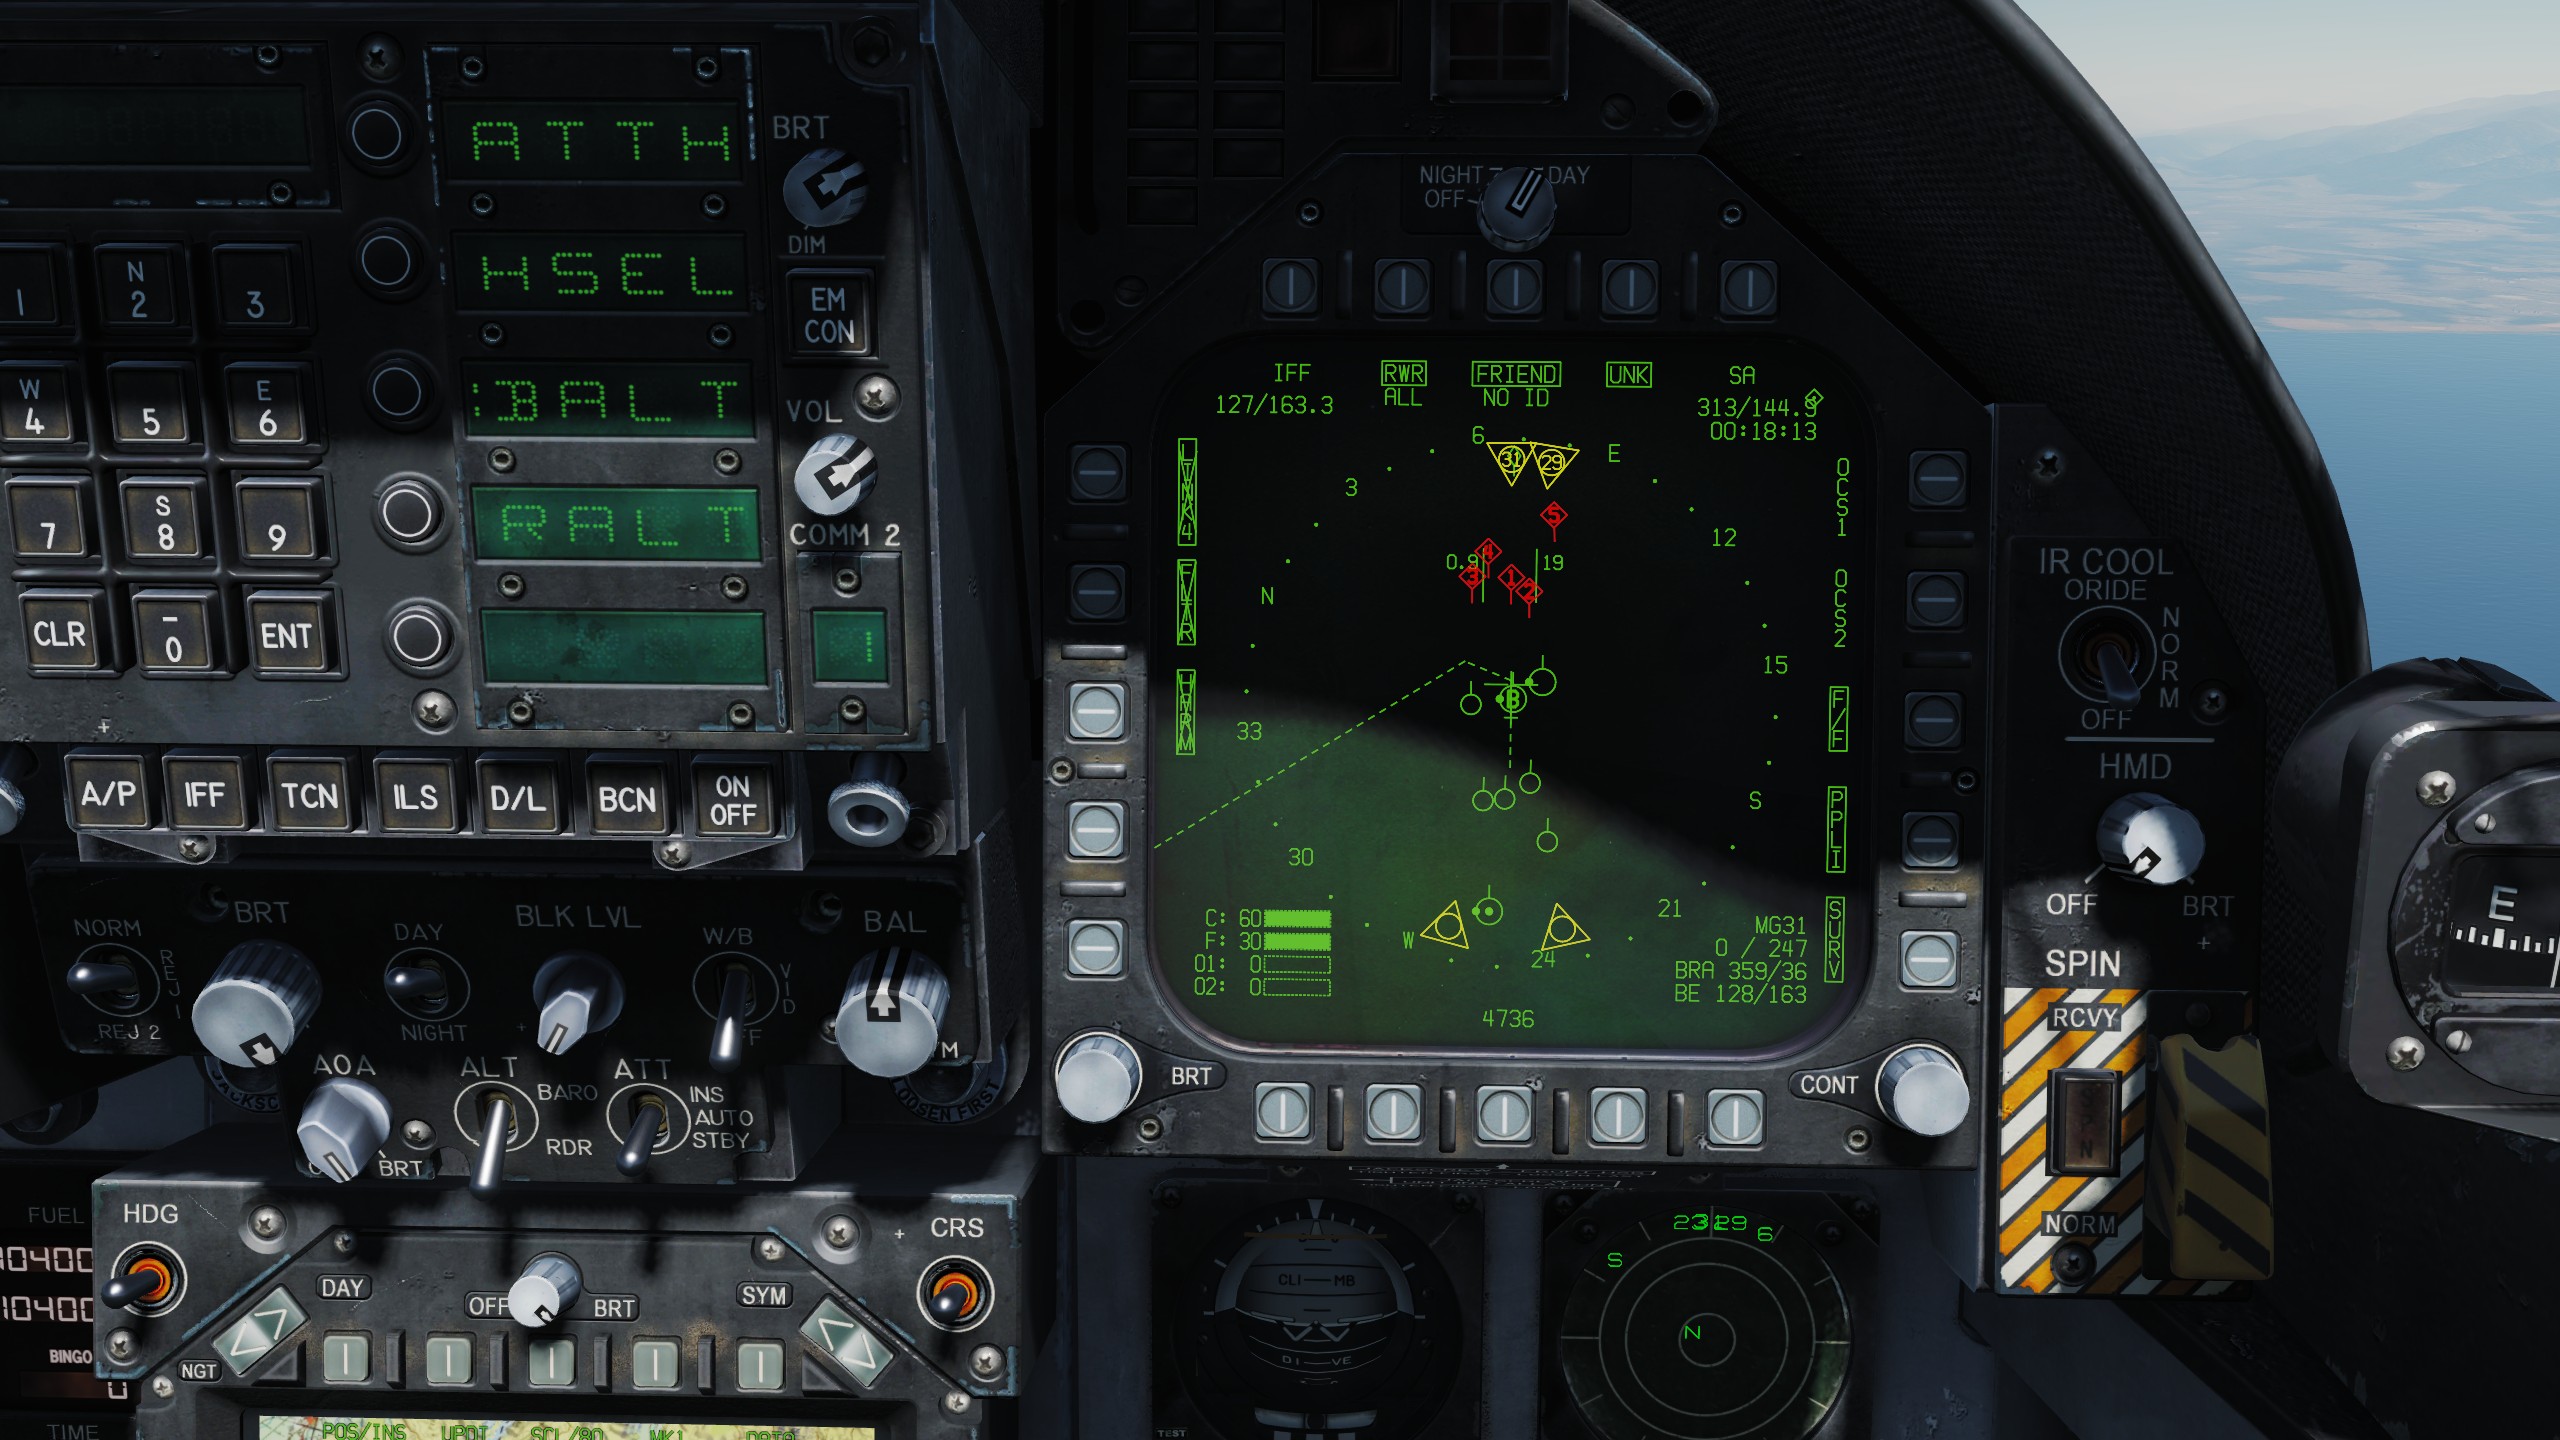
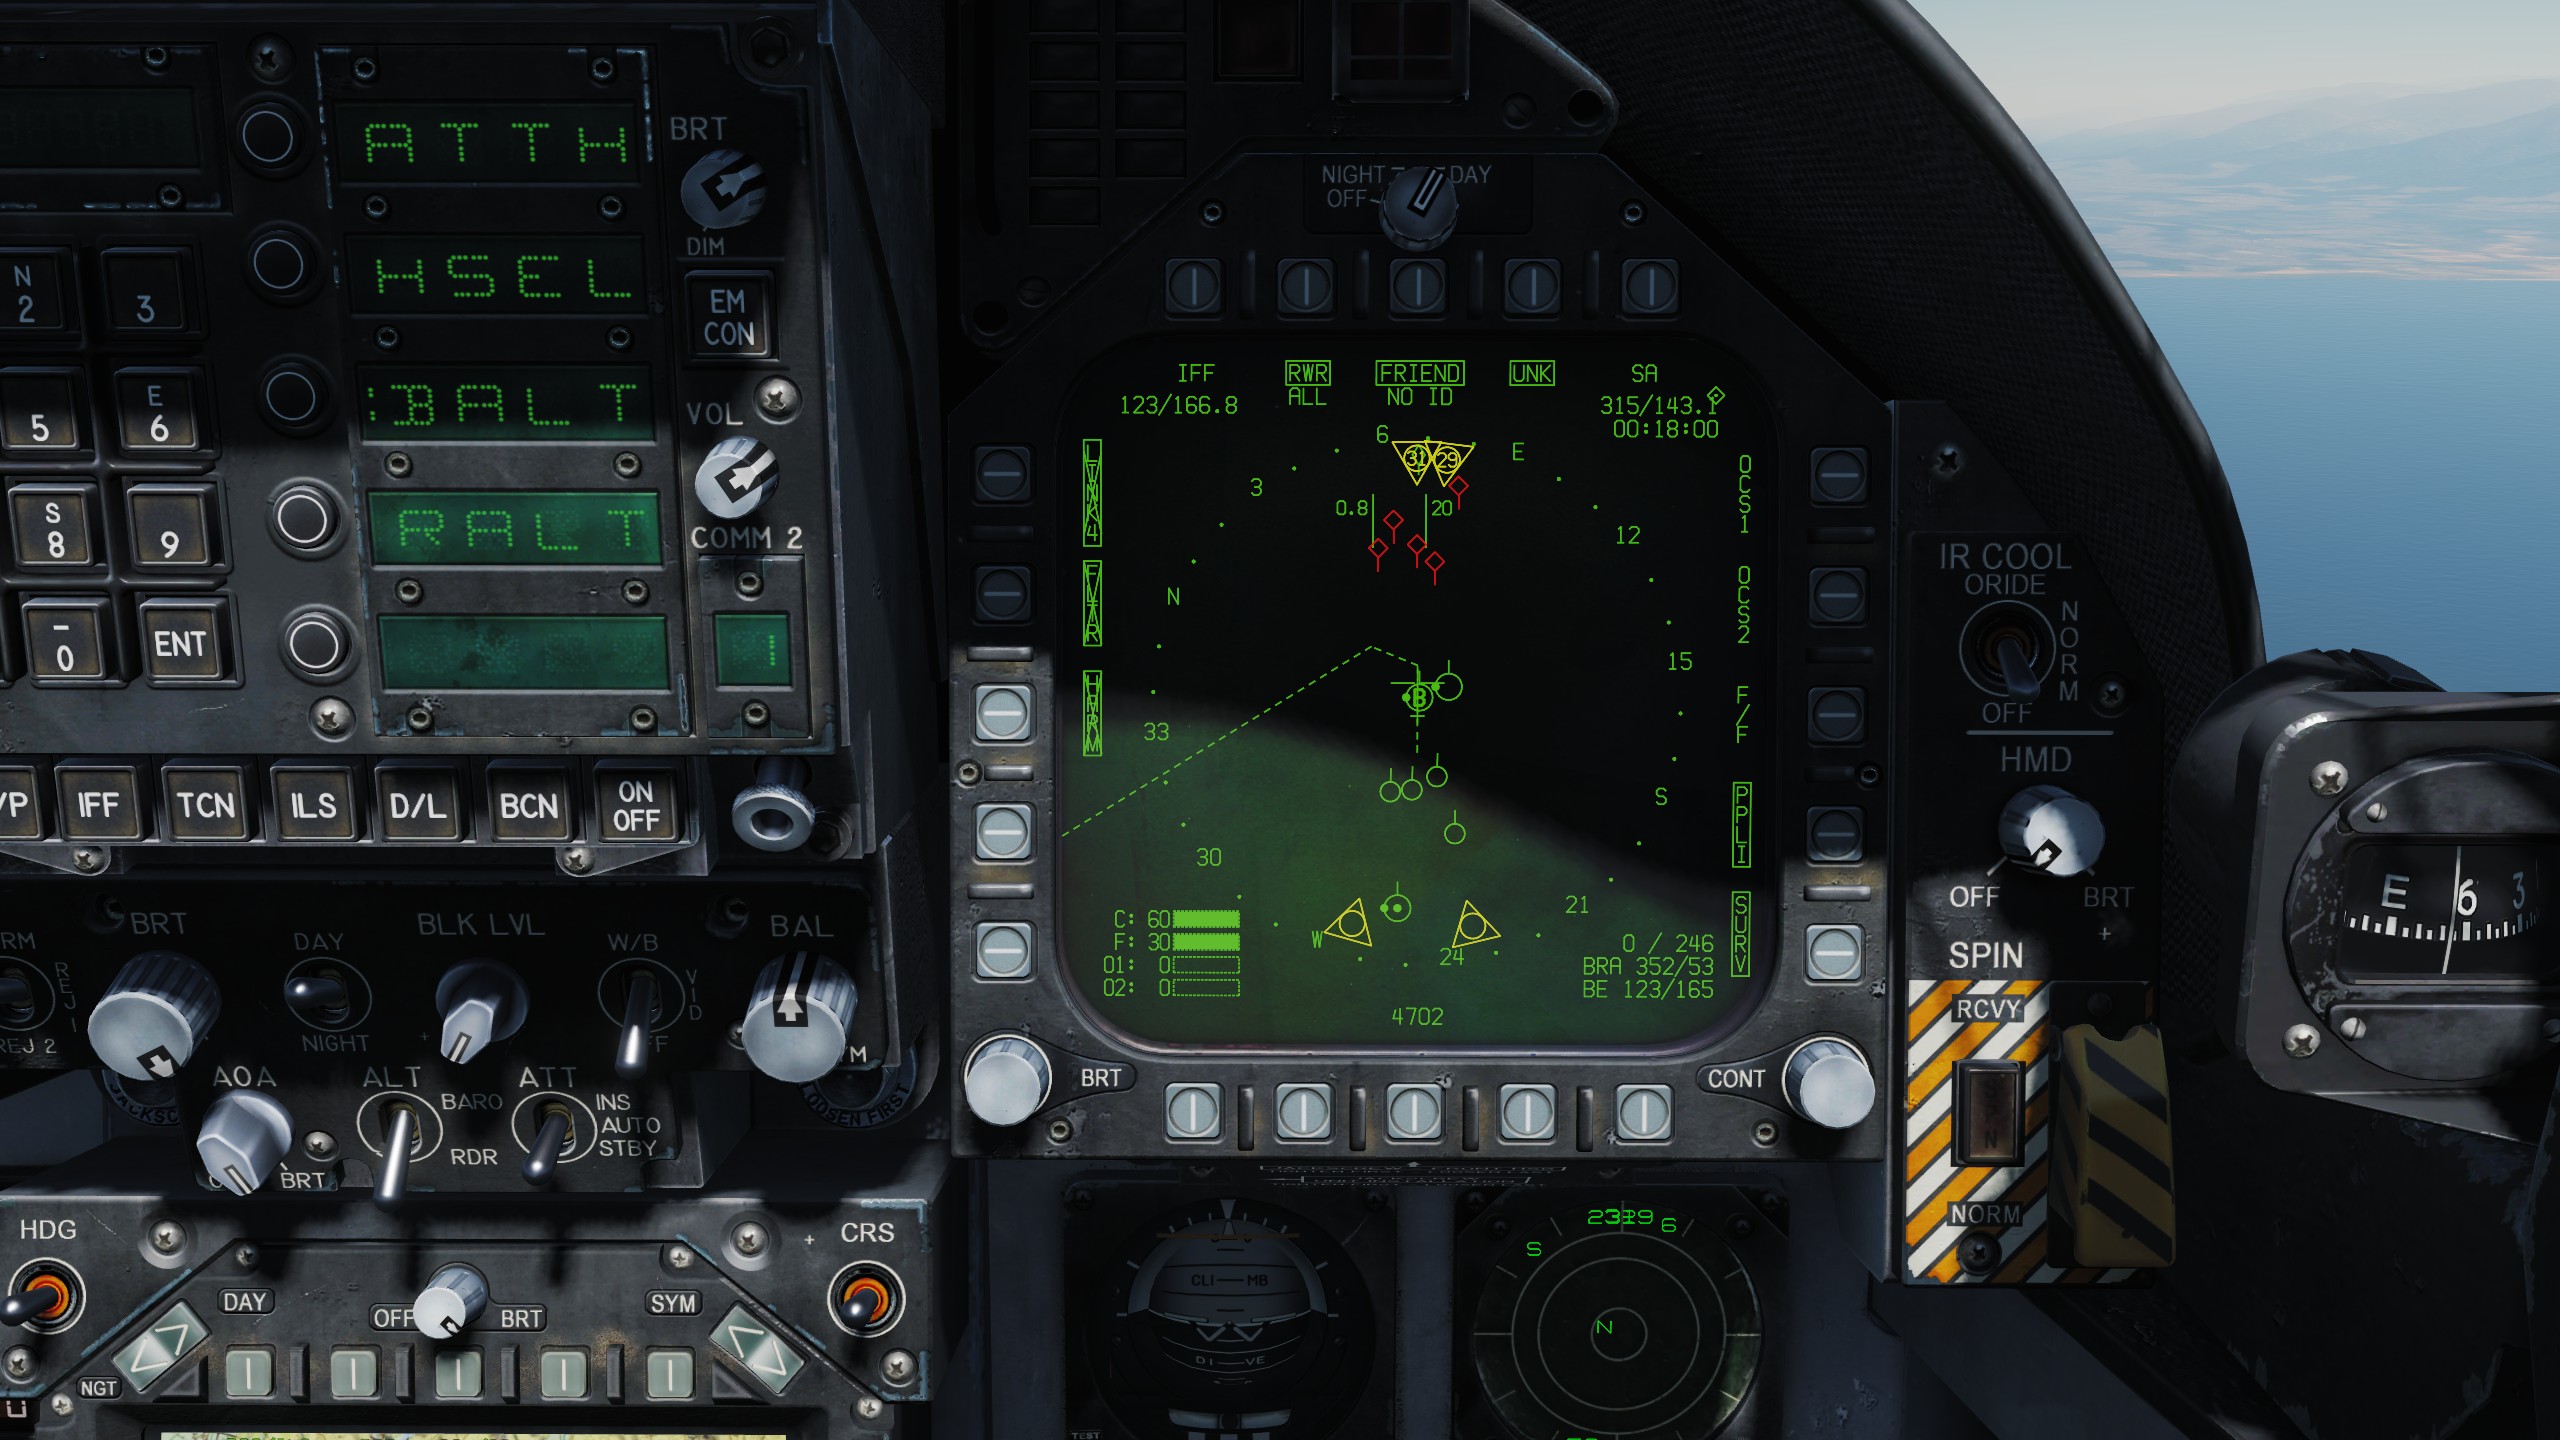
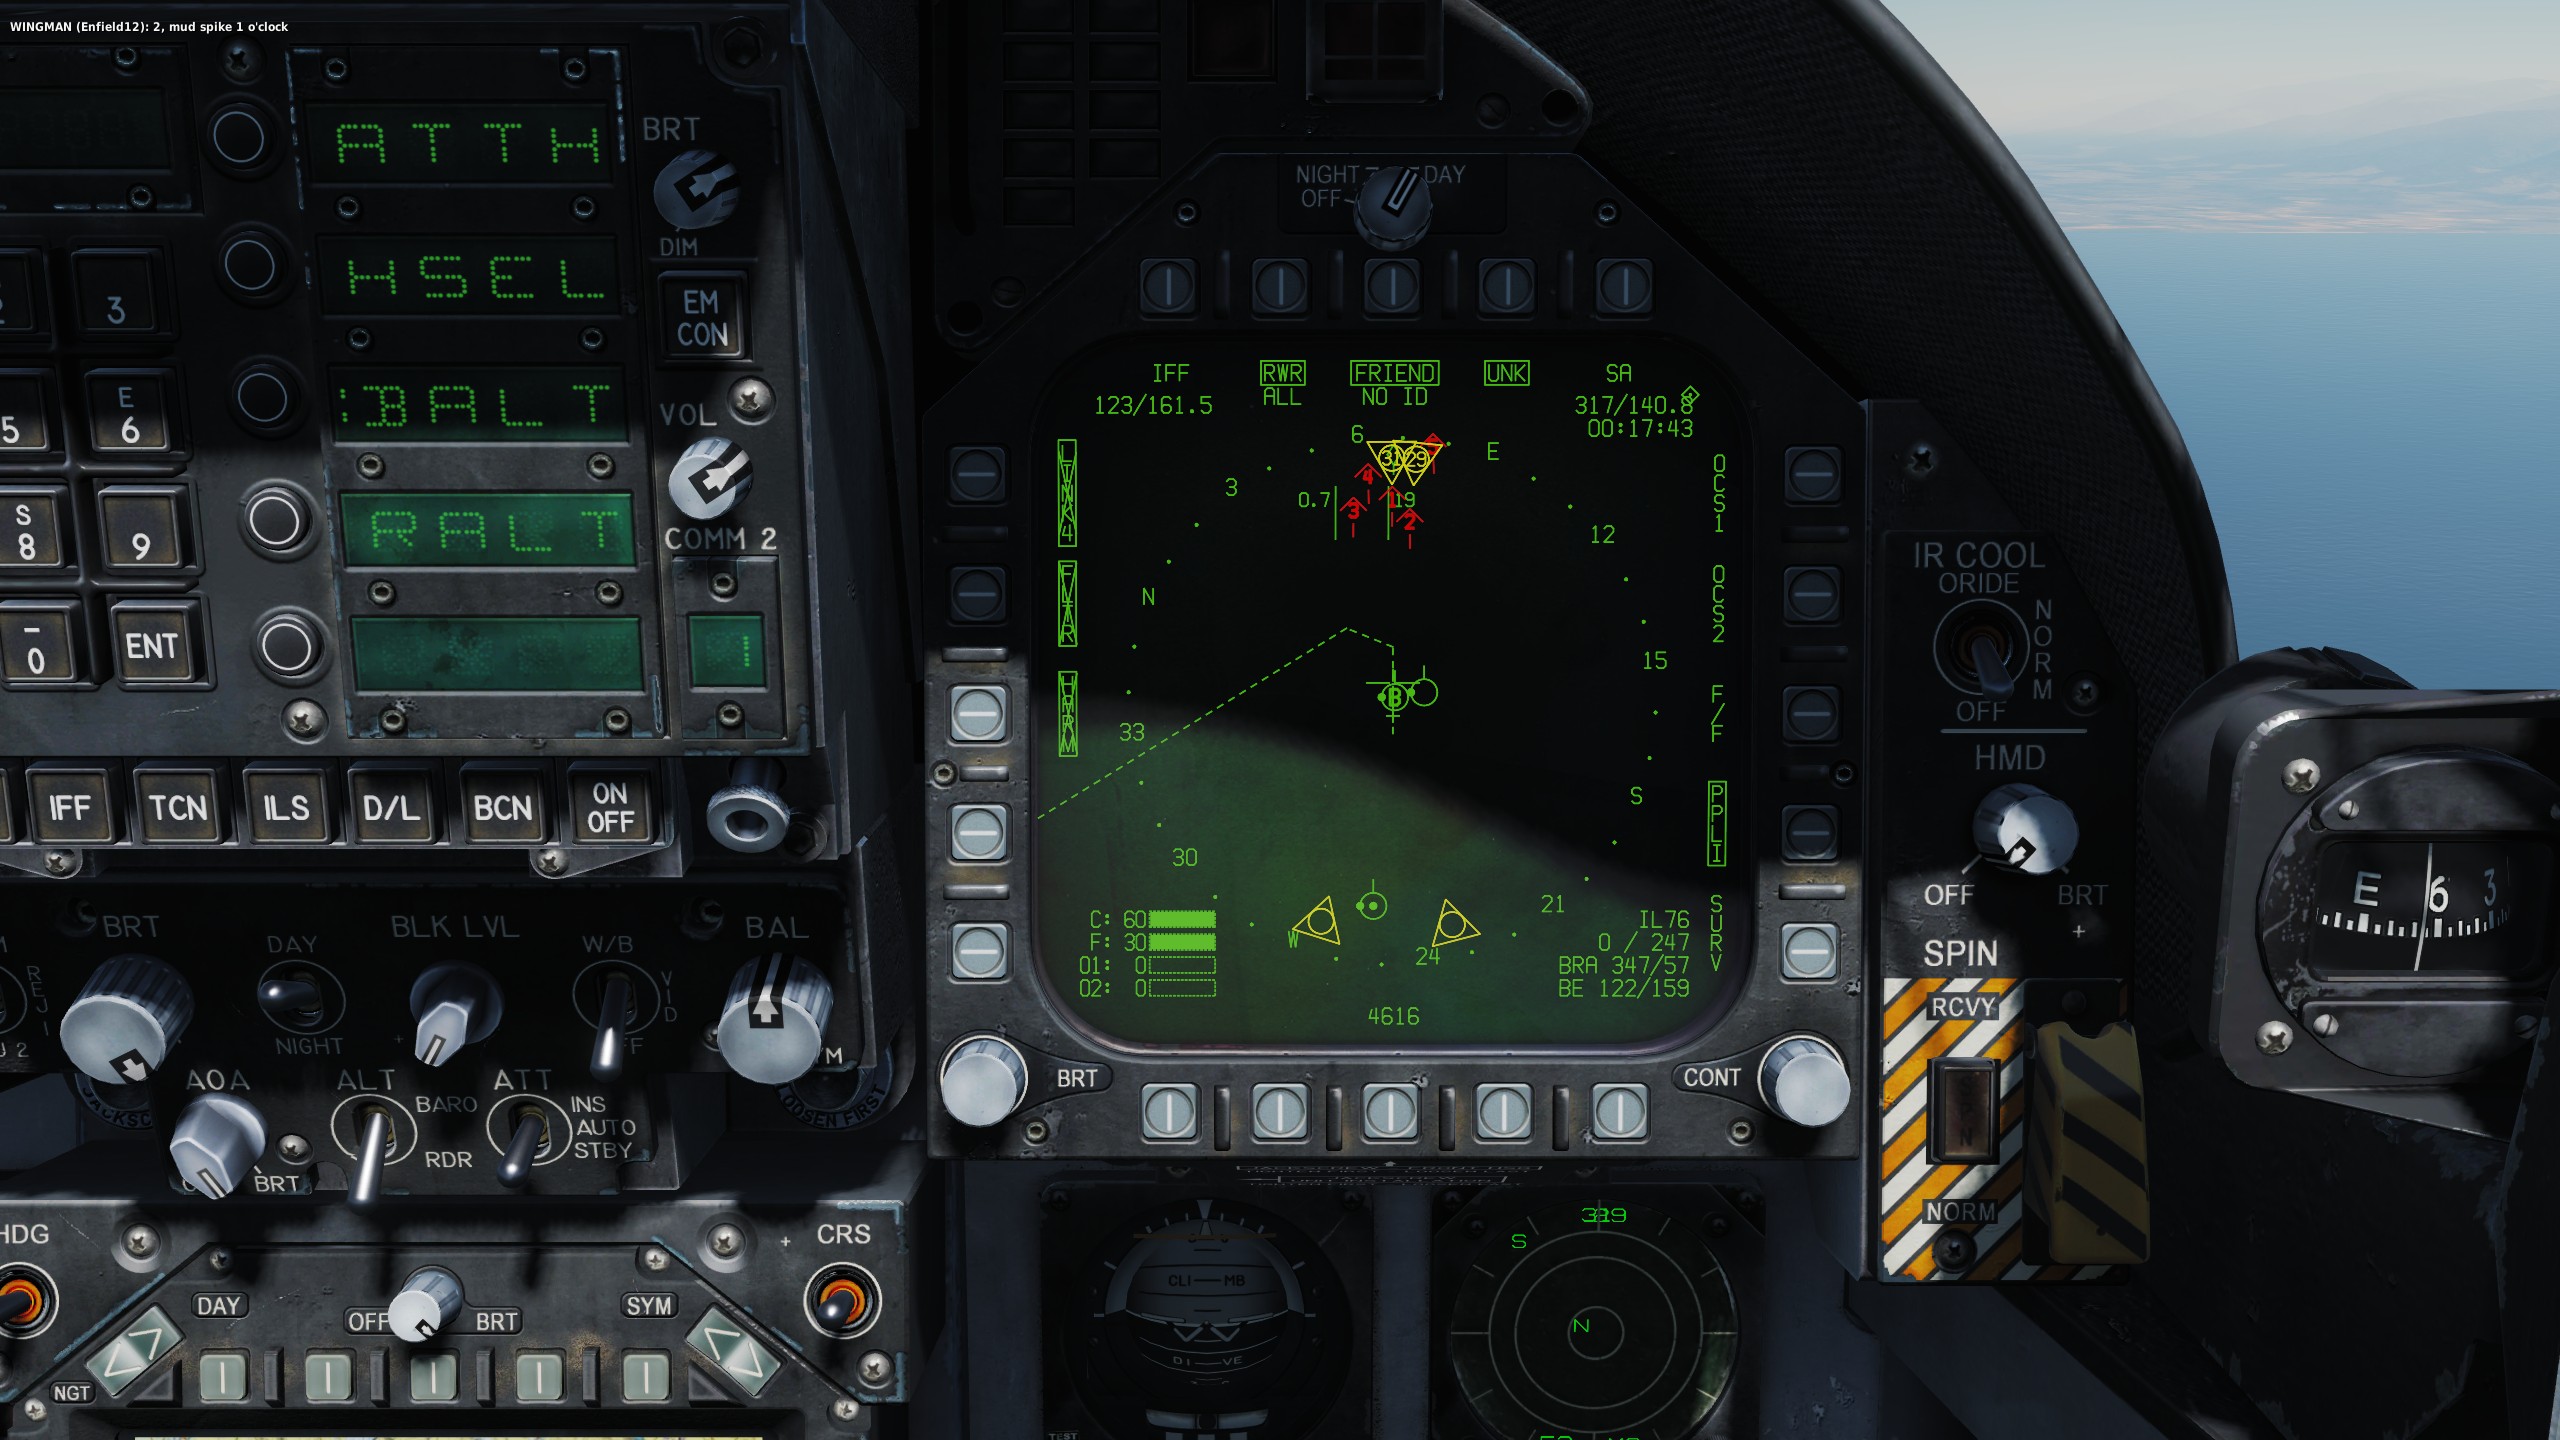
The Data Link (D/L) Situational Awareness (SA) page and new radar functions are making steady progress, so I thought I’d make another little update using images. This all very much work in progress and subject to change. The first image shows the radar format on the left DDI with Latent Track While Scan (LTWS) selected and the TDC hovering over a brick. The brick now displays the selected weapon Launch Acceptable Region (LAR) as well as target Mach (left of HAFU) and altitude in thousands of feet (right of HAFU). The next step would be to designate the target as the Launch and Steering (L&S) target and the ability to set a secondary Designated Target (DT2). Along with a hover over contact, you can get additional information up to three contacts in LTWS mode. With MSI enabled, you’ll also then have D/L information available. Once LTWS is done, then we’ll take care of Track While Scan (TWS) mode. On the right DDI is the SA page five unknown contacts at the top of the page., They are yellow because they have no ownship IFF interrogation (hover over contact and depress sensor hat switch to interrogate). The staple at the top of the HAFU indicates the player has no IFF on a target, but the lower chevrons indicate friendly donor aircraft (F/F) have set the targets as hostile. Once both the player interrogates the contact and comes back negative, then the HAFU would change to red and be a diamond. In this way, the color and top and bottom of the HAFU tell you a lot about the classification of the contact. Remember: staple = unknown, chevron = hostile, and semi-circle = friendly. Yellow = unknown, red = hostile, and green = friendly based on ownship. In the second image the left DDI now shows a target locked in STT with Non-Cooperative Target Recognition (NCTR) enabled. A successful NCTR print of the target depends on range and aspect angle into the intakes of the contact. On the right DDI we see that the target is identified as an IL-76 and the star HAFU indicates the STT L&S track. It is yellow because no ownship IFF interrogation has been made. Because the radar is in STT, it is not scanning for other targets. As such, all other contacts on the SA page are from F/F and SURV sources over the D/L. The smaller red triangles are SURV tracks from an AWACS that only the AWACS is seeing. The red lower chevrons with the dot is from a friendly donor (F/F) source. - Wags

-
Correct, in i7 8700k, 1080Ti I also never dip below 60 fps.
-
Minimum 60 fps with even over-populated missons.
-
Hey everyone, After our meetings today, I can update you on our current near-term planning for the upcoming Hornet features. For the 27 February update we plan (not promise): JDAM basic operation minus dynamic launch zone HARM TOO and PB modes Latent Track While Scan (LTWS) and Track While Scan (TWS) air-to-air radar modes Following those, priority items will be: Data Link / Link-16 / MIDS. This has been a huge undertaking and will take a bit more time to get right, particularly for multiplayer data-sharing and creating a unified picture between clients. We want to get this right. New IFF system tied to D/L NCTR tied to D/L JDAM dynamic launch zone. Data Card. This won’t just be a data card but allow you to customize many aspects of your aircraft set up. Lightening II Targeting Pod JSOW Again, I need to emphasize that this is planning and not a promise. Things can certainly change. We try to be open and provide you insight into our planning, but with the understanding that this is not set in stone. - Wags
-
This rambling video provides a look at how I set up my graphics and controls for the DCS: F/A-18C Hornet.
-
-
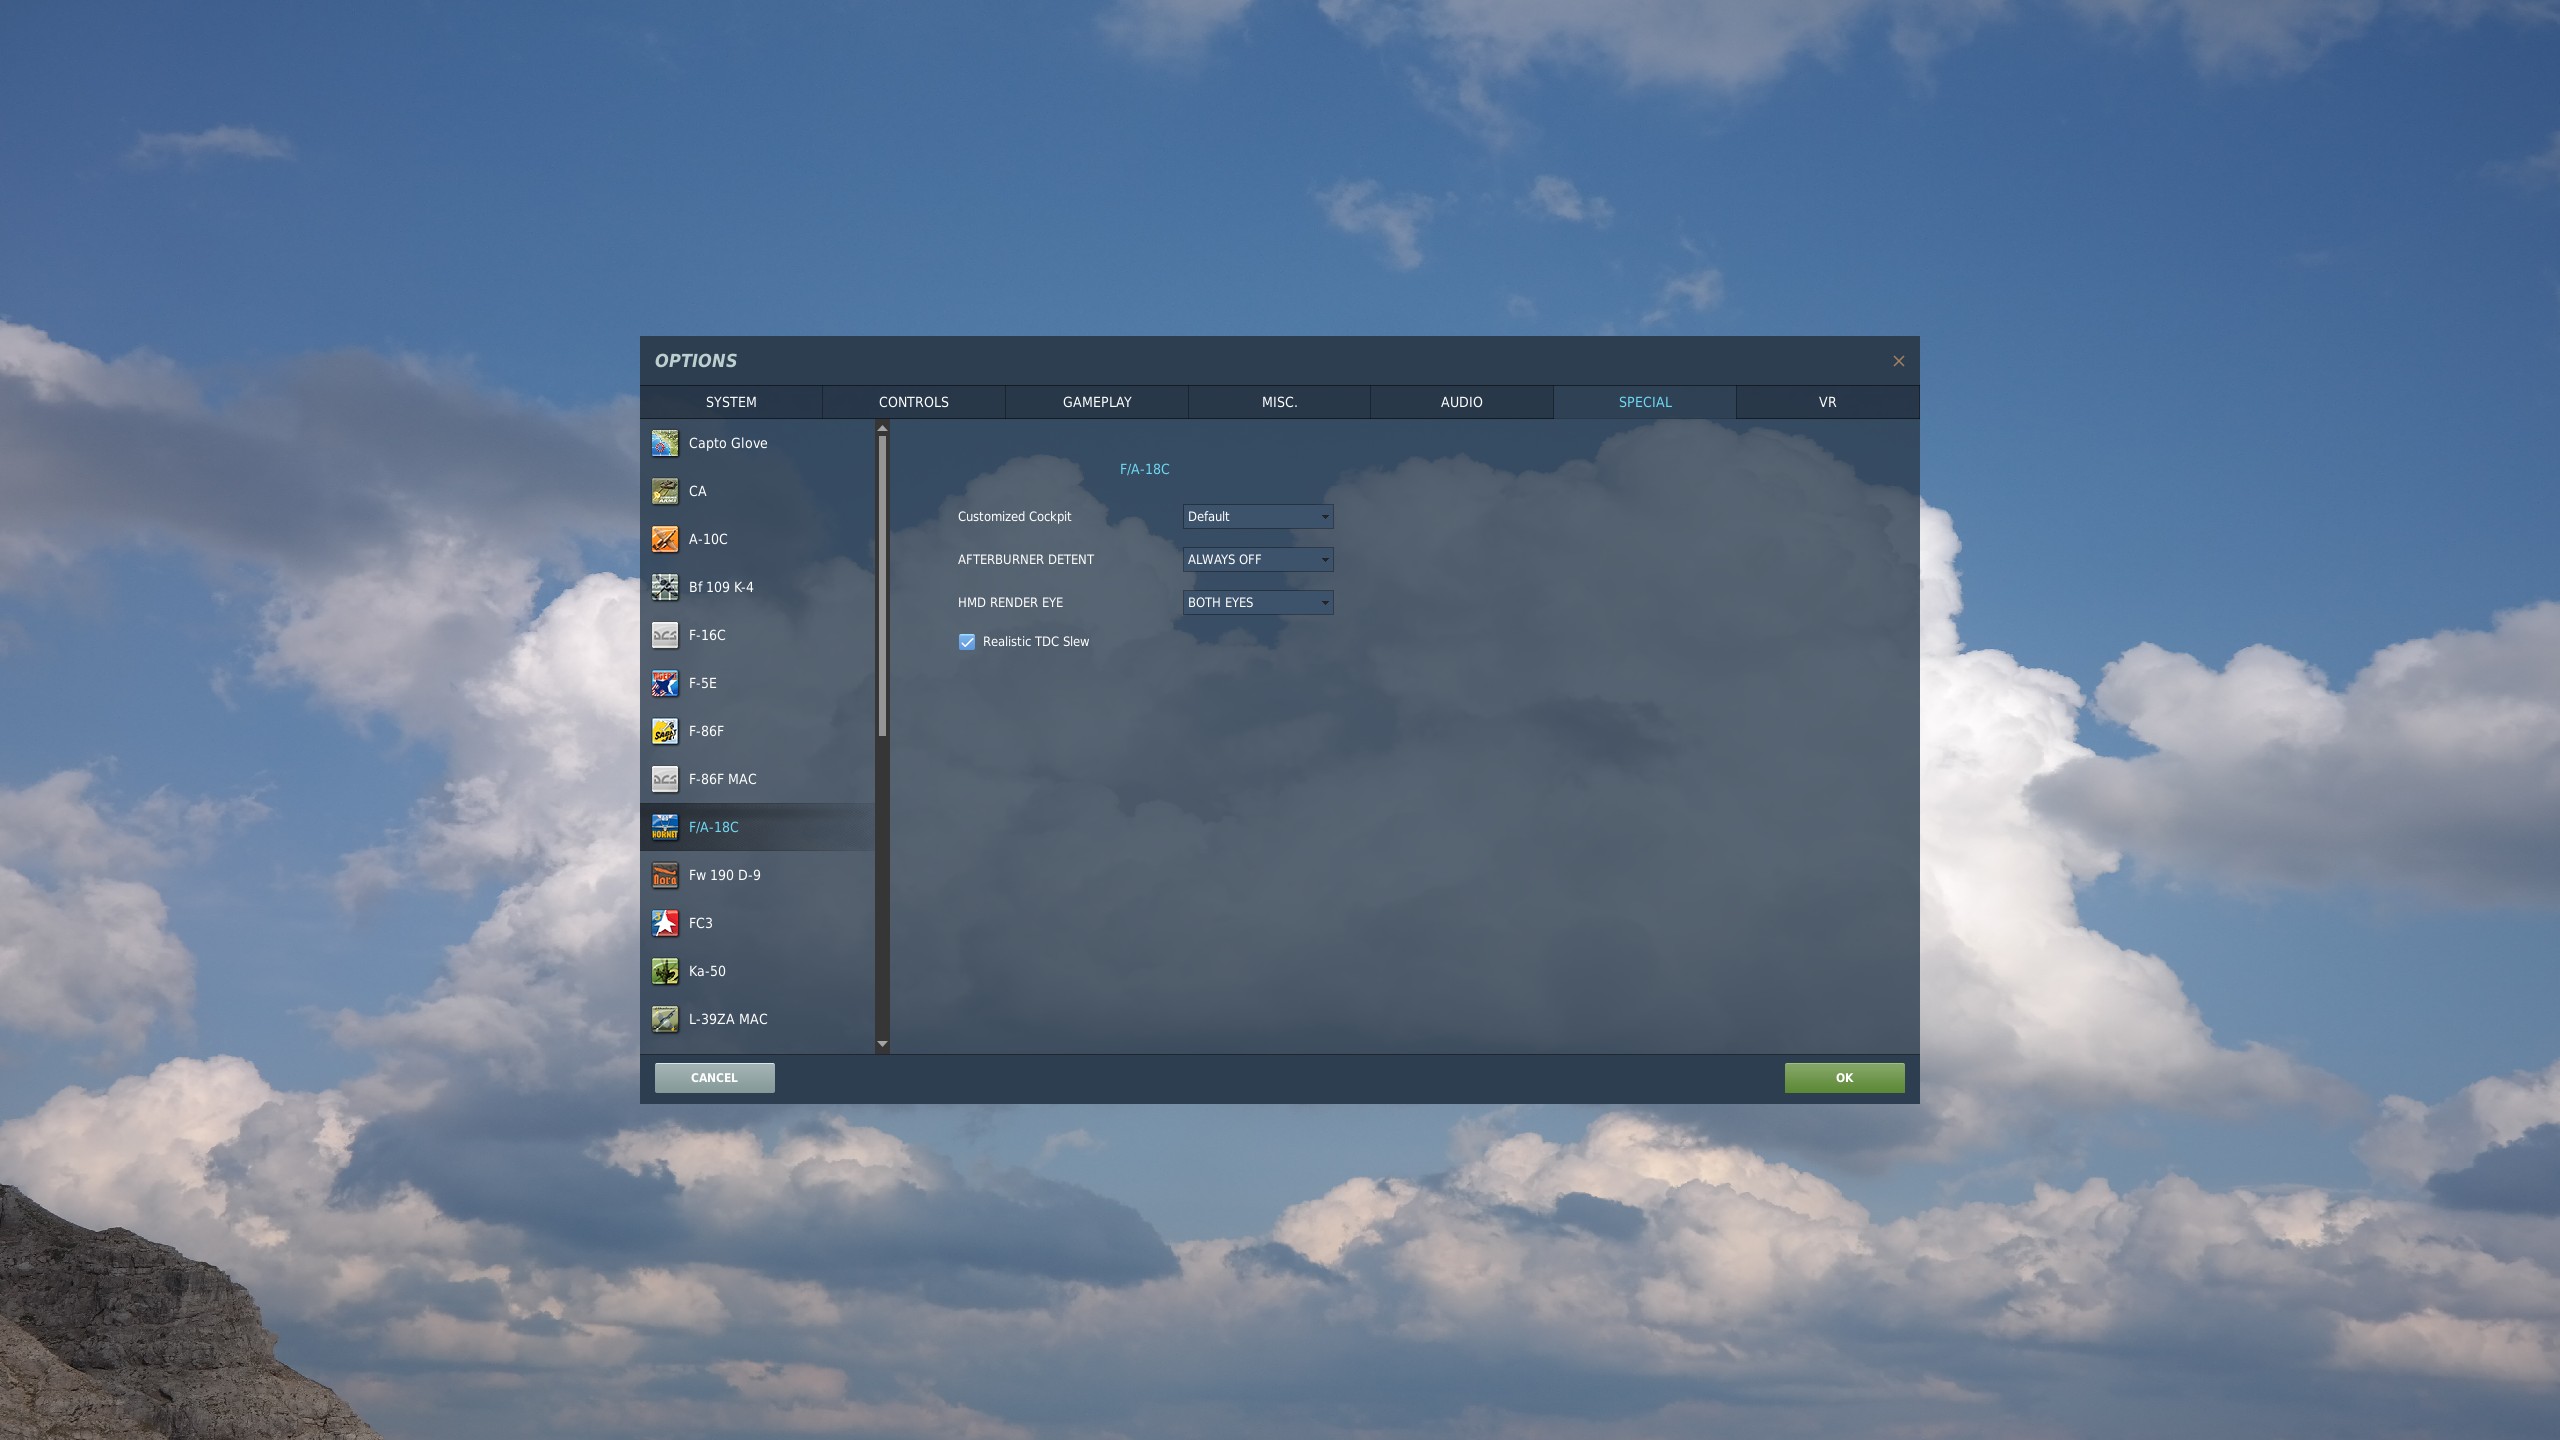
Hornet Alternate AGM-65F Maverick Slew OPTION In the next Open Beta we plan to release a new option for the AGM-65F Maverick slew that does not require realistically pressing down on the TDC switch while slewing. This video is to help set it up and understand the logic. This is added to address issues with the Warthog throttle mini-hat.
-
 This test includes an elevation well above sea-level, a non-default barometric pressure of 28.34, and a non-default AOT of 32C.
 -
In the next F/A-18 Open Beta update for 13 February 2019 we plan several improvements that include weapon accuracy and pullup cue / Break X logic. This video demonstrates some of these upcoming changes over the Nevada map. This video is also meant to demonstrate accuracy regardless of target MSL elevation or mission temperature / barometric pressure.
-
Hey everyone, As always, we are reading everything being said and we understand that some of you are having difficulty with weapons delivery accuracy and the pullup cue/break X. Based on the next planned Open Beta update, I made this video to help show correct fuze settings and delivery that provides accuracy and staying above the pullup cue. This should be available in the 13 February 2019 Open Beta update. - Wags
-
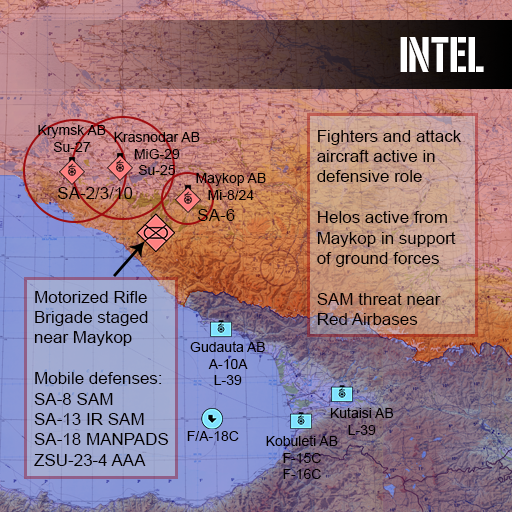
Hornet Mission of the Week Magnum Force The Black Sea 24 June 1992, Morning Fictional The collapse of the Soviet Union in 1991 led to a renewed conflict in the Caucasus region. The initial attempts by Russian forces to seize Georgian territory were driven back, but that has only strengthened Moscow’s resolve. The Russians continue to build a sizable ground force near Maykop. A fully equipped Motor Rifle Brigade has been identified with additional forces continuing to flow in. The deployment of additional Russian ground forces to the theater prompted a response by NATO. Cruise missile attacks on Russian airbases and infrastructure bought NATO enough time to deploy air and ground forces to the region. Squadrons of F-15C, F-16C, F/A-18C, A-10A, and Tornado fighter and attack aircraft are now operating from Georgia and the Black Sea. These are augmented by a small number of Georgian assets, mostly L-39 light attack aircraft. Small detachments of Russian Su-27 and MiG-29 front-line fighters remain active from Krymsk and Krasnodar under the protection of SA-10 SAM systems, but the threat of an air attack on Georgian targets is minimal. Your mission: We will provide SEAD support for a small interdiction package aimed at disrupting enemy road activity and damaging the Maykop railyard. Most enemy supplies, equipment and other materiel enters the area through this single location. Disrupting the flow of enemy supplies will interfere with the enemy troop buildup south of Maykop. Two flights of two L-39s armed with bombs, callsign Pontiac 1 and Pontiac 5, will depart from Gudauta AB and proceed north to the Maykop railyard target. Additional flights of A-10s, callsign Tusk 1 and Tusk 5, will patrol south of Maykop and destroy enemy ground forces operating in the open. They will be supported by a SEAD flight of four F/A-18C Hornets, callsign Springfield 1 (player), who will orbit southeast of the targets and engage any radar equipped air defense units that become active. A CAP flight of F-15Cs will also be on station to deal with any airborne threats. The primary target is a railyard consisting of fuel processing facilities to the northeast and warehouses to the southwest. The Pontiac 1 and 2 L-39 flights will ingress separately and attack the target from different headings. Pontiac 1 will bomb the fuel related facilities to the northeast while Pontiac 2 bombs the warehouses. See the mission planner for a look at the package ingress and egress routes and for detailed navigation planning. Your F/A-18C SEAD flight, Springfield 1, will be on station to suppress any radar guided air defense threats in the area. An SA-6 SAM site has been identified at Maykop AB and may become active at any time. This site is known to operate very conservatively and to cease transmitting for a short time if an anti-radiation missile launch is suspected. Adjust your tactics to ensure this threat is suppressed while the Pontiac L-39 flights are in the area. Additional mobile threats may be present in support of ground forces. Radar guided systems may include SA-8 SAMs or ZSU-23-4 AAA. Monitor the radio for the status of radar threats in the area and engage any threats to allied aircraft if able. Pontiac and Tusk flights will announce when they have left the target area. Springfield 1 may leave the area and return to base after all flights have safely egressed. An AWACS controller, callsign Focus, will provide early warning of approaching aircraft. Requests for the current situation can be made at any time in your radio AWACS menu by choosing PICTURE or BOGEY DOPE. Carrier Admin: TACAN: 74X ICLS: 11 Success criteria: - Reach the target area, protect the other flights and return safely to the carrier. Design notes: - Enable 'allied flight reports' in your gameplay options. Calls are filtered so only relevant information comes through. - Open the mission planner for detailed navigation planning. The enemies present on the map represent current intel and is information you are intended to have. - Different enemy air defense plans are built into the mission. It will play out differently each time. Caucasus FA-18C Magnum Force.miz
-
We plan to relesae on Steam once the Lunar Sale is done. It would not be fair to AvioDev to release the C-101 in the middle of a sale. Thanks
-
Done!
-
We now, internally, have a new TDC slew option for the Maverick that does not require the TDC to be depressed while slewing. Once you cease slewing the seeker, the seeker will attempt to lock whatever is the center of the crosshairs. If it can nothing to lock, it will go into break lock mode. In other words, pretty much how it works with the Maverck in the A-10C. It should be available in the next Open Beta. - Wags
-
In today’s Hornet mini-date, I thought I’d start talking about some of the Data Link (D/L) and Situational Awareness (SA) page fundamentals prior to release. We hope to release into the Open Beta later this month. There is a lot to take in, so let’s get started early. Naturally, there will be introduction videos, academic videos, interactive training lessons, and a manual chapter on this. Let’s talk about some of the elements: Much like the HSI, you have your TDC relation to bullseye (A/A Waypoint) in the top left corner. In the same manner, you have many of the same waypoint controls like display of the selected waypoint, bearing/distance/time to selected waypoint, and sequence options. If the selected waypoint is visible on the SA display, it appears as a circle with the waypoint number in the center, with north arrow. In the bottom left corner are your chaff and flare counters. O1 and O2 will come later. Yes, we’ll have option for 120 flares. When enabled from PB 7, yellow triangle symbols appear along the bearing to air-to-air radar emitters. These have options to be set to off, side, and ID or not. Green contacts are identified as friendly, red as hostile, and yellow as unknown. This is done through a combination of IFF and NCTR prints. There are three possible sources of data that can build the SA picture: ownship sensors, other fighters (F/F), and AWACS aircraft like E-2 and E-3 (SURV). These sources are then correlated or they can be toggled on and off from the SENSR sub-level page on PBs 13, 14, and 15. PPLI allows the location and data sharing of networked aircraft. When only ownship sensors detect a target, only the top half of the HAFU (symbol) is displayed. When only from an F/F donor, only the bottom half is displayed. If both ownship and a donor detect the same contact, then both top and bottom halves of the HAFU are displayed. Contacts only detected by a SURV donor, are smaller in size circle or diamond generally. When the TDC is assigned to the SA page (indicated as diamond in top right corner), the TDC can be slewed. When placed over a contact, its Mach and altitude in thousands of feet is displayed on either side of the TDC cursor. While hovering over a contact, additional information is displayed in the bottom right corner of the display and this can vary based on its identification. Such data can include: NCTR print, bearing and range from ownship, bearing and range from bullseye, fuel level, callsign, etc. A small dot on the left side of a green circle indicates it is a donor to the Link-16 network and is sharing data with you. A dot in the center of the circle indicates it is a command and control (C2) asset. B, C, or D inside a contact indicates it is one of your flight wingmen. The number shown for red contacts indicates its threat ranking. A star indicates the track is your L&S target. More functions will be coming soon, which I’ll talk about at a later point. Please remember that this is very much work in progress and very much subject to change. Thanks, Wags
-
[REPORTED] Hornet should be able to carry 120 flares.
Wags replied to Silvern's topic in Bugs and Problems
Thanks for feedback. It turns out that it varies between early and late lots. For a late lot it should indeed be higher than 30. We'll fix it. -
[FIXED INTERENALLY] Training: Cluster munitions
Wags replied to cfarsr's topic in Missions and Campaigns
Without a track, we cannot determine where you are going wrong. -
[FIXED INTERENALLY] Training: Cluster munitions
Wags replied to cfarsr's topic in Missions and Campaigns
-
Make sure you have the carrier TACAN first entered and selected.
-
Only set to OFF if there is some sort of system electrical issue. Otherwise, always set to ON.
-
With one of the recent Hornet updates, we added new and more realistic tones for the AIM-9X Sidewinder. This video is provided to help better understand them.
-
This is correct as is.