Savvy
-
Posts
119 -
Joined
-
Last visited
Content Type
Profiles
Forums
Events
Everything posted by Savvy
-
Such amazing work, it really has transformed the map. Hope ya'll got paid
-
Amazing work guys, very well done
-
I have to agree. It's great, but would personally prefer having two (or more) charts - one for Pilot and one for Obs and just have standard black.
-
Astro A10. Decent price, decent quality, comfy and fits over the VR headset with no troubles.
-
Thanks for letting us know. If possible, please put it in the change log. Harrier really is turning into a great module. I'm slowly forgetting how to fly the other jets because the Harrer is just so much fun.
-
Are you using Oculus? I had an Oculus home update that I had postponed, however it caused constant CTD and even bluescreens until I manually ran the update then restarted the PC.
-
This is awesome, great work. I love the modular design.
-
Yep, they sure do.
-
I doesn't really matter from what I've seen. I think most of the ones I use for things like heading/course knobs are 20step encoders.
-
Thanks for that. I designed all the panels either from the F18 NateOps manual, or the generic panels were taken directly from other aircraft. E.G the Tacan panel is copied from the F-5e. External lights will be from the Harrier etc. The entire thing is modular so I can switch out panels if I change my mind. I'd suggest just jumping in a having a go. If on a budget start with a cheap USB joystick board, some buttons/switches and mount into some offcuts of wood. The next step up would be using something like a Leo Bodnar Board, or go full DIY and use an Arduino (Leonardo) You'll likely change your mind a lot as you go, so just start something easy, perhaps a few switches that control flaps/gear/hook/master arm.
-
Something I forgot to mention was that all switches and gear/wing/wheel break are all momentary so they can go up or down but always revert back in a middle default position. This means they are never out of sync with the sim. I never liked it with the warthog in VR when you went to flip a switch up that was already up, then you have to flip it down then up again to register.
-
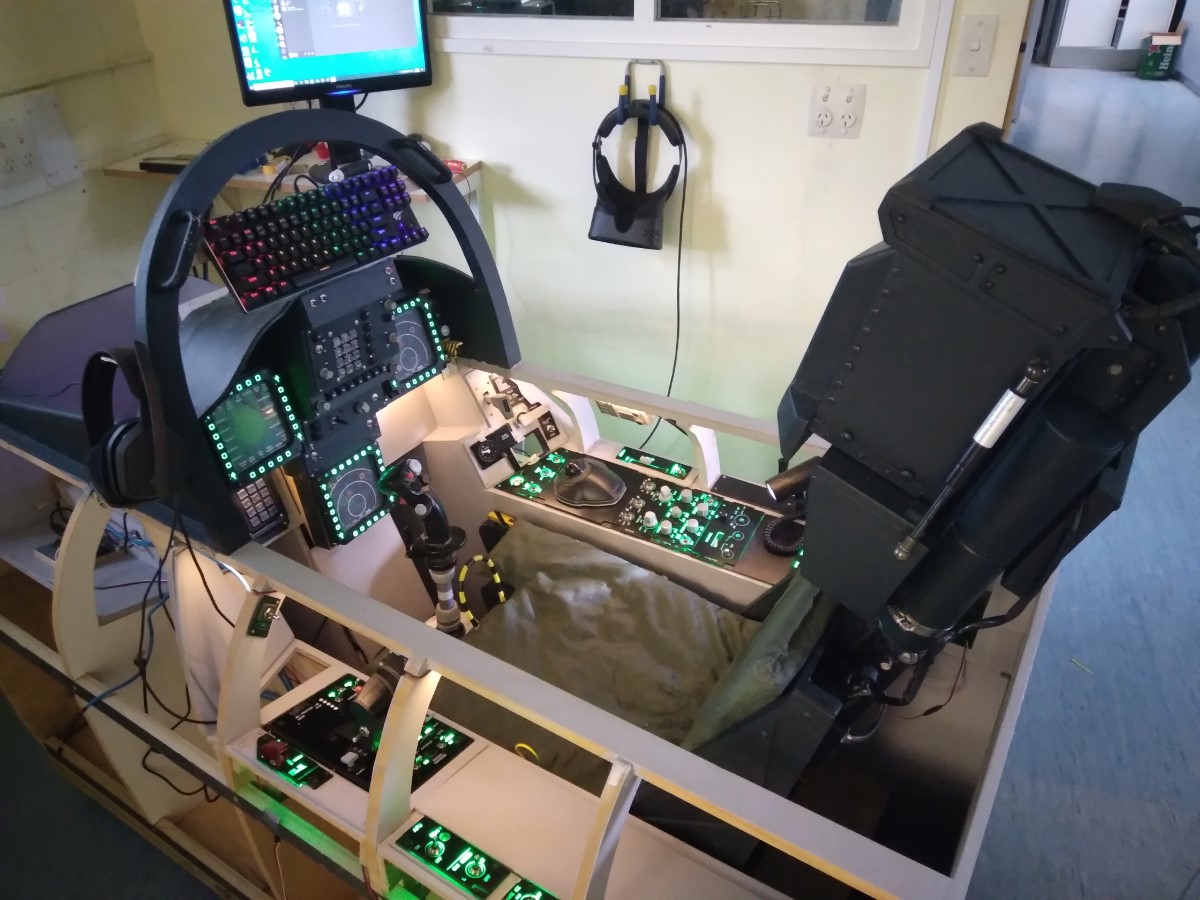
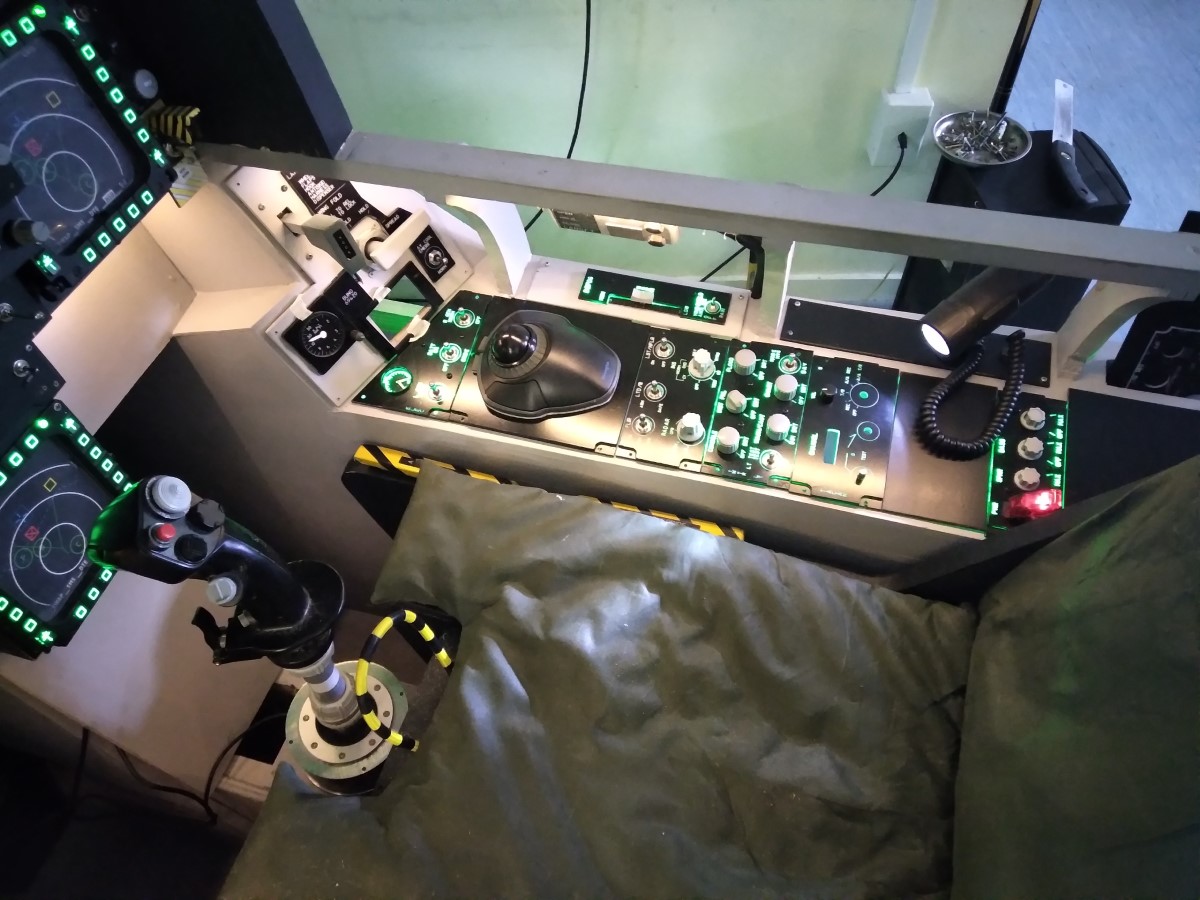
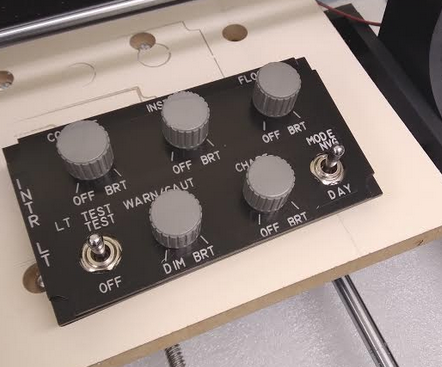
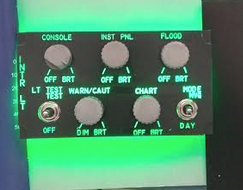
Here's a couple of progress shots of my generic VR pit. I'm currently in the process of rebuilding all the inputs with my new CNC machine and have included things like back-lighting, flood lighting etc which is all controlled by the internal lights panel. I've also attached some tactile transducers to the seat which make it shake with bass noise. These are controlled by a custom panel on the rear of the right console, so I can reach out and turn it down/off if needed. For now, I've also included the mouse in the right panel. I can't decide if I want it there or not but it does make it very easy to access for those few times when I don't have a switch available. The fuel management panel currently has 2 keypads controlled by Arduino. The left one has misc controlls like score, arming and comm1, comm2. The right one is assigned to function keys F1-F12. This allows me to use the radio commands very easily, just press Comm1, then the relative function key to the right to execute the commands. I've only really partially done the right panel, all the rest is still very much the older V1 version so looks a bit rough.

-
I've got the 3020 version of that one and are quite happy with it. I've managed to get what I would consider pretty good looking panels created just using the knife blade (which comes with the kit) to engrave.
-
Which laser etcher/engraver are people using for creating cockpit panels?
Savvy replied to obious's topic in Home Cockpits
I've got a 3020 CNC machine that I use to engrave my panels. I'm happy with the results I've got so don't feel the need to get a laser module at this stage. -
missing info Can multicrew cause UH-1 to break up mid flight?
Savvy replied to Dangerzone's topic in Bugs and Problems
Have had the same thing happen twice. Usually when the other guy has lag, and always at low alt. The first guy I told off because I thought he pressed 'C' to take control. Second time it was my Son so I just swore at him in the next room -
cannot reproduce Multicrew Radio Synch Issues Co-Pilot / Pilot
Savvy replied to cfrag's topic in Bugs and Problems
Have had the same problems. Multicrew in the Huey is a bit of a mess. Have also found when flying close to the ground can cause an insta-crash as if the co-pilot lags and thinks we hit the ground which causes the pilot to explode. I don't hold much faith in the Hind or Apache if this is the current multicrew state. -
You mean like how the panel shakes in the Huey?
-
3. Can no longer change the APKWS laser code on the ground with L-SHIFT,L-ALT +1/2/3/4 4. LST doesn't seem to lock onto 3rd party lasers. I think this is an old bug? I can't lock onto lasers set by drones or other aircraft.
-
Great point regarding the spindle direction! I was actually wondering if that might have an effect. Fortunately mine just happened to be set to clockwise rotation and the path was going anti-clockwise so I was already getting pretty good results.
-
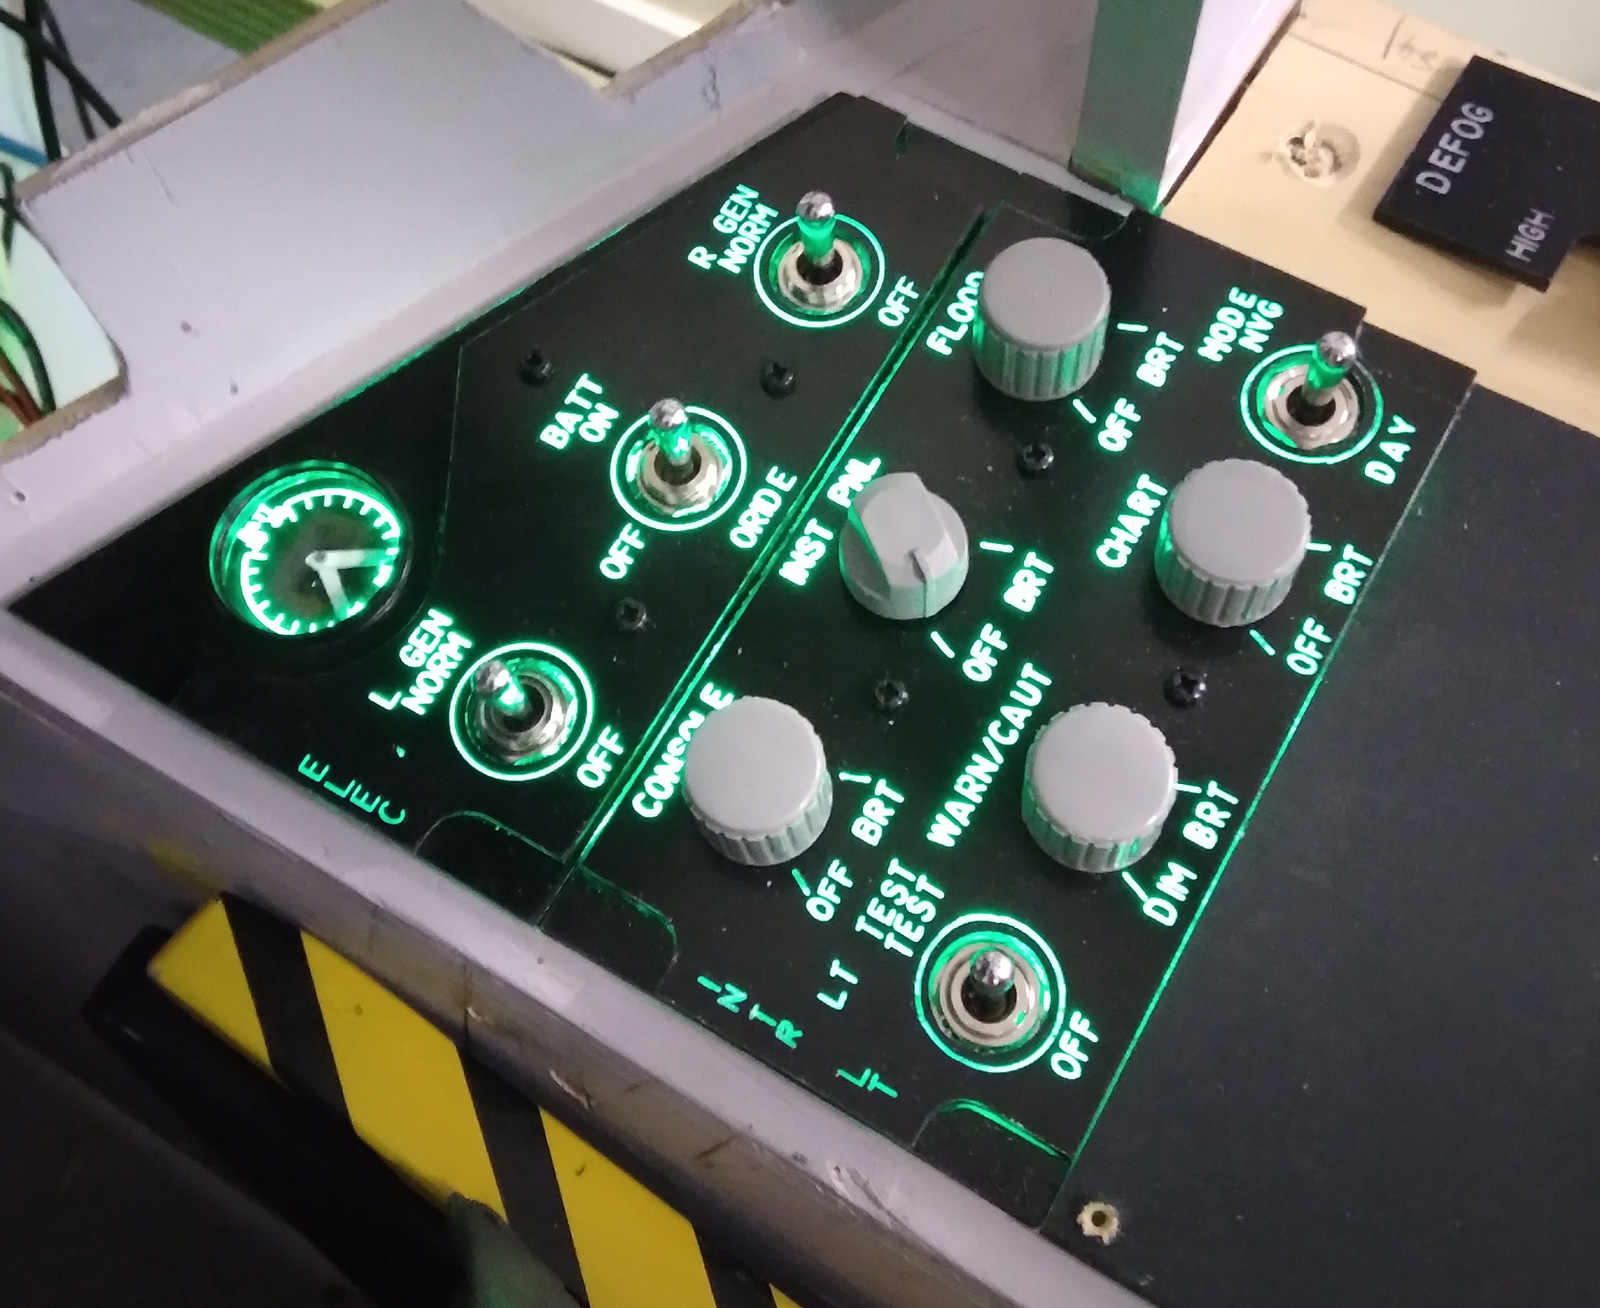
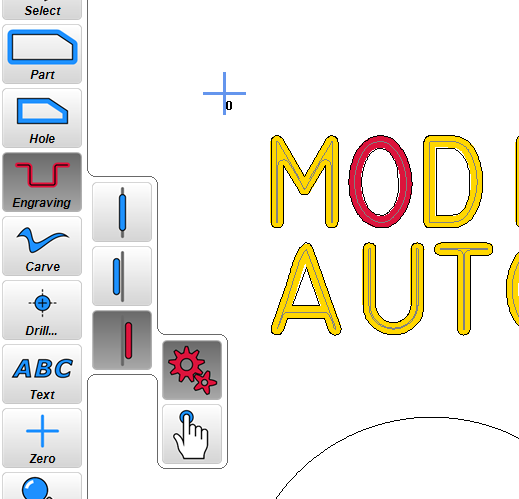
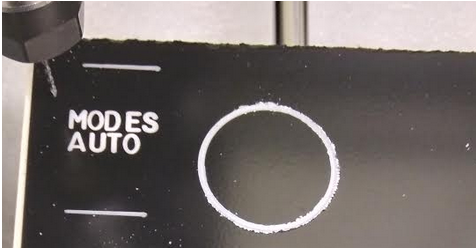
After finding the hard way how frustrating it can be getting a cheap chinese CNC machine to cut and engrave panels, I thought I share my settings to-date. I'm still finding better ways to do things so this will be edited when required. It's also a good place to leave this so I can find the info the next time I need to do this Fee free to add any info, it might save somebody losing some hair. Here's a couple of shots of my first completed panel, with a demo of the backlighting which only has 1 strip of led in the demo so will be better when completed. Backlighting pick didn't come out very well, I'll replace it once it's cleaned up a bit. Settings for Milling Acrylic: First make sure you are using cast acrylic as extruded acrylic will melt on the bit and break it. Starting setup is as follows: Bit: Single flute 3mm end mill Feed Rate: 200 - 600mm/min (start lower, see more info in below posts) Plunge Rate: 120mm/min Spindle RPM: 8000 - 12,000rpm Depth per cut: 0.25mm (this seems low but it's the only way to stop my bits breaking) If you get chattering, then lower your feed rate. Too low feed rates can increase friction and cause melting. Sharkfin61 mentioned that setting the Spindle direction to clockwise and set the travel path to anti-clockwise gives the cleanest cuts. Painting the panels: Spray 1 coat of primer and 2 coats of good quality automotive black spray can. Lightly sand in between and leave to cure for 24hours Settings for engraving panel text: Make sure text is 'exploded' from Fusion 360 before exporting as a .dxf, otherwise it will come through as a blank box in EstlCam. Bit:So far it looks like a 1mm (non-straight end bit is best). The tip is very slightly 'peaked' which allows different thickness of the font based on the depth of cut. Alternative Bit: Just use the pointy knife bits that come with the machine and set to 0.08 depth Feed Rate: 250mm/min Plunge Rate: 120mm/min Spindle RPM: 12000 Depth of cut: 0.08 - 0.1 depending on how fine you want the font. Using Estlcam, select Engraving and set the outside line of the font object: Test examples: 0.1 depth cut: Font height is 4mm so quite small 0.08 depth cut: Font height is 4mm so quite small General Tips /Notes: Make sure the nuts and bolts on the CNC machine are not loose, especially where the travel rods connect to the X/Y/X motor. As this can cause slipping. If the cutting bit is 'Chattering', your travel speed is too high When changing a bit, first push the Collet into the collet ring. This will 'click' into place, these two parts can then being installed into the spindle. Not doing this can cause the bit to wobble With the machine off, turn the spindle to ensure the end of the bit doesn't 'wobble' due to it being incorrectly mounted into the collet. This will instantly break the bit as soon as it moves in the plastic. Using an upward spiral end mill will pull the plastic flakes away better but may pull the sheet up causing problems.
-
I switched to stand alone befre the update so ED would get more of my money, boy that was a mistake. My updater has been running for over 24hours... currently at around 65% complete, downloading at around 160kb/s. Wish I had stuck with Steam. Edit: I just tried the Auto-Tuning thing above, then restarted. Now it's going much faster. Pity I didn't come in here yesterday.
-
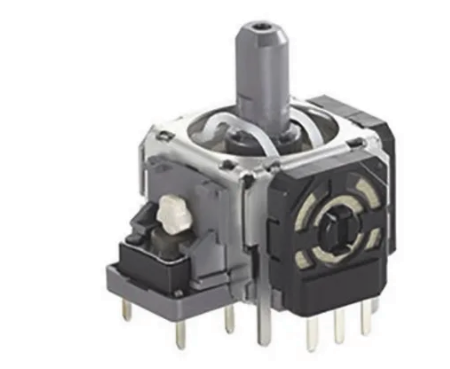
I used an xbox-type thumb controller, pulled off the thumb hat and replaced with a square switch. Plugged into arduino I converted the axis values into digital joystick push buttons. Had the added bonus of have the 'push in' function.
-
Thanks very much CorporalCarrot, that really is a huge help. Once I get everything working to a reasonable level I might post a new thread called "Settings for CNC panels" which has all the info I've found. I'm sure it would be a helpful resource for others including myself. I'm waiting on some replacement bits so I can continue my testing. The only single-flute one I can find locally is 4mm but hopefully it's ok for cutting the outlines.
-
Thanks all, yes after some research I found that Fusion 360 was free for hobbyist. I'm still on the fence on what to do. Fusion 360 looks to be more capable, especially if I want to move into creating 3d type parts in the future however the learning curve is indeed quite high. I couldn't believe how easy Cut2d was to use, I don't even recall looking at many tutorials - everything just seemed in logical places. As a software developer myself I found it really interesting. Edit: After finding the "sketch" mode in Fusion 360, it suddenly makes a lot more sense for building 2d stuff. I did manage to send a demo rectangle to the CNC machine to see how it would cut plastic. It was a total mess, the plastic would just melt on the bit then it would break. I found there's two different types of Acrylic, extruded and Cast. Cast being much better for milling panels. What settings are you guys using for cutting the panels? I started with 1mm bits but they broke, then moved to a 2mm bit but I broke this also by setting the z-depth then pressing "down" instead of "up", breaking the bit into the plastic. So frustrating. At the moment I'm looking at cutting 3m cast Acrylic with these settings (I'm still testing): 2mm bit 10,000 RPM (not even sure my Chinese 2030 can do this) 650 mm/min travel speed 230 plunge speed. 0.5mm depth of cut per pass, so it takes 6 passes to cut through the full 3mm. Does that sound close to what you guys are using? I also secure the sheet onto the bed with double sided tape, but found the tape would catch all the shavings on the final pass, causing some issues. I wonder if this is also 'grabbing' the bit causing it to break sometimes. I'm using bits that (I think) are more for carving wood - which could be causing the breakages. As I understand it a single flute end mill is what I'm after.
-
Edit: I'll post my findings right here at the top to save others from reading through. Software: The general consensus on CNC software is to use the Free Personal version of Fusion 360 for design, and Estlcam for the path generation. Fusion 360 has a high learning curve but is very powerful. If you focus on '2d Sketches' it will be easier to follow. Cut2d,vCarve are very good bits of software but are quite expensive. Adobe Illustrator, Corel Draw and Google Sketchup(free) are other options. After some testing and swearing, I posted my settings here: Original post: So my 30x20 CNC machine has arrived and I've got a couple of test panels, with paths all created and ready to go with Cut2d. However I see that the Cut2d Trial version doesn't allow me to export the paths so there's no way to actually see if it will work. I find Cut2d to be *really* good software and was intending to buy it however I don't really want to pay the $250NZD without actually seeing how the end product will look. So now I'm back to square-one a bit and looking at what software setup might be best for me. It looks like Inkscape with plugins may be able to create the Panels and Tool paths, however Inkscape is (being free) requires a lot more faffing abouth. I see Fusion360 is another option, but that has a pretty high monthly fee. What does everyone else here use for CNC milling software? Should I just go ahead and buy Cut2d or is there some other software that will work better?