Boris
-
Posts
1421 -
Joined
-
Last visited
-
Days Won
3
Content Type
Profiles
Forums
Events
Everything posted by Boris
-
Seeing as the Kurfürst will be released tomorrow, today is likely the last day for the preorder discount. Also keep in mind that tomorrow will be half a day earlier for you.
-
I'm pretty sure Mustang's environmental shaders mod includes a fix for this: http://forums.eagle.ru/showthread.php?t=113374
-
I find it helps to trim the elevator down to the first mark forward for take-off. As you're holding the stick back to lock the tail wheel, the aircraft may lift too early, causing a stall. Trimming down a bit helps to keep the aircraft on the runway for longer, which means greater airspeed and a more stable take-off. With controlled rudder inputs to keep the Dora straight I can usually achieve a nice gentle two wheel take-off.
-

searching for 109K4s stationed in Austria during 44-45
Boris replied to 9.JG27 DavidRed's topic in Bf 109 K-4
That they were captures there doesn't mean they were stationed there though... Or maybe only briefly. I can imagine that the pilots fled from the Russians in 45 and flew to Austria so that they could fall into the "friendlier" allied hands. -
Well, with ED elements we know that as a rule we can expect to see them later rather than sooner. But still, it would be a shame to see this great mod go to waste! Would be awesome to see it fly in the bomber missions of the ACG WW2 server!
-
What ever happened with this??? Would be great to finally play some bomber escort missions in multiplayer... especially as the Bf-109 is coming out next week! :D
-
I certainly hope so! Haven't seen any information to the contrary yet... They still have the rest of this week to go.
-
Kind of reminds me of this... :megalol: ${1} Unfortunately I can't find the clip of where he throws aluminum foil from the plane to spoof a missile.
-
Would you pay for Su-27 if it come out as a separate DCS standard module.
Boris replied to PLAAF's topic in DCS Wishlist
The demand for high fidelity fighters is so high, I'm sure a DCS level Su-27 would be an instant hit. Financially too. The added value would completely justify selling a new module I think. -
Unless you have your own layers entered, the CDU is constantly using the currently measured wind at your altitude to correct the weapons. If you only have one layer entered, the CDU will blend this entry with the actual measurements at your current altitude. This is probably why you're seeing a slightly different value. Often it is enough to enter only the bottom layers that the bombs will fall through, relying on the aircraft's measurements for the drop altitude. If I don't have any wind info on the mission, I usually read the wind values off the CDU as I climb out. If you're entering these as you go, make sure the wind correction is set to NONE, to make sure you're getting the aircraft's readings, not the one's you've manually corrected for. And then of course, once you have all your layers punched in, remember to set it back to WIND or BOTH, to make sure your changes are taken into account.
-
Giving your Sided Winder Force Feedback 2 Steroids
Boris replied to Whiplash's topic in PC Hardware and Related Software
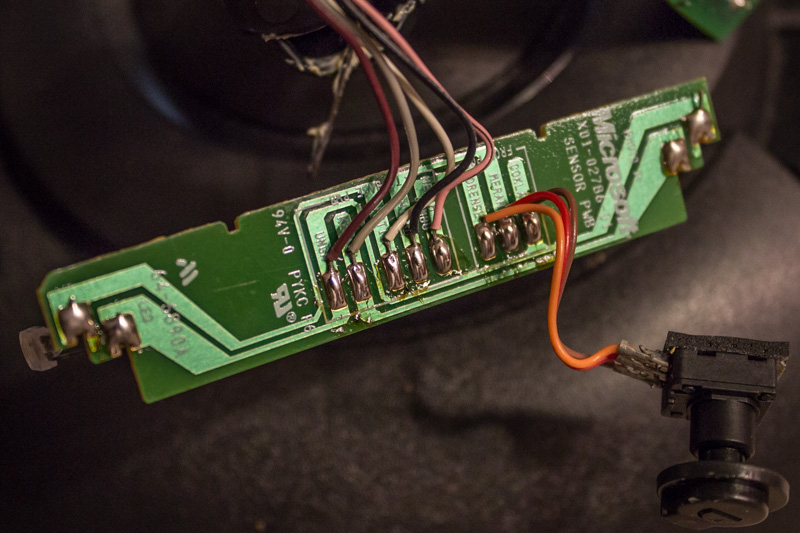
No need, it's done! What Sydost said is correct. The grey and white wire and voila, the stick is now activated with a toggle switch. I've tested it in DCS and everything works the way it's supposed to. I'm very happy with the end result! :joystick: Thanks Whiplash and all the others that were of assistance!
-
Giving your Sided Winder Force Feedback 2 Steroids
Boris replied to Whiplash's topic in PC Hardware and Related Software
Ah ok, this is the power for the light sensing diode? So I wouldn't need the dark red wire at all if I incorporate a switch? Just hook up the grey and the white and it's good to go? -
Giving your Sided Winder Force Feedback 2 Steroids
Boris replied to Whiplash's topic in PC Hardware and Related Software
Thanks! I think that makes sense. And the dark red wire is the ground I assume? -
Giving your Sided Winder Force Feedback 2 Steroids
Boris replied to Whiplash's topic in PC Hardware and Related Software
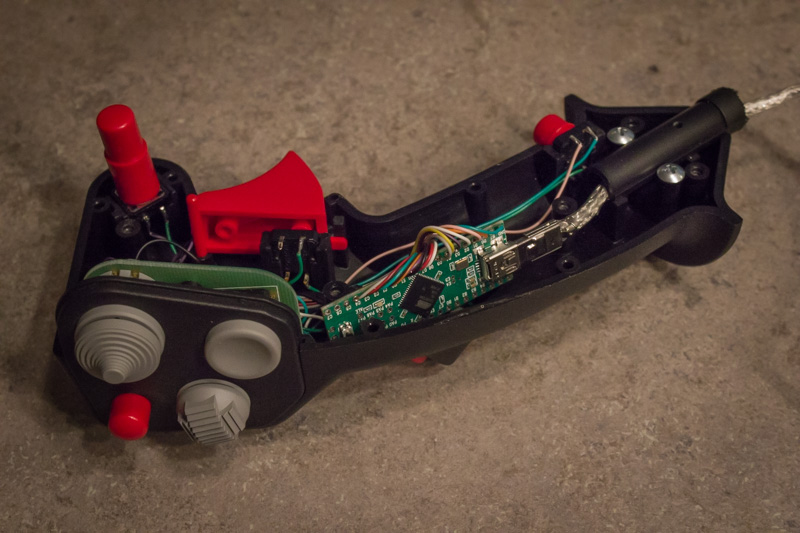
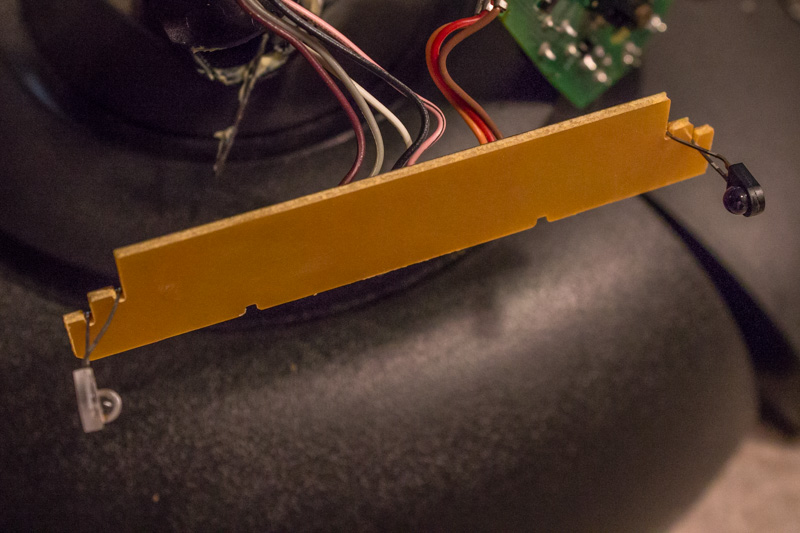
The Warthog handle is extremely heavy compared to that of the sidewinder. I'm not sure how the motors would handle it. You would definitely need a counterweight, which would require some kind of custom mounting for your stick. PeterP made a mod in which he used the motors from two sidewinders to power an extended Cougar grip, but this is much more challenging. http://forums.eagle.ru/showthread.php?t=83814&highlight=sidewinder Alternatively you could try getting your hands on a CH Fighterstick, which has exactly the same layout, minus the two-stage trigger. With a little bit of ingenuity you might be able to mod another trigger stage in, using one of the buttons from the Sidewinder. The advantage to the CH grip ist that it is made of plastic and much lighter than the Warthog. It's not cheap, but you might be able to get a used one. Here's my modded CH Combatstick (has a few less Hat switches than the Fighterstick): You can see how the buttons are now connected to the teensy, with the USB cable running out. I want to put the whole thing together now, but I also need to replace the light sensing diode with some sort of a switch. Probably easy to do, but I'm unsure of how I should connect it. The existing circuit seems to have two sensors, that are facing each other and the stick is activated when the circuit is broken. Is this correct? Here's a couple of pictures of the front and back of the board: The black part which is hanging off is the pot for the rudder axis of the sidewinder, which I'll no longer be needing. Ideally, I just want to unsolder the appropriate wires and solder them to a switch that I can attach to the base. Would anyone be kind enough to enlighten me on the correct method for doing so?
-
Or why they don't jut simplify things and change the altitude for the bottom layer setting to something like 500m.
-
Thanks, I suspected this would be some sort of complex calculation rather than a single sensor. I did some extensive testing on this. Yes, it is true that the wind is slower at ground level. I tried to explain this in the first post of this thread. While wind speed is in fact about half as slow at ground level, it doesn't work as one would expect. For example, in the mission editor we have set the following: 10m - 10 m/s 2000m - 10 m/s 8000m - 10 m/s Here we would expect a constant wind speed of 10 m/s at all altitudes, with somewhat slower wind of around 5 m/s below 100m from the ground. But what we see in game is a little different. What we actually end up seeing is something like this: 10m - 10 m/s 100m - 12 m/s 500m - 20 m/s 1000m - 15 m/s 2000m - 10 m/s 8000m - 10 m/s The reason for this strange behaviour, is that the wind speed for the bottom layer is set at only 10m. We have already set this at 10 m/s. However, the engine wants to simulate slower wind speeds at very low altitude. So it needs to upscale the wind for the rest of the layer to compensate in order to give the effect that the wind is slower below 100m. This upscale happens to be TWICE the wind speed actually entered. From about 350m to 650m the wind speed is 20m/s and then drops in order to blend with the layer above. So if we want to achieve a constant airspeed of 10m/s for all layers, we would need to enter the following: 10m - 5 m/s 2000m - 10 m/s 8000m - 10 m/s As a rule, the bottom layer always needs to be half the speed you actually want it to be.
-
Giving your Sided Winder Force Feedback 2 Steroids
Boris replied to Whiplash's topic in PC Hardware and Related Software
Alright, I'm now over the greatest hurdle, which was to get the buttons to work with the CH grip and to extend the wires! I decided to visit my uncle, who is an electrical engineer, on the weekend and he was kind enough to help me with my project. In the end, it was much easier than I expected, but getting the help saved my a lot of time. We mapped out the buttons using a multimeter which was very simple. Turns out the board in the stick does nothing but to keep some of the buttons in place. In the end the wires coming out of the stick are still one for ground, and one for every button. The two four way hats are also treated as buttons, which made things very simple. We ended up using the teensyduino joystick example and copy and pasted a few extra buttons to the script so that we have 14 in total. So most of the work was already done. My uncle came up with the brilliant idea of rather than to extend all of the wires, why not put the teensy inside the stick rather than the base, and just have the USB cable as the extension. The teensy++ 2.0 happened to be just small enough to fit inside the grip. This way we were able to keep all of the buttons wired up as they were, shorten the wires and solder them to the teensy. -
First of all, 50 m/s is a huge wind speed. That's a category three hurricane! This is beyond anything you should set your wind to. By airspeed indication, do you mean your aircraft's indicated airspeed? If so, this isn't used to measure the direction and speed of the wind outside, but the speed at which the aircraft is traveling through the air. The IAS doesn't go below 50 anyway, so no wonder you're getting an indication of around 50. If you look at the screens in my first post, you can see the atmospheric wind direction and speed in the top right corncer of the CDU screens. 123/012 for example. A 12 knot wind coming from a magnetic bearing of 123 degrees. EDIT: I've thought about this and I've come to see your point. If you're sitting on the ground and have a head wind faster than 50 knots, why doesn't it show as indicated airspeed??? Anyone? Also, how does the CDU know the current atmospheric winds, given that the plane is moving through the air?
-
Giving your Sided Winder Force Feedback 2 Steroids
Boris replied to Whiplash's topic in PC Hardware and Related Software
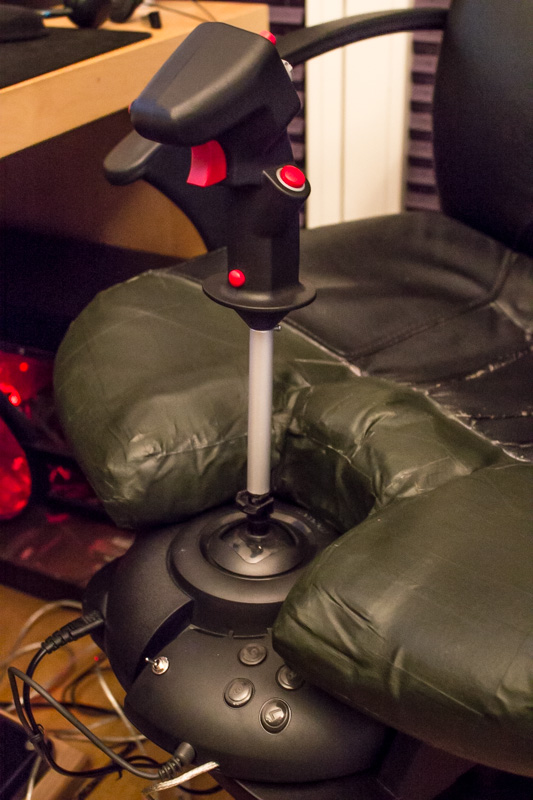
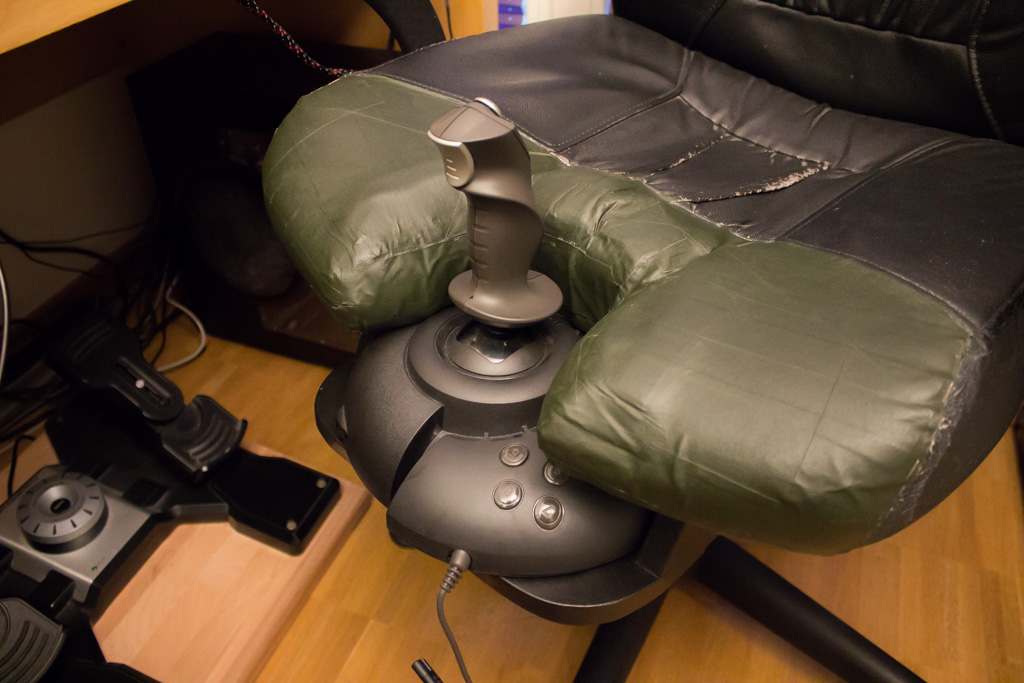
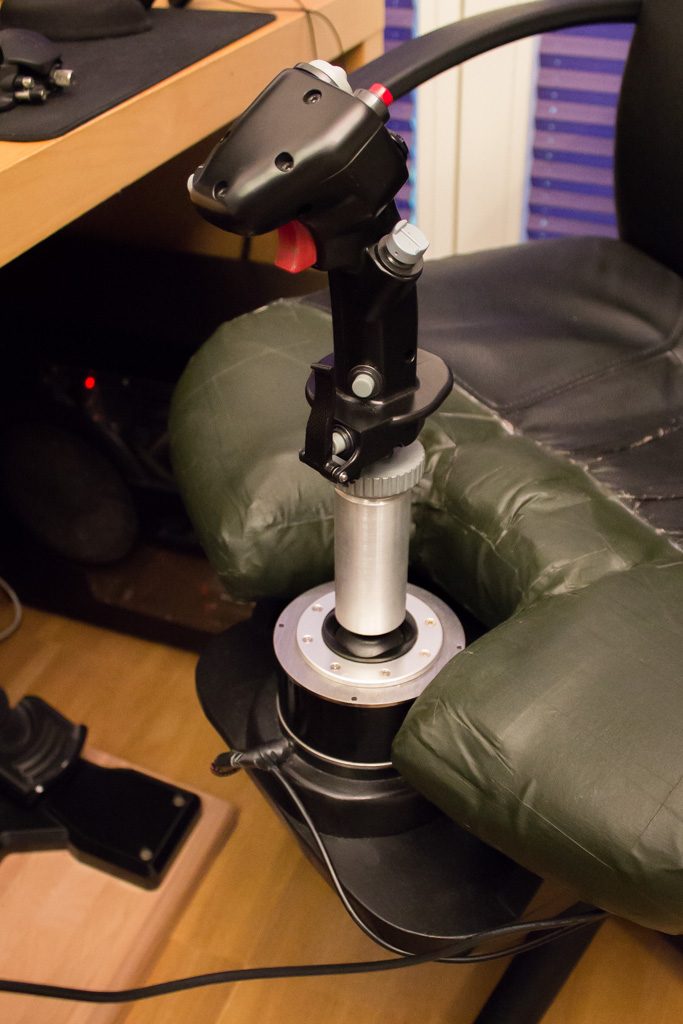
Nice! That looks like a really great set-up! It's been slow going on my end... I've only just got together all of the parts and equipment I need and am kind of stumped on what to do now. Here's what my chair currently looks like with my Warthog attached: The idea is to be able to just remove the Warthog, which is bolted to the chair with some wing nuts, and just put the sidewinder in it's place when I need it... Like so: Obviously now the next tasks are to increase the force feedback, extend the stick, attach a new grip and get it to work with the teensy. The resistors I got are exactly the right type. Exactly the same size and they should fit nicely on the existing ones on the Sidewinder board. Just for future reference for anyone else that wants to attempt this, the correct form factor for the SMD resistors is 1206 and the correct desgination is 1R0 or 1R00. I don't think I'm going to have much trouble with this and the job of soldering on the extra resistors seems pretty straight forward. The question now is, how do I get these two to work together? I have no idea how I should attach the wires. I've opened the stick and some of the buttons are connected to a small board in the stick while some connect to the board of the original joystick directly. So I'm asking myself, do I rewire every button to connect to the teensy directly, or do I keep it as is using the board in the stick and the original wiring... Can the teensy deal with that??? Many of the tutorials I see use a breadboard, but I just want to use the teensy and take advantage of its small size.
-
Saitek X55 or Thrustmaster Warthog
Boris replied to mr.john_doe's topic in PC Hardware and Related Software
The only reason I'd get the X55 is if I really couldn't afford a Warthog. -
Steam sale: Better to buy FC3 or separate aircraft for DCS World?
Boris replied to Jamesp1's topic in DCS: Flaming Cliffs
The only advantage to buying the separate modules is to have more icons at the bottom, extra wallpapers and more menu music. -
If you post a track of you doing the start-up we might be able to see if you go wrong somewhere. This is not a bug I've ever experienced. Next time this happens, quit the mission and click on "save track". Then remember where the track file is and attach it to your next post.
-
Yes, I hear they speak a dialect in Austria that is quite similar to German.
-
Looks like 3.
-
Also, make sure your left engine has completely cycled up before you start the right.