Terry Dactil
-
Posts
476 -
Joined
-
Last visited
Content Type
Profiles
Forums
Events
Everything posted by Terry Dactil
-

PointCTRL - Finger Mounted VR Controller
Terry Dactil replied to MilesD's topic in PC Hardware and Related Software
It is on the way to Australia? January 6, 2020, 4:38 pm Arrived at Facility CANADA Your item arrived at a facility in CANADA on January 6, 2020 at 4:38 It is now two weeks without any signs of movement. I was hoping to get this last Xmas, not next Xmas :( Any one else have a similar lengthy stop while in transit?? -
PointCTRL - Finger Mounted VR Controller
Terry Dactil replied to MilesD's topic in PC Hardware and Related Software
Yes. That would be possible. I remember a story some years ago about a tourist thinking he was on a flight to have a holiday in Sydney, Australia and he thought it was a bit colder than expected when he arrived in Sydney, Nova Scotia! However, I would expect to see the tracking information updated and it has now been 10 days for them to discover an incorrect address. I'm a bit worried that some bugger has pinched it! -
PointCTRL - Finger Mounted VR Controller
Terry Dactil replied to MilesD's topic in PC Hardware and Related Software
Anyone know how to get my PointCTRL package out of the clutches of the Canadians? :) It is supposed to be on its way to me in Australia, but has not moved for the past 9 days. January 6, 2020, 4:38 pm Arrived at Facility CANADA Your item arrived at a facility in CANADA on January 6, 2020 at 4:38 pm. January 6, 2020, 12:53 pm Processed Through Facility CANADA January 6, 2020, 2:53 am Customs Clearance CANADA January 2, 2020, 12:13 pm Processed Through Regional Facility JAMAICA NY INTERNATIONAL DISTRIBUTION CENTER -
PointCTRL - Finger Mounted VR Controller
Terry Dactil replied to MilesD's topic in PC Hardware and Related Software
I think your Pony Express doesn't know which way it is to Australia :) (Australia Post does the same. I had a parcel sent from a city suburb 5 km away that went all over Australia before eventually finding me.) Tracking History January 6, 2020, 4:38 pm Arrived at Facility CANADA Your item arrived at a facility in CANADA on January 6, 2020 at 4:38 pm. January 6, 2020, 12:53 pm Processed Through Facility CANADA January 6, 2020, 2:53 am Customs Clearance CANADA ^ ^ ^ ^ December 31, 2019, 4:55 pm USPS in possession of item WALLINGFORD, CT 06492 -
No Drop Tank on Load out editor for the Spitfire
Terry Dactil replied to Ibis's topic in DCS: Spitfire L.F. Mk. IX
Thanks. I had the same problem, which is now fixed. Some clarification though. I had to be in mission editor to get the 'new' option and set a new load-out. It was then available in-game as a default. For the Spitfire I set my default options to Bomb x 1 Bombs x 2 Bombs x 3 Drop tank - slipper Drop tank - torpedo Perfect :thumbup: -
Thrustmaster Cougar Throttle Schematic
Terry Dactil replied to hawxxer's topic in PC Hardware and Related Software
Yes. Great idea if your throttle is still working. Not so great if the original electronics are dead like mine were. :D -
Yes. Just looked. M3 x 0.5 pitch. Length 36.75mm overall. Measured diameter 2.88mm which is standard for a 3mm screw..
-
Thrustmaster Cougar Throttle Schematic
Terry Dactil replied to hawxxer's topic in PC Hardware and Related Software
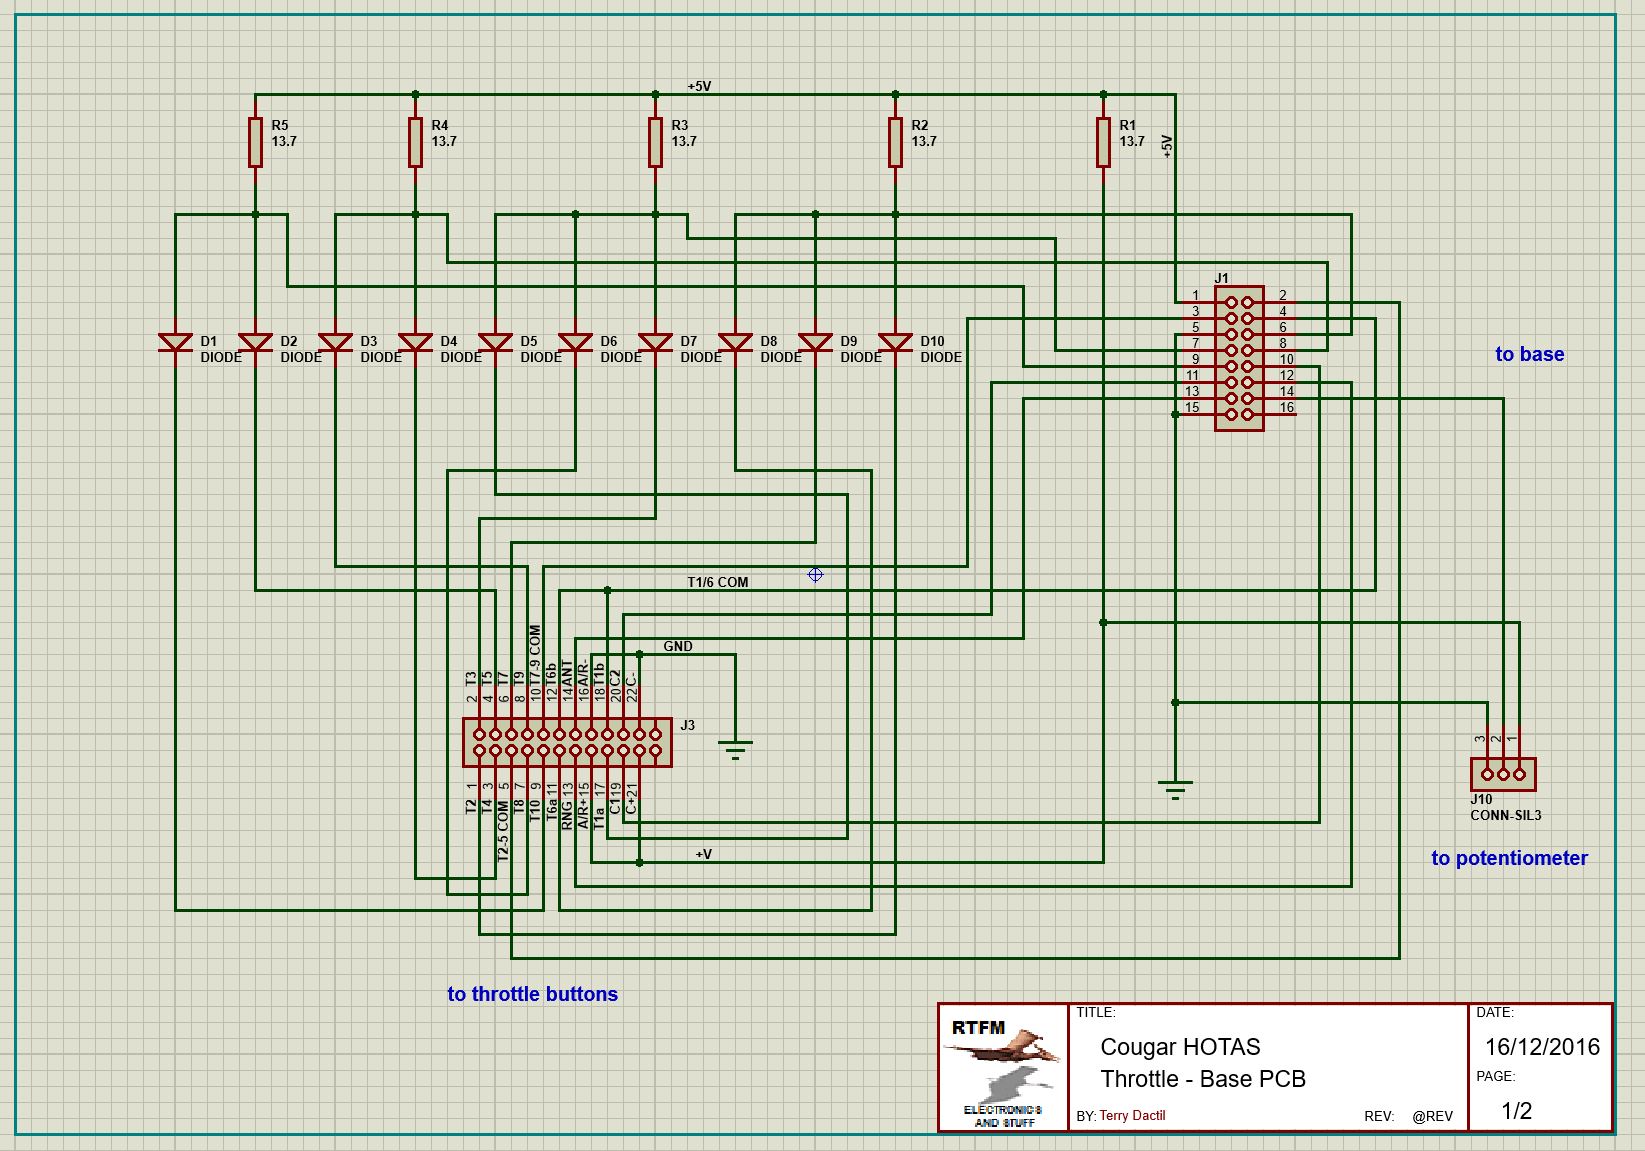
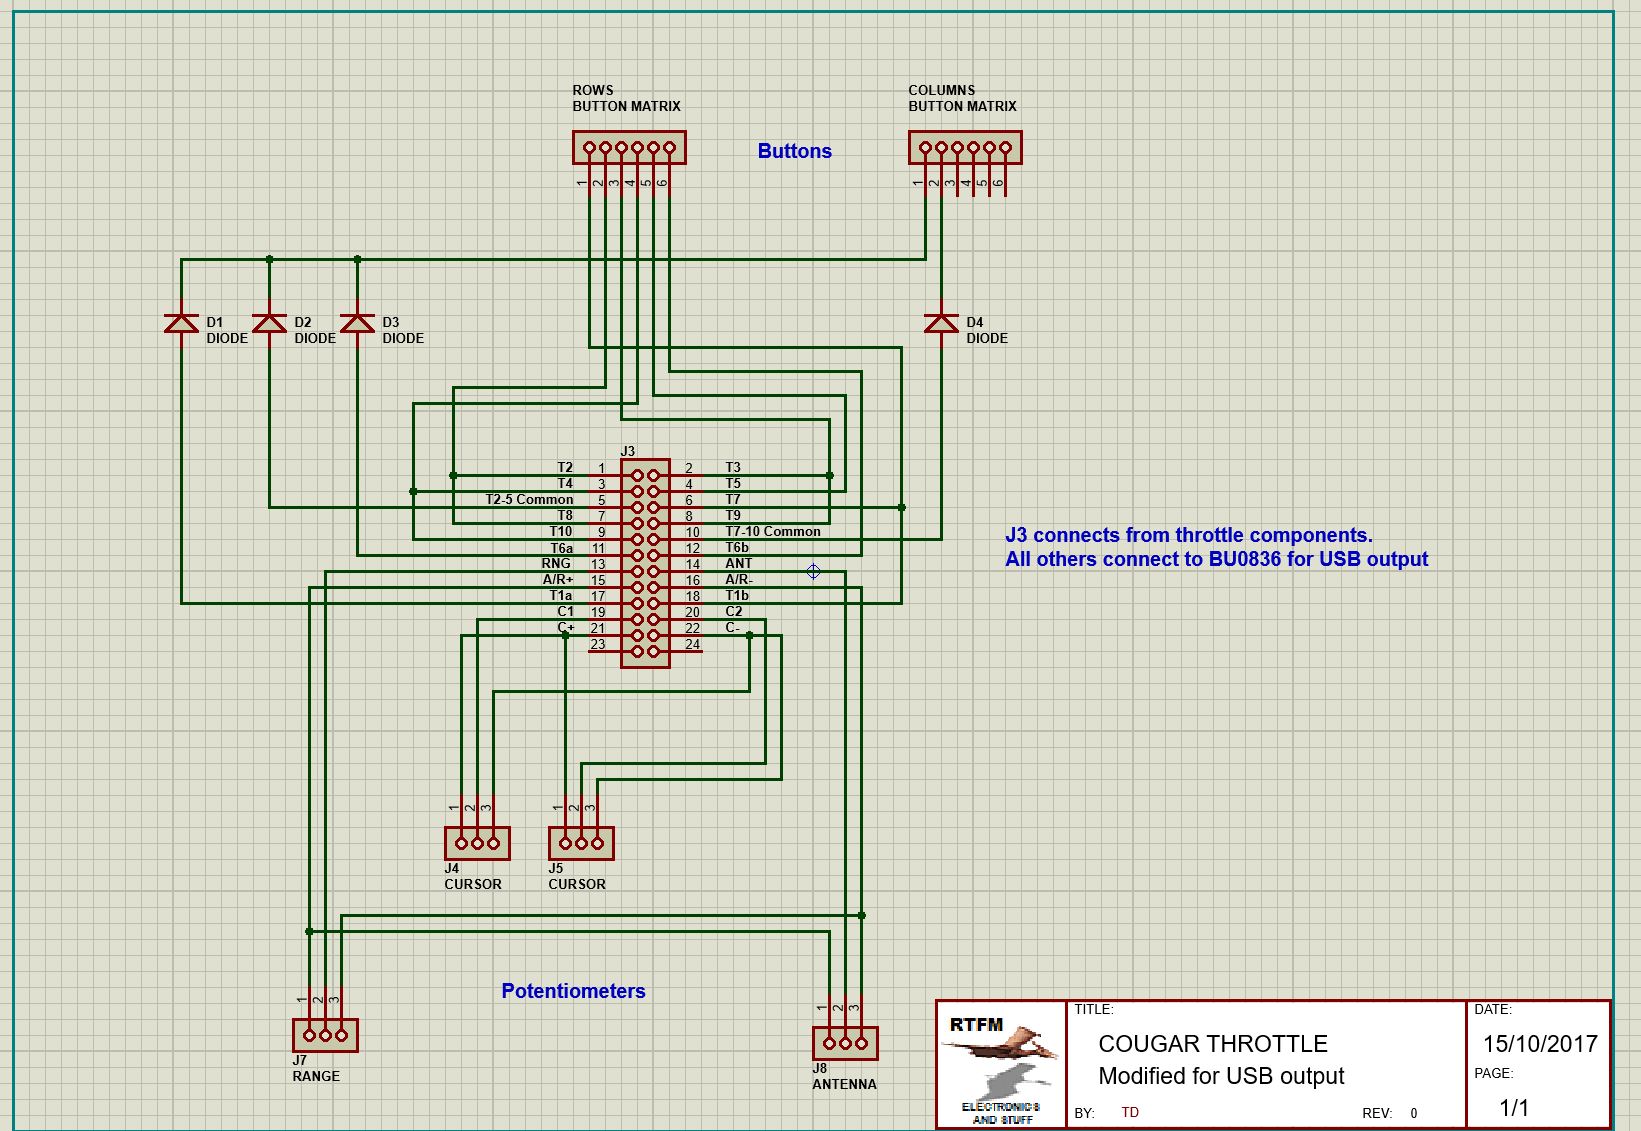
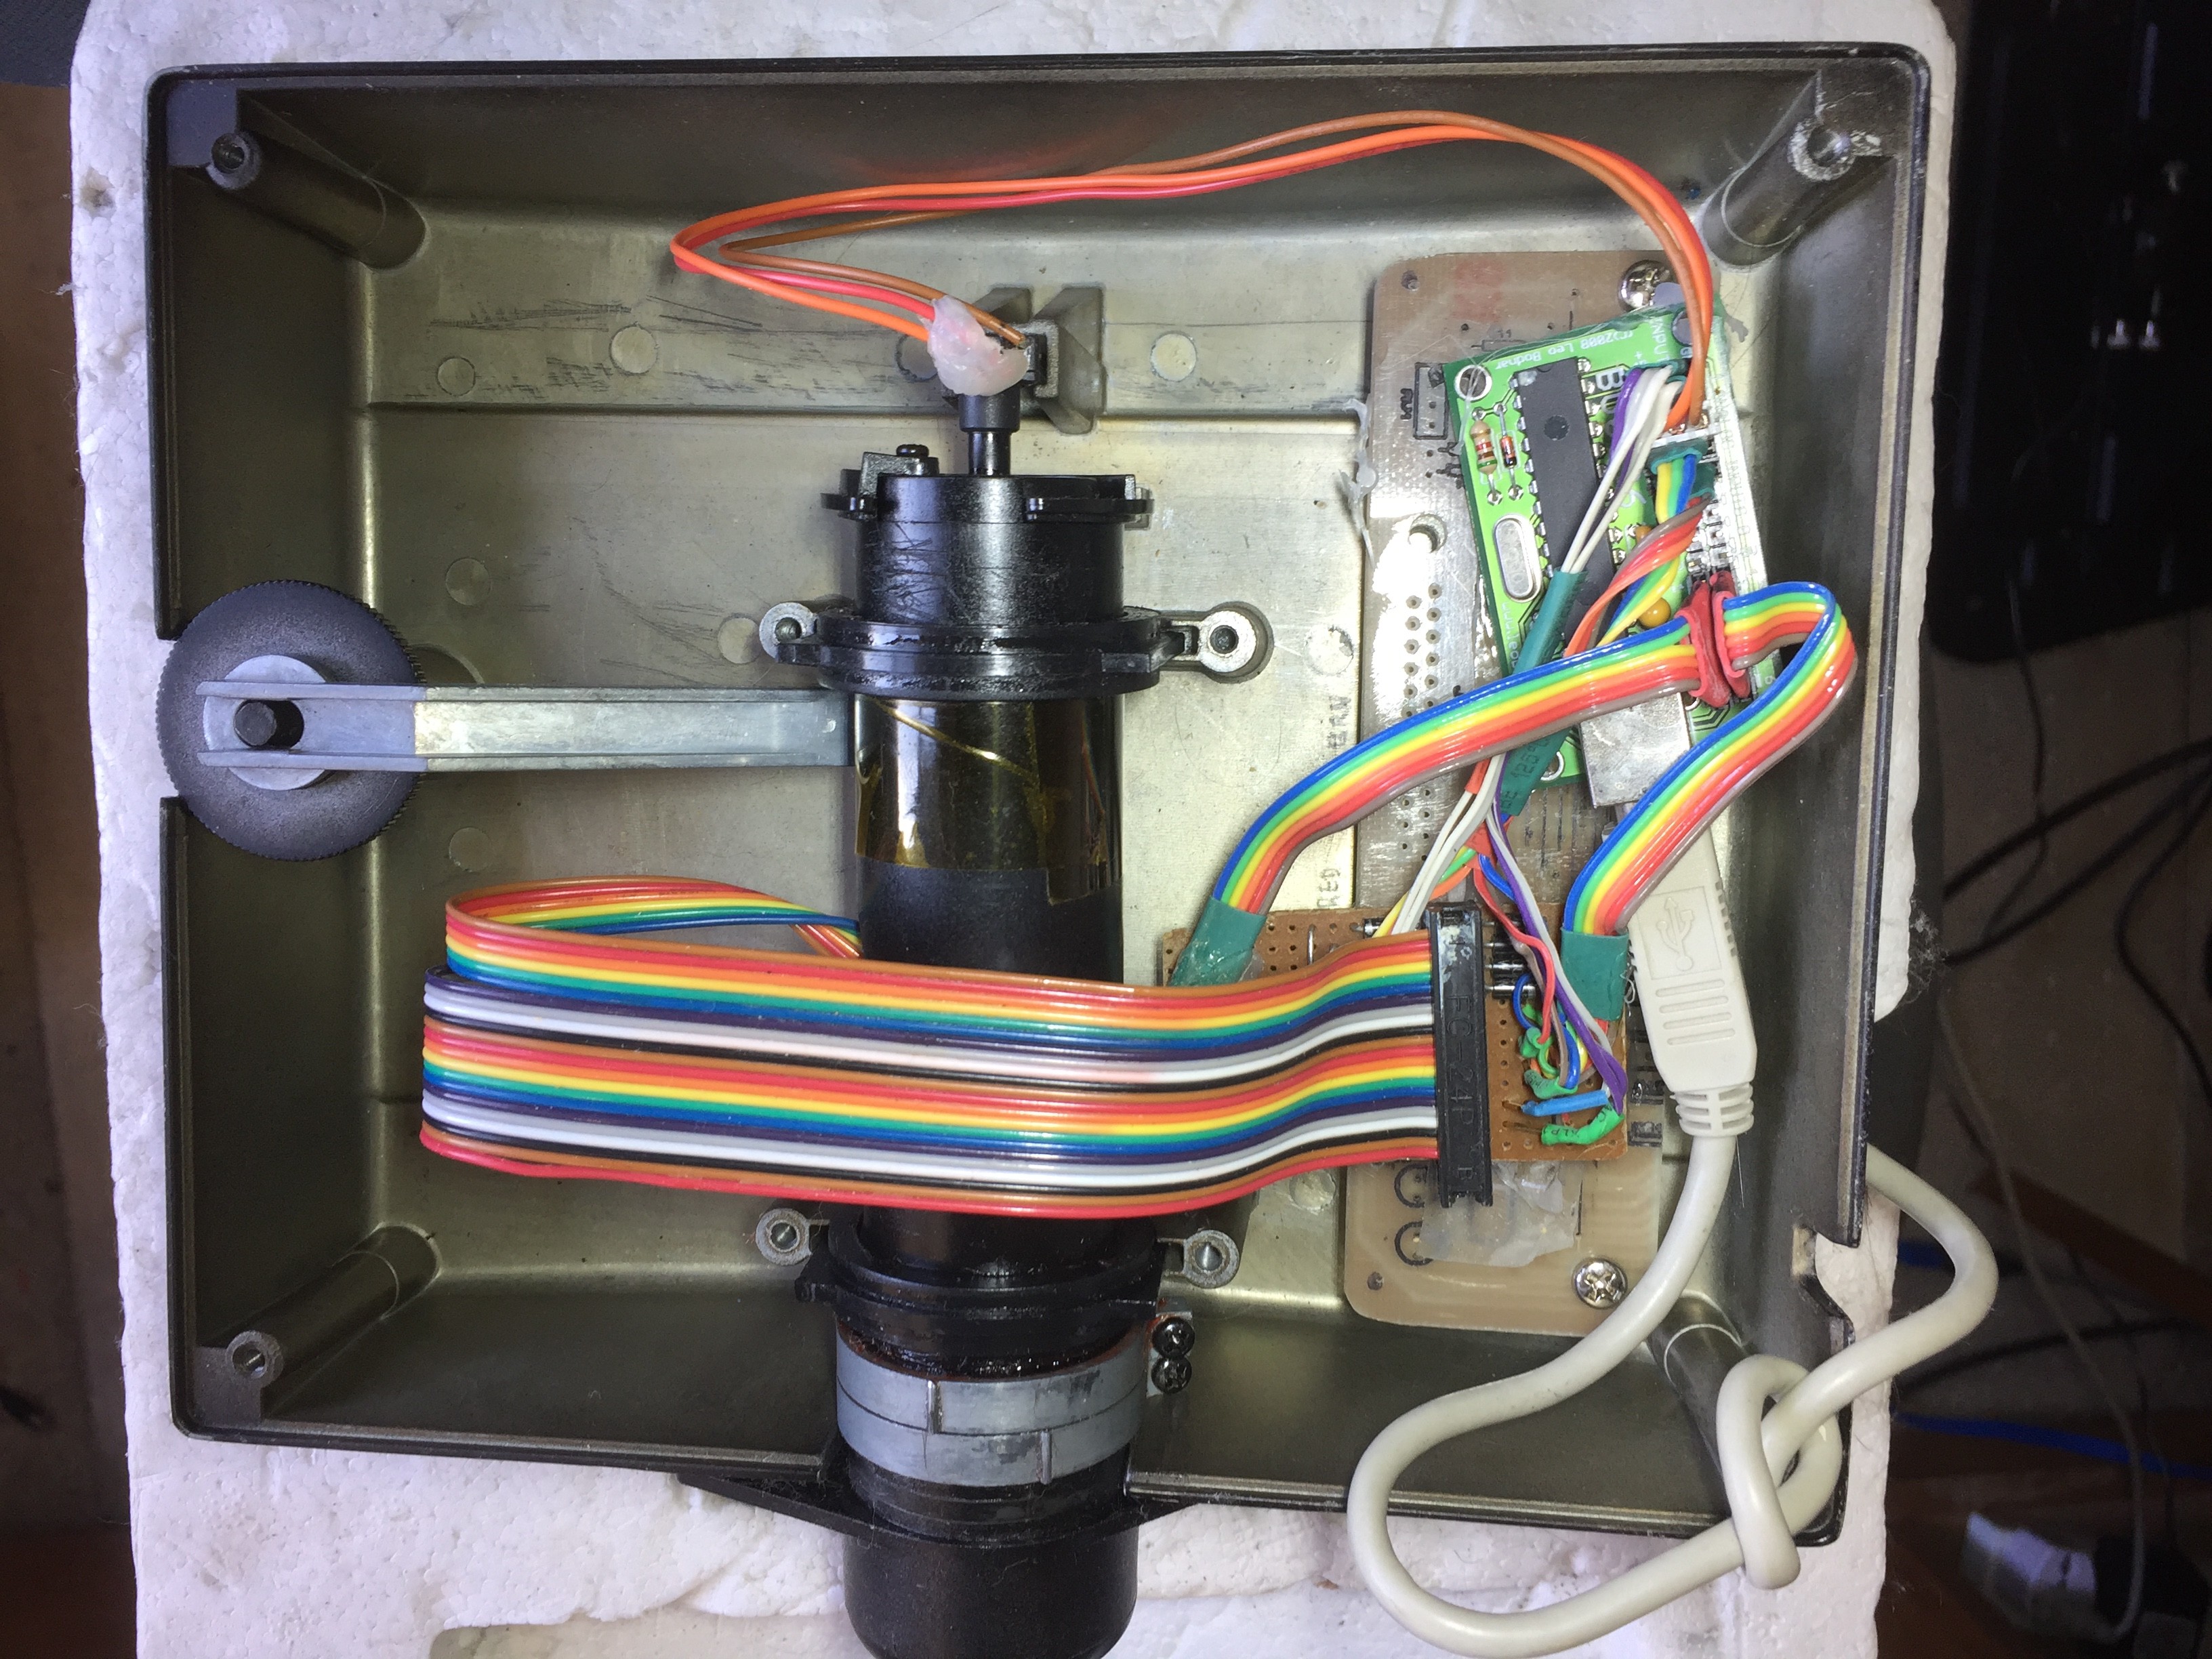
I converted my Cougar throttle to USB using Leo Bodnar's BU0836 some time ago, so this might help. This is what the base PCB looked like when I traced the connections. Note that there are two unused pins on the big ribbon connector. I seem to remember it was essential to get the offset in the right direction when connecting! This base PCB was then discarded, and connections made to the BU0836 to provide the USB output. At that time I did not have facilities for making PCBs, so the connections were a dogs breakfast on Veroboard.. However , none of this is visible and it works perfectly.
-
Vipergear Force Sensor for TM Cougar - is it any good?
Terry Dactil replied to sirrah's topic in Thrustmaster
Yes. They are standard connections. You will need to get the polarity correct, though. An explanation might help: The normal Cougar X & Y axis potentiometers have a wiping contact on a resistor. One end of the resistor is grounded (0 v) and the other end is connected to 5 volts. This means the voltage on the wiping contact depends on its position on the resistance and will be somewhere between zero and 5 volts.. All very cheap and simple, but it wears out or gets dirty and then the output voltage is all over the place. This is why hall effect transistors are used now: no moving contacts to wear out. The strain gauge, however, is just a gadget whose resistance varies a tiny amount when it bends and changes length a minuscule amount. This is not directly usable as an output and needs to be amplifies (more than 100 times or so?) before it can be used. For some reason the amplifier used here can only output 3.5v maximum, and so its neutral point is adjusted to be halfway at 1.75 volts. The output can then be scaled and calibrated with software. I use Leo Bodnar's DIView which is free. Hope this helps. -
Vipergear Force Sensor for TM Cougar - is it any good?
Terry Dactil replied to sirrah's topic in Thrustmaster
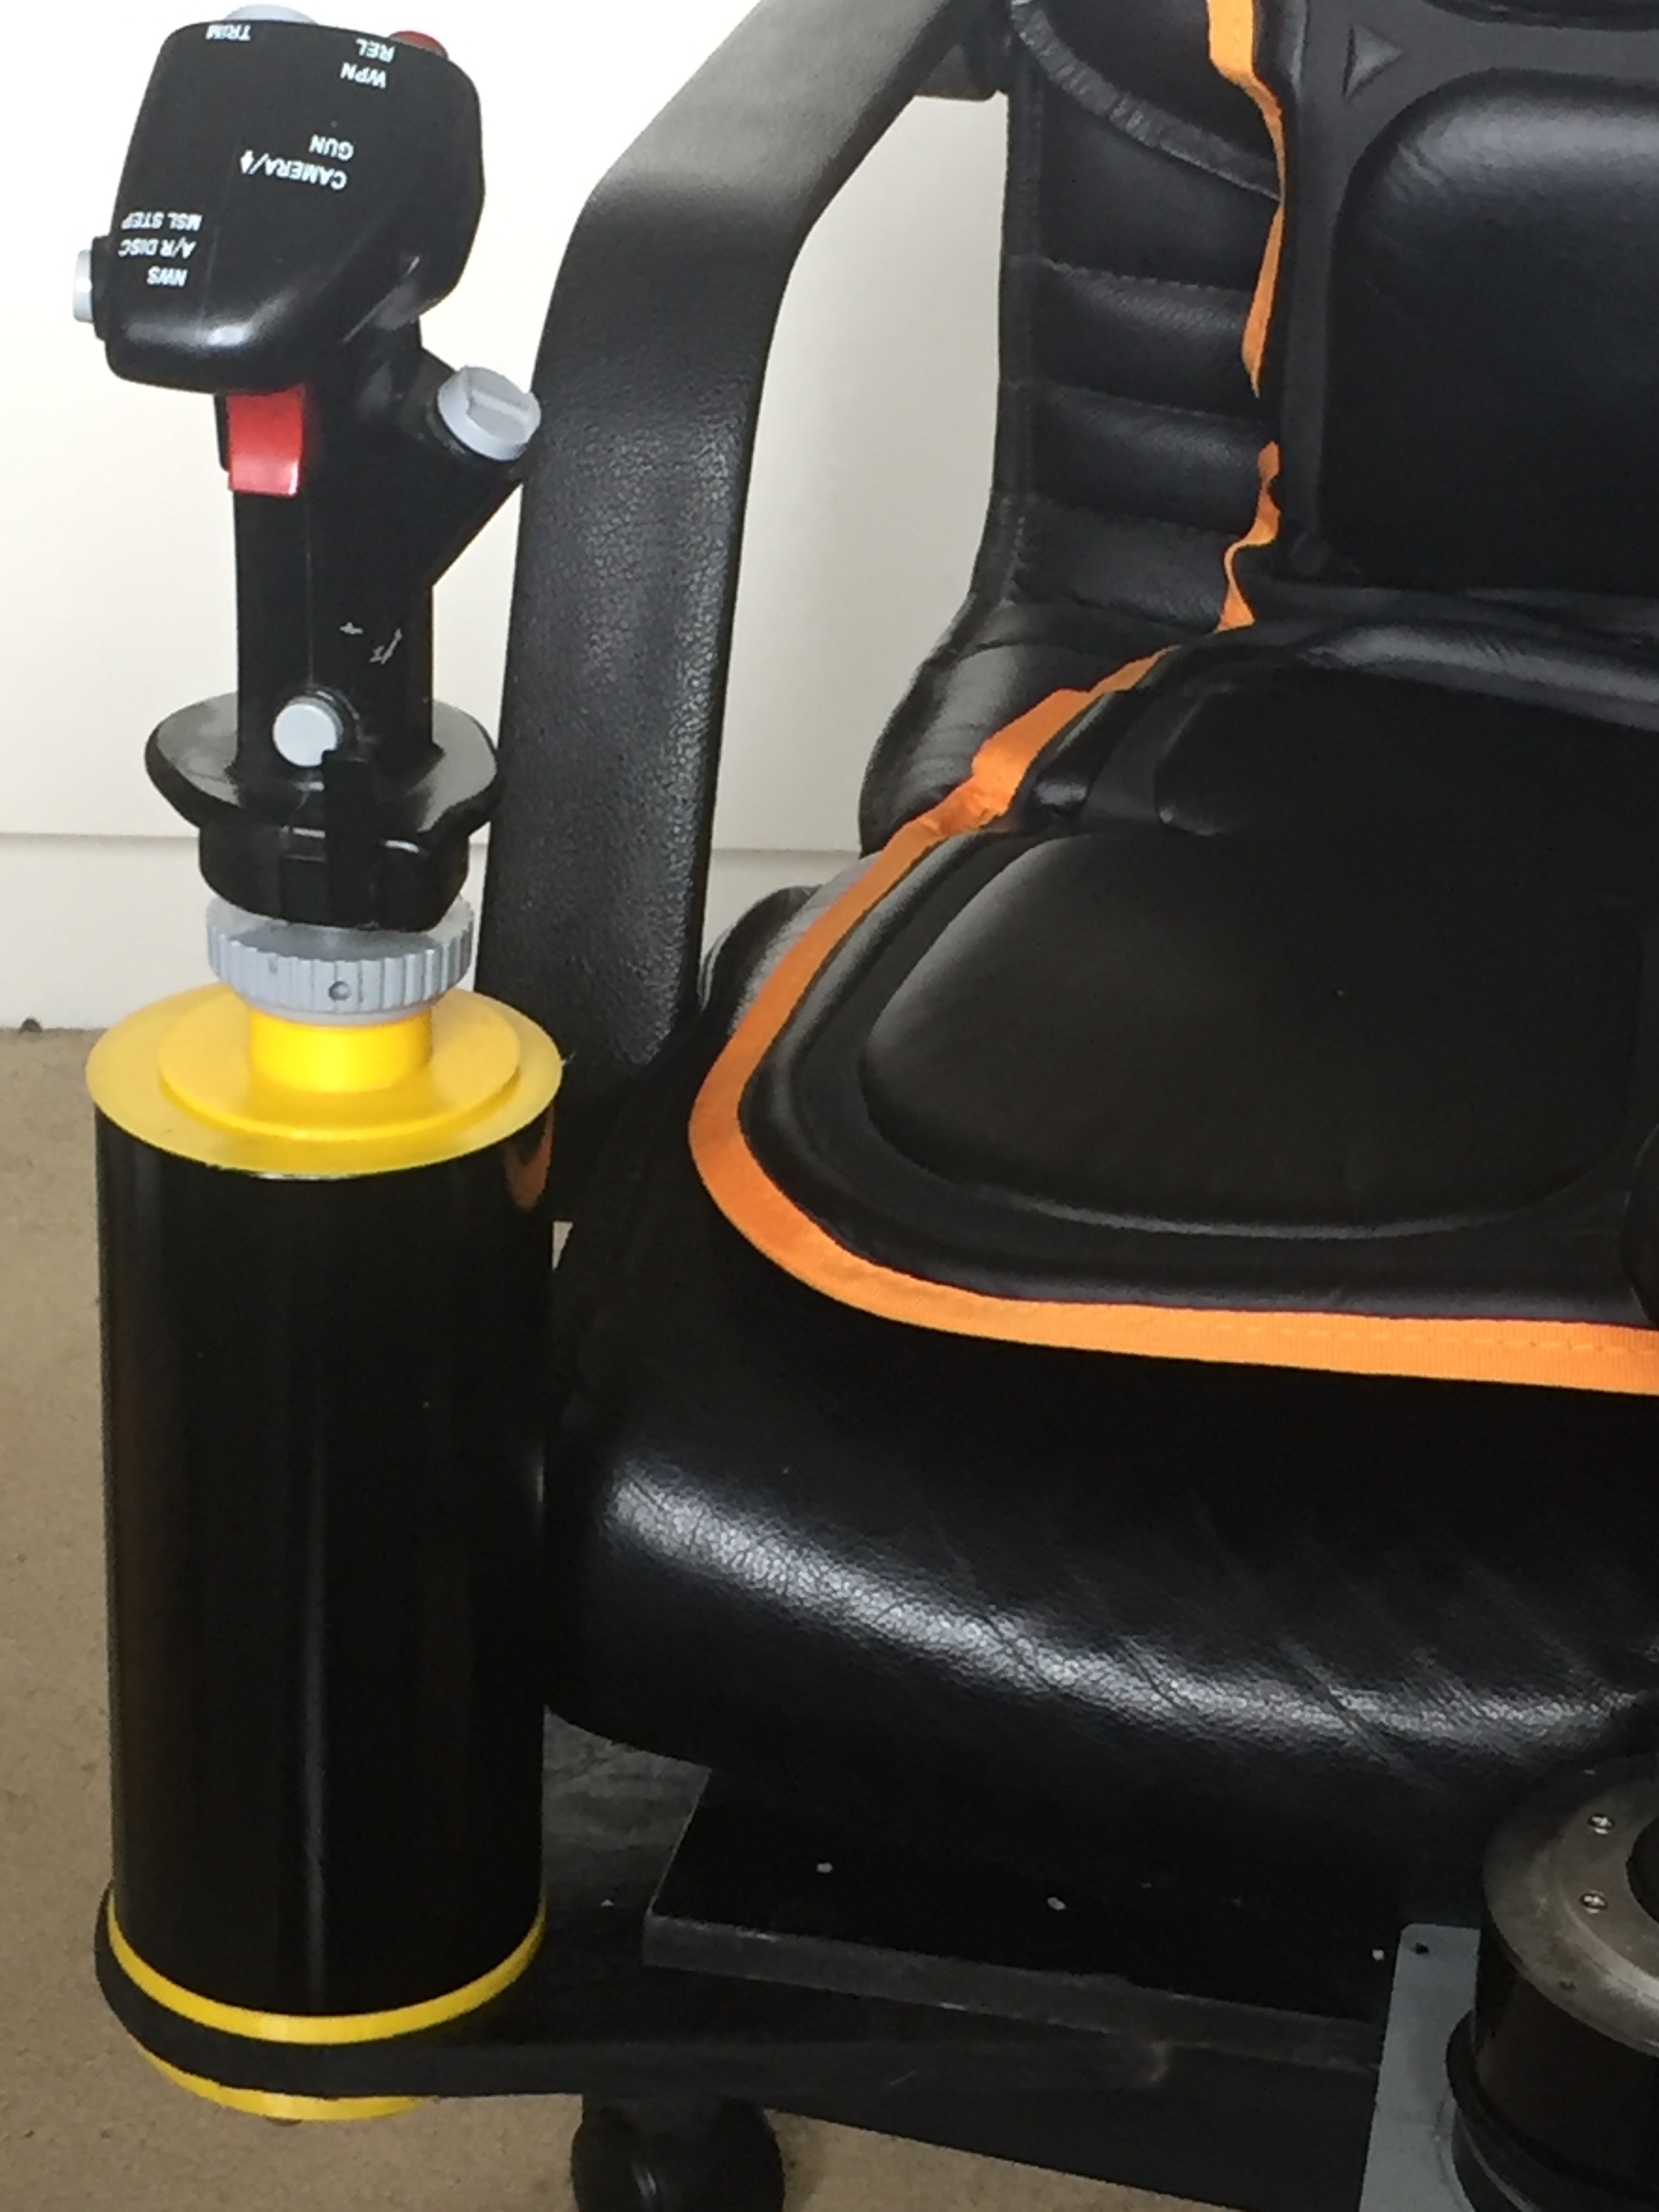
The strain gauges are almost a drop-in replacement for the original potentiometers. They have only 3 connections; ground, 5v power, and an outpu, just like the original pots. Some adjustment is required as the output is 0v to 3.5v with the no-load voltage (1.75v) set by an adjustment on the circuit board. All the dimensions are quite arbitrary: I just sat in my flight seat (an office chair) holding the joystick handle and measured the distance to the bottom of the seat to where I could put a mounting bracket. Then I cut a suitable length of plastic water pipe to make the bendy bit to mount the strain gauges on. I 3D printed 3 mounting components to suit. I had all the dimensions for the bit that connects to the handle from previous joystick extensions. There are videos on the web showing how to use clear tape to accurately position the strain gauges while attaching them with instant glue. All pretty simple. You should be able to use the circuit board from the Cougar base with only a re-calibration of the x and y axis. My original board died, so I have to make a new circuit board. I converted the throttle to USB a long time ago. This was eay as all the wiring from the buttons and potentiometers was available in the base to connect to Leo Bodnar's BU0836 USB interface. Quick and dirtyas it was before I could make PCBs and 3D print things. This is not possible with the Cougar joystick, as there are 18 buttons but only 5 wires coming out of the handle. It turns out that the button status comes out as 3 bytes on an SPI bus where each bit represents the position of a button. The tricky bit is combining all that with the x and y axis readings and sendig it all out via USB. I'm using the USB descriptor from the Warthog as a template to save re-inventing the wheel. :) I'm using a PIC 18F4550 chip for the prototype as it has extra ports useful for debugging. The final version will use the smaller 18F2550 chip.
-
Vipergear Force Sensor for TM Cougar - is it any good?
Terry Dactil replied to sirrah's topic in Thrustmaster
I also have an old Cougar joystick with a busted gimbal. I have converted it to a rigid version in anticipation of the arrival of the F16. I used BF350-3AA/1.5AA strain gauges which are available on eBay for less than $5 each. Some scrap lengths of plastic water pipe and some 3D printing and the job is done. Now all I need is the F16. :thumbup:
-
It is not only the AI in DCs...
-
Gunsight Disappearing Workaround
Terry Dactil replied to imacken's topic in DCS: Spitfire L.F. Mk. IX
I am running the latest stable version 2.5.5.33184 My gun sight continues to vanish at random times in various missions. THIS BUG STILL EXISTS! (Just like the rudder and sun glare problems we hope will be fixed in the next year or so.) :thumbup: -
It really is there. Believe me. :)
-
Rudder Trim Movement Takes Too Long in 2.5.5
Terry Dactil replied to imacken's topic in Bugs and Problems
Voice Attack can be used as a work-around until this gets fixed. I use a "set takeoff trim" command at mission start. 15 seconds of right rudder trim (RCtl+/) for full right rudder trim, 7 seconds of nose down trim (RCtl+;) for 1/2 unit NU trim. I can live with the slow rudder trim after takeoff when using the coolie hat on the stick as I have a good set of rudder pedals and an axis response curve that gives precise rudder control in this area, even if it does take far too long. It would be great if we can get a 2 speed trim modification. -
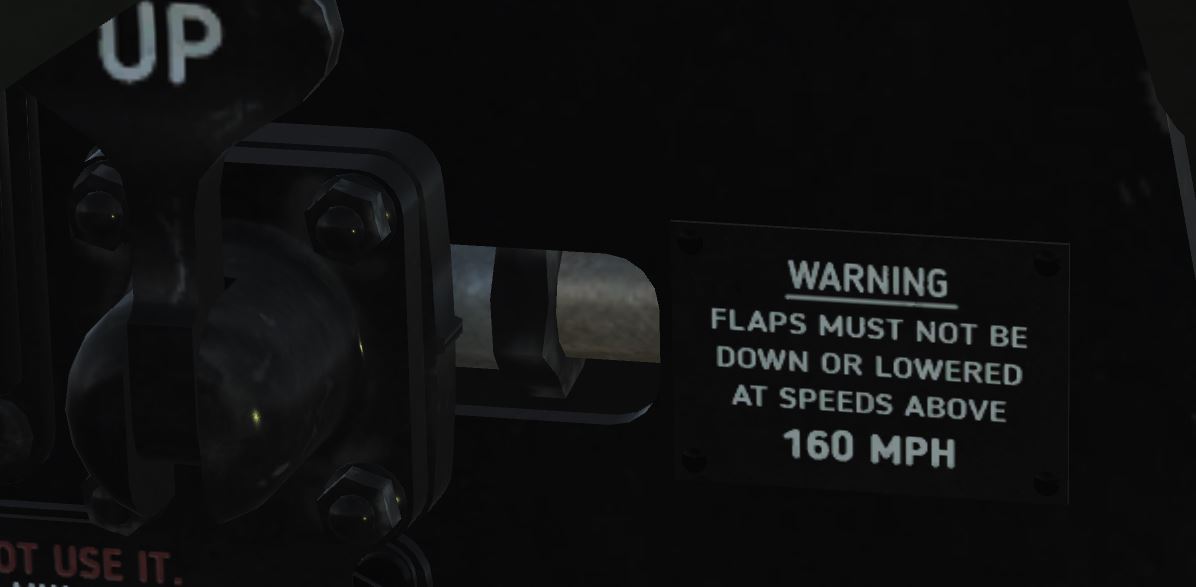
Isn't this discussion irrelevant? You should not be in this situation anyway. Why are you ignoring an operating limitation then complaining that it is not perfectly modeled? It seems like getting all upset if the wings are falling off at 495 kts instead of 500kts. Just don't go there and it is not a problem. Sorry: That comes across a bit snarky. Just trying to say that if you operate within the limits you will never see that bug.
-
[MISSING TRACK] Uncommanded full left rudder input
Terry Dactil replied to Hornetjock's topic in Bugs and Problems
Hornetjock Go back to post #20 by finch He gave me the solution to fix my viewpoint problem. It also fixed my steering problem, but I have no idea how or why it did that. It does nothing to fix the keystroke problem, but that doesn't matter if you use rudder pedals. I'm just happy that it worked so well for me. :) Dunno. Has anyone else tried it? -
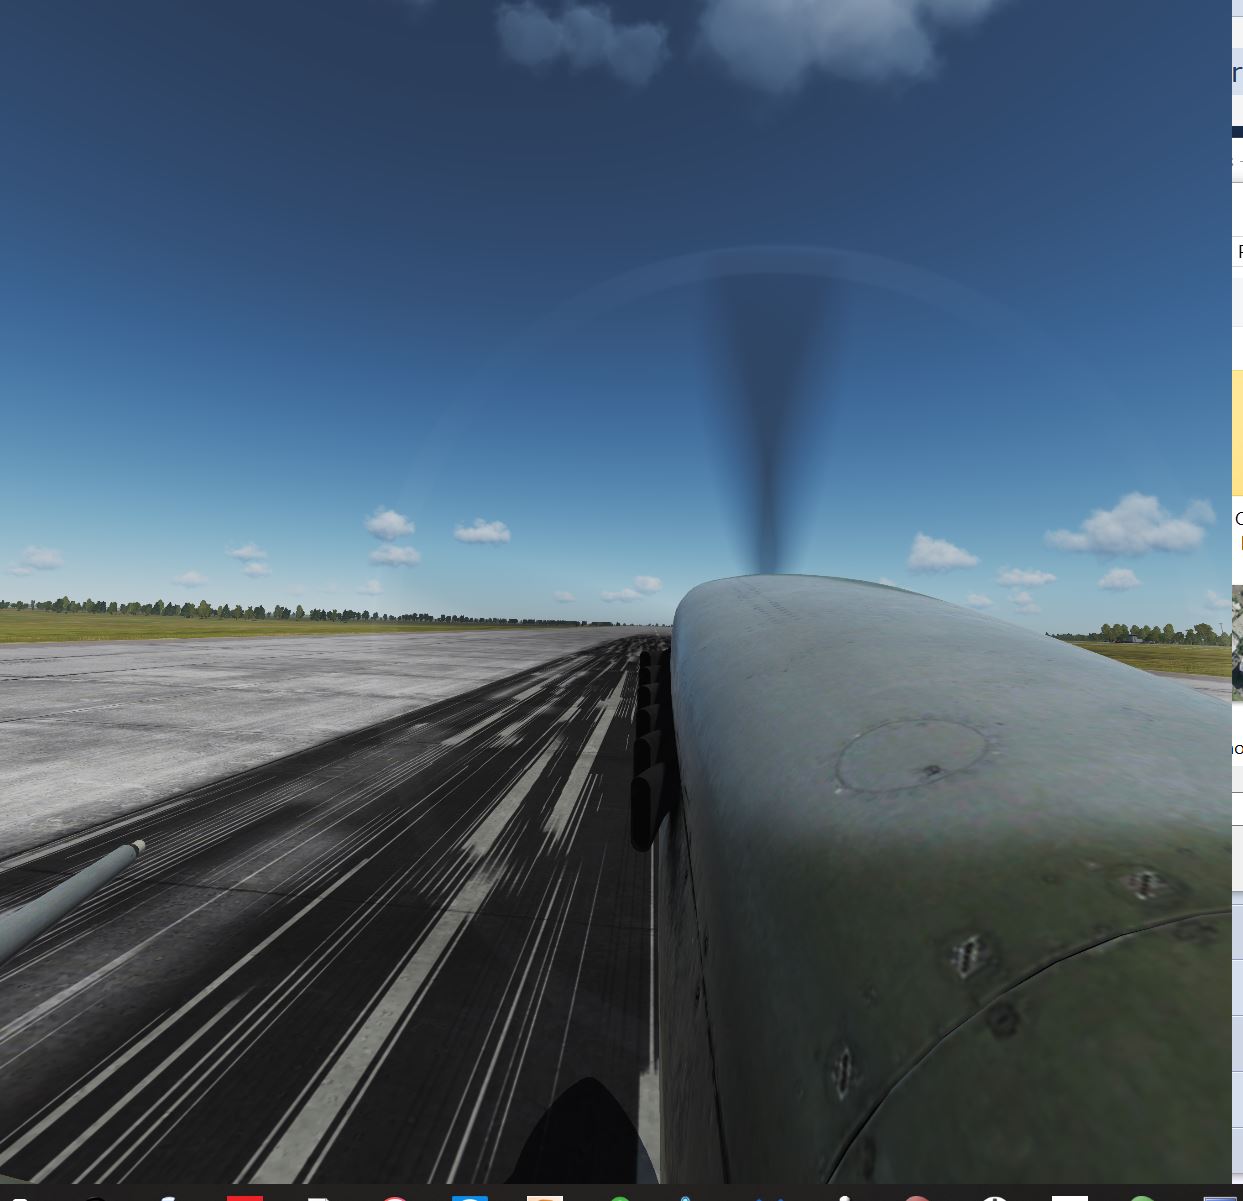
My cockpit view had me sitting on the wing after the last update. The problem was completely solved with the help of finch in another thread
-
[MISSING TRACK] Uncommanded full left rudder input
Terry Dactil replied to Hornetjock's topic in Bugs and Problems
When I reverted to the previous release version(2.5.4.30886) I only checked if I was inside the cockpit or not, and I was not. Bummer! I did not think to also check the rudder response to the keystrokes, as I don't use the keyboard. Sorry about that. It may be a work-around for keyboard users. i suspect that reversion should have fixed that problem, as it only appeared with the latest update. It may be worth going back to the previous version until the bug gets fixed. Reversion instructions can be found here - https://forums.eagle.ru/showthread.php?t=114030. (Be aware that like a normal update, the file is huge and takes a long time to download.) There is one further mystery in this saga. Before deleting the View file in the Saved Games folder, my Spitfire was impossible to taxy - with the slightest forward movement it would swing violently to either side and just refuse to go straight at any time. Now, after deleting the View file, it runs perfectly straight on takeoff with just the normal small inputs on the rudder. Why the view file affects steering is a mystery to me. -
[MISSING TRACK] Uncommanded full left rudder input
Terry Dactil replied to Hornetjock's topic in Bugs and Problems
finch: :thumbup: Thank you. thank you thank you. That fixed all my problems. I am now back in the cockpit and the Spitfire can be taxied again. The rudder deflection problem still exists in both directions if using the z & x keys but taxying is now perfectly fine if using rudder pedals. I spent several hours downloading and reverting to the previous release version, only to find that it did not fix anything. I am beginning to realise just how much the files in the saved games folder can affect the program. Thanks again. -
[MISSING TRACK] Uncommanded full left rudder input
Terry Dactil replied to Hornetjock's topic in Bugs and Problems
Bugger! It's going from bad to worse. I tried 'Repair DCS World' and now I cannot get into the cockpit in VR. I am stuck outside the cockpit on the port wing. This only applies to the Spitfire in VR and not to any of the other aircraft. The problems persist in both instant action and missions. I have tried disabling and re-enabling the Spitfire module, but this had no effect. I have also cleared all the superfluous key bindings for trackir (not being used) and mouse with no effect. The last update really screwed up the Spitfire. :cry_2:
-
[MISSING TRACK] Uncommanded full left rudder input
Terry Dactil replied to Hornetjock's topic in Bugs and Problems
Confirmed here too. My z & x keys also give the incorrect response described. However, I use rudder pedals, and these are now giving random flickering and vibrations. Update:Seems to fly OK airborne, but it is now impossible to taxy on the ground. Update: My rudder flicking has been traced to a spiking pot in my old CH rudder pedals. By good timing my new Thrustmaster pedals arrived today and now the rudder is silky smooth. However, it is still impossible to taxy as it appears that any input to stop a turn in one direction remains applied for some time after the rudder is centralised and results in a rapid swing in the other direction. The result is a completely erratic and unstable aircraft that is impossible to taxy -
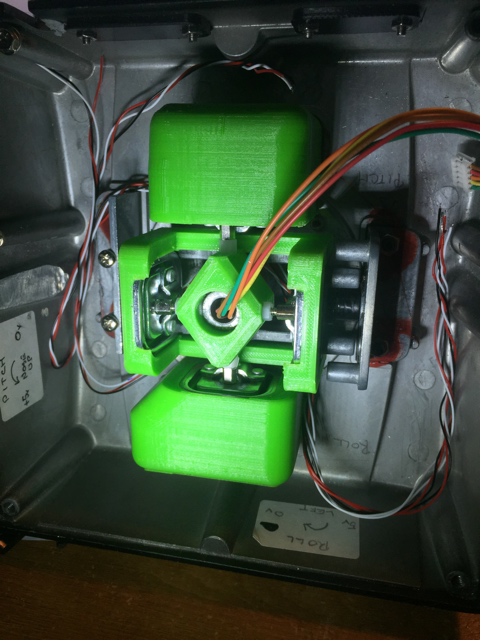
Well - So far, so good. I have managed to mount the four strain gauges without making any changes to the existing components. This means I can easily go back to the original condition if this does not work satisfactorily. The next part of this project, the electronics, will be interesting. The status of all the buttons on the handle is 3 bytes on an SPI bus which needs to be combined with the load values from the strain gauges and the whole lot sent off on a USB connection in the appropriate joystick format. My brain hurts already!
-
Solved here. I had the same problem with the Rift S being recognized, but then getting the black screen in setup. The Repair kept failing after the 7GB download with an error during install. The 'brute force' repair method was obviously needed. I disconnected all unnecessary devices from the computer. Deleted the Oculus program folder on the C drive. Ran CCleaner to remove the left over junk. Went to the Oculus web site and downloaded the Rift S file. (not the Rift - I noticed there is a several MB difference in file size from my original.) Installed it Everything now works fine :thumbup:
-
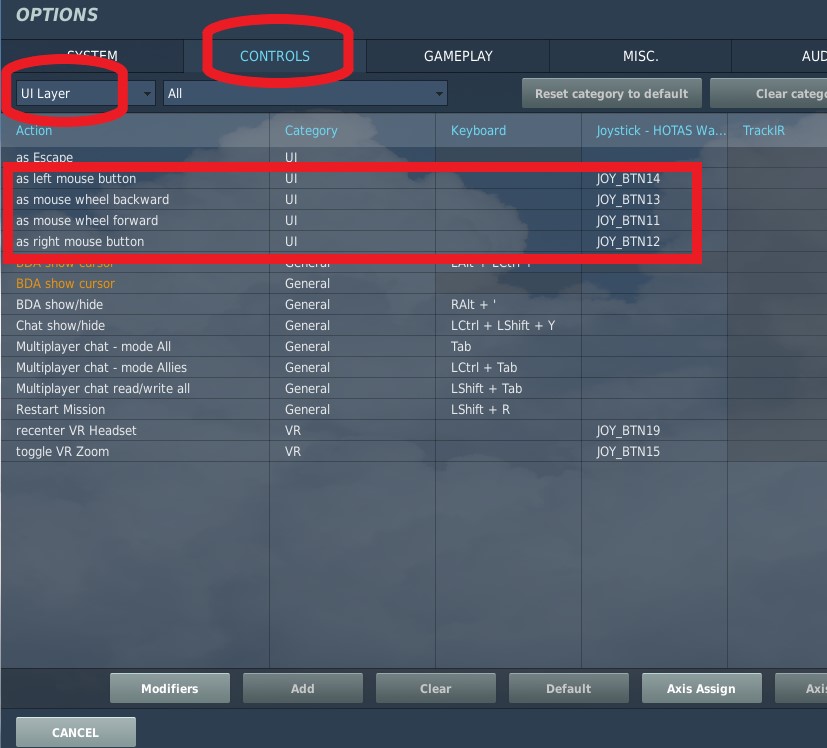
It is not a problem! Most of us cannot see the needle on the ASI anyway. :D