bonesvf103
-
Posts
1229 -
Joined
-
Last visited
Content Type
Profiles
Forums
Events
Everything posted by bonesvf103
-
I don't know about preventing it, but if you have PLM mode mapped to a HOTAS button, what i usually do when he does that is tap the PLM button. This will override his STT and set it back to a default radar mode from which Jester will usually default to TWS. The only drawback really is that it take a second or two to repopulate the scan because the TWS has to make those 2 sweeps again before displaying tracks. v6, boNes
-
I wonder why Grumman (or whoever) made it that way. v6, boNes
-
Tomcat is much harder to do aerial refueling than hornet
bonesvf103 replied to Ddg1500's topic in DCS: F-14A & B
How long until they model that, I wonder...? v6, boNes -
Tomcat is much harder to do aerial refueling than hornet
bonesvf103 replied to Ddg1500's topic in DCS: F-14A & B
I believe on the KC-135R, the Tomcat had to plug into the basket enough to put a kink in the hose, and maintain that. This is because that particular hose comes off of the boom, and is not very flexible, and only 10 feet long, so doing this helps the fuel properly flow. That is probably what one sees in video where the probe is being "rammed" into the basket. IIRC, it isn't done on any other refueler. IN fact, this has earned the KC-135R the nickname "Iron Maiden" from Naval Aviators. Some poor soul wrestling with the Iron Maiden: From a Hornet driver: I also find the Tomcat to be easy to refuel, possibly more than the Hornet, but that's subjective. Once I'm plugged in the Tomcat, I give it a very small throttle shot and bring it back that small amount every other second and I stay plugged. Of course that also depends--if I end up starting to overtake the tanker, I skip the shot for a second or two to compensate and I'm fine again. No matter what the technique you use, just remember trim, and very VERY small control inputs and counter them immediately with the opposite input to avoid PIO. You know are in close formation and as you probably know, the control inputs get tinier and tinier the closer you are to the aircraft you are flying with. Or, think about an ILS approach or a ICLS approach. The closer you get to the runway/carrier, the more sensitive a control input is. Be mindful of that when tanking too! v6, boNes -
I read somewhere that it is centered physically on the Tomcat's nose by default. I don't use the HUD for much more than rough reference; for accurate horizon I use the VSI and attitude indicator instead. v6, boNes
-
If you buy a portion of the map, you can still fly in the other portions of the map, it will just not be in high resolution or detail until you buy those portions as well. v6, boNes
-
Tomcat Air to Air Refueling basket question
bonesvf103 replied to Bushwood's topic in DCS: F-14A & B
You eventually find what works for you and stick with that. I myself never use rudders, I just use tiny control inputs and immediately counter them to balance it out else PIO becomes a problem. The only trim I use is elevator trim as with the wings in bob mode you lose some lift and I don't want to have to hold my nose up while I'm trying to plug, so I trim accordingly. v6, boNes -
So what can we expect when the TARPS becomes operational? What kinds of things will we be able to do? v6, boNes
-
correct as-is Can't change radar azimuth after a lock.
bonesvf103 replied to H60MTI's topic in DCS: F/A-18C
Oh, and to switch contacts after firing, hit TDC undesignate. It will make your DT2 L&S and L&S DT2. If you only have one target designated in any way after firing, you have to slew the cursor over to another brick and TDC designate that before you can switch back and forth. Also, hitting reset only drops all your designated targets and if you configured the radar and saved the settings, it will reset to those settings too (save for azimuth). But this only works when you are in RWS mode. v6, boNes -
I have been arizona and still have seen an emitter box in my HUD. I couldn't shoot at it since I was arizona, but something was still detecting and displaying the threat, so I'm assuming the notion that the detection gear being in the pylon holds true, or if not, it just is possible somehow to show it in the HUD even if you're arizona. v6, boNes
-
cannot repoduce and missing track file HARM PB mod + Offset WP
bonesvf103 replied to Dovivan's topic in DCS: F/A-18C
Did you weapon designate the desired point that you want the HARM to fly to? v6, boNes -
RIO advice needed on locking targets on DDD to match target on TID
bonesvf103 replied to hannibal's topic in DCS: F-14A & B
Since you are concerned with locking on to the closest bandit based on returns in your DDD, I would suggest being in pulse search mode, that way you get range in your DDD. Since you were trying to get info in the TID, I assume you were in a pulse doppler mode. If the bandit is less than 50 nm away and you are in pulse mode, you can see which one is closest to you in the DDD then use the HCU to lock him, and then you will get all the info you wanted in the TID. Now if for whatever reason you want to use the pulse doppler modes (maybe you want a longer detection range than 50 nm), then the best thing you can do to lock the closest bandit is to use the datalink. That way you can get the clues you need to help you figure out which blip in the DDD is the closest one to you based on the datalink contact in your TID. It might not be very efficient though as you wont' have closure information from the DL and that is what is displayed on the DDD in this mode, but you can at least get azimuth to be able to pick out a little better which blip is the closest one to you. But I think the more efficient way to get a lock on the closest bandit from a pulse doppler mode is to use the DL or the BRAA call to help you configure the radar to get the bandits on your own radar. If they are far enough out, start with PD Search and once you see them in the DDD and they are less than 90 nm away, switch to RWS and give them a few sweeps, you will have info in the TID as to who is closest then you can switch to TWS, hook the closest one you want, then hit PSTT or PDSTT as needed. The idea is you start building up your picture and SA and you refine your target returns as you close in to shoot or intercept. v6, boNes -
cannot repoduce and missing track file moving target - which tool ?
bonesvf103 replied to marzzz's topic in DCS: F/A-18C
Yup! After I posted and was able to get to my PC, I checked GMT and yes I did notice that it did seem to work fine. Maybe at the time of testing, it was stiill behaving in the way I described and this was fixed later, I dunno. But what I said about the TPOD stuff still applies it seems. Guess MAVF likes the GMT more than TPODs! v6, boNes -
cannot repoduce and missing track file moving target - which tool ?
bonesvf103 replied to marzzz's topic in DCS: F/A-18C
I did a study on this and found out a few things. First of all, and this may be minor and may not be modeled, but it should be considered: the MAVF, being used by the USN, is meant for ships more than the traditional land-based armor. That's not to say it won't work on them, but it may have a harder time tracking/locking them then they would a ship which is basically a hot spot on a cold ocean background. The thing to keep in mind is that when you designate a target in GMT or TPOD, once you switch the TDC to Maverick, it ground stabilizes to the last POINT that you designated in the GMT at that instant, not the target itself. Thus it will not follow the target. Now, if you are lucky, it will look at a point that is close enough to the target to catch its IR signature and it will snap to it and lock on, but otherwise, it's just ground stabilized at that particular point until you slew it over and try to lock it. I ran several tests in different situations and the basic conclusion I got is that initially the TPOD/GMT will tell the MAVF where to look, but it will not update where it is looking automatically--the MAVF will not follow the target even though the GMT is or the TPOD is. The closest you can get to this is to constantly TDC depress (target designate) to "update" the MAVF seeker. In GMT that means you lock the target, TDC to the MAVF, and uncage. The MAVF will snap to the point that the target that is locked is on, but will stay at that point, it won't move with the lock. So you either have to break lock in the GMT and slew the MAVF over (it should be reasonably close then), or you TDC back to the radar and redesignate the target to "update" the MAVF and repeat until you get in close enough to discern the target. Then you should TDC to the GMT, break lock, and immediately TDC to the MAVF MFD and uncage it and fine tune it in the MAVF MFD onto the target until it locks. Then you can rifle. Same goes when using a TPOD. Lock the target in the TPOD with PTRK, then designate it (remember locking it only means the TPOD will follow it, not make it SPI). TDC over to the MAVF and uncage, and it will slew right to the point that you designated, but it will stay there. If the target moves, even though the TPOD is locked onto it, the MAVF won't follow it, it will remain ground stabilized at the last designated point. TDC back to the TPOD and TDC designate it again. This will update the MAVF and look at that point again. Repeat this until the target is close enough to be seen well in the MAVF MFD. When that happens, TDC designate in the TPOD one more time, then break lock, then immediately TDC to the MAVF page and slew the MAVF onto the target until it locks. Then you can rifle. Here is a video (sorry no audio) of one of those tests: Note that in the video, to demonstrate how the MAVF does not automatically follow the target even though it is locked and designated in the TPOD (at :34), you will see in the HUD the diamond showing the TPOD lock and the triangle showing the MAVF seeker start on top of each other but as the target moves, the diamond separates from the triangle as it moves with the target but the triangle itself stays put where I last designated (at around :50). So I have to TDC back to the TPOD, TDC designate again, then the MAVF snaps to that new point. I repeat this until I get close enough to lock it with the MAVF itself, at which time I break the TPOD lock, and immediately TDC to the MAVF and slew it onto a lock and rifle. The Maverick will not continuously follow a target in PTRK/ATRK. Only Mavericks used by F-16s and A-10 do. v6, boNes -
Yeah I think I was surprised first seeing it in a scene from "Behind Enemy Lines." v6, boNes
-
Thanks! I really appreciate the time you have taken for this. v6, boNes
-
F-14B RIO issues Point Track, Area Track
bonesvf103 replied to Elwood_Blues's topic in DCS: F-14A & B
I don;t really ever use AGC. With MGC I get a lock that is held pretty well. I find that if I am in point track and I lose the lock, if I quickly select area track, then slew the cursor back on target, I can get a point lock right away again. v6, boNes -
Hi, Yes, I can confirm that when I wait a little longer those blips do fade away and only the current one remains. I guess I was a bit too hasty when I observed the change and took the screen shots. So what does the reading on the left vertical scale mean then? If it is also closure, but considers azimuth, I'm not sure what the point of it is if we have closure on the right vertical scale. Can you explain more? I also tried to find the target in the DDD in pulse mode and although I do find it after a while, I'm a little baffled that I don't find it sooner because I have the setting set pretty much where the target would be in the envelope. He is heading at me at 10300 about 30 miles away initially. I set pulse search so that there is no MLC or zero doppler to worry about. I Set the DDD range to 50, I turn the TID range to 50 as well--that way I can better visualize the radar cone. If I half action in the TID in the middle, that should be at 25 miles and since he is at 30 I'd expect him to be a little further up the TID, so when I half action in that region, the upper and lower scan limit shows 0 lower and above 10000 upper (don't recall exactly but it is above 10000)--so the target should be visible in the DDD, but it's not. I play around with the bars and intuitively the target should be there but it's not. As he gets closer and I mess arou nd with elevation, bars, and acimuth, as well as center, I eventually do get him, but only after he is 20 nm or less. I attached a trackfile and mission. Can you see what I may be doing wrong? Thanks. v6, boNes LastMissionTrack.trk F-14B-AWG-9-3.miz
-
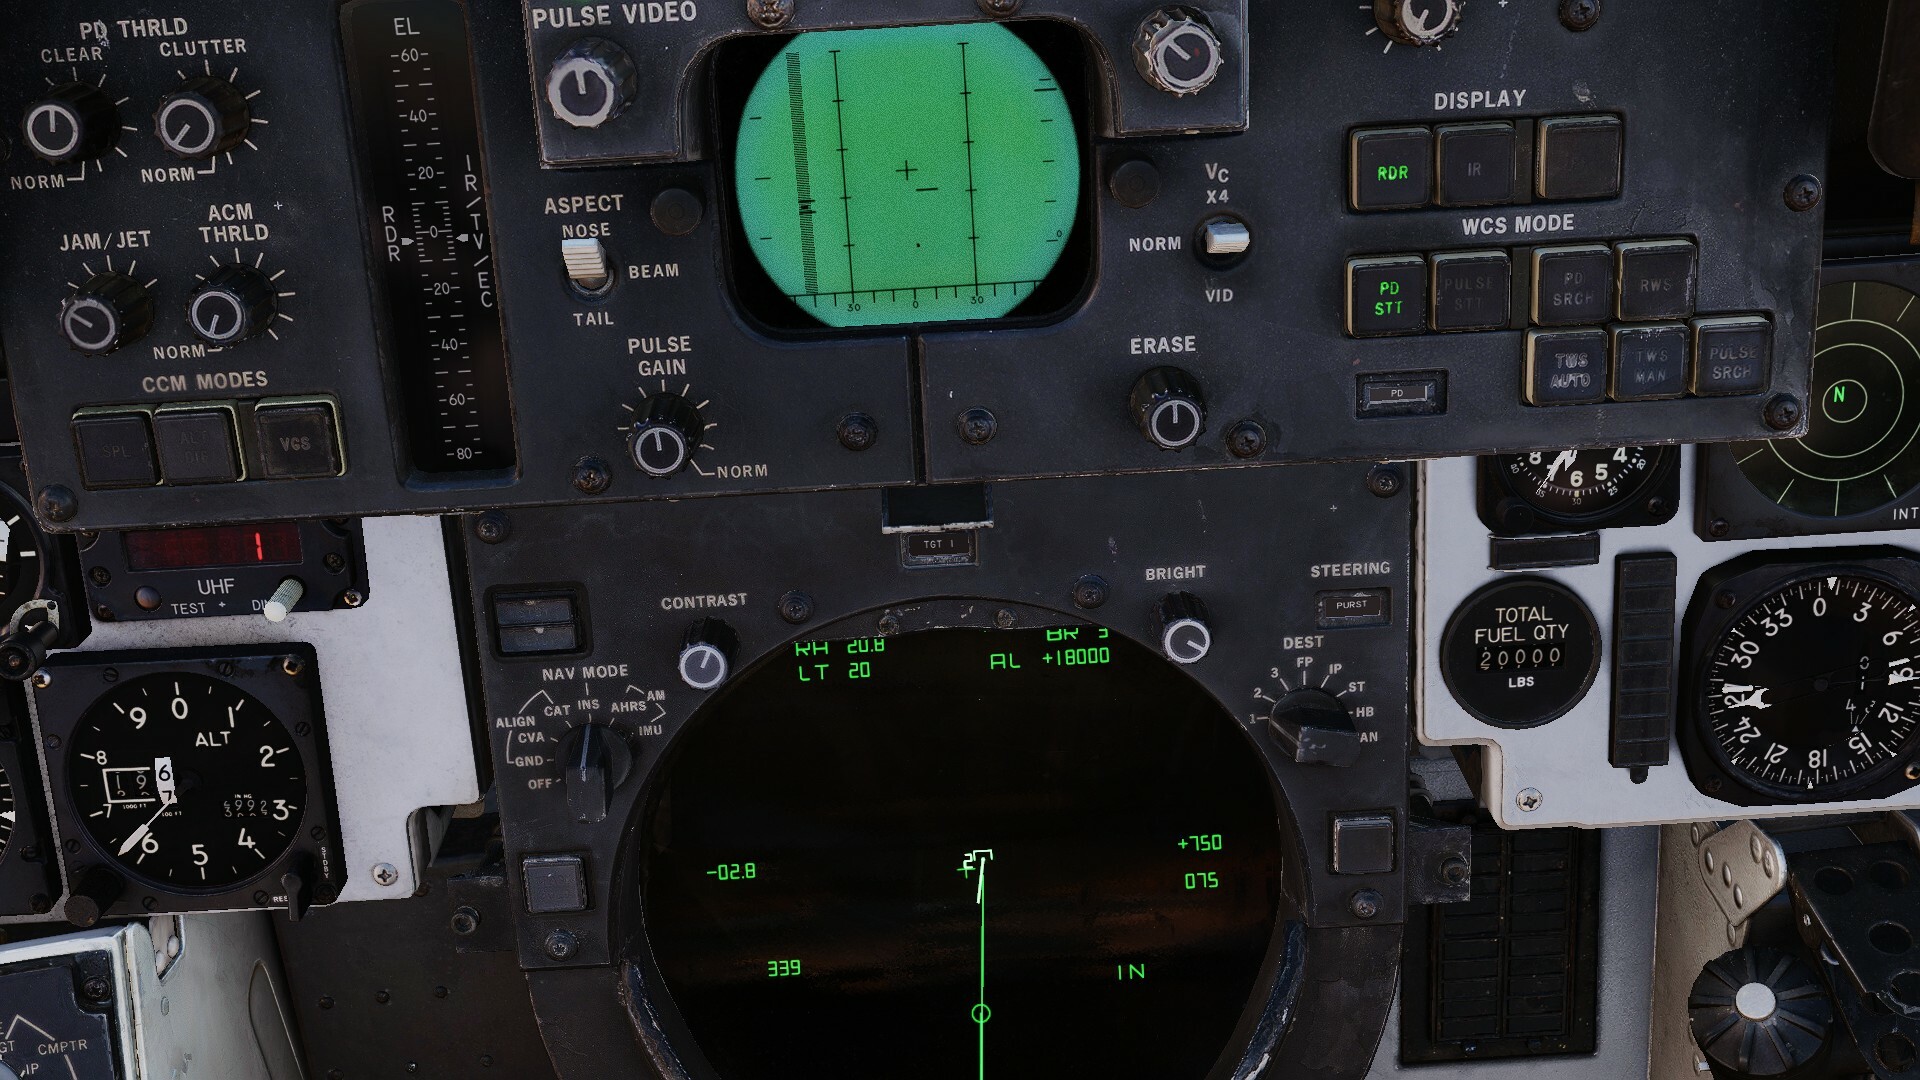
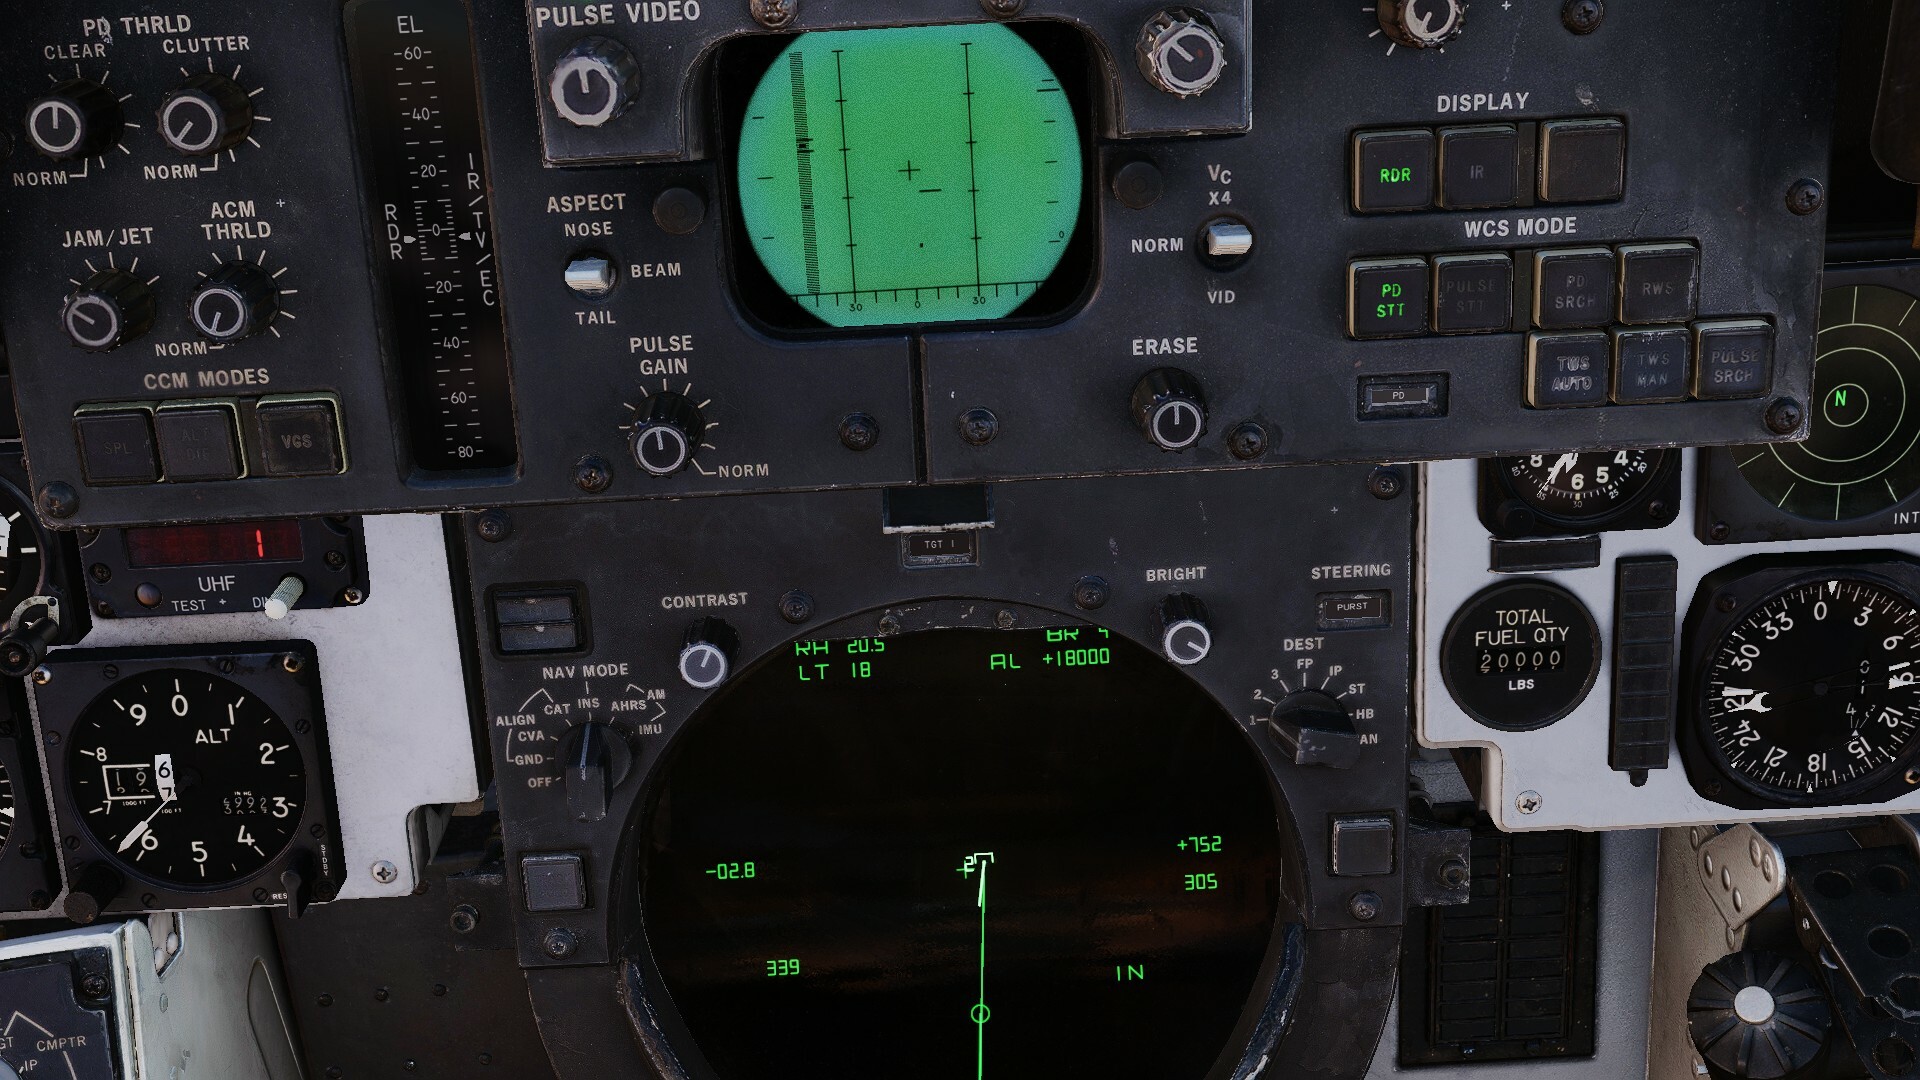
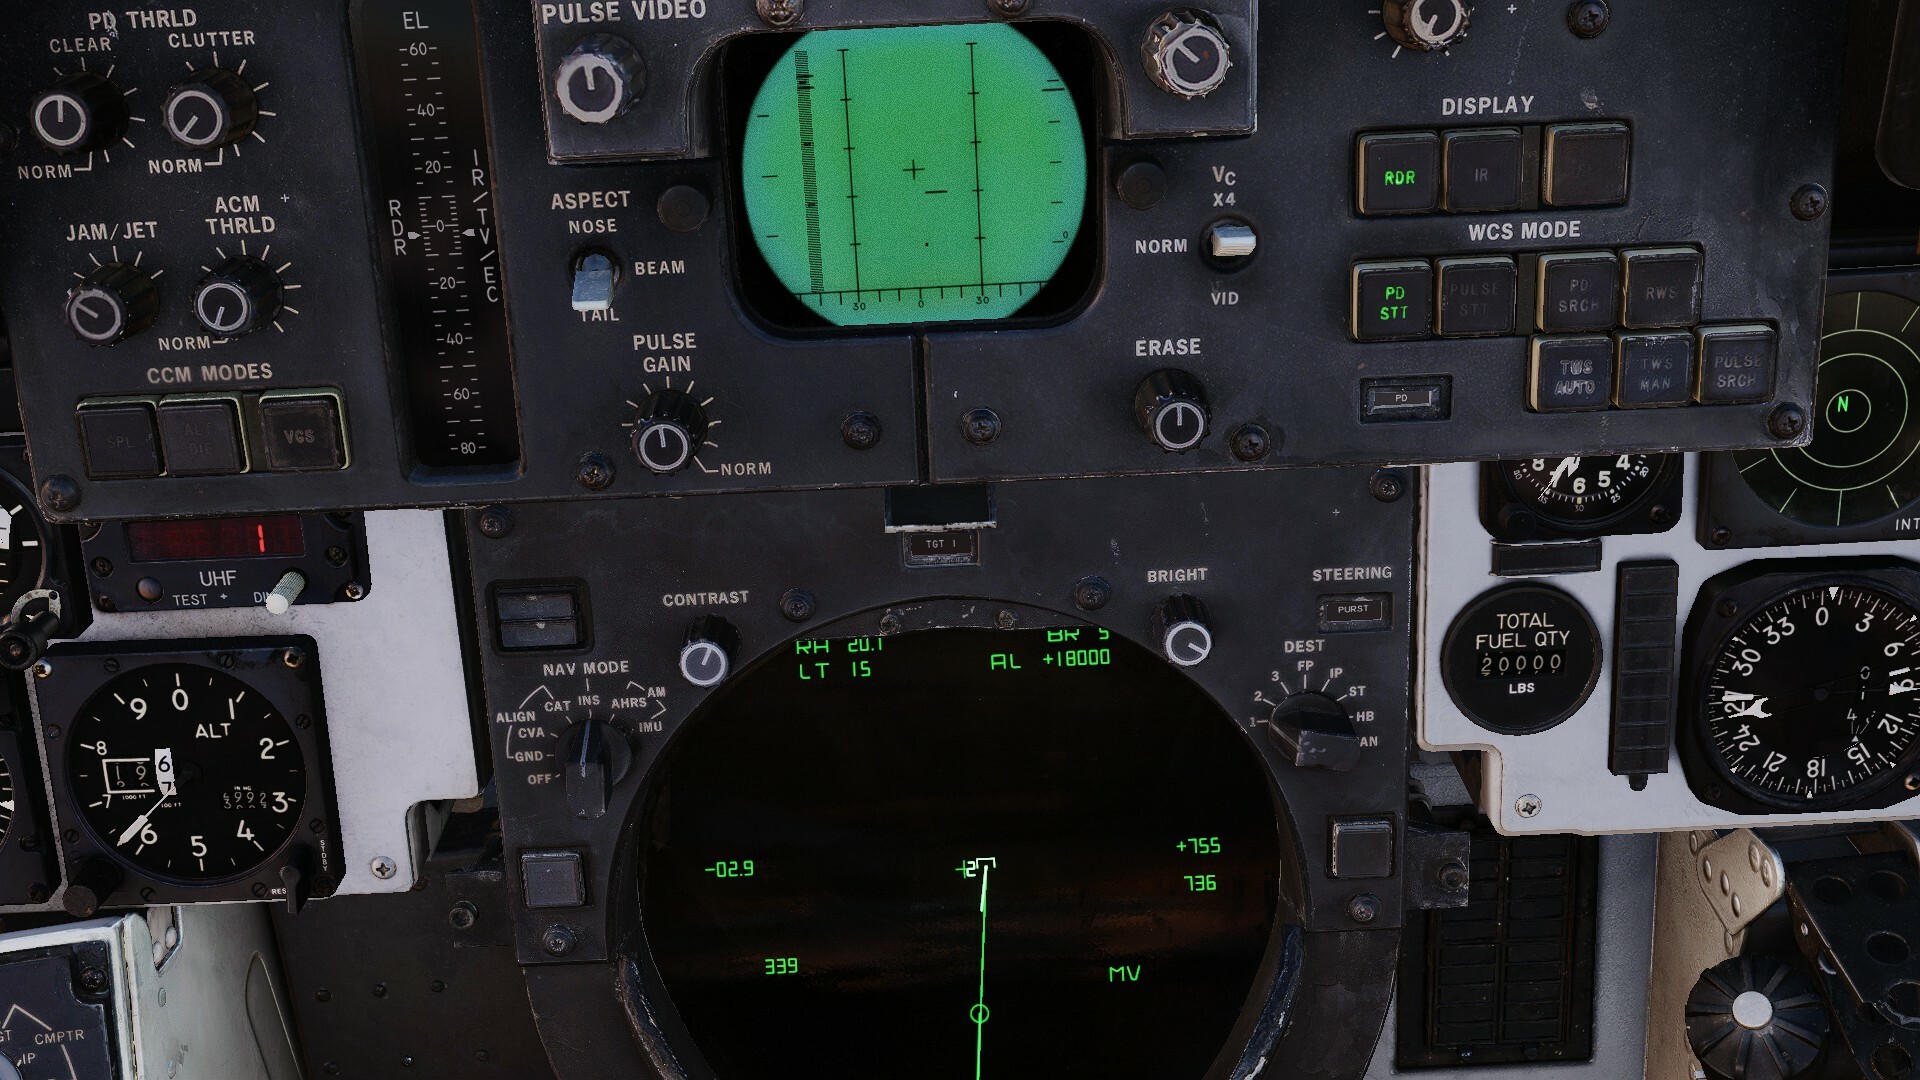
Thanks, I tried to apply what you said and I was able to find the target easier and lock him. Another question though, in the DDD, I have a target locked in PD STT, and on the right side vertical scale I read about 755 kts closing which is what it says in the TID also. But on the left side vertical scale where the target is shifted over, since I'm set to nose aspect, I'm reading it to be about 300 kts opening. Why is that? Also, when I switch the aspect from nose to beam to tail, the marker shifts as I expect it to, but it shows 2 markers in beam and 3 in tail. What does that tell me?

-
Oh, I thought when you said when coming from PD search it's range that you meant that if I was in PD search then locked with the HCU in the DDD then it's rate only--but then I saw that it gave both. So I think what you meant is that when you are in PD search BEFORE you lock on with the HCU it's rate, and in the case of Pulse then it's range (ie, the usual behavior). I was misunderstanding until I played around with it myself. So when you are in PD search and you lock with the DDD and the lock strobe shifts to the left, is the blip on the left at the vertical axis rate then? What does the synthetic blip tell you, just azimuth? When I lock in Pulse with the HCU in the DDD it shows range but not rate, which I understand. But I also saw that in the TID it shows a rate. Is that rate valid? Is that the workaround to getting rate when you are using a pulse mode? I'm also having an issue with the radar in Pulse search. I am using the stock radar training mission, but elimated all the C-17s except for one heading right at me (I'm on the ground). He is at 10.500 ft about 30 miles away. I set the radar to pulse search and put the elevation above 3 deg to turn off the MLC. I set azimuth to 60 and another time to 20. I set the bars to either 6 or 8 depending but the idea was to keep the scan limits shown in the TID for the appropriate range in such a way that his 10500 altitude is within it. Even though the lower and upper limits of the scan limit place him inside that range, I still don't get a blip. I don't seem to get him in the DDD until he is really close. I guess I don't get why id the lower limits it say 9 and the upper is 60 why he wouldn't show up at his 10500 ft altitude. I'm guessing it has to do with bar setting? v6, boNes
-
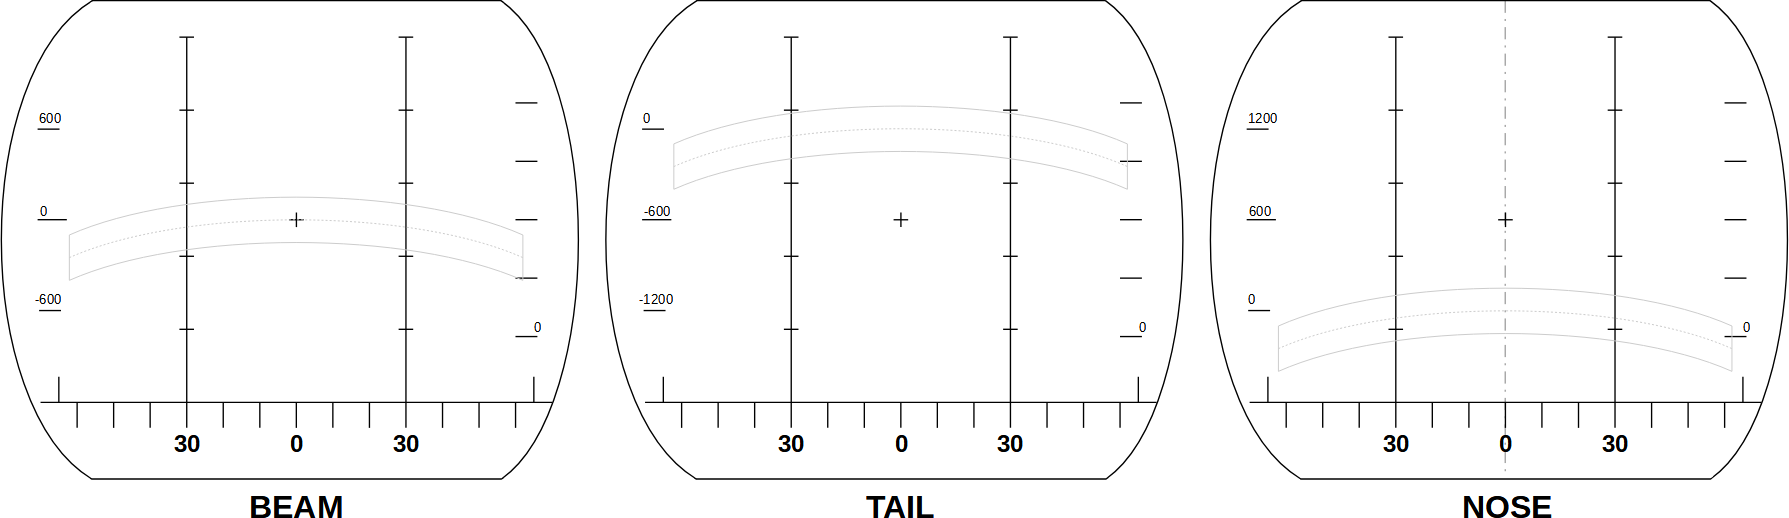
OK, I had a look again, and like I said in my original post, I was going off the top of my head and had it backward. When aspect is set to nose, the blip is on the bottom and when it is in tail it is slightly above the cross, not the other way around (I tried it 3 times to be sure)--so no need for video examples. I think what really threw me was that the 0 point on the DDD shifts. In the manual it mentions the scale limits but not the 0 point shifting accordingly so I thought 0 was always the cross. So I thought above the cross was one scale and below was another scale, not the same scale but shifted. Now it makes perfect sense. Thanks! v6, boNes
-
Ah, OK, that makes more sense especially to disregard the side scale numbers. Another question: If you use the HCU in radar mode to lock a target, is range displayed in the DDD? If so, what is the scale of the DDD? Is it 0 on the bottom and whatever the range scale is set in the buttons above the DDD ? Thanks. I'll post that video and/or trackfile later. v6, boNes
-
Thanks for your response. Yes, the first thing I thought when doing this was it didn't make sense, primarily because the tanker was clearly moving away from me, so the closure should be opening--this is what was shown in beam and tail, but in nose it was showing closing--whether it was 200 kts or 600 kts, it still showed closing,and that doesn't make sense. I'm assuming that when in PD search, opening is below the DDD center cross and closing is above the cross. Is the aspect closing scale shown on the leftmost vertical axis in the DDD while the Vc closing scale is shown on the rightmost vertical axis on the DDD? I ask because in the HB online manual under AWG-9 and the section entitled Pulse Doppler mode there is a shot of the DDD and the leftmost axis is graduated from -1200 on the bottom and +1200 on the top and on the rightmost axis it is graduated from 0 at the bottom to 800 at the top. On that rightmost scale there is a tick mark, I assume shows the closure? It's not labeled in that shotor in the text I can find. I am off site now but when I can, I will post video of it as it is something I reproduced many times. So the Vc switch works in ONLY STT modes? I am also confused by this because in the HB manual it says "The Vc switch (18) controls the rate scale on the DDD in the pulse doppler search modes" but doesn't mention its roll in STT. Thanks. v6, boNes
-
I'm sorry, now that you posted that, I do recall that you mentioned that. I look forward to the updated version, and of course to the F-4 as well! v6, boNes
-
I was reading about the DDD at https://www.heatblur.se/F-14Manual/general.html#detail-data-display-ddd-and-panel And it said that the TGTS switch is not implemented. I was under the impression that it was. Is the manual up to date? v6, boNes