crash test pilot
-
Posts
221 -
Joined
-
Last visited
Content Type
Profiles
Forums
Events
Everything posted by crash test pilot
-
A-10C Landing Gear Handle Baulking Pin
crash test pilot replied to CorporalCarrot's topic in Home Cockpits
Last three points. Its intended for leds, but you can use the signal for whatever you want. It is just a logical high or low signal.
-
A-10C Landing Gear Handle Baulking Pin
crash test pilot replied to CorporalCarrot's topic in Home Cockpits
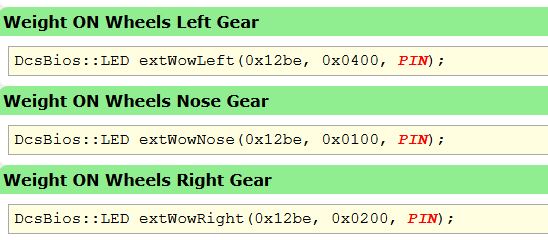
Look in the control reference under external aircraft model, there are weight on wheels available. -
The original slew nubbin is the weakest part of the WH throttle, but deltaalphlima is offering an inexpensive mod that works like a charm. https://deltasimelectronics.com/products/thumbstick-slew-sensor-adapter
-
Best solution for an angled TM grip
crash test pilot replied to Hellbat's topic in PC Hardware and Related Software
I did a few tests: With the heavy Warthog stick, extra heavy springs and the 20cm extension a forward tilt of about 10 - 15 degree is manageable, more forward tilt leads to a forward sagging of the stick. That is also the point where i noticed a difference in forces between pull and push. If you plan on a sidestick configuration without extension I guess you can tilt the virpil base 15 degrees forward without noticing a change in forces. The WarBRD base comes with 2 sets of springs - normal and strong. The extra strong springs have to be ordered additionally but are only needed for really long extensions. -
competition ended DCS: P-47D Thunderbolt livery competition
crash test pilot replied to BIGNEWY's topic in DCS: P-47 Thunderbolt
Love your Ballls Out! The code should be G9-L, though.. -
Best solution for an angled TM grip
crash test pilot replied to Hellbat's topic in PC Hardware and Related Software
My experience with a Virpil WarBRD base and a TM Warthog stick: Virpil sticks have a loose cable and connector as opposed to the Warthog and Virpil advises to unscrew the connector plate in the base to be able to use the Warthog. This means also that you can freely rotate your stick to the left or right without rotating the base (crossing the center bump cams off-center would be awkward). I also use a 20 cm virpil extension which sets the heavy Warthog stick about 3 cm behind the center of gravity of the base and have not found this to be problematic in any way - so you could tilt the base forward if if you want a forward angled stick. It centers good even with the standard springs, but especially with the long extension the heavy grip tends to oscillate so i use the extra strong springs. If you plan on using the TM Cougar grip and want a better base i can recommend the Virpil offerings. -
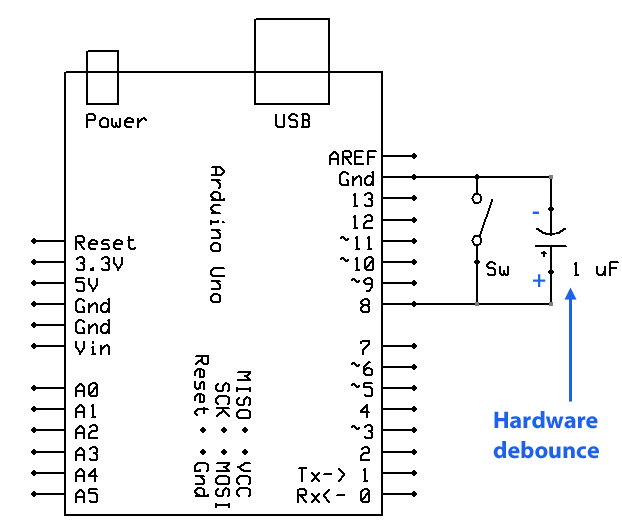
Not so trivial - we all learn something new from day to day. Here you go: You can also put the capacitor below the switch - parallel means it does not interrupt the line to the switch but is connected the same way as the switch. Edit: Here you see Why it is called "parallel" - not my work but a good picture of the principle:
-
Will Warthog flight stick hats be easy to use with small hands?
crash test pilot replied to jpinard's topic in Thrustmaster
Also came from X52 to Warthog, the stick has similar size, but hats and button are far better reachable. The base is bad, i swapped it for a virpil. -
Ghosting and diodes are usually a thing for switch matrixes; it does not matter which side of the button the diode is attached, the direction matters. But your problem seems to be a bouncing problem as indicated by no1sonuk and should be treated with a capacitor parallel to the switch as no1sonuk advised.
-
I used this display for my cdu and plan to use another one for my arc-210: https://www.ebay.de/itm/3-5in-ILI9486-Control-IC-TFT-LCD-Display-Module-320x480-for-Ar-Mega2560-16-Bit-R/133455625846?ssPageName=STRK%3AMEBIDX%3AIT&_trksid=p2057872.m2749.l2649
-
The rs485 network is just a way to connect multiple arduinos over said rs485 network... One mega connecting as master to pc over usb and several arduinos (nano/uno/mega) as slaves connecting to the master.
-
DCS BIOS is dead, any alternatives?
crash test pilot replied to v81's topic in PC Hardware and Related Software
An easy possibility for expanding your ports for dcs-bios would be a rs-485 network. Have a look here: -
DCS BIOS is dead, any alternatives?
crash test pilot replied to v81's topic in PC Hardware and Related Software
Have a look at the flightpanels fork by blacklibrary: https://github.com/DCSFlightpanels/dcs-bios -
I cannot answer all your questions, but a few: You can use a mega as a slave, although people seem to have problems with certain brands. Sadly i dont know which. My chinese megas work fine. For DCS-BIOS over rs485 you need a mega for the master because it has 4 UARTS (one for the usb connection and one up to three for the rs485 busses), whereas the nanos and unos only have 1. You can use more buttons on a nano if you use a button matrix. This works best with momentary pushbuttons. I think there is a way to use latched switches in a matrix but i did not figure out how. As a dedicated tinkerer i like the low-cost of arduino clones and prefer pro-micros with mmjoy2 and shift registers over expensive boards for generic input devices. I just build a huey collective with this. My a-10 cockpit contains 25 nanos and 6 megas as slaves and one mega as master with three rs-485 busses, one for the left console, one for the right console and one for the front panel.
-
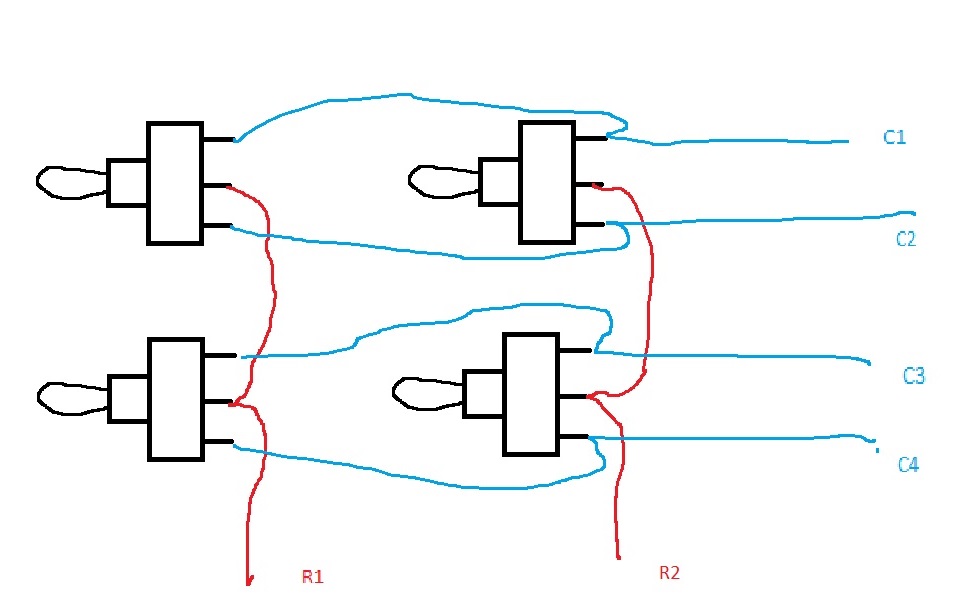
Try it like this, your matrix shares both pins of the on-off-on switches on the same column. This can not work.
-
How to connect all A-10C home built cockpit panels to A-10C DCS
crash test pilot replied to hawgmech's topic in Home Cockpits
For DCS-BIOS the way of connecting all is RS485. Watch here: You need a master (must be a mega) to which the slaves (nanos, unos or megas) connect over Maxim max487 chips. A warning : do not buy the cheap chinese max487 from ebay; i bought a pack of 50 for 9$ and only one survived my testing phase. I bought the next batch from Reichelt for 2€ a piece, and none have failed me since then. -
You can use 8 axis in mmjoy, in the assignment column you can choose from X, Y, Z, rX, rY, rZ, slider and dial. I dont think they have different behavior, its just names. Try it!
-
Mea culpa... Thanks to both of you for outstanding work!
-
Now i feel really stupid, because i wrote so and deleted it because the thread about mmjoy here and in simhq was started by sokol... me<---double idiot
-
Have fun!
-
https://sites.google.com/site/mmjoyproject/fajly-dla-skacivania Edit: me<---idiot
-
Oh I see you are using version 20151118, maybe you could upgrade to 20160818 (recommended by sokol, who wrote this program). You would need to upload new firmware to your board. Or you just test the "switch" setting?
-
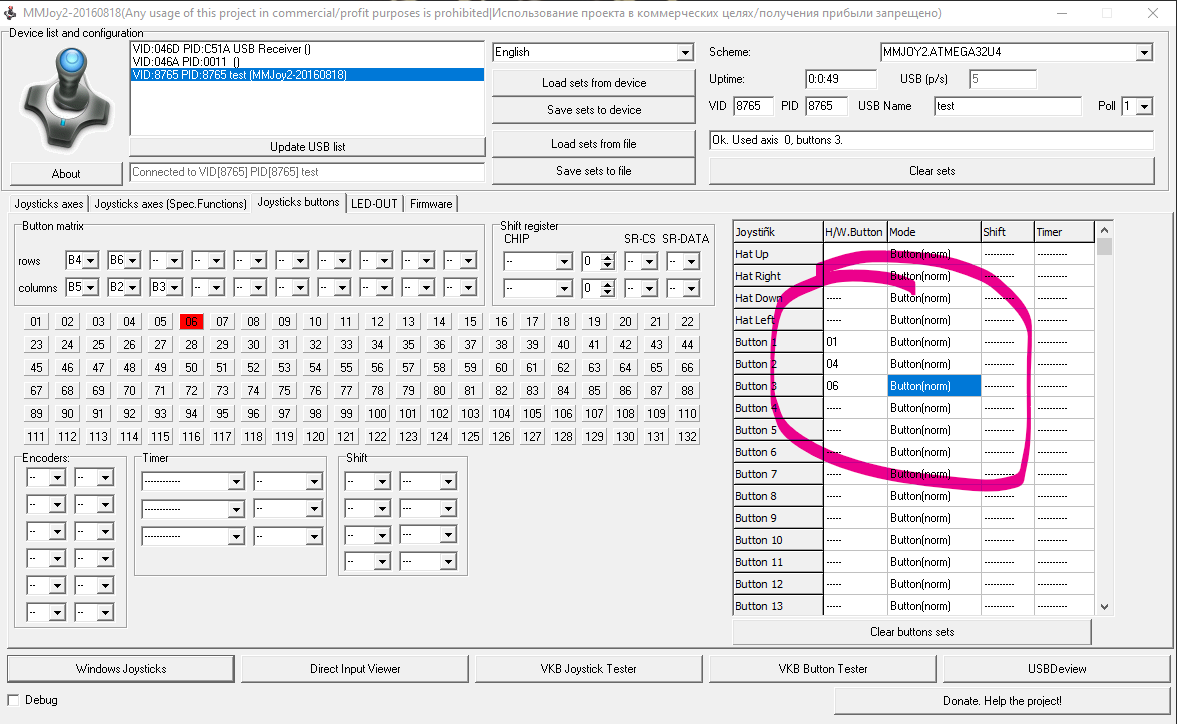
For a quick test I have hooked one momentary push-button and a toggle (on-on) to my test-device. I set them all as button(norm) and they show up in windows joystick control fine.
-
I think you have not assigned any of your buttons in the right side of your first screenshot. If the button-press shows up in the left side, hardware is ok, but you need to assign each h/w button to a button-number in the right side of your mmjoy-window. Dont forget to save set to device afterwards.
-
White lettering from Cougar to Warthog stick
crash test pilot replied to Ala12Rv-Tundra's topic in Thrustmaster
You need special transfer sheet - there are different types for inkjet and for laser (if you have a thermotranfer printer this would be the right one) and both come in clear or white background (the usual printer cannot print white!). After printing you need to seal the print with special formula like micro liquid decal film. Maybe you know someone who is into scale moddeling and ask that someone for help?