All Activity
- Past hour
-

Not getting full super carrier experience on Bankler's mission
BIGNEWY replied to Camel's topic in Bugs and Problems
Hi Camel, thanks for the new thread, can you attach a track replay example. Also can you let me know which carrier it is in the mission? is the Stennis CVN 74? If so the deck crew wont show there as it is the free carrier. thank you -
 Hi @BIGNEWY, as requested separate topic with track. I am using the supercarrier version of the mission below (version 7.4) When choosing a cold start slot, I am spawned on the deck but no deck crew is nearby. I also am not getting a message like "Awaiting salute gesture. Salute when ready". Can you please look into this? Thanks. supercarrier.trk
 -
VoiceAttack with VAICOM. "Look for Ground Targets" (or SAMs, or ships, or tanks, or activity) You just tell Jester what to do. VA with VAICOM is literally a gamechanger.
-
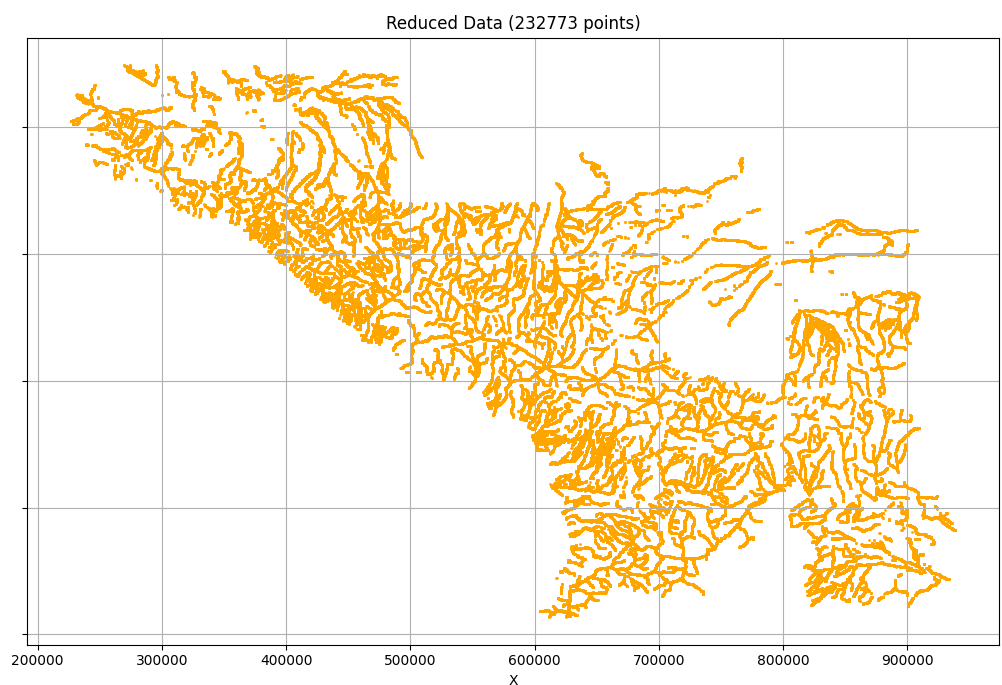
First off, I want to acknowledge that what follows is not groundbreaking — I know others have achieved similar results before. But despite plenty of digging, I couldn’t find anywhere this specific approach is properly documented or explained. So I took on the challenge of figuring it out myself. The Disposition function has recently been discovered and mentioned in the Reddit forums. From what I can tell this does something similar and is far simpler. That said, I still think this method might still be useful to some in the community. It’s also about time I gave something back, since everything I’ve managed to create for my own fun has been built on the shoulders of what others have shared before me. What This Does This setup provides a way to determine the distance from any given point to the nearest map feature: forested areas, roads, towns, rivers, beaches, and so on. Once the KD-Tree is built during mission load, the actual search for nearest point is pretty much instant. Building the KD-Tree can take a few minutes depending on the number of data points. I'm sure there are lots of practical uses but I've used it primarily to spawn/move ground units without them ending up in the indestructable forest. At its core, this is just a way to calculate the distance from a position to the closest matching map feature — based on colour-coded map data. How It Works Python (setup): Take a screenshot of the map and grab the RGB values for each pixel. Match each pixel’s RGB to map coordinates. Filter the pixels based on RGB — for example, greenish colours for trees. Save the resulting coordinate data to a file. Optionally reduce the data resolution to save performance. Lua (in mission scripting): Load the pre-generated data file. Build a KD-Tree (a spatial data structure that allows fast searches). Use the KD-Tree to find the nearest matching point and measure the distance. Use this to determine proximity — e.g. “how far am I from the nearest tree?” Final Notes As must be obivous by now, I’m not a programmer. So feel free to take this and rewrite it to be cleaner, faster, or just less ugly and pass it on. Lua Code to Setup the KD-Tree --- ================= KD Tree Functions ================= --- -- Function to load data from CSV file local function LoadDataPointsTrees(filename) local points = {} local Path = "C:\\Users\\xbox\\Saved Games\\DCS\\Missions" local ok ,fileData = UTILS.LoadFromFile(Path,filename) for lineNumber = 1, #fileData do lineString=fileData[lineNumber] local easting, northing = lineString:match("([^,]+),([^,]+)") easting = tonumber(easting) northing = tonumber(northing) table.insert(points, {northing, easting}) end return points end -- ===================== Data Point Distance Function ====================== -- -- Rebuild the KDTree recursively function rebuild_kdtree(data) if data == nil then return nil end local point = data["point"] local left = rebuild_kdtree(data["left"]) local right = rebuild_kdtree(data["right"]) return KDTreeNode:new(point, left, right) end -- Define a k-d tree node local KDTreeNode = {} KDTreeNode.__index = KDTreeNode function KDTreeNode:create(point, left, right) local node = {} setmetatable(node, KDTreeNode) node.point = point node.left = left node.right = right return node end -- Helper function to slice a table local function sliceTable(tbl, startIdx, endIdx) local sliced = {} for i = startIdx, endIdx do table.insert(sliced, tbl[i]) end return sliced end -- Function to build the k-d tree local function buildKDTree(points, depth) if #points == 0 then return nil end -- Select axis based on depth local axis = depth % 2 -- Sort point list and choose median as pivot element table.sort(points, function(a, b) if axis == 0 then return a[1] < b[1] -- Compare x-coordinates else return a[2] < b[2] -- Compare y-coordinates end end) -- Choose median local median = math.floor(#points / 2) + 1 -- Create node and construct subtrees return KDTreeNode:create( points[median], buildKDTree(sliceTable(points, 1, median - 1), depth + 1), buildKDTree(sliceTable(points, median + 1, #points), depth + 1) ) end -- Function to calculate squared distance between two points local function squaredDistance(p1, p2) return ((p1[1] - p2[1])^2 + (p1[2] - p2[2])^2) end -- Nearest neighbor search in the k-d tree local function nearestNeighborSearch(node, target, depth, best, bestDist) if node == nil then return best, bestDist end local axis = depth % 2 local nextBest = best local nextBestDist = bestDist local currentDist = squaredDistance(node.point, target) if currentDist < bestDist then nextBest = node.point nextBestDist = currentDist end local direction if axis == 0 then direction = target[1] < node.point[1] else direction = target[2] < node.point[2] end local primary = direction and node.left or node.right local secondary = direction and node.right or node.left nextBest, nextBestDist = nearestNeighborSearch(primary, target, depth + 1, nextBest, nextBestDist) if (axis == 0 and (target[1] - node.point[1]) ^ 2 < nextBestDist) or (axis == 1 and (target[2] - node.point[2]) ^ 2 < nextBestDist) then nextBest, nextBestDist = nearestNeighborSearch(secondary, target, depth + 1, nextBest, nextBestDist) end return nextBest, nextBestDist end -- Function to print the k-d tree (for testing purposes) local function printKDTree(node, depth) if node == nil then return end printKDTree(node.left, depth + 1) printKDTree(node.right, depth + 1) end -- Example function to serialize a Lua table (KD-tree) to a string local function serializeTableFROMGPT(t, indent) indent = indent or 0 local result = "" local padding = string.rep(" ", indent) result = result .. "{\n" for k, v in pairs(t) do local key = (type(k) == "string" and string.format("%q", k)) or k if type(v) == "table" then result = result .. padding .. "[" .. key .. "] = " .. serializeTable(v, indent + 4) .. ",\n" else local value = (type(v) == "string" and string.format("%q", v)) or tostring(v) result = result .. padding .. "[" .. key .. "] = " .. value .. ",\n" end end result = result .. string.rep(" ", indent) .. "}" return result end -- Example function to serialize a Lua table (KD-tree) to a string local function serializeTable_close(t, indent) indent = indent or 0 local result = "" local padding = string.rep(" ", indent) result = result .. "{\n" for k, v in pairs(t) do local key = (type(k) == "string" and string.format("%q", k)) or k if type(v) == "table" then result = result .. padding .. " " .. key .. " : " .. serializeTable(v, indent + 4) .. ",\n" else local value = (type(v) == "string" and string.format("%q", v)) or tostring(v) result = result .. padding .. " " .. key .. " : " .. value .. ",\n" end end result = result .. string.rep(" ", indent) .. "}" return result end -- Example function to serialize a Lua table (KD-tree) to a string local function serializeTable(t, indent) indent = indent or 0 local result = "" local padding = string.rep(" ", indent) result = result .. "{" for k, v in pairs(t) do local key = (type(k) == "string" and string.format("%q", k)) or k if type(v) == "table" then result = result .. padding .. " " .. key .. " = " .. serializeTable(v, indent + 0) .. "," else local value = (type(v) == "string" and string.format("%q", v)) or tostring(v) result = result .. padding .. " " .. key .. " = " .. value .. "," end end result = result .. string.rep(" ", indent) .. "}" return result end -- ============================================================================================================= local function GetDistanceToTrees(targetCoord) -- Nearest neighbor search example local distSquared = nil local nearest = nil local north = math.floor(targetCoord.x) local east = math.floor(targetCoord.z) --env.info(" - target coordinate " .. north .. " ".. east) local target = {north, east} --env.info(" Test north "..target[1] .. " east ".. target[2]) if kdtree then nearest, distSquared = nearestNeighborSearch(kdtree, target, 0, kdtree.point, squaredDistance(kdtree.point, target)) --print(string.format("Nearest neighbor to (%d, %d) is (%d, %d) with squared distance %d", target[1], target[2], nearest[1], nearest[2], dist)) else env.info(" ---- KD-Tree is empty ---") end -- Returning the squared distance (as finding root takes time) return distSquared end – Set up the KD-Tree env.info(" -- KD-Tree:") env.info(" - Loading the RAW Tree Datapoints") local points = LoadDataPointsTrees(treeDataPoints) env.info(" - Building the KD Tree") kdtree = buildKDTree(points, 0) To get a distance use the following: – Using the functions : distanceToTrees = GetDistanceToTrees(randomCoordinate) To build the dataset, you need to generate the RGB data for each coordinate on the map that is of interest. This Python script does that and filters for some different map features on the Caucasus map. Different maps may require changing the RGB filters a little. # # -- ========================================== -- # -- ============ DCS Tree Mapping ============ -- # -- ========================================== -- # # -- Mikey, "LittleNose" # -- October 2024 # # Script to take screenshots from DCS Map and determine the terrain / features # For me it is primarily used by my mission script to determine location of the indestructable DCS trees # This can be used as a database for searching against when spawning / moving ground units # # I use the data points file to check coordinates for distances from trees # The datafile takes a long time to read into DCS script, however, it only needs to do it once per server restart. # Within the DCS mission script, KD-Trees is the function I use for searching the data points file # https://www.baeldung.com/cs/k-d-trees # # # Thanks go out to the Martin from the SDCS server. # Here on the ED Forums, it is mentioned SDCS use "Anti Tree Technology": # https://forum.dcs.world/topic/346202-strategic-dcs-a-modern-persistent-pvp-combined-arms-driven-campaign/ # Although I don't know how they do it, knowing it's possible was the inspiration to try. # In the same vein, I hope that this spurs others into refining and helping the community. # # Also thanks to the MOOSE team # without their support I’d not have continued trying to script my own playground in DCS # # # -- =============== Instructions =============== -- # # Check your Python has the required libraries, and pip those you don't (eg: pip install pyautogui). # Open DCS in windowed mode, position the window top left of your screen # Open Python client in non-overlapping window # Open Mission Editor in DCS, and run a blank mission. # Move the compass rose out of the way # Go into the Map screen, and zoom in so you can see the tree colours. # - Zoomming in further gives more detail, but takes longer overall # Set the script vaiables below # - a suitable window size to capture the relevant screen area (the map) # - Set the number of x and y sections. This moves the screen to cover more map area. # Run this python script - don't touch the mouse/keyboard until complete # The trees.csv file created is a list of coordinates where there are trees # # Finally, This is set up on a small section for your first test run, # update the window size and number of Sections to suit your setup once you see how it works. # # # # ---------------------------------------------------------------- GLOBAL USER VARIABLES ---------------- # # screen pixel locations for the screen grab area, set these to match your visible map area on your screen xWindowLocations = [60, 2400] # left, right 60, 2400 yWindowLocations = [80, 1300] # top, bottom 100, 1300 # Number of screen grabs to take, x = horizontal, y = vertical xSections = 4 ySections = 2 # ---------------------------------------------------------------- SYSTEM VARIABLES ---------------- workingFolder = "C:\\Users\\xbox\\Saved Games\\DCSTrees\\" rgbPartOutputFilePrefix = "trees_rgb_part_" rgbAllOutputFilename = "trees_rgb_all.csv" outputFilenameWater = "filtered_water.csv" outputFilenameRiver = "filtered_river.csv" outputFilenameTrees = "filtered_trees.csv" outputFilenameTowns = "filtered_towns.csv" outputFilenameRoads = "filtered_roads.csv" # Distance between pixels on the screen distPerPixelTopX = 0 distPerPixelBtmX = 0 distPerPixelLeftY = 0 distPerPixelRightY = 0 xCornerCoords = [[0,0],[0,0],[0,0],[0,0]] zCornerCoords = [[0,0],[0,0],[0,0],[0,0]] # ---------------------------------------------------------------- SYSTEM IMPORTS ---------------- import os import csv import math # pip install pandas import pandas as pd import numpy as np np.set_printoptions(suppress=True) #pip install matplotlib import matplotlib.pyplot as plt #pip install pyautogui import pyautogui #pip install keyboard import keyboard #pip install pyperclip import pyperclip # ---------------------------------------------------------------- FUNCTIONS ---------------- def GetAreaGameCoordinates(): print(" - Get Coordinates of the DCS Screen Grab") global xCornerCoords, zCornerCoords # loop 4 corners cornerIndices = [[0,0],[1,0],[0,1],[1,1]] for i in range(len(cornerIndices)): ix = cornerIndices[i][0] iy = cornerIndices[i][1] # Move Mouse to corner location of screen grab pyautogui.moveTo(xWindowLocations[ix],yWindowLocations[iy]) # Get Popup with coords keyboard.press('alt') pyautogui.click() keyboard.release('alt') # copy the coordinates pyautogui.moveTo(430, 375) pyautogui.click() # close the window pyautogui.moveTo(350, 375) pyautogui.click() # pu thte text into the clipboard copiedText = pyperclip.paste().split("\n")[0] print(" - Text copied: {}".format(copiedText)) # Manipulate teh text to get teh coordinate values copiedTextSplit = copiedText.split(" ") if "+" in copiedTextSplit[1]: xCornerCoords[i]=(int(copiedTextSplit[1].split("+")[1])) elif "-" in copiedTextSplit[1]: xCornerCoords[i]=(int("-"+copiedTextSplit[1].split("-")[1])) if "+" in copiedTextSplit[2]: zCornerCoords[i]=(int(copiedTextSplit[2].split("+")[1])) elif "-" in copiedTextSplit[2]: zCornerCoords[i]=(int("-"+copiedTextSplit[2].split("-")[1])) def GetPixelSize(): print("\n - Get the pixel size") global distPerPixelTopX, distPerPixelBtmX, distPerPixelLeftY, distPerPixelRightY print(" Northing Easting") print(" - top left coord : {}, {}".format(xCornerCoords[0], zCornerCoords[0])) print(" - top right coord : {}, {}".format(xCornerCoords[1], zCornerCoords[1])) print(" - btm left coord : {}, {}".format(xCornerCoords[2], zCornerCoords[2])) print(" - btm right coord : {}, {}".format(xCornerCoords[3], zCornerCoords[3])) # coordinates NorthingDistanceLeft = xCornerCoords[2] - xCornerCoords[0] NorthingDistanceRight = xCornerCoords[3] - xCornerCoords[1] EastingDistanceTop = zCornerCoords[1] - zCornerCoords[0] EastingDistanceBtm = zCornerCoords[3] - zCornerCoords[2] distPerPixelTopX = EastingDistanceTop / pixelsWidth distPerPixelBtmX = EastingDistanceBtm / pixelsWidth distPerPixelLeftY = NorthingDistanceLeft / pixelsHeight distPerPixelRightY = NorthingDistanceRight / pixelsHeight print(" - Size of a Pixel Top X: {:.2f} m".format(distPerPixelTopX)) print(" - Size of a Pixel Btm X: {:.2f} m".format(distPerPixelBtmX)) print(" - Size of a Pixel Left Y: {:.2f} m".format(distPerPixelLeftY)) print(" - Size of a Pixel Right Y: {:.2f} m\n".format(distPerPixelRightY)) def GrabScreen(): print(" - Grabbing Screen ") left = xWindowLocations[0] top = yWindowLocations[0] width = xWindowLocations[1] - xWindowLocations[0] +1 height = yWindowLocations[1] - yWindowLocations[0] +1 #Grab image: imageScreen = pyautogui.screenshot(region=(left,top, width,height)) print(" - Captured Screen, pixels x{},y{} to x{}, y{}".format(xWindowLocations[0], yWindowLocations[0], xWindowLocations[1], yWindowLocations[1])) # Generate a List of the RGB values in format (r,g,b,transparency): pixel_values = list(imageScreen.getdata()) rgbPartOutputFilename = rgbPartOutputFilePrefix+str(screenX)+"_"+str(screenY)+".csv" try: os.remove(rgbPartOutputFilename) print(" - Deleting Existing file {}".format(rgbPartOutputFilename)) except: pass print(" - Existing file {} not found to delete".format(rgbPartOutputFilename)) fileOpenCSV = open(rgbPartOutputFilename, "a") #Save RGB to a file: print(" - Generating RGB {}, X{} Y{}".format(loopNumber, screenX, screenY)) eastingPixelCoord = 0 northingPixelCoord = 0 for i in range(len(pixel_values)): pixelColourUnit = [0,0,0] pixelColourUnit[0] = round(pixel_values[i][0], 3) pixelColourUnit[1] = round(pixel_values[i][1], 3) pixelColourUnit[2] = round(pixel_values[i][2], 3) pix_x = i % width pix_y = int((i-pix_x)/width) eastingPixelCoord = zCornerCoords[0] + (pix_x * distPerPixelTopX) northingPixelCoord = xCornerCoords[0] + (pix_y * distPerPixelLeftY) dataString = str(pix_x) + ", " + str(pix_y) + ", " + str(eastingPixelCoord) + ", " + str(northingPixelCoord) +", "+ str(pixelColourUnit[0])+ ", " + str(pixelColourUnit[1])+ ", " + str(pixelColourUnit[2]) + "\n" fileOpenCSV.write(dataString) print(" - Screen Coordinate Top Left N{:.1f}, E{:.1f}".format((xCornerCoords[0]), (zCornerCoords[0]))) print(" - Screen Coordinate Btm Right N{:.1f}, E{:.1f}".format(northingPixelCoord, eastingPixelCoord)) fileOpenCSV.close() print(" - Saved CSV File {}, {}\n".format(loopNumber, rgbPartOutputFilename)) def MoveTheMap(): print(" - Moving the Map for the Next Screen Grab {} {}".format(screenX, screenY)) global xCornerCoords, zCornerCoords pixelX1 = (xWindowLocations[0]+xWindowLocations[1])/2 pixelY1 = (yWindowLocations[0]+yWindowLocations[1])/2 pixelX2 = (xWindowLocations[0]+xWindowLocations[1])/2 pixelY2 = (yWindowLocations[0]+yWindowLocations[1])/2 if screenX == (xSections - 1): pixelsMoveY = -(pixelsHeight + 1) pixelY1 = yWindowLocations[1] pixelY2 = yWindowLocations[0] print(" - Moving the Map Screen South, {} pixels, from {} to {}".format(pixelsMoveY, pixelY1, pixelY2)) else: if screenY%2 == 0: # then it is even numbered row (row 0 = even) pixelsMoveX = pixelsWidth + 1 pixelX1 = xWindowLocations[1] pixelX2 = xWindowLocations[0] print(" - Moving the Map Screen East, {} pixels, from {} to {}".format(pixelsMoveX, pixelX1, pixelX2)) else: # even numbered row pixelsMoveX = -(pixelsWidth + 1) pixelX1 = xWindowLocations[0] pixelX2 = xWindowLocations[1] print(" - Moving the Map Screen West, {} pixels, from {} to {}".format(pixelsMoveX, pixelX1, pixelX2)) pyautogui.moveTo(pixelX1, pixelY1) pyautogui.mouseDown(button='left') pyautogui.moveTo(pixelX2, pixelY2, 1.5) pyautogui.mouseUp(button='left') print(" - Finished moving the map") def CombineTheFiles(): print("\n---------=== Combining the separate files into one ===---------") try: print(" - Deleting Existing Combined data file {}".format(rgbAllOutputFilename)) os.remove(rgbAllOutputFilename) except: print(" - No Existing file found to delete") print(" - Combinging Files:") for i in range(xSections*ySections): fileX = i % xSections fileY = int((i-fileX) / xSections) rgbPartOutputFilename = rgbPartOutputFilePrefix+str(fileX)+"_"+str(fileY)+".csv" print(" {}: {}".format(i+1, rgbPartOutputFilename)) fileCombined = open(rgbAllOutputFilename, 'a+') # append fileToAdd = open(rgbPartOutputFilename, 'r') # read fileCombined.write(fileToAdd.read()) # combine fileToAdd.close() fileCombined.close() print(" - Completed Aggregating the Files into {}".format(rgbAllOutputFilename)) def FilterForRGB(valR, valG, valB, fileNameOut, tolerance): print("\n---------=== Filtering for RGB ===--------- {}".format(fileNameOut)) matchCount = 0 try: print(f" - Deleting existing file {fileNameOut}") os.remove(fileNameOut) except FileNotFoundError: print(" - No existing file found to delete") print(" - Filtering...") with open(rgbAllOutputFilename, 'r') as infile, open(fileNameOut, 'w', newline='') as outfile: reader = csv.reader(infile) writer = csv.writer(outfile) for row in reader: east, north = round(float(row[2])), round(float(row[3])) r, g, b = float(row[4]), float(row[5]), float(row[6]) # Calculate Euclidean distance between RGBs distance = math.sqrt((r - valR)**2 + (g - valG)**2 + (b - valB)**2) if distance <= tolerance: writer.writerow([east, north]) matchCount += 1 print(" - {} points found in Filtered data in file: {}\n\n".format(matchCount, fileNameOut)) # ---------------------------------------------------------------- MAIN ---------------- print("\n\n\n\n\n\n\n\n\n\n\n\n\n\n\n\n\n\n") print("\n\n\n\n\n\n\n\n\n---------=== Screen Grabber and RGB Pixelator ===--------- \n") # BASIC Setup os.chdir(workingFolder) numberOfSections = xSections * ySections # pixels pixelsWidth = xWindowLocations[1] - xWindowLocations[0] pixelsHeight = yWindowLocations[1] - yWindowLocations[0] # -- MAIN LOOP -- for loopNumber in range(numberOfSections): # variables to know the screen indexed location screenX = loopNumber % xSections screenY = int((loopNumber-screenX) / xSections) print("\n---------=== New Screen Grab, Index {} {} ===---------".format(screenX, screenY)) # run the functions GetAreaGameCoordinates() GetPixelSize() GrabScreen() if loopNumber != numberOfSections-1: MoveTheMap() else: print(" - Last Screen Complete, no need to move the map") # Gather all rgb files and gather into one file CombineTheFiles() # Filter the file, and generate a "Trees" file #FilterForTrees() RGBWater = [126, 185, 198] RGBRiver = [ 55, 92, 140] RGBTrees = [ 90, 138, 93] RGBTowns = [198, 131, 0] RGBRoads = [170, 80, 0] tolerance = 30 FilterForRGB(RGBWater[0], RGBWater[1], RGBWater[2], outputFilenameWater, tolerance) FilterForRGB(RGBRiver[0], RGBRiver[1], RGBRiver[2], outputFilenameRiver, tolerance) FilterForRGB(RGBTrees[0], RGBTrees[1], RGBTrees[2], outputFilenameTrees, 3) FilterForRGB(RGBTowns[0], RGBTowns[1], RGBTowns[2], outputFilenameTowns, tolerance) FilterForRGB(RGBRoads[0], RGBRoads[1], RGBRoads[2], outputFilenameRoads, 10) print(" - Image Grab Size, Pixels, X: {}, Y: {}".format(pixelsWidth+1, pixelsHeight+1)) print(" - {} Images, Pixels, X: {}, Y: {}".format(numberOfSections, numberOfSections*(pixelsWidth+1), numberOfSections*(pixelsHeight+1))) print(" - Total Number of Pixels: {}".format(numberOfSections*(pixelsWidth+1) *(pixelsHeight+1))) print("\n ------ === Script Complete === ------\n\n") Finally, once you capture your data points, you can reduce the filesize by changing the resolution. I find 75m data points works reasonably well. import os import pandas as pd import matplotlib.pyplot as plt workingFolder = "C:\\Users\\xbox\\Saved Games\\DCSTrees\\" os.chdir(workingFolder) # Load data from input file #input_file = "filtered_water.csv" #output_file = "filtered_water_reduced.csv" #input_file = "filtered_river.csv" #output_file = "filtered_river_reduced.csv" #input_file = "filtered_trees.csv" #output_file = "filtered_trees_reduced.csv" #input_file = "filtered_towns.csv" #output_file = "filtered_towns_reduced.csv" input_file = "filtered_roads.csv" output_file = "filtered_roads_reduced.csv" grid_size = 75 # Adjust for more/less accuracy vs reduction # Read the original CSV data = pd.read_csv(input_file, header=None, names=["x", "y"]) # Dictionary to store one point per grid cell grid_dict = {} # Grid-based filtering for x, y in data.itertuples(index=False): gx = x // grid_size gy = y // grid_size key = (gx, gy) if key not in grid_dict: grid_dict[key] = (x, y) # Create reduced DataFrame reduced_df = pd.DataFrame(list(grid_dict.values()), columns=["x", "y"]) # Save to output file reduced_df.to_csv(output_file, index=False, header=False) # Step 4: Plot both original and reduced datasets side-by-side fig, axes = plt.subplots(1, 2, figsize=(14, 6), sharex=True, sharey=True) # Original data plot axes[0].scatter(data["x"], data["y"], s=1) axes[0].set_title(f"Original Data ({len(data)} points)") axes[0].set_xlabel("X") axes[0].set_ylabel("Y") axes[0].grid(True) # Reduced data plot axes[1].scatter(reduced_df["x"], reduced_df["y"], s=1, color='orange') axes[1].set_title(f"Reduced Data ({len(reduced_df)} points)") axes[1].set_xlabel("X") axes[1].grid(True) plt.suptitle("Original vs Reduced Data Points", fontsize=14) plt.tight_layout(rect=[0, 0, 1, 0.96]) plt.show() Hope you have fun. Here's an example of the Rivers in Caucasus at 100m intervals. null

-

[SLOW PERFORMANCE] Unusually long load times and close times
Mainstay replied to SOLIDKREATE's topic in Game Performance Bugs
Loading is still absurd long especially in VR. Shader cache size set to 100GB. HT is off in the bios. The game still loads like a damn snail. Its at a point where its getting so annoying long i just dont wanna bootup DCS anymore. -
The binding for "Directional gyro cage" uncages the gyro, and vice versa. Cheers! P.S. I'll throw this one is as well because its very minor and not worthy of its own thread: When the starter switch cover is up, and the cowl flap lever is pulled all the way aft, it passes through the cover. I now close the cover after using the switch and no more issue. Amazing how that works
-
 This thread was a life saver, thanks for the tips. I just bought this module during the sale and I have been fighting the damn pedal trimmer for days. One second I am in a stable hover and with no input from me the helicopter yaws off into the next time zone. I thought I had turned off all of the trimmer functions like I did for the Mi-8, but I guess it works a bit different. Anyway, if i read this correctly, I want to set up the microswitch logic to auto off and bind a micro switch toggle button on my HOTAS somewhere? Is there an indication anywhere in the cockpit on the status of the microswitch?
 -

Release in 2026 but barely any info 6 months before 2026?
Furiz replied to LimePartician's topic in DCS: F-35A
Yep agree, might be ok to post a tail pic to tease once in a while -
I ordered a RTX 5090 FE...what have I done?
kksnowbear replied to rapid's topic in PC Hardware and Related Software
Nothing wrong with using SATA SSDs In fact, for boards where there's only one M2 slot, I further the advice above by recommending boot from a SATA SSD, using other SATA drives (even conventional HDDs) as needed for general storage/games that aren't as demanding, and reserving the M2 slot for games that benefit most from the additional performance. As far as the fans/AIO mounting... Brilliant AIO radiators should never be used as intakes; people usually do this for one reason (and it's a not a very good reason). As above, with the Gen5 drives, there will invariably be those to come along and dispute this. Their opinions are at odds with fact. -
From watching old real world training videos and reading the handbooks, it said to push the throttle forward as the engine was cutting off during shutdown in order to let it draw some fuel into the cylinders to make the next startup easier. Yes, priming makes it easier to start IRL, but if there's fuel already in the cylinders and you crank the engine with mags on, it may be enough. It's also warm outdoor temperatures in the DCS world, requiring less priming than a cold day. You can use this info to pretend your plane already had enough fuel in the cylinders from the last pilot who shut it down.
-
Bumping this with a track, with DL disabled we still receive full datalink info including flight members, friendly and enemy tracks when TACAN is turned on. Hornet_TACAN_DL_Marianas.trk
-
no bug IHADSS gunner sight is not really match from pilot seat
devnull replied to Danhopark323's topic in Bugs and Problems
figured it out, i have IHADS rendered on both eyes!! if i want to leave it like that, i have to close for example the left eye and aim vertically like this. Horizontally close as possible to the dot in the middle.
-
Hey guys, after almost 5 years, I decided to write review of Raven One campaign by Baltic Dragon. That was my second campaign, which I’ve uploaded on YouTube. I began as novice F-18 driver and after first mission, I was impressed, how much details were put in it, detailed briefings, kneeboards, voiceovers, everything. It took me to seat and I feel very stressed before every mission, because I didn’t know, what next mission will bring. That was first time, where I need to do Cold startups, so I was more stressed, because I didn’t it before and if I didn’t forget anything, lol. And I have to say, after every mission I flew, I learned something new. I had to learn air-to-air refueling, which was not so easy, but I was eager to continue, so I had to learn it. Same with the Case 1 and 3 departures and recoveries. After finish of this campaign, I started read the novel Raven One by Kevin Miller and that was intense. I don’t want to share stories of this campaign with you, because of possible spoilers, but I can assure you, you will definitely enjoy heartbreaking moments of each mission! I can highly recommend this campaign! BTW: My playtime of this campaign was exactly 20 hours! Here is the link for flythrough: Thank you, Baltic Dragon, Kevin Miller and Vincent Aiello. Great job! Take care! Flying KENNY
-

I ordered a RTX 5090 FE...what have I done?
rapid replied to rapid's topic in PC Hardware and Related Software
To be honest I mostly use SSD Drives to store my stuff at the moment on my current build I have 2 x M.2 and 4 x Sata SSD. I will do the same with this Build. 3 x intake from the side, 3 x intake from underneath, 1 x exhaust rear and the AIO will be pushing the remaining air out the top. -
Danke Ganesh für den Link, schau ich mir mal in ruhe an. Da hat man ja noch ein paar Optionen die man mal ausprobieren kann @Nedum Die Latenz schwangt schon etwas, in dem Video von mir komischer weise nicht. Sonst ist sie immer bei 45 ms oder geht auch auf 35 ms. Hab jetzt noch mal den H.264+ Codec und auf Godlike gestellt, da sitzt die Latenz auch bei 41 ms fast fest. Hab mit dem H.264+ auch immer nur so 350 Mbps, komme nie auf 500 Mbps. Obwohl der Puppris genau neben mir steht. Und die anderen Codecs haben ja auch alle eine Begrenzung von 200 Mbps oder Irre ich mich da? Wie könnte man jetzt weiter raus finden, woran das evtl liegt?
-

investigating Takeoff rotation is too slow
RogueSpecterGaming replied to VarZat's topic in Bugs and Problems
Thats just you not holding the nose at 13 degrees AoA. I've consistently gotten to 95-100 kts with 2xtanks, 2x 120s, 2x9, 2x WWPs. With a slick jet I can get all the way to 70-75 knots. -
Release in 2026 but barely any info 6 months before 2026?
NytHawk replied to LimePartician's topic in DCS: F-35A
let them cook -
Without maliciously hi-jacking the thread.....and not suggesting a bug... On landing, the opposite seems to occur, the nose wheel getting sucked down to the ground immediately. Those wonderful aero braked landings we associate with Viper operations seem very difficult to maintain. Even at low fuel weights and a buttery soft main wheel contact, it's a fight to hold the nose up. Is there an optimal gross/fuel weight for this to occur. An optimal speed?. I'm trying to keep the nose high, but at speeds of say 140kts, the nose drops hard. There's no float. I use a realsim side stick. Which is very sensitive. I wonder if these issues (and those of the op) are related to what control setup is used?
-

IHADSS gunner sight is not really match from pilot seat
admiki replied to Danhopark323's topic in Bugs and Problems
More precise you are, more precise slew will be. - Today
-
VF-211 Remake WIP
-
need track replay AI refueling broken
vctpil replied to mArTiNkOpAc's topic in Aircraft AI Bugs (Non-Combined Arms)
Hi, I experienced the same problem in Caucasus and Afghanistan. Another problem is the use of the UNIT FUEL HIGHER THAN. 2 x F-16 have 80% of fuel, need to refuel then to joint another point when the n°2 have more than 90% of fuel. Result : F-16 goes to next waypoint without refueling. I tried with AI TASK PUSH and AI TASK SET with the same issue. Without this trigger, the F-16 stay in formation with the refueler and refuel indefinitely. Track and mission in attached. Thanks, Vincent Test AAR.miz Test AAR.trk -
+1. It takes me a good amount of back stick pull to get the F-16 off the ground. I have had this for months now. The speed has to go above 200kt to takeoff and above this speed I am pulling hard on the stick. I feels something is holding the jet to the ground so much so that when it finally lift off, I would have to apply some level of forward stick movement so as not pitch up high. Glad someone brought this up for clarification. Sent from my SM-S908U using Tapatalk
-

Making DCS Accessible for Blind Players – A Realistic Proposal
draconus replied to Dataaja95's topic in DCS Core Wish List
It's the matter of output. What is calculated in the sim goes to your display but for them it's going through sound/speech. -

waiting for resolution ED/RAZBAM Situation Info & Discussion
aaronwhite replied to NineLine's topic in RAZBAM
Sorry to hear about your brother! And yeah, it's wild how many institutions rely on trying to force old stuff to work because it ended up becoming the foundation of a massive and hugely important system. I can only imagine how tough it is for the developers having to try and work with the core DCS engine to add all of these new features and things that were never even a dream to be considered forever ago when the original foundation was being laid down. It's honestly incredible how far the ED team has been able to bring their engine over the years. I randomly found Flanker 2.0 back around 2001 or so and just grabbed it because it looked fun, and that started my lifetime addiction to the ED flight sim world. By the time Lock-On was coming around, I was scouring the internet for any piece of detail on the game I could find, and once it came out, I was reading updates and checking screenshots every time they came out. I still remember the now "Old" Mi-24 being teased in the screenshots they had back then, and just thinking how incredible the texture and details were on the thing. The bulged tires and weight blew my mind. And even then, I could have never imagined that we would get to where we are now, with a Dynamic Campaign engine in the pipes and the massive graphical makeover that the game has had in recent years. -
if you are both having a similar issue, I'd suggest joining the Virtual Desktop Discord and posting the issue there.


.thumb.jpg.07d6a0318315f0131e263bfbe7904e2b.jpg)