
Gilligan
-
Posts
155 -
Joined
-
Last visited
Content Type
Profiles
Forums
Events
Everything posted by Gilligan
-

cannot produce and mssing track file F-16 TGP pod not powering on?
Gilligan replied to LePaul's topic in DCS: F-16C Viper
Maybe? I think the HTS still powers on if you turn the hardpoint on before starting the jet, so possibly. Agreed that, If you do a re-arm without turning them off, the hts pod will still work, but the tpod will need to be power cycled before it will come on. No idea if this is true to life, or a bug, or what. Just stating the current case as I've experienced it. -
cannot produce and mssing track file F-16 TGP pod not powering on?
Gilligan replied to LePaul's topic in DCS: F-16C Viper
If you turn the hardpoint power on before the jet fully starts it will not power on. I started turning both hardpoints on later in my start up procedure, like after I start INS, and they've been working fine. It does take a couple minutes to come on but I figured that was normal/functioning as intended. -
Missions are ticking by....great stuff.
Gilligan replied to Aronis's topic in F-16C Weasels over Syria Campaign
If you don't mind my asking, what is your start-up procedure? Are you doing a full "real-life" start up, testing the FLICIS and other BITs, etc? I use Bogey Dope's quick start up (and a couple personal preferences) and have never had any issue with getting in the air in time, including HMCS alignment and maverick boresighting. Things I do, personally, to save some time, particularly with mavericks, is to turn them on as soon as the jet powers up. So if I was doing a cold start with mavericks: Battery to main power IFF to norm UHF radio Function knob to "Both" Ask to start up Canopy Down JFS to Start 2 Lock Canopy, & Arm ejection set power on RWR & HMCS and setup countermeasures and ECM as desired Set Stores Config Settings, Turn on Taxi Lights, Set Parking break, Enable Ground Jettison. Set Master Arm to SIMULATE, Let laser arm ON Set Left Eyebrow brightness, Set HUD brightness, Set Right Eyebrow brightness Uncage and set Standby Altitude Indicator *At this point your engine RPM should be above 20% RPM and ready to go over the horn with the throttle. Keep an eye on the engine RPM gage between setting the JFS to Start 2 and now, IF RPMs exceed 20% before you get to this point, by all means go over the horn with the throttle and then continue with the above procedure. Set FCR and RADAR ALTIMETER switches to the ON position Set the MMC, ST STA, UFC, MSD, and GPS Receiver Power switches all to ON *At this point I usually have to wait a second while all these systems power on. I double check my procedure up to this point and fix anything I may have missed. *IF I am carrying mavericks, as soon as the MFD's power on, I go to AG mode and turn the Mavericks on, then exit AG mode. Turn the Altimeter Mode Switch to ELECT Set the INS Selector Switch to Stored Heading or NORM, which ever is appropriate at the time (99% of the time it's stored heading). A stored heading should take about 90 seconds to complete, and a NORM alignment takes about 8 minutes and may require you to manually enter some LAT, LONG, and HEADING data into the DED. Align HMCS Set Bullseye to ON (LIST -> 0 -> 8 -> 0 -> Return) Set the DED back to the INS page (LIST -> 6) to monitor the alignment progress Set up my DOGFIGHT mode preferences (Right MFD to show HSD) Set up my AA/MISLOVERIDE preferences Go into AG mode and set my AG mode preferences Turn power on to both the left and right hardpoints (HTS and TPOD) *about this time my Stored Heading INS alignment should be complete Set the INS Selector Switch to NAV Turn on any GPS guided munitions I may be carrying and let them align. *If I am not starting under a shelter I turn on Datalink and GPS time at this point in my procedure. If I am starting under a shelter I have to wait until I can taxi out from under said shelter On the ICP, press 6 - the DED should show "GPS SYSTEM" at the top. If it just shows "SYSTEM" do NOT turn on your datalink If the DED is showing "GPS SYSTEM" then turn the MIDS LVT knob to the "ON" position Press "RETURN" on the dobber, then press List -> Enter to pull up the DLINK sub page, hit any number key to set GPS Time to ON. Wait until the SYNC changes from Course to Fine then press Return on the dobber Check GPS munitions Alignment - if it's not done now it will be soon. Check your MAVs WPN page and see if they're powered on yet. If they are not wait until they are IF you want to do a ground boresight alignment. The process is super simple. Make sure your ground jettison switch is set to enable, and your master arm is set to simulate. Lock something with the TGP (If I do this on the ground I use the light poles), then lock the same thing with the mav's seeker. If lock is achieved then hit the OSB next to "BORESIGHT" on the WPN MFD. If you have mav's on stations 3 and 7 you'll need to do this for each station. If you plan on doing this in the the air then proceed to the next step. At this point I will set any other settings I want to set (or while waiting for the mavs to finish powering on) like external and cabin lighting, setting laser codes, setting bingo, entering extra steer points, setting any extra COMMS channels I want, etc. Turn on Nose Wheel Steering. Request permission to taxi and taxi out. All this should take about 5 to 10 minutes at the most if you're using the Stored Heading alignment. *IF you were starting under a shelter (Not relevant in the FIWOS campaign), check the TIME page on your DED (ICP 6) once you're clear of it and wait until it shows "GPS SYSTEM" then turn the MIDS LVT to "ON" and set the GPS Time to on using the same procedure as above. Don't forget to set your master arm to on when you fence in. -
Boresight distance absolutely matters with the mavericks. If I can do an air-boresight procedure at 8ish miles I usually get solid correlation between the two. If I do it on a closer object on the ground there is parallax error. I have a couple tricks I do to try and mitigate this error but it is there. Like ChillNG recommends above, once you ID (and maybe lock) the target with the tpod, zoom out to get a sight picture that is as similar to the view from the Mav seeker as possible and make sure the two match. It is a lot to do once you've started your attack run, and it doesn't really get any easier, especially when you're worried about MANPADs and AAA. ID your target outside of 20 miles and above 15k feet. When you turn in, try to be nose on by 15 miles and 10k feet, this gives you five to seven miles to correlate your TPOD and Seeker displays. Lock with the seeker at about 8 miles, and try to rifle and turn off before 5 miles at the latest. I've found that anything closer than 5 miles is not only is it a massive risk but sometimes the maverick cannot maneuver enough to make the hit if your nose isn't dead on the target. I never use the auto handoff.
-
Wrapped this campaign up a couple of weeks ago, and took some time to digest my experience and think about it, and while I wanted to love the campaign, as I am a big fan of Rain and his podcast, and with the knowledge that BD is a respected developer with a proven track record, I didn't enjoy it as much as I had hoped. There were definitely some high points that I did enjoy, and there were plenty of positives, but it was not without its, what were in my opinion, drawbacks either. I absolutely understand and respect the dedication to realism with regard to this campaign, so I will not say that the campaign was boring as a negative, I will say however, that it did feel very "on rails." I did not feel that I had much freedom, if any at all, to accomplish missions with any degree of autonomy. The bindable "1 or 2" binary input system, while streamlined and easy to use while in flight, I don't think offers as much leeway as more options in the F10 menu may have. My answers to questions were pretty limited to basic "yes, no" as to if I had weapons to accomplish a task, or enough fuel to RTB, or if myself or my wingman was going to attack a target first - In comparison to to other campaigns where you can chose which target you feel is the most important to attack, as well as the option to order your wingman to engage a variety of targets to assist you. On the other hand, I somewhat understand why this was the case due to (what in the end was a really cool and immersive aspect of the campaign) the specific, and detailed 9-line information from JTACS, or the "Shooter, Cover" instructions from flight leads having to be pre-recorded and not leaving much room for dynamic decision making. On that topic, I really enjoyed both of those aspects, the realistic 9-Lines and having to input coordinates in MRGS format forced me to learn and expand my own skillset as a "DCS pilot," and the "Shooter, Cover" instructions were just cool and fun to have included. Being "heavily scripted," imo, was both a blessing and a curse for this campaign. Some specific highlights that I think really showed the potential of the campaign in my opinion were: Mission 1, after the landing gear failed to drop - this was actually really engaging and having to work through the checklist and get the gear to drop by other means was a very immersive experience and I felt really accomplished for knowing where the required items were in the cockpit and pulling the landing off. mission 3, where we had to engage and eventually strafe the convoy outside of As Sukhnah. mission 5, escorting rattlesnake was fun and a cool experience. Missions 7 and 8 were both pretty straight forward and fun to fly. While 8 felt a little bit on rails after the initial JDAM drop, the firework show was cool to watch. Mission 9 felt like the only actual "wild weasel" mission in what was otherwise a CAS heavy campaign. I enjoyed it for that reason primarily, and despite a bug where one of the SA6 batteries failed to activate, still found it a fun and engaging mission. Watching the cruise missiles hit the airfield was pretty neat too. Mission 11 - I enjoyed the pace of action and the chaotic feel of the fight. Some specific Issues that I encountered and felt were particularly frustrating or because they were completely mission breaking: Mission 4 where the wingman would bug out and the mission would not progress after the CBU drop on the mortar site. Mission 6 after the Jordanian pilot from Tiger flight goes down, I tracked his chute with my tpod and wasted a lot of time looking in the area he actually landed for the technical I was supposed to engage, found one and killed it, but it turned out to be the wrong one. All the while I was supposed to have been looking several miles away from where his shoot landed at the fishing depot after he was magically teleported to somewhere near there. This was very immersion breaking and I felt like I was punished for actually tracking his chute and looking where that landed vs gaming it. Mission 12 - I encountered a mission breaking bug with Tally where she would not engage her technical unless I waited and let her shoot first before I shot at mine. It's really frustrating to execute everything correctly and still have to play a mission multiple times due to a bug like this. There was a lot of potential here for a great campaign. Unfortunately the mission breaking bugs and feeling like the missions were on rails really kept it from being what I felt it could have been in the end.
-
Mission 12 - Question on D Mavericks (spoilers)
Gilligan replied to Istari6's topic in DCS: F-16C The Gamblers Campaign
I have similar issues with Mavericks, however I was able to hit the required technical in 3 out of 4 attempts. IMO the key was doing an air boresight on the mavs during my ingress into the city. I picked one of the bright burning fires on my way in, locked with the tpod, locked with the mav seeker at 10 miles, and then hit the boresight at 8 miles. When I was attacking the technical I made sure to wait to lock with the TPOD until I was at that 8 mile distance, and just had to trust the mav was locking the correct spot before rifling it off. I was engaged by manpads doing this, but was able to pull off and make my escape each time. Best of luck. -
Okay, so now that I was able to get the campaign finished and had a couple days to remember and digest everything, I wanted to go over the campaign some, mostly for my own purposes but hopefully there is something useful in the following paragraphs for the developers as well. First off, wow. What an incredible campaign, absolutely stellar job from a design standpoint. Overall each mission was engaging and I will definitely be playing through again in the future to attempt a perfect score, but for now I'm just happy to have survived everything, accomplished the main objectives, and come away with a decent score in the end. Difficulty progression through the course of the campaign was good and expectations were realistic but also demanding enough that sometimes I doubted if I was up to each task. There aren't many full campaigns available for the viper at the time of writing this, but of those available I have no doubts that this is the best one, especially when compared against the other "weasel" oriented campaign available. This definitely gave me a new appreciation for the weasel mission, and I think I may just have caught the "Bug" for it in game. Actual bugs in the campaign were very limited, which is more than I can say vs some other paid campaigns. The only one I actually encountered was during mission 4 when one of the Blackhawks wigged out and crashed into a tree. I don't think this was meant to happen and it definitely caught me off guard but didn't count against me in the end. Otherwise this was actually a really fun mission to fly, watching the SOF team do their thing on the TPOD was super cool. The campaign really picks up the pace during mission 6, Metro Indigo. I really enjoyed this one as well as Mission 7 - another low level ingress and pop-up attack, this time against an SA6 battery. Mission 8 was another really demanding flight, and I thought I had really screwed up when the Tornado was shot down, but now I know this is basically a scripted action and there wasn't anything I could have done to prevent it. Missions 9 and 10 I consider essentially a single mission in two parts, and Weaseling at night definitely required some extra attention and added yet another level of difficulty. Another very demanding flight that I was happy to have completed. Mission 11 is where I had to shelve the campaign initially for performance issues, however, after a recent update performance was improved enough that I was able to fly and complete the mission successfully. Dodging SAMs over Damascus was absolutely terrifying, and the "surprise" at the end was even more stressful. I did get one of the Migs, however one of the one "despawned" on me moments before my missile hit it. I understand why this happened, but it was a little bit silly. Mission 12 was probably the ultimate weasel mission, escorting and entire strike package over SAM infested airspace and knocking out threats as they popped up. Watching the hornets send their Volley of Harms was Incredible, and I managed to form up with one of the B1's was it dropped it's payload. Just super cool and a lot of fun. Some of the missions I was able to complete first try, and others took several attempts, however each time I was shot down or damaged I learned from it, and was much less likely to make that mistake again. I really enjoyed the "dynamic" mission dialog options where-by you could direct your wingman to engage specific threats, how the SAM sites reacted to those actions, and how that forced you to think and make decisions regarding those threats and how they might react to being engaged. This really made me feel like the choices I made were important, if not to the overall arc of the campaign then at least important to how I was able to complete missions successfully, or not. This interactive system was really cool and added tremendous depth to the experience. All in all, absolutely tremendous work - congrats to the Devs for putting this one together. A very fun campaign and I am looking forward to part 2.
-
after the last update performance has increased threefold. Which means I'm getting 30fps over damascus instead of 10 for mission 11, making it at least playable. Was able to complete the mission this way. Little bug, I killed one mig but the second de-spawned moments before my aim9 hit it, so didn't get the points there. A little frustrating but oh well.
-
What stick are you using/do you have the paddle switch depress bound to anything? I had an "Accidental"/unintentional input from the paddle switch binding that would disable my autopilot on ground starts (hot & cold) that I would not encounter during in air starts. (WW F16EX)
-
reported F16 Switching modes, Dogfight/ missile resets the radar setting
Gilligan replied to ARCTIK's topic in Bugs and Problems
It's "normal" at this point but it is not working as intended. This bug has been "on their radar" for a while now, however no fix is forthcoming so far as I can tell. -
Can I input MGRS into the F16?
Gilligan replied to Viking 1-1's topic in DCS: F-16C The Gamblers Campaign
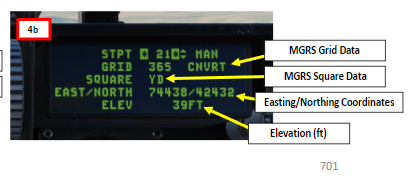
Sorry for misunderstanding. I didn't realize it was in the knee boards, that's neat. I knew that the redflag campaign creates a page with the JTAC 9 lines, so it makes sense they'd be there for this one too. You should also be able to pull it up in the message history. The JTAC says the elevation before the coordinates so I have to jump down to the ELEV line then back up to the coordinates when he's reading out the 9 line but it's there. -
Can I input MGRS into the F16?
Gilligan replied to Viking 1-1's topic in DCS: F-16C The Gamblers Campaign
Its at the bottom of the MRGS input screen on the DED. Be sure to hit ENTR after you input the value, and then hit ENTR again on CONVERT to save the steerpoint. Part 16 (NAV & ILS) of Chucks guide for f16C, 5.4 - MRGS Coordinates null
-
Mission 9 : AGM65D laser guided by JTAC ?!
Gilligan replied to Falken2's topic in F-16C Red Flag 21-1 Campaign
Lasers will not guide the AGM 65D. They are IR guided (Heat seeking). IIRC there are laser guided Mavericks but I don't think we have access to them in game. You SHOULD be able to visually see the laser the JTAC is emitting on your TPOD screen in either of the FLIR modes. JTAC gives coordinates in MGRS format. You CAN input these directly into the F16 as STPTs 21-25. Press 4 (STPT) on the ICP Press "21" (or 22, 23, 24, or 25) to select the steerpoint you want to use. Press SEQ (Dobber Right) and after a couple seconds the readout on the DED will switch from the usual degree decimal minute format to the MRGS format. The coordinate will follow a format similar to: "37S DV ### ###" or "37S DV ##### #####" (GRID SQUARE EAST NORTH) the specific numbers or letters are different depending on where you are but it will be in that format. GIRD - the "37S" will be one entry, hit ENTER on the ICP to edit the field, use the number buttons on the ICP to set the numbers, hit Enter and it will highlight the letter, use the Increment switch up and down to change the letters, then press ENTER again. SQUARE - the "DV" will be anther entry, Hit ENTER, use the increment switch to change the first letter, hit enter again to highlight the second letter and set it using the increment switch, then hit ENTER again when you're done to save it. EAST/NORTH - The numbers can be either 3/3 or 5/5, it will automatically detect which one you input, IIRC you can just type them in then hit enter. Set the Altitude the same way. After you entered the info into all the fields, dobber down until the CNVRT field is highlighted and hit ENTER one more time. This will store the STPT and your TGP should slew to it automatically. https://chucksguides.com/aircraft/dcs/f-16cm/#pf2bd Section 5.4 for MRGS Steerpoints -
The circle flashing is the DTOS que, not the CCRP release que. Wait for the Circle to flash and then go away, your time to release will reset to somewhere between 0:08 an 0:06. Hold WEP RELEASE at this point, a second crossbar will drop down the CCRP line and the LGBs will drop once the timer hits 0:00.
-
Mission 4 seems impossible with new SAM kinematics
Gilligan replied to Noctrach's topic in F-16C Red Flag 21-1 Campaign
Swap one of your Mav's for a HARM. Set it to POS mode on STPT 9 and send it when you get as close as you are comfortable. I've had pretty consistent success sending it a little bit past the ridgeline once the SA10 starts firing and then going defensive. If you do it this way have your flight hold at STPT 8 and then attack once the SA10 is offline. I use either a spare HARM or MAV to take out the SA15 to the North. I've also had success going North for a bit along the ridgeline after STPT 8 to get a little closer. Just watch the HQ7 and you'll be fine. I set my flight to trail if I go this route and tell them to attack once I send the HARM. Again taking some spare ordinance for the Tor. Sometimes I hit the HQ7 as well on the way out. Going in with MAV's only is full on suicide, and waiting for Springfield flight to suppress with HARMs is unreliable as they get shot down about 50% of the time on the way in. -
I think this is largely down to the RNG on if a Heater is going to bite off on a flare or not. I tried 4 different times, once going high and pulling into the missile (dead), going low and pulling into the missile (Dead), going Low and pulling away from the missile (Lived), and going High and Pulling Away form the missile (Lived). All entries were done at or just under mach 1, off burner, and pre-flaring around 5k ASL. The two times I died the missile did not care about the flares and tracked right at me through the defensive maneuver. The two times I survived the Missile went after a flare as I was initiating the defensive maneuver and were not defeated kinematically. So unfortunately it's not a skill based encounter. At least it seems to be entirely up the the RNG of whether the missile will go for a flare or not.
-
mission 9 - whiplash not responding
Gilligan replied to mla306's topic in F-16C Red Flag 21-1 Campaign
I've been replaying this campaign and all JTAC functionality has been restored. I think there might have been a DCS problem that has since been resolved. -
TPOD Defaults to H4 no matter which STPT is Active
Gilligan replied to Gilligan's topic in Bugs & Problems
Yeah no sweat. I believe this is an issue with DCS itself, and SPI problems with MAVs is on their short list for known issues being addressed in an upcoming patch, so hopefully that gets things back on track. I've just been setting the mavs to PRE before starting INS and then waiting to boresight them until we are over the mission area and that seems to be working, plus the added benefit of reduced parallax in the boresight alignment. -
I have also noticed something similar: For example, there were a couple of instances where I "Fenced in" when I heard the flight lead direct me to in coms, and since I have most of my Fence-In commands bound (or turned on during start up), I am able to do so pretty quickly before the red box with "instructions" is able to show on screen. If I have completed my fence in prior to the red box materializing I will get the Radio Dialogue "Fenced" however the red box will remain until a new "instruction" is shown, and the F10 menu will be stuck with the "Fence In" option with no others showing for the duration of the mission. The couple of times I experienced this is wasn't mission breaking so I didn't report it.
-
Bug: Mission 12 (Raqqa II) - Tally doesn't engage technical
Gilligan replied to dimanizer's topic in Bugs & Problems
Tried it again today. Same thing. Here's a track file of Tally not Engaging. https://www.dropbox.com/scl/fi/gjnsfgwcghjjqnak0sfy3/M12Tallyfailuretoengage.trk?rlkey=0dcbvqohej5dcvvlsairtt7md&st=wjevbzx6&dl=0 UPDATE: Got it to work if I let Tally Shoot first at the southern technical. I had to hold my Mav until she rifled hers off, then shoot. If I shot first she would not engage. Tried it twice letting her shoot first it worked both times. -
Bug: Mission 12 (Raqqa II) - Tally doesn't engage technical
Gilligan replied to dimanizer's topic in Bugs & Problems
I’m also getting this bug. I engaged the rooftop AAA at start and killed it. Killed the northern technical by the mosque. Talley never engaged the southern technical. Just kept flying her racetrack pattern west of the city. no mods. -
I also got minus 20 on this one for missing one of the SA6 radars, however I only ever saw two active launchers on both the TPOD and HAD screen. Reviewing the TACVIEW I see all three sets of launchers, but only two of them launch anything, the Northern most and Southern Most, the Middle one remains inactive. Likewise I only see two SA6 Radars, again at the northern and southern sites. There seems to be one missing at the middle site? (Images attached) As specified in the Fighter-to-Fighter I engaged the Southern site and Flash launched on the northern site. My HARM hit the Radar at the southern site, however the northern site goes inactive while Flash's harm is still airborne and it re-directs at the southern site. Wasn't a problem ultimately but seemed strange. I did get engaged during the "uneventful" exfil by an SA11 after following the more northerly 342 heading recommended by Overlord(?). I bonked the snow drift radar with my 2nd harm (CHAOS still calls out "MAGNUM SA6"). Found this fairly humerous.
-
TPOD Defaults to H4 no matter which STPT is Active
Gilligan replied to Gilligan's topic in Bugs & Problems
I think I figured this one out after messing with it some. If the Mavs are set to VIS mode the SPI gets stuck near H4 for me. I suspect it has something to do with that being where I did the Boresight procedure, however I'm certain that I unlocked everything before proceeding. Ensuring your agm65's are set to pre should fix the issue. I don't know if that is working as intended or a bug within DCS. -
On mission 6 I think Ghost's laser failed on me or maybe something else, but I missed by first GBU12 drop and I'm not sure why. Profile seemed good, had the correct 1665 laser code. Circled back around and lit up the car with my own laser and hit it a couple meters off but still got the shack. File to large to attach but here's a dropbox link: https://www.dropbox.com/scl/fi/hacvu8znt3qfkm39dsht5/GamblersFailedJTAClaze.trk?rlkey=k11yidtws2xcsfpdkvs1ca222&st=c4lcasth&dl=0
-
Appreciate your diligence. I was able to get passed this last night - I took two CBU-103's and dumped both over the mortar site. Both CBU's hit the target area and the second CBU killed both trucks after the first damaged them. This seems to have worked to ensure that the trucks were dead before the wingman BDA, and the mission progressed.