Viper1970
-
Posts
2290 -
Joined
-
Last visited
Content Type
Profiles
Forums
Events
Everything posted by Viper1970
-
Universal military aircraft homecockpit project
Viper1970 replied to Viper1970's topic in Home Cockpits
And all loose put together at the command unit for a quick view . There are still many things that will change. As said the lettering is still totally missing, the panel surface will also be painted in grey, the frame arround it with satin black, small TFT's will be mounted at the back of the MFD's and an the MFD's themselves the buttons arround the displays will be light grey and the other buttons also color coded related to there functions. The TM TFRP pedals, respectively the base will also painted in the same grey as the HOTAS. The bottom line of switches in my console panels is not perfectly arranged, cause it's not the best way to reach the switches, but there is no other way to mount the consoles, cause of the electronics at the back. Putting the HOTAS more downwards respectively there plates isn't good for the ergonomics. And overall it's in any case only for retro flying and a bit of flying in modern simulations, if I'm not in the mute for starting up the cockpit just to test something like a plane, feature or what ever. and these are the TFT's that should be mounted behind the MFD frames. I still have them lying arround. They were used for FPV RC flying in the past. As I sold most of my RC equipment to be able to finally fulfill my dream of the past 24 years, my homepit, there is no use for them anymore. So I can use them as MFD displays. They have a HDMI input and can be connected to the PC as well. I will use them with my modern tank and naval simulations (if there is a way to use a second and a third display) or will put some static pictures on them with the layout for the retro sim I'm just playing. For DCS etc. I will also try to get them fully funtional. Could be nice if a second guy can play as RIO/WSO/gunner while the other one is flying in the pit. The whole panel can of course also be folded down and slipped under the desk, if not needed.
-
Very cool idea. And who cares how things look like if they work. At my last cockpit I used all kind of things to be able to make some aircraft parts. I did not have the money for a 3D printer back those days, cause at this time they were really expensive. Even coke bottle caps cutted down in size a bit, glued together, sanded and painted, served as the knob at the and of my gear lever. And after sanding and painting it really looked nice. So there is always time for cosmetics later, first it has to do it's job.
-
Universal military aircraft homecockpit project
Viper1970 replied to Viper1970's topic in Home Cockpits
Ready painted. Not fully dry yet . All lettering has still to be done, also at the HOTAS and the UFC of my com-unit. Will do this the next days and hope that the weather is fine enough to do the final coating with satin clear coat also. I have not fillered these parts, cause they are only for the com-unit and I want to get them ready as soon as possible. So not the nicest work here. But if coated satin clear they will look much better anyway. All is simply brush painted.
-
Universal military aircraft homecockpit project
Viper1970 replied to Viper1970's topic in Home Cockpits
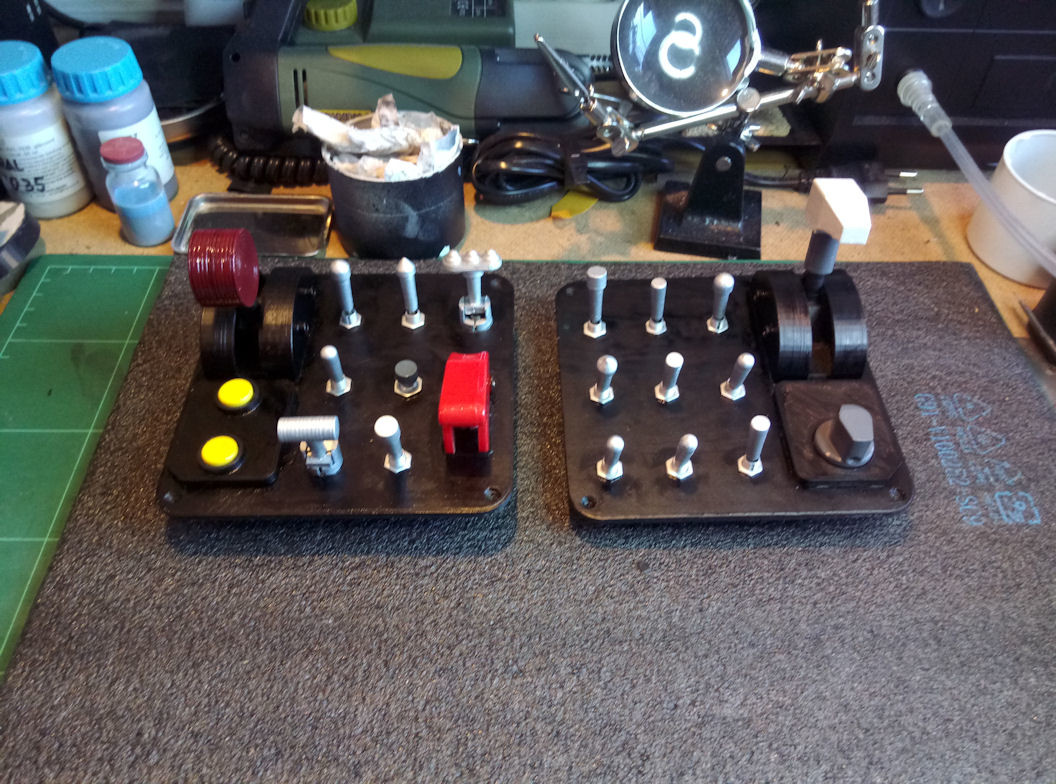
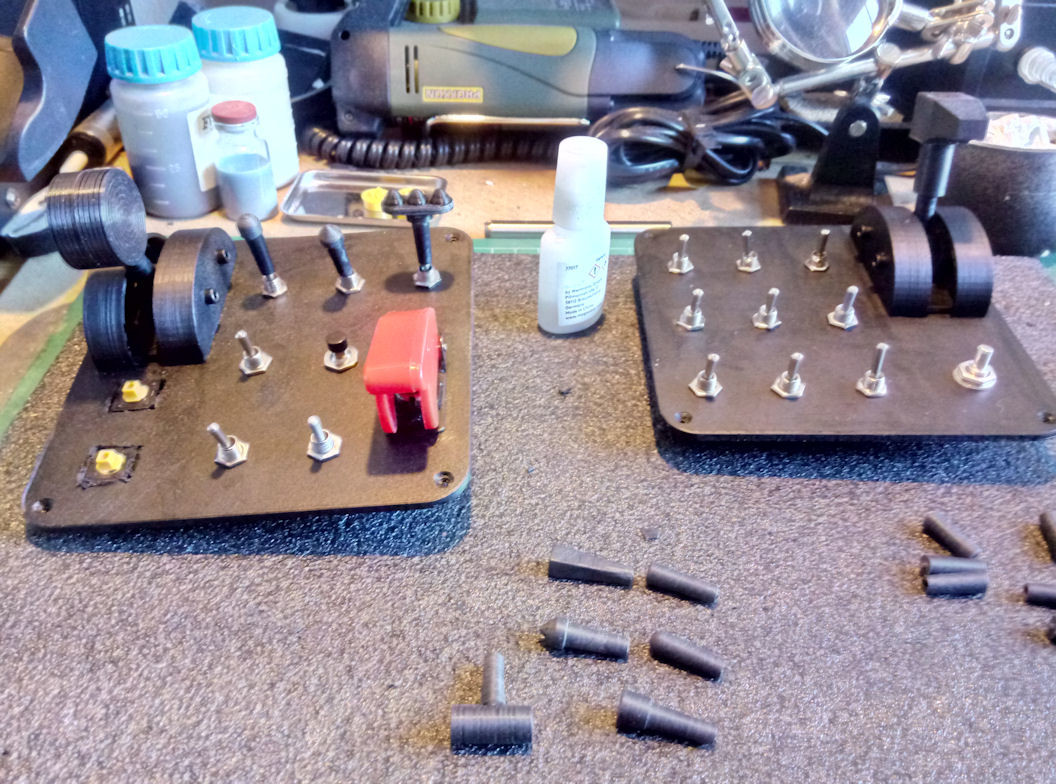
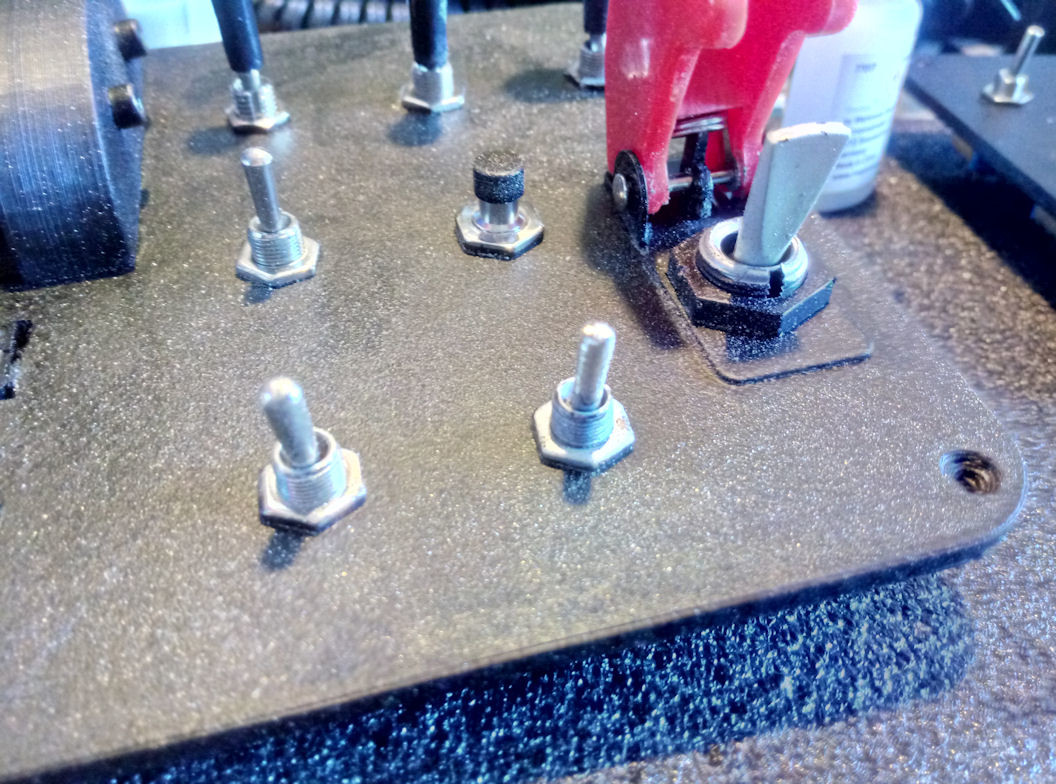
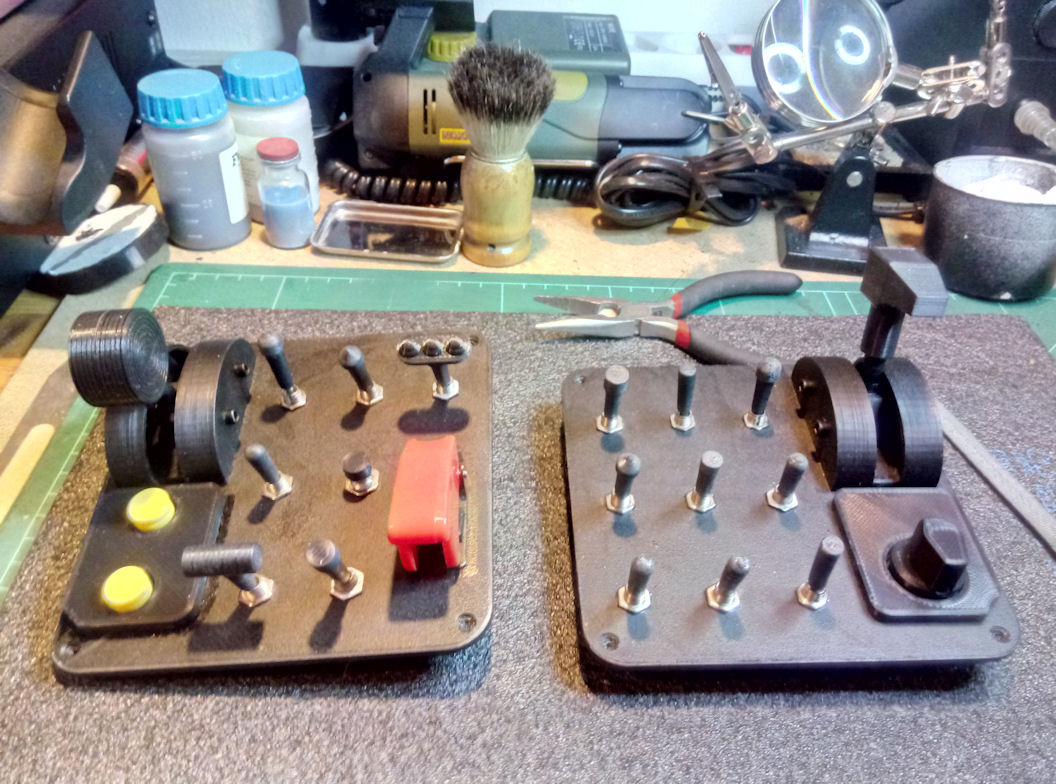
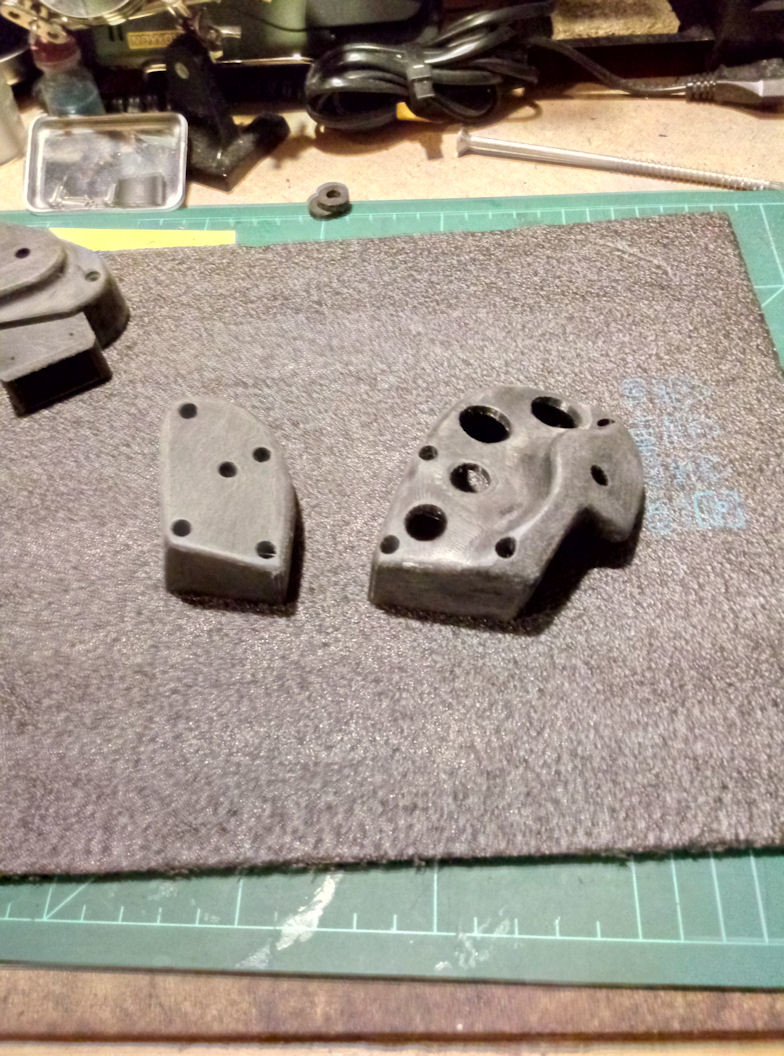
Small panels painted first time (only with a brush, cause of the weather/temerature) and mounting the switch caps. I have printed them with FDM/PLA and after the print I drilled out the hole a bit, plugged them again on a drill in the lathe and did a bit of sanding. You could also do such caps with a resin printer (I own an Anycubic Photon too), but I'm a lazy guy and hate the cleaning of the SLA-printer after the print job. So I try to do as most as possible with FDM. The only thing I will use the SLA-printer, is for complex gears or POV-Hat mechanics and even in this case I will try to do as most as possible with FDM if realizable. The FDM is simply so much more convenient to use and if the print job is finished, just switch it off and you are done. No cleaning or anything else. For the landing lights switch I have to construct a little very small guide to prevent it from rotating. I wanted to do this before mounting but I've totally missed it. Sadly most switches you can buy have a freely rotatable lever. Sometimes you can get some with a bolt instead of the normal mechanics, but you never find a note on what is used in the catalog. So it's hard to order exact the needed ones. Before mounting the caps I sand them down a bit with a Dremel to have a more cylindrical switch lever, which makes it easier to put the cap over. I glue them on top with super glue, but you have to be carefully that no glue gets in the switch mechanics. If a switch gets damaged during use, I simple cut the cap of with the Dremel and after this you can normaly remove the switch and change it with a new one. You have to print a new cap after this of course. To color them I use simple revel email model color (not the water based). When the lettering is done and the weather is fine I will coat all the Inputs I made with a thin layer of satin clear coat, to protect them from broaching of. But the email color already is very strong if it's fully dried out. The shaft of the caps I also coat with super glue before painting. This makes them much more stronger. I always use glues with a brush, which makes such works more easily. The lettering will be done with a special ink jet paper and a normal ink jet printer. At first I wanted to make the whole surface a complete print, but after a while of rethinking I decided to make only labels for it. I do this, because in the planning some things look other than in reality and if you want to use a switch for a better fitted function after you have finished the panel, it's much easier to remove only a label. Drawback is that it is not so nice looking, but I can live with that. and the very tiny "rotate lock" for the landing light switch. A second one will be mouted at the launch bar switch. All printed with FDM at a temp of 228° with very low speed and a layer height of 0.12mm. I had to split those here, cause I missed to integrate the parts before I glued the caps to the switches. I don't want to remove them again so I did this trick. At all other switches that should be locked in the axis rotation I will use non splitted parts and fit them before I glue the cap at the switch The panel plates will be painted once more and all the rest have also to be painted now.
-
Universal military aircraft homecockpit project
Viper1970 replied to Viper1970's topic in Home Cockpits
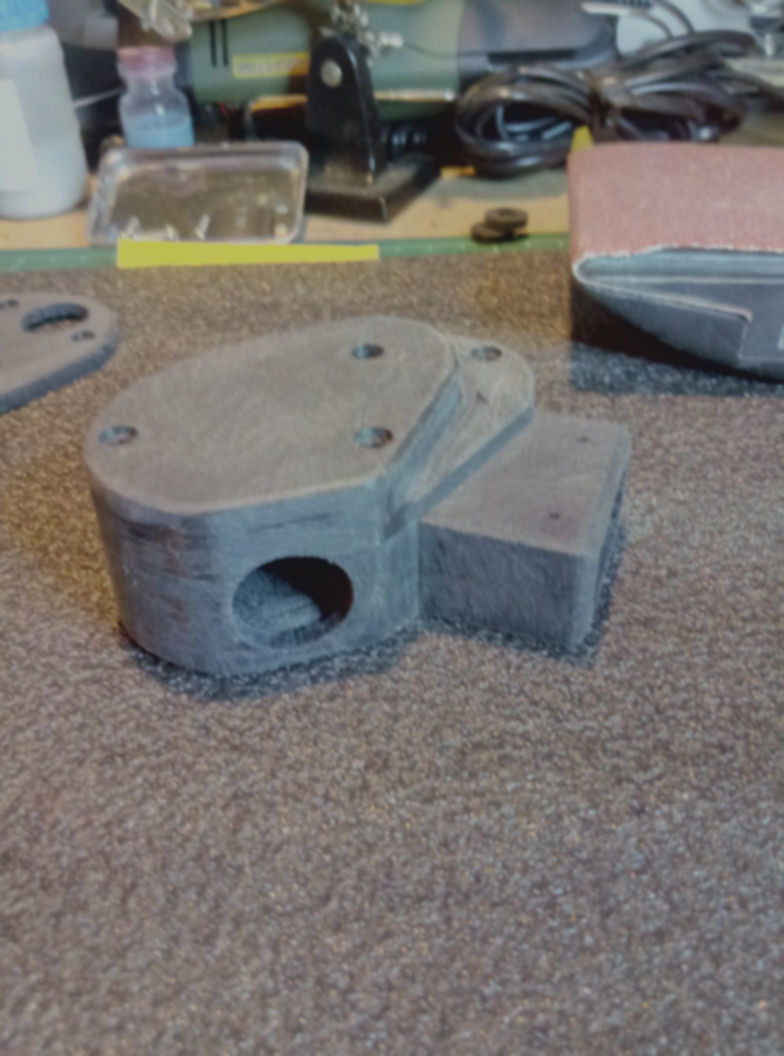
Cougar base ready and painted . Now I have to print the parts for the Warthog sensor mounting inside. P.S: While waiting for further cockpit parts to be printed, I work at the small side consoles for my command unit again Just fixed the gear and the hook lever at the panels, They are very tiny
-
sad! Maybe you can post some photos from time to time if you are allowed.
-
Universal military aircraft homecockpit project
Viper1970 replied to Viper1970's topic in Home Cockpits
And the outside grip shells of the F/A-18C throttle, which also get's mounted on a Warthog throttle base
-
Absolutely top notch work!
- 340 replies
-
- 1
-

-
- ka-52
- black shark
- (and 3 more)
-
Universal military aircraft homecockpit project
Viper1970 replied to Viper1970's topic in Home Cockpits
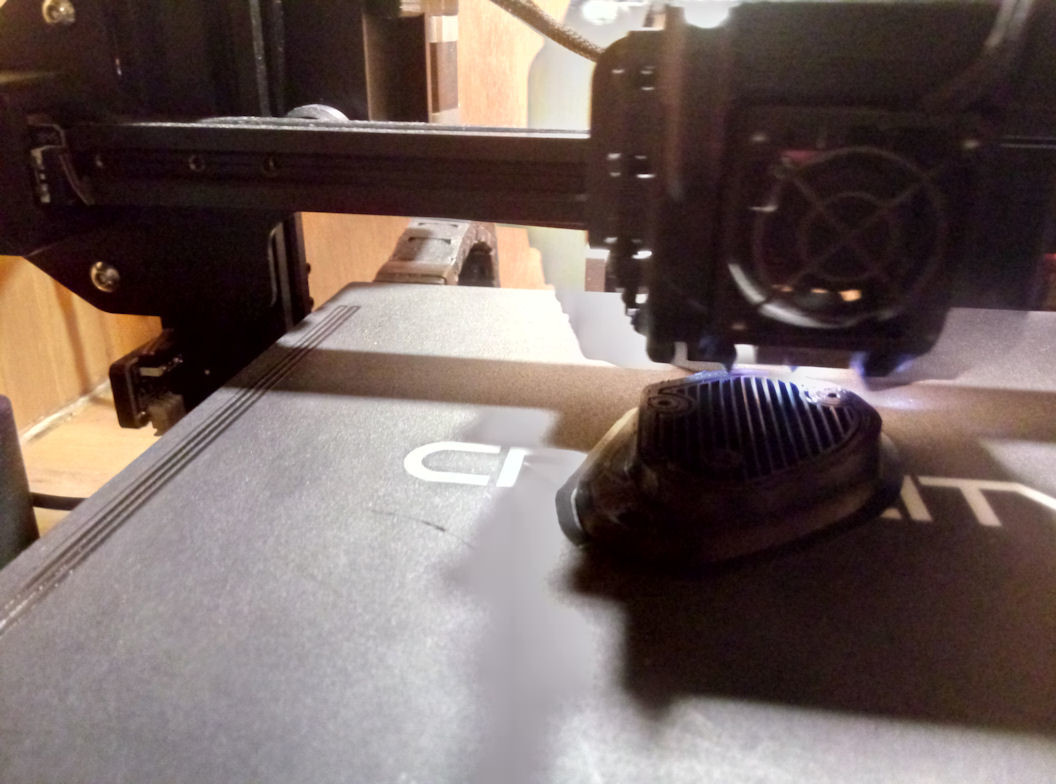
F-14 throttle grip in the works. Last part will be printed tomorrow . Just sanded it a bit an after this I will adapt it to one of my Warthog bases. I hope for a bit better weather the next time to be able to spray filler and paint it. I used 0.12mm layer height here (0.12 fits better to the ender z-axis stepper as 0.10), a 0.5 nozzle, a speed of 0.55mm/s and an infill of 60% (bed temp is 55°). I always print with a relatively high temperatur for PLA (original Creality PLA) of 228° which turn out perfect in my case. The surface is smooth directly after printing and what is much more important, it's really tough so you can do a sanding very well. I also tried PETG, but it makes not much difference. If you print PLA relatively hot it's also very, very stable and can be sanded good enough. And although PETG is also nice to print, I prefer PLA over it. It has much less stringing during the print.
-
Your pit is done so well, I will never reach this kind of perfection. Looks like a very big "side project" you startet. Can you share the discord link. I'm very interested in it
-
Universal military aircraft homecockpit project
Viper1970 replied to Viper1970's topic in Home Cockpits
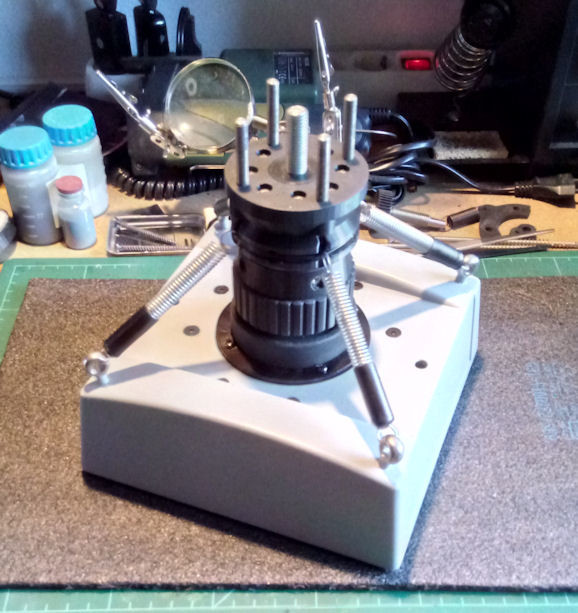
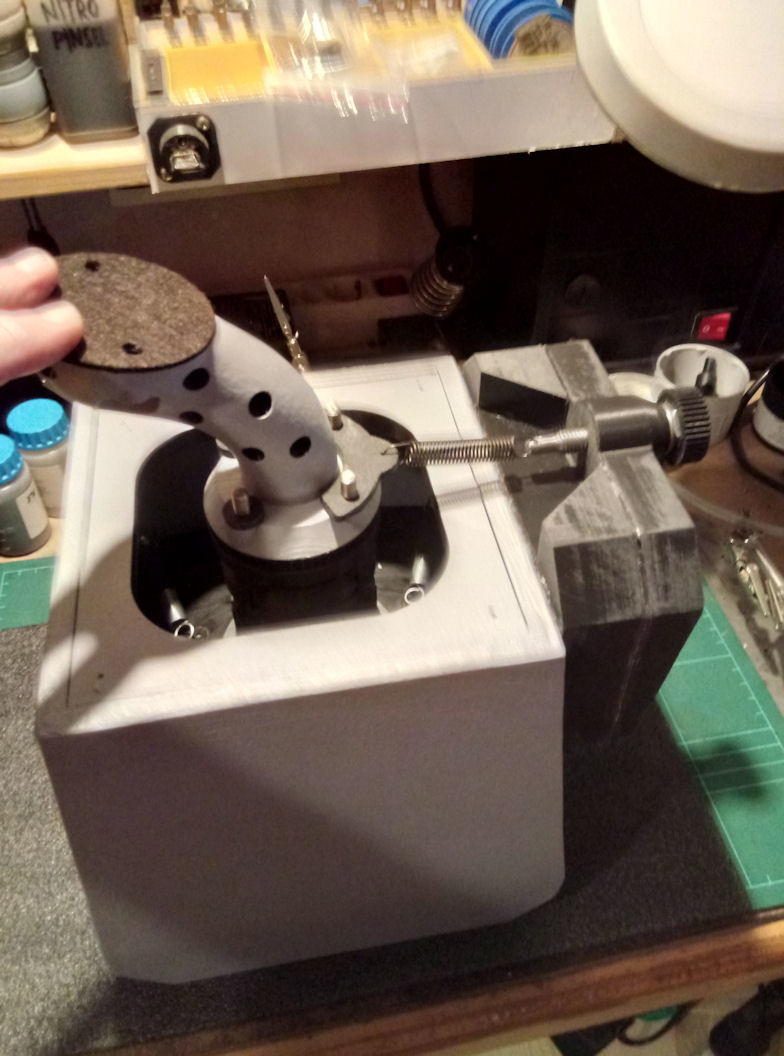
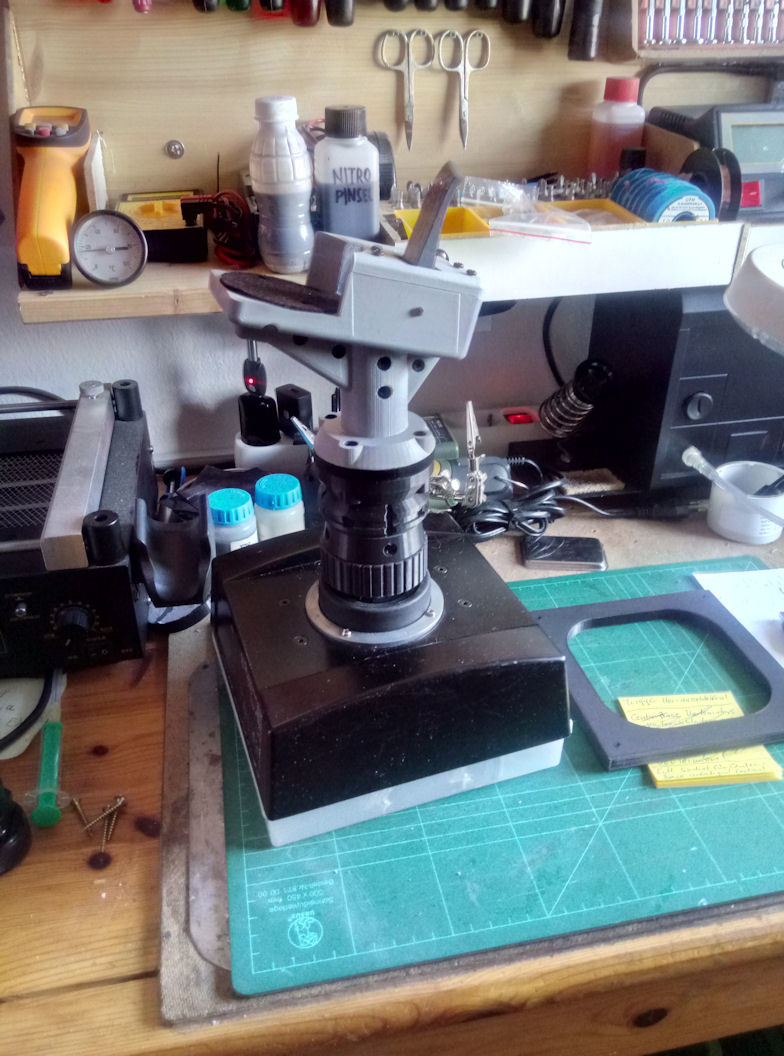
Just finished the "counter-weight mechanics" for my center base. The spring can be adjusted with the knurled nut. This spring has not much strenght, just enough to keep the TM metal grips balanced in the center if the base is angled mounted on my center console. It's so smooth that it will even not affect the movement of the stick anyway noticeable. At the moment the four spring inside the housing on top of the Cougar aren't connected, so I had to hold down the extension for a better understanding of how it works. I had to remove the springs again for the paint-work that follows on the Cougar base. The counter-weight mechanics has also to be fillered and painted in grey. Edit: ... and just mounted the inside springs for a better test and also put the Warthog stick on it. Sadly I have not printed the sockets for the TM-grips right now, to be able to mount them correctly, but the weight is the important thing to see if all is balanced. Works like a charm. Just enough space to let the spring completely remove it's tension when in the up position without being loose. You did not notice the fifth spring at all. For lighter grips I can remove the spring completely or, what I will prever, add some weight to the plastic grips also, using some balancing weight for aluminium rims glued inside the grips.
-
My first own computer was a 386DX 40 from Profex in 1992. My first computer I was playing Flight Simulator II on, was my dad's C-64. After this he went over to IBM compatible PC's and bought a ridiculously expensive Genie 16. I was really pissed, cause this was such a huge step backwards for gaming compared to the C-64. Only CGA graphics with two three color schemes to choose from (Magenta, Cyan, White or Red, Yellow and Green) . Anyway I have played Flight Simulator II (the PC version), Sublogic's Jet, and Chuck Yeagers advanced flight trainer endless hours on this machine. I bought such an analog stick for it, which looked like one of the sticks out of an RC transmitter and glued a Quickshot II grip from the C-64 on top of it . The analog stick was a huge upgrade for flying compared to the digital sticks of the Comodore.
-
Resoldering all connections at the inoperable PCB's helped me so often in the last years. Equal what it was, Hifi, TV, computer parts or HOTAS systems. Nearly 75% of the resoldered electronics did their job again after the rework.
-
Also ich stehe auch auf LowVis oder Camo und da auf das EU-Green Scheme oder die Vietnam Tarnlackierung. Bunte Sonderlackierungen oder auch die alten Lackierungen von der Navy und den Marines sind nicht so mein Ding. Desert gefällt mir auch nicht so besonders, obwohl es ja auch LowVis ist. Bei Helos das ganz dunkle Oliv der Army und bloß kein Haifischmaul oder ähnliches (selbiges gilt auch für die A-10 - da bevorzuge ich aber das EU-Green Camo der A-10A über das graue Schema der neueren A Modelle bzw. der C Variante). Hab bei meinen Modellen fürs Pit-Zimmer ewig gesucht um die F-14, F-16 und die F/A-18 ohne bunte Staffellackierungen an den Heckflossen zu finden. Meist bekommt man Sonderlackierungen oder buntes Heck .
-
Hab's geändert F-4E ist jetzt unter Heatblur. Bin momentan viel am Basteln und hab da nich aufgepasst .
-
Universal military aircraft homecockpit project
Viper1970 replied to Viper1970's topic in Home Cockpits
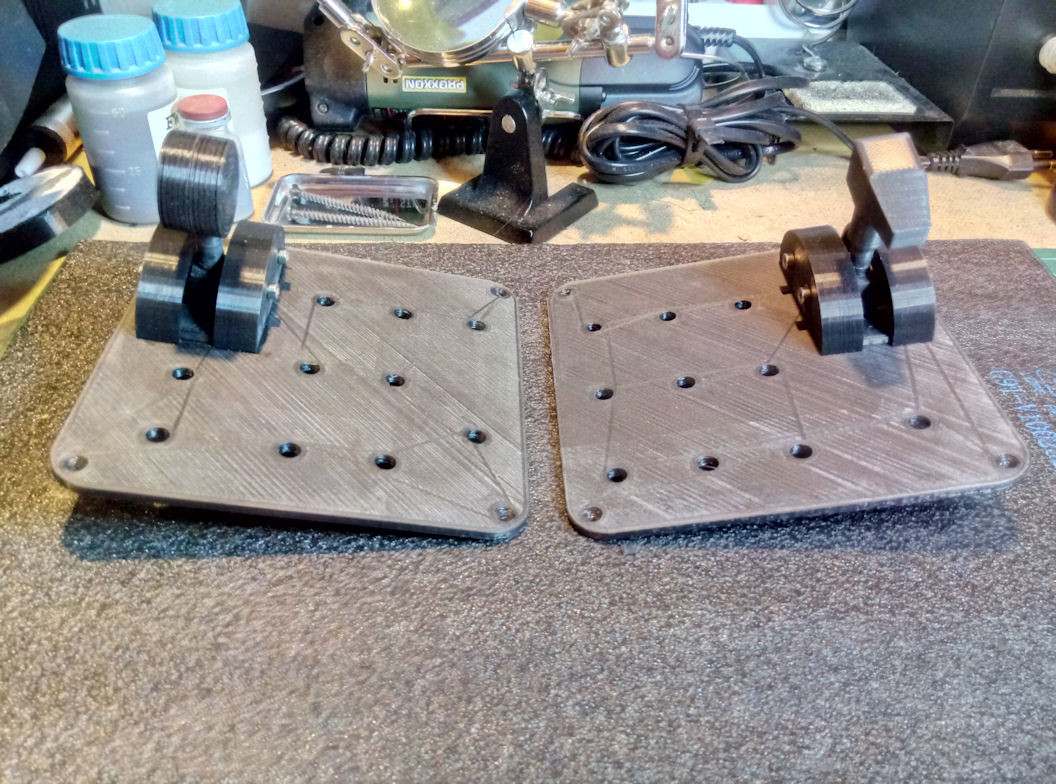
The extension parts that are on top of the Cougar base. The knurled nut is freely rotatable from the rest, which is srewed to one part together. This first extension can be slipped over the M10 srewbolt, and srewed to the base like an original grip. The rest of the screw bolt on top slips inside the bottom of my other extensions and is an additional stabilization. On top of this base-extension my other special extensions are mounted (helo, jet, yoke) with four small knurled nuts that are screwed to four M6 bolts which will be inserted on top of the first extension and superglued. Threads are already cutted, but I have to saw four bolts from a large thread bar and then do some rework with my lathe. The Cougar base has two holes that run through the whole base including the bottom plate in which to long srew bolts fit. This will fix the Cougar base at my center console. Over this all the housing with the extension guidance plate is mounted. I have also constructed a mount for the fifth spring at the front, which will act as a "counterweight" for the heavy TM metal grips. This one will be adjustable in strenght and can also be completely removed. The parts are still printing. The Cougar base has also still to be painted in grey . All of this was possible, cause my cables to the base are transfered outside of the extensions. It's a bit like WinWing does it with their cables at their throttles.
-
Universal military aircraft homecockpit project
Viper1970 replied to Viper1970's topic in Home Cockpits
For the TM Viper and Hornet grips I will need stiffer springs or a fifth adjustable spring at the front to compensate their weight. Cause of my towards to the seat angled base and the upside down L-shape of the extensions (I made this to have the stick more near towards me and also to have more travel to push without getting problems with the main panel) they tend to move towards the seat out of center I just testet it with the TM grips and they are heavy as hell . But I think I will make the idea with the fifth adjustable spring, that can then regulate the "counterweight" to the grip, cause I don't want much stiffer springs. They are just right now, except for the TM grips. -
Universal military aircraft homecockpit project
Viper1970 replied to Viper1970's topic in Home Cockpits
All put together, still loose
-
Universal military aircraft homecockpit project
Viper1970 replied to Viper1970's topic in Home Cockpits
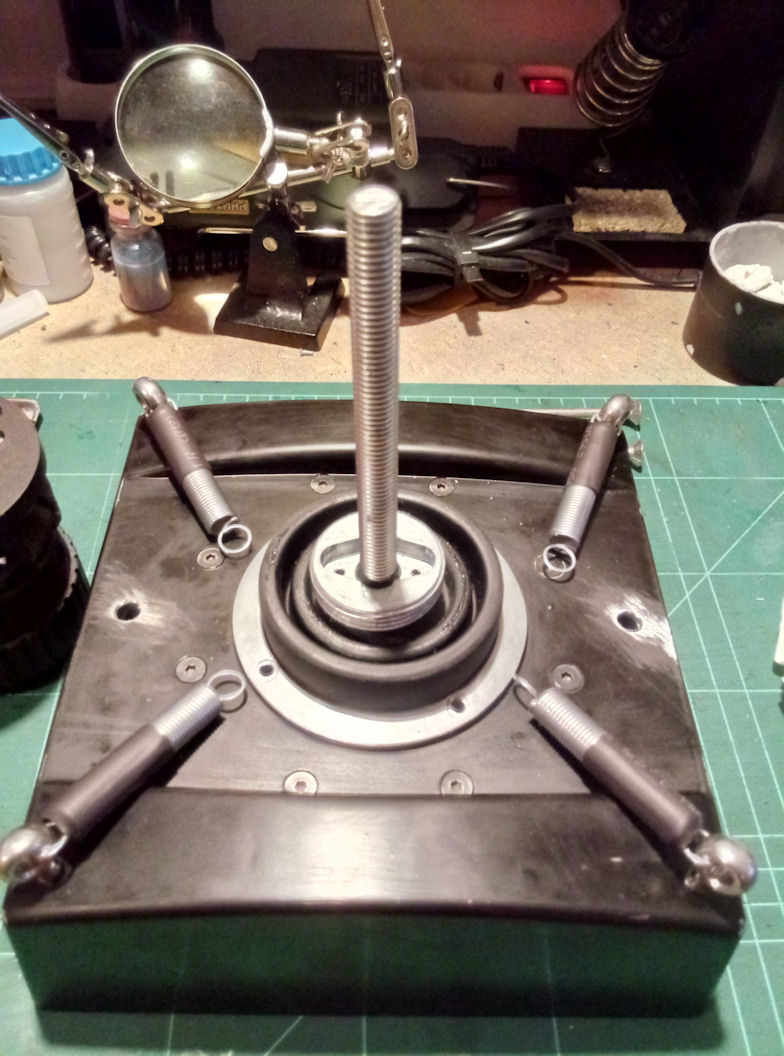
Just removed the original springs inside, used micro washers to remove every little play inside the axis mechanism and greased the whole mechanics with a grease similar to NyoGel 767A. Magic! It is so smooth, there is not a single bumb, clonk, detend or anything that you could feel while moving the stick. It returns absolute precisely to center and there is no extra resistance you have overcome to leave the stick out of it's center position. It's really a dream and so simple, no cams, piston spring mechanics or anything other complex rocket science, just four diagonal tension springs. Stiffness can be adjusted with different springs mounted, but for me it feels just as good as it is and I can always mount another set of springs if needed. Now I have to integrate the Warthogs "hall-sensor" and the magnet at the end of the axis (essentially the same way like in the Warthog itself - will print some small parts for this) -
Universal military aircraft homecockpit project
Viper1970 replied to Viper1970's topic in Home Cockpits
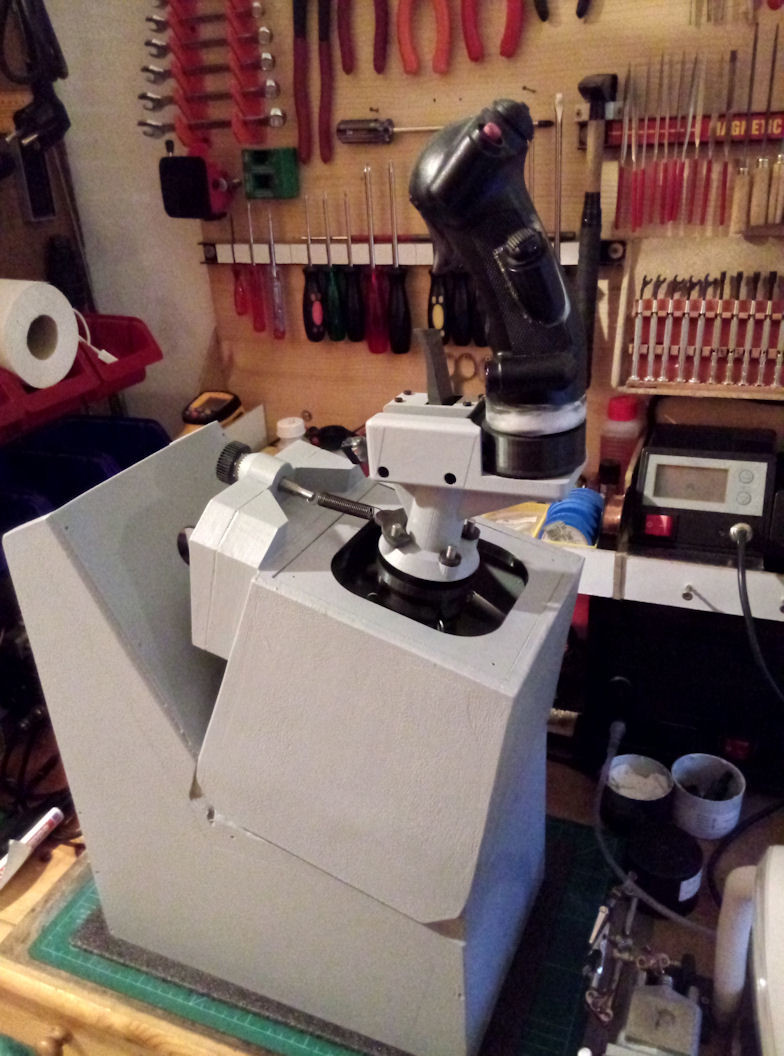
The spring mechanics on top of the Cougar. And also with housing mounted. Still a test nothing is fixed with screws in the "grip shaft" and the original torsion springs inside the cougar are still mounted. I will remove them and do a greasing with NyoGel later. and the first part of the F-14 throttle grip in print. I have two LED's inside my air-flow-nozzles in the print head, to be able to better observe what is happening directly at the printing-nozzle. The printer is an Ender 3 Pro with a modded print head and a dual z-axis system, where the second axis is simply driven over a toothed belt on top of the z-axis frame. This improved the print quality a lot in my opinion. I made this instead a second stepper, cause it's easier to do and both axis are running substantial in parallel this way.
-
Genau, jetzt wo du es sagst kommts mir auch wieder . Der Disketten-Filter, genau den hatte ich auch noch rein gefrimelt. Ist schon ne Zeit her der Umbau. Aber funzen tut das Ding einwandfrei.
-
Wow Hannibal, what an amazing work! You are a genius at building things! This motion platform rocks!!!!! That thing would be a dream in my little simulation cave, but I think my wife would ...
-
Also ich hab beides und so schlecht ist die PS3 Cam mit Open Track auch nicht. Man muss halt den IR Filter der Linse entfernen , dann geht das schon. Ich verwende das System weiterhin an meinem Kommandostand. Hatte ich schon vor Track IR im alten Pit, da eben günstiger und war eigentlich zufrieden. Eines der Dinge die recht gut funktioniert haben, andere Dinge im damaligen Pit haben viel mehr Kopfzerbrechen bereitet. Der "neue" Track IR 5 kommt ins Pit und wird im Wechsel mit der G2 benutzt. Je nach dem was mir grad lieber ist.
-
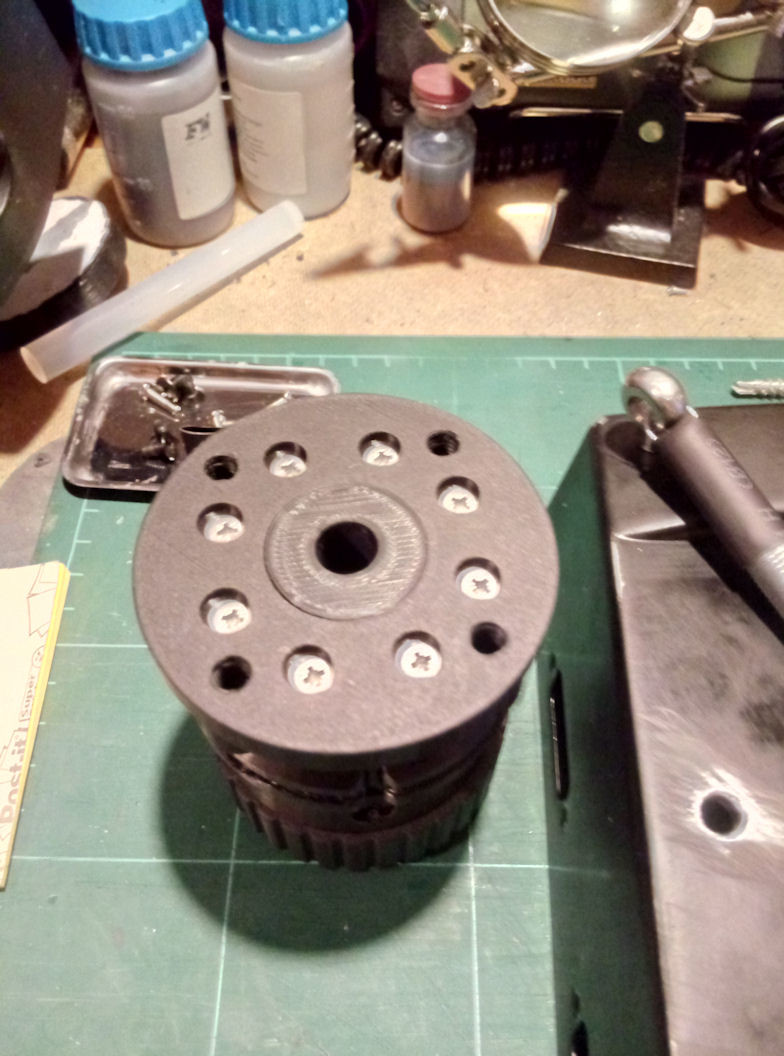
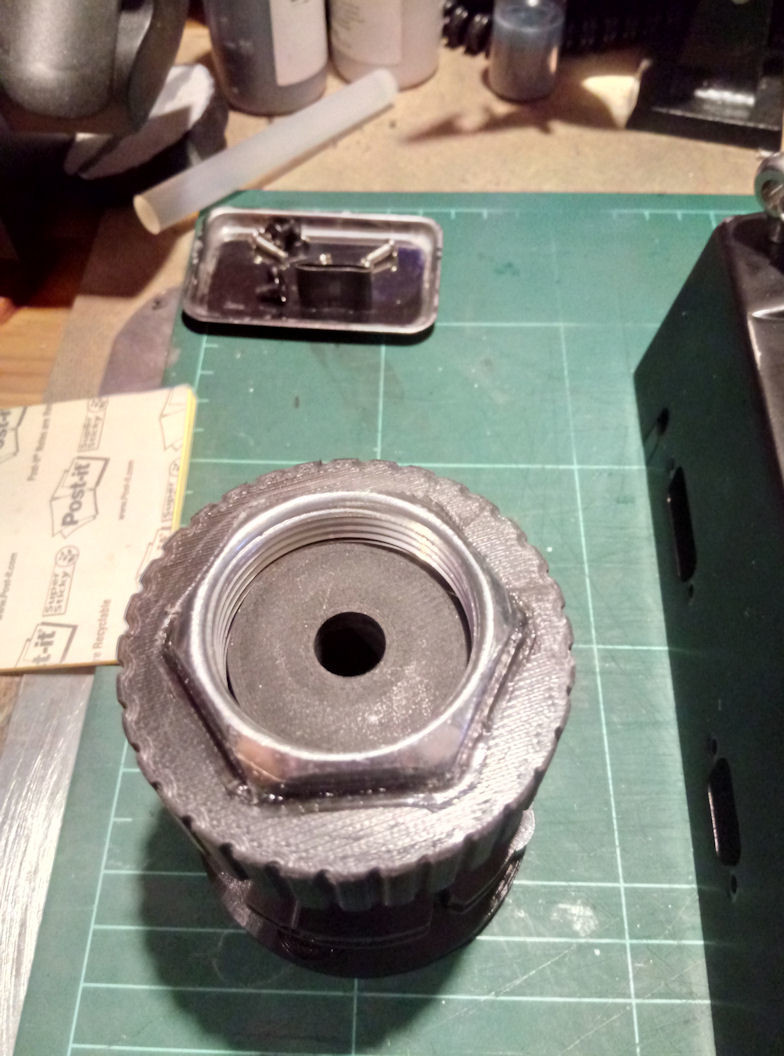
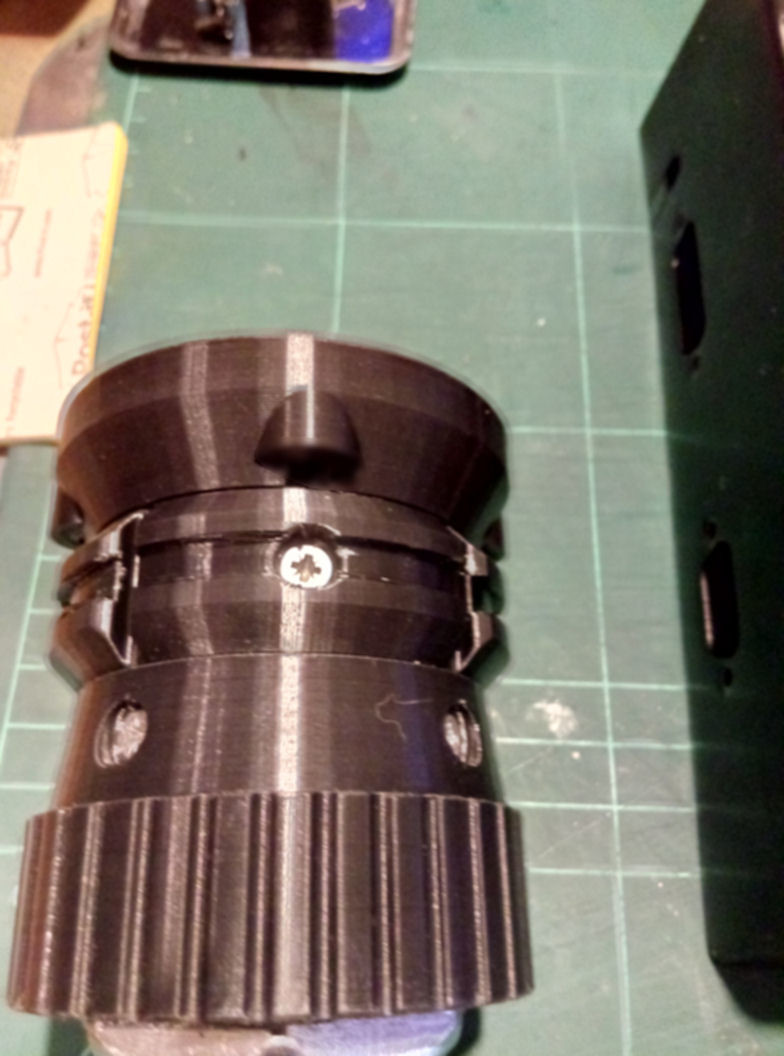
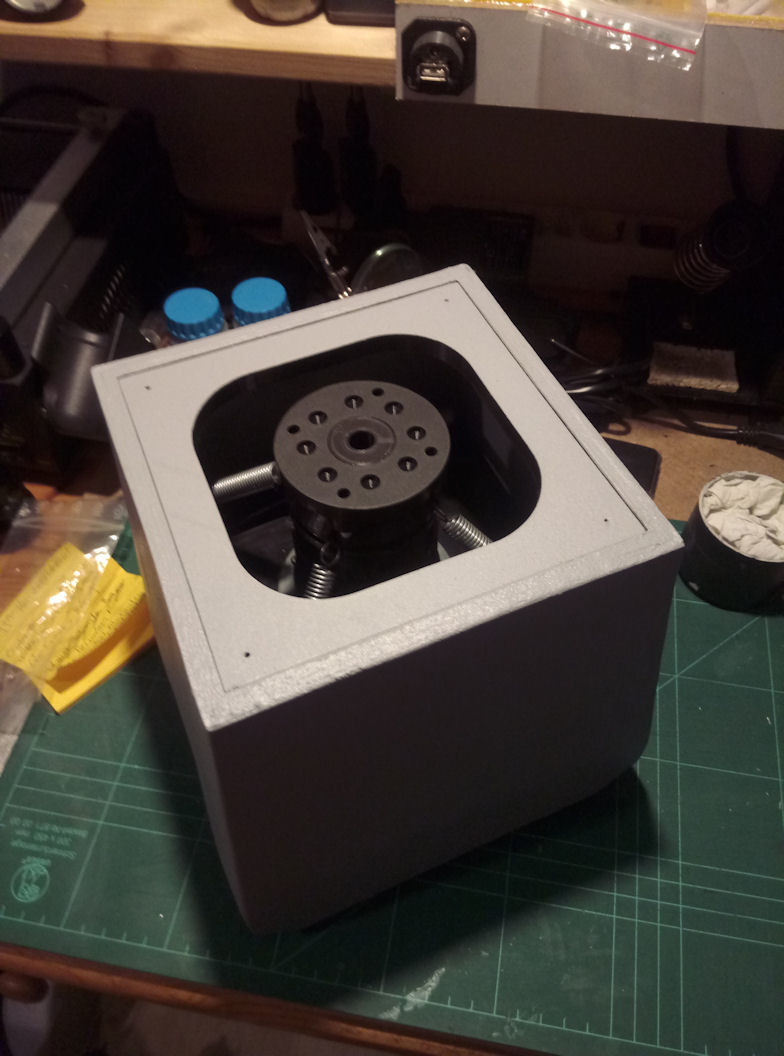
Universal military aircraft homecockpit project
Viper1970 replied to Viper1970's topic in Home Cockpits
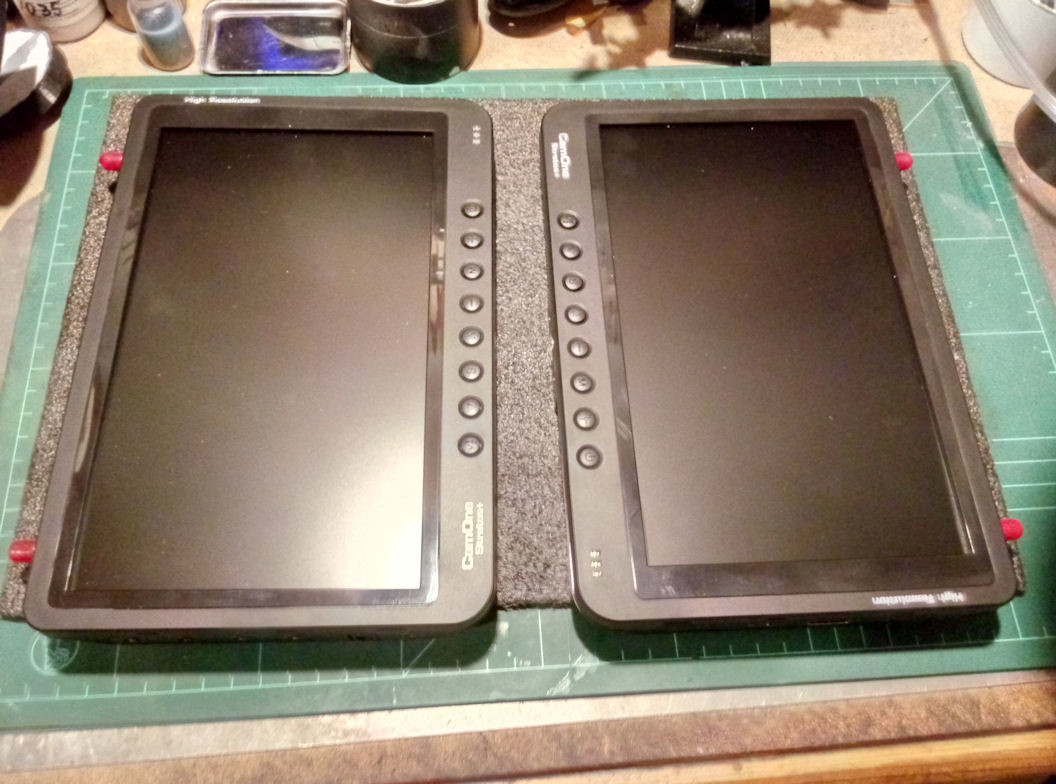
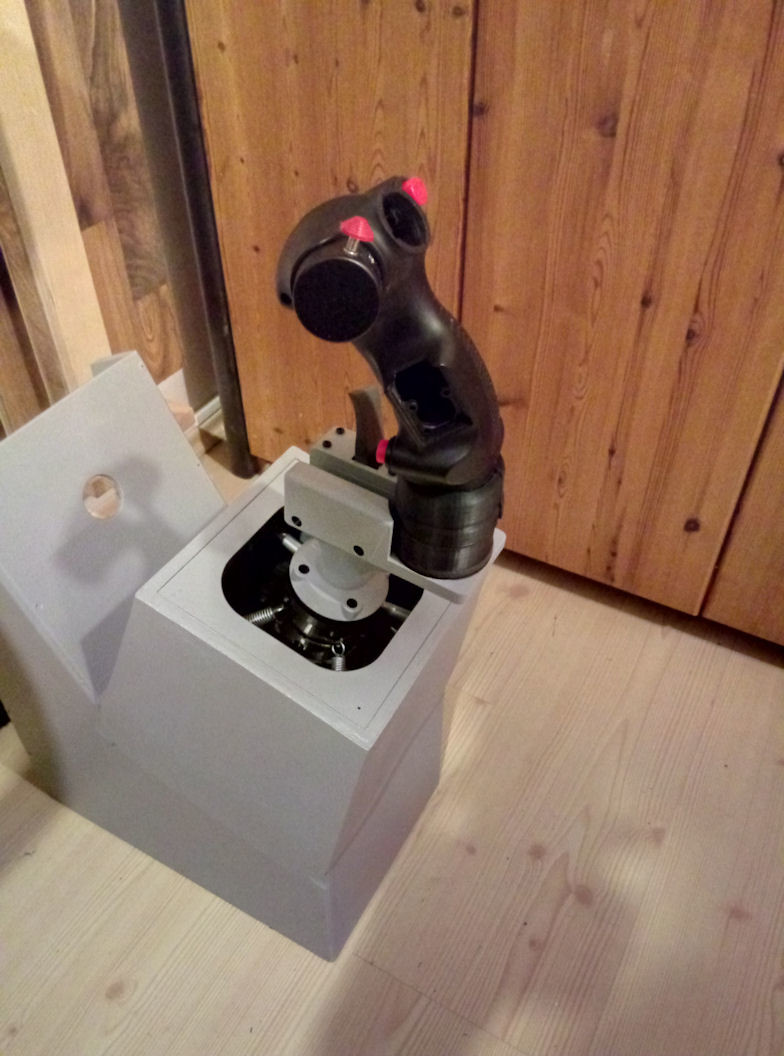
So, printer repaired and running again! It was only a loose contact in my Molex plugs I added, to be able to remove the whole print-hat without desoldering anything. The old Cougar base with the jet extension and the parts between. The first from the bottom is the nut-part. Inside is a steel nut. The second is just an adapter to get some more lenght and a transition to the third part. Here the springs to the four corners on top of the Cougar base will be connected (original torsion springs inside will be removed). The fourth part gets four screw bolts and there will be all extensions with knurled nuts connected. The whole mechanics up to the extension will be cased by a big housing, which is just in the work. At this housing you can integrate different guide-plates for the travel of the stick. One with normal rounded square hole for normal use. One with a slot only, to prevent x-axis movement for the yoke (I had the idea of a pendular yoke for the big birds before TM came arround with the Boeing Yoke ) and one with a round hole to limit the x/y diagonal movement. Inside the mechanics there will be a 10mm bolt, which also fits with a small part of it's lenght inside any extension. So the whole thing is really stable. The Cougar base will also get grey paint, but if the housing is mounted to it you didn't see it anyway . P.S: At the photo the part where the spring will be conneted is in a wrong direction. The slots for the springs should point to the four corners of the Cougar base for sure, but this was only a test wtih still loose parts. The springs will be holded at this part by a simple cable tie, which fits in the notch arround the part. I did this, cause it's much more stable as printed pins with a srew or a bolt to connect the springs. And if it's worn out you simple replace the cable tie. There is nothing which could brake of. and the center console with the housing for the Cougar base and it's mechanics (it's seperate and will be screwed to the console). All is only just painted with filler at the moment. The guide-plate will be fixed with four neodym magnets inside the frame and the plate itself has four little srews inside that vouch on these magnets. If you want to change the guide, just pop it out and take another one. On top of the console the panel, respectively the TFT for the MFD's and the instruments is connected at the rig (on the place a wheel is mounted originaly). The panel is attached to this TFT and can be changed for jets or helicopters and maybe also one for the big birds in future. I still can drive racing cars in the rig, cause all can be removed and a steering wheel with gearshift, handbrake and car pedals etc. can be mounted. As said this thing is "universal".
-
Universal military aircraft homecockpit project
Viper1970 replied to Viper1970's topic in Home Cockpits
Not much to show at the moment, cause my printer makes trouble. Looks like the hotend has a cable break. Started a printjob at night and in the morning there was nothing more as a half piece printed. Just have repaired it a few weeks ago and it did run so perfectly. Now this .