Terry Dactil
-
Posts
475 -
Joined
-
Last visited
Content Type
Profiles
Forums
Events
Everything posted by Terry Dactil
-
Yes. These should be more accurate than the bombs I have been scattering far and wide around targets. Are the rockets working though? I can get the ground crew to hang them on the wings, but in the controls setup I can't bind the one listed keystroke to a Hotas switch. Also I can't find any control/arming/selector panel in the cockpit for the other functions. The manual only shows rockets as a 'work in progress'. Suggestions please? ___________________________________________________________ Duh! There are new training mission that shows where the Master Arm and Salvo switches are placed in a truly British WW2 cockpit layout. In the training mission there is now a great big "salvo" switch on the coaming that wasn't there before. Still can't bind a hotas key to fire the rockets though.
-

need track replay Mosquito Handling, what happened?
Terry Dactil replied to Bozon's topic in DCS: Mosquito FB VI
I have to agree. There seems to be no resistance by the wheels to any lateral movement. It is like the runway surface is ice. If you try really hard it is possibly to take off with the aircraft pointing about 90° off the direction of travel. There are some big problems with the undercarriage dynamics. My particular whinge being the excessive pitch up moment on touchdown. -
Yes. I have just done a beam approach into Manston in bad weather while flying the Mosquito. I was in a crosswind and the cloud / snow particles were moving quite rapidly across the flight path. The cloud / snowing effects are very pretty, but there is something badly wrong with the dynamics. In real life when you are flying in rain or snow where you can see the particles they are always coming straight towards you as you are both equally affected by any wind. You are both in the same air mass and at this stage its speed and direction is irrelevant. It got even worse when I turned 90° and flew downwind. Now I was being overtaken by the clouds and snow. It was passing me and moving away in the forward direction as if I was stationary on the ground. It looks like ED need to do some revision on their relative frames of refece, and while they are at it perhaps change their wind directions to the common standard 'coming from' not 'blowing to'. ____________________________________________________________ Update: I have to take it all back! I flew the mission again and everything looked perfect. Even the tower told me the correct wind direction ( After landing the snow was visibly now blowing 180° different from the first time. Perhaps something randomized in the mission is screwing thing up?) ________________________________________________________________ Update 2: Repeating the mission several times (LSHFT + R) gave the weird effects and reversed wind direction again each time. However, a restart of the computer and DCS OpenBeta restored normal effects. Strange
-
Engine exhaust flames. Are they realistic?
Terry Dactil replied to Terry Dactil's topic in DCS: Mosquito FB VI
Yes I have, and I have also operated aircraft engines for more than 40 years. Aircraft engines are not designed to give extreme amounts of power, run on exotic fuels and have 30 second overhaul life. Yes. That is very impressive, but I bet you have never seen a drag racer engine running for many hours like an aircraft engine has to. That is not a valid comparison. -
Engine exhaust flames. Are they realistic?
Terry Dactil replied to Terry Dactil's topic in DCS: Mosquito FB VI
Yes . We see engines being test run and there are pretty flames out the exhaust. Why are the engines being test run? Probably to adjust the carburetor. Exhaust flames do not produce power and are just wasting fuel. To be fair, there is one way that there may be some combustible mixture in the exhaust stubs. These are supercharged engines which is why they do not have tuned exhaust / collector pipes. There is some brief valve overlap at the end of the exhaust stroke where both intake and exhaust valves are open at the same time and the pressurized intake charge helps scavenge and helps the exhaust on its way. However, the spark plugs are not firing here so there should be no ignition source to produce a flame. If there is, it means there was combustion still occurring on the exhaust stroke (or perhaps a large glowing carbon build-up) and the mixture control is grossly in error. Sorry /rant off. -
Engine exhaust flames. Are they realistic?
Terry Dactil replied to Terry Dactil's topic in DCS: Mosquito FB VI
All that demonstrates is that some programmer is completely clueless about how a 4 stroke engine works. the combustion of the fuel gives pressure to drive the piston down on the power stroke then the upward exhaust stroke gets rid of the combustion gasses in preparation for the next (intake) cycle. if there is still fuel burning during the exhaust stroke it cannot provide any power and is just a waste of fuel and shows that the carburetor is not adjusted correctly/. As a side note: The problem of WW2 aircraft being seen at night was not because of flames from the exhaust, but because the exhaust gasses are hot enough (>1000C) to cause the stubs to become red-hot and this glow was visible. You can see a lot of photos where the bombers have a metal shield over the exhausts to hide the glow. Here is an example:
-
This one is probably more useful. "Start time(r) ......... Check time(r) will give you the elapsed time since the first command. Elapsed time.vap
-
reported Mossy controls input setup
Terry Dactil replied to 71st_Mastiff's topic in Bugs and Problems
Yes. It is quite a treasure hunt now to find where the controls are concealed. Look for input.Mosquito.trigger_camera_bomb -
Look back view (F4) still broken - but you can fix it!!
Terry Dactil replied to Terry Dactil's topic in Bugs and Problems
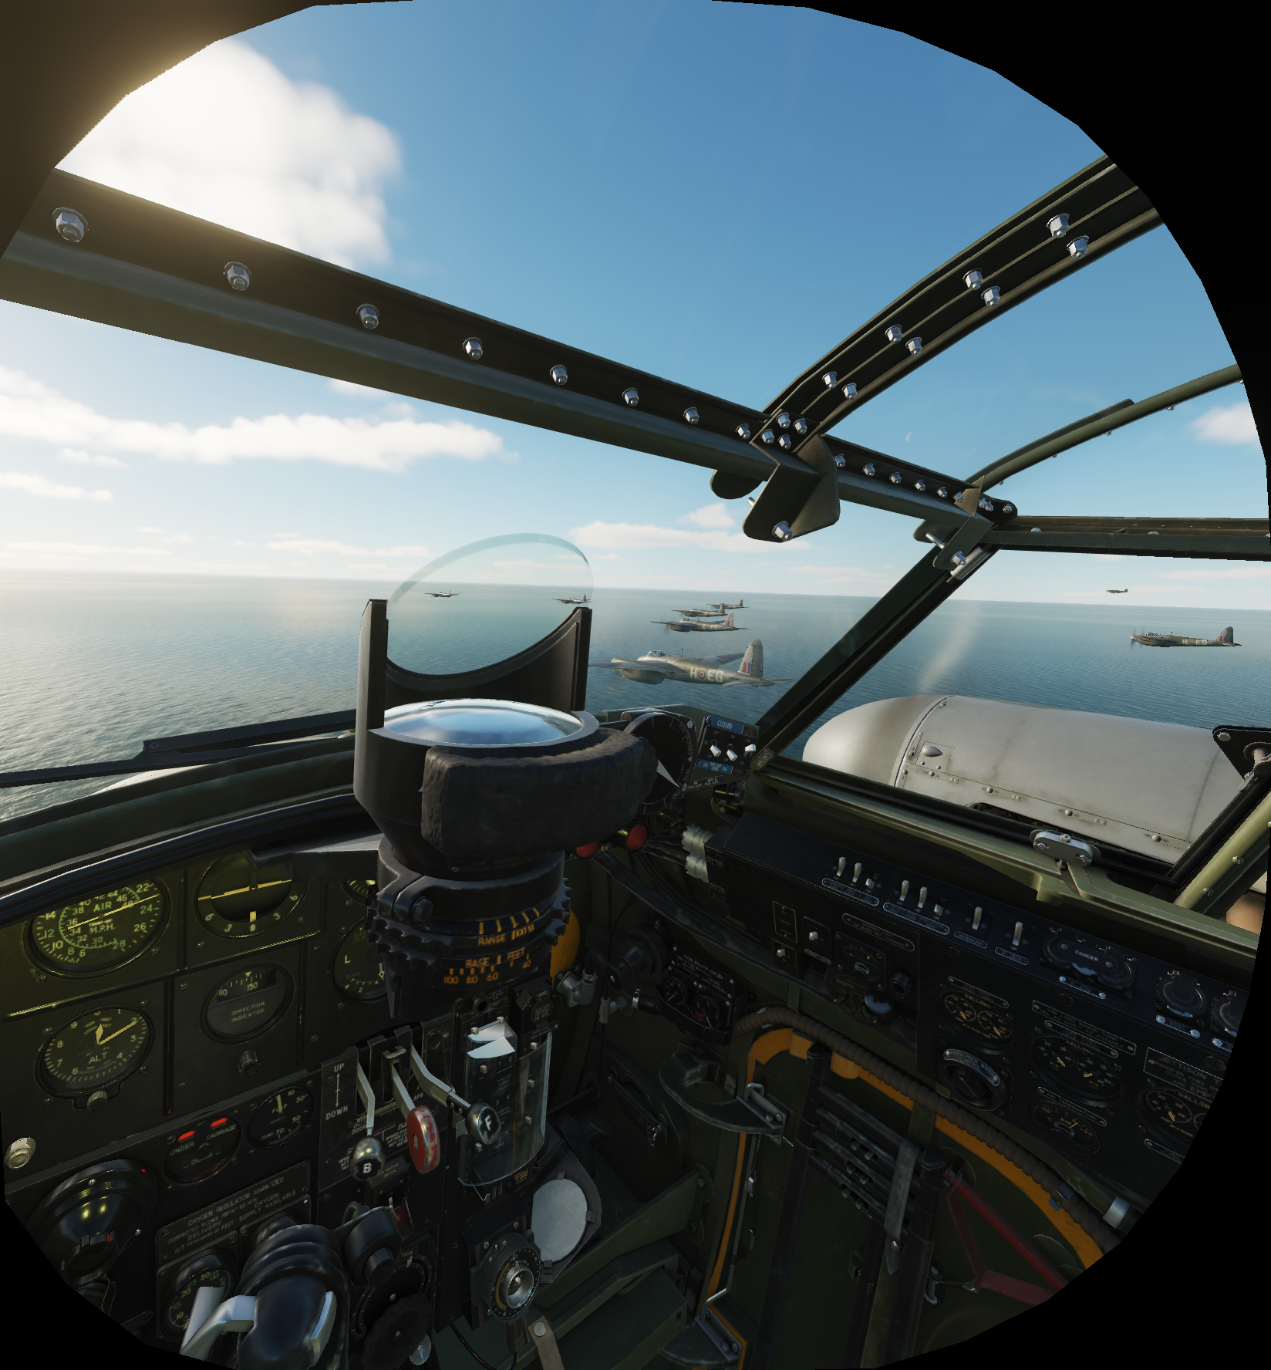
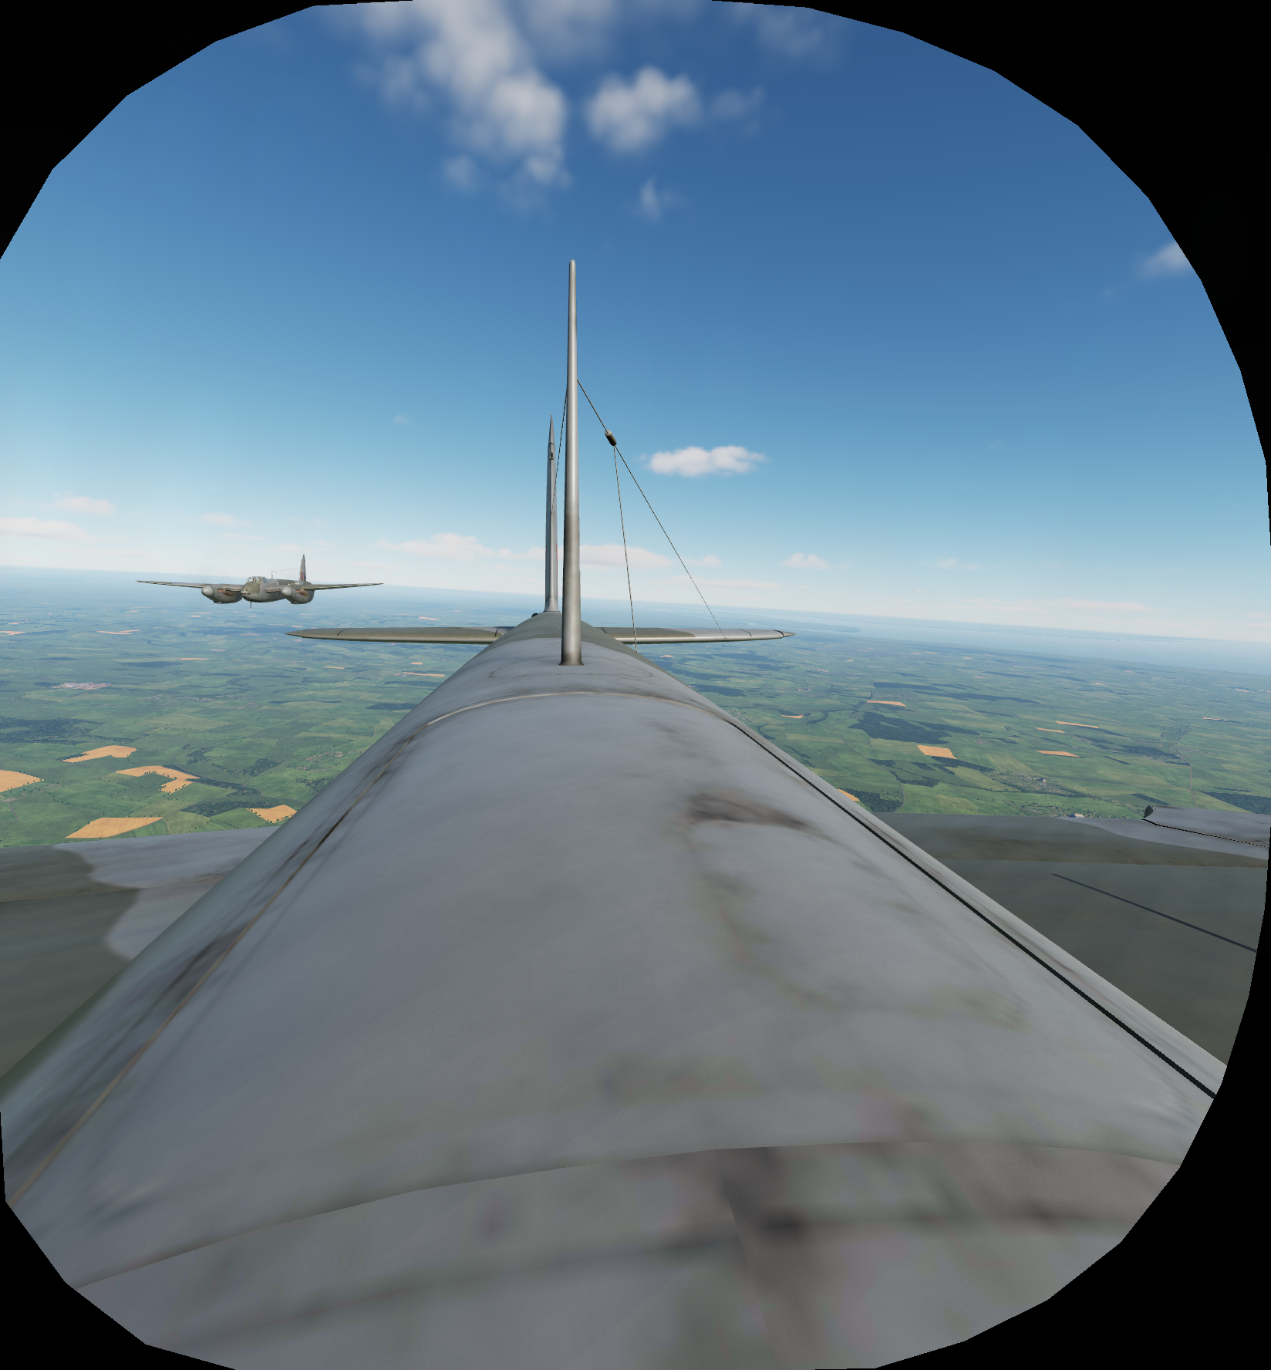
Call me obsessed! For the Mosquito I have made prop rpm levers, an analog brake lever/ park brake, and added the 2 speed elevator trim mod. Nigel my Navigator also responds to my Voice Attack commands and helps with the cockpit chores. Now with the look back mod I can see in VR when I am surrounded by Mosquitos. It is getting better all the time!
-
Look back view (F4) still broken - but you can fix it!!
Terry Dactil replied to Terry Dactil's topic in Bugs and Problems
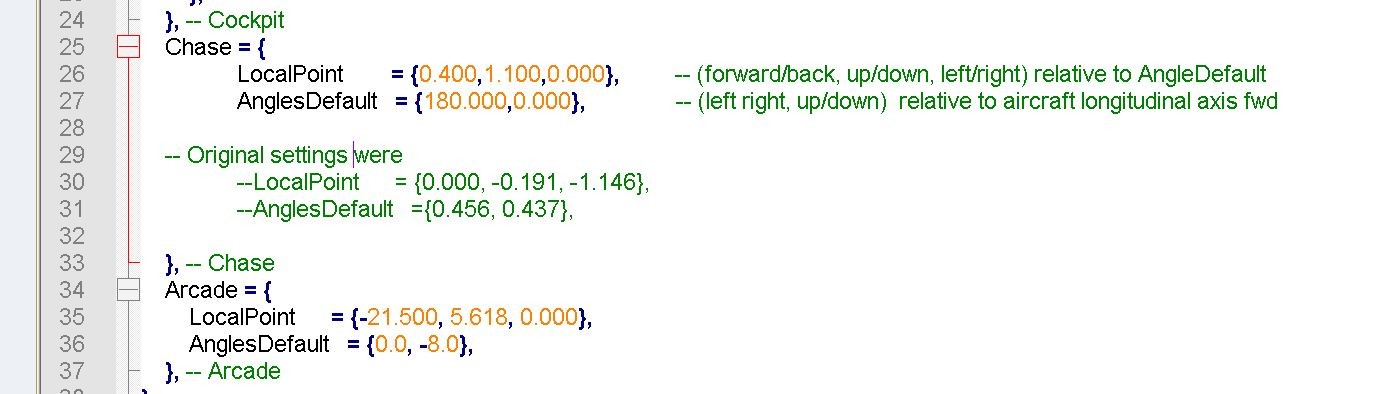
I can see my wingman! Seems like the best way to fix something that ED can't be bothered about, is to fix it yourself. Go to the file <your drive>:\DCS World OpenBeta\Mods\aircraft\MosquitoFBMkVI\views.lua Change the Chase View lines Look back (F4) will actually look back now, but only until overwritten by the next update or repair. I suggest using OVGME or Open Mod Manager to avoid this. You can adjust the values to move the viewpoint back a bit into the cockpit, but it becomes very cluttered with the aircraft structures.
-
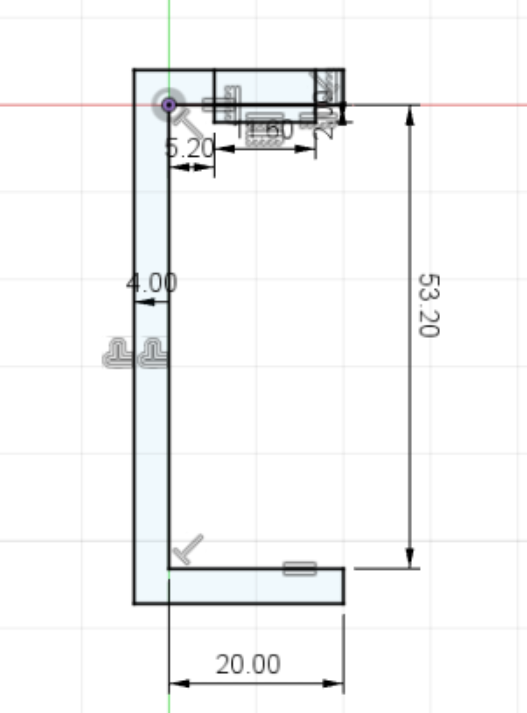
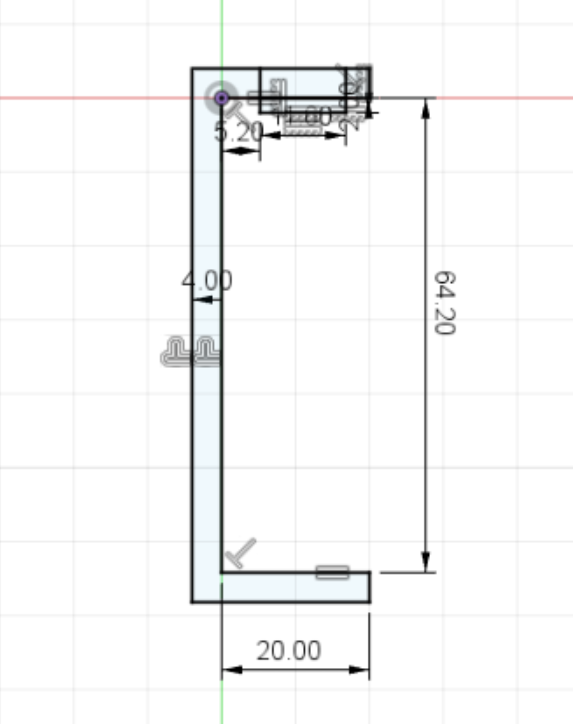
Kirk66: I managed to find the old files. These show the distance between the upper and lower faces as 53.2 mm, but I guess the grub screw takes up the difference from your 50mm measurement. Anyway, from your measurements, it looks like yo want an extra 11 mm and that is easily done. Here are the modified files. Note: Fusion360 file is now 3mf format instead of stl. It is much the same but now includes graphics. Includes a gcode file. These are both for the side clamp only as there are no changes to the other bits. Your buddy should be able to print this. Side clamp-mod61.zip ***************************************************************************************** For anyone who knows their way around in Fusion360 wants to try modifying the original designfiles - here they are. Good luck! Side clamp v8.zip
-
Info: Fixed all my problems with the brute force method. As I was getting the confirmation beep and the log showed the commands being recognized, I assumed something was getting screwed up further downstream in DCS. Uninstalled DCS and cleaned everything off that drive. DCS was the sole occupant of this SSD. Re-installed DCS from scratch. Probably only needed deleting the saved games folder, but what the heck - I had all day to watch the download progress bar.
-
Look back view (F4) still broken - but you can fix it!!
Terry Dactil replied to Terry Dactil's topic in Bugs and Problems
Yes. Tried that. Spent most of the time bumbling around somewhere inside the structure of the wing, fuselage or the engine nacelle. Plus RALT + NUM0 does not save the view for recall if you eventually get something useful. There are plenty of other keystroke options for fancy camera positions and video editing. I just want a look back view that does what it used to do - looks back not forward -
As in many other modules, in the Mosquito the Look Back (F4)view does not look back; it looks forward. It is also positioned under the wing which is a rather weird position to be looking from. This F4 bug has existed (on other modules) for several years now. It was quite useful when it actually looked back. Any chance of fixing it in the next few years? If ED can't be bothered fixing this, does anyone know where the lua code is located so we can modify it ourselves?
-
The standard way of describing any direction relating to the aircraft structure is with you looking forward (and upright). Left and right relate to the aircraft, not you.
-
Analogue Brake Lever Add-ON For Warthog Stick
Terry Dactil replied to No1sonuk's topic in Thrustmaster
Sorry, maybe I could have explained it better ... I replaced the metal ball bearings with the same size of plain bearings made of plastic. There is no axial movement possible. Since there is little movement or loading here a plain bearing works fine. -
Analogue Brake Lever Add-ON For Warthog Stick
Terry Dactil replied to No1sonuk's topic in Thrustmaster
Fortunately I don't have this problem as I am using a 10cm stick extension. I also have an adapter plate that raised the palm rest 5cm so I can easily reach the trim/hat switch without moving my grip. This causes an apparent problem in that now I can't apply full brake without moving my fingers out of the way as they obstruct the lever's full travel. However, this is actually a great feature to have! I can now land the Mosquito, squish the brake lever onto my fingers, decelerate without the risk of nosing over, and have good directional control using the rudder's differential braking effect. Perfect. -
How can I read vertical velocity dial from pilot seat ? (1)
Terry Dactil replied to Swson's topic in Bugs and Problems
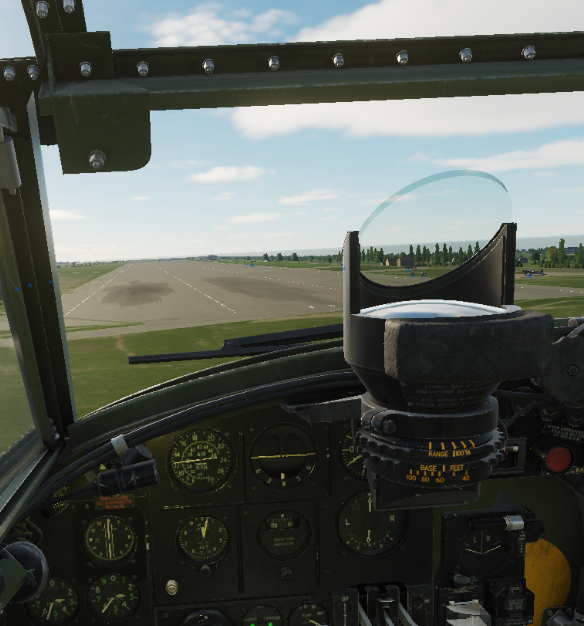
The problem is that the default viewpoint is way off the correct position. As mentioned by other posters the default position needs adjusting because it is way too high and way too far back. Get yourself into the correct position and you can see at least the left half of the vsi which is the needly bit and all that you need. This is what I see on the approach, and I can easily see my sink rate although it is only the left half of the dial You need to move your viewpoint down quite a lot as well as considerably more forward. Adjust it down while on the ground and the windscreen wiper is the perfect indicator for thre correct 3 point attitude Here is my quick and dirty Voice Attack profile to incrementally adjust the viewpoint so I don't have to use the keyboard while in VR. Adjust seating position-Profile.vap Although the command are " move seat ..." the seat does not move ,it is only your viewpoint. but you get the idea.
-
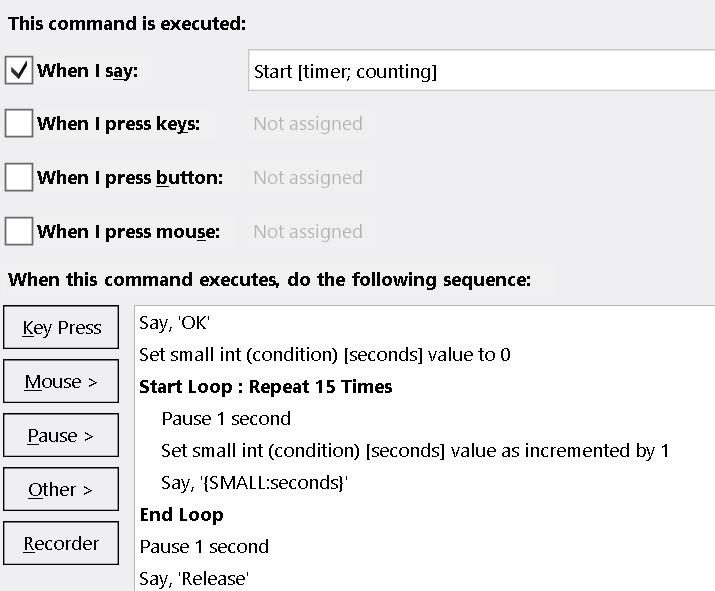
If you haven't made one yet, here is a Voice Attack timer I use to assist DR navigating.
I have set it to announce the elapsed time in minutes and seconds. (Hours can be included, but are not very useful.)
-
OK. Commands now being recognized after the latest update. Trouble is most take about 30 seconds before the action happens. Better, but still pretty much still unusable for me. Any ideas on speeding up the response time? *** DISREGARD *** Fixed by deleting the export.lua files. Now seems to be working OK. *** IT IS STILL BUGGERED *** Works perfectly at start of a mission, but when into the mission some commands (options. kneeboard, wingman etc) are delayed by over a minute.
-
Thanks for sharing the brake lever files. It certainly makes the Mosquito easier to handle on the ground.
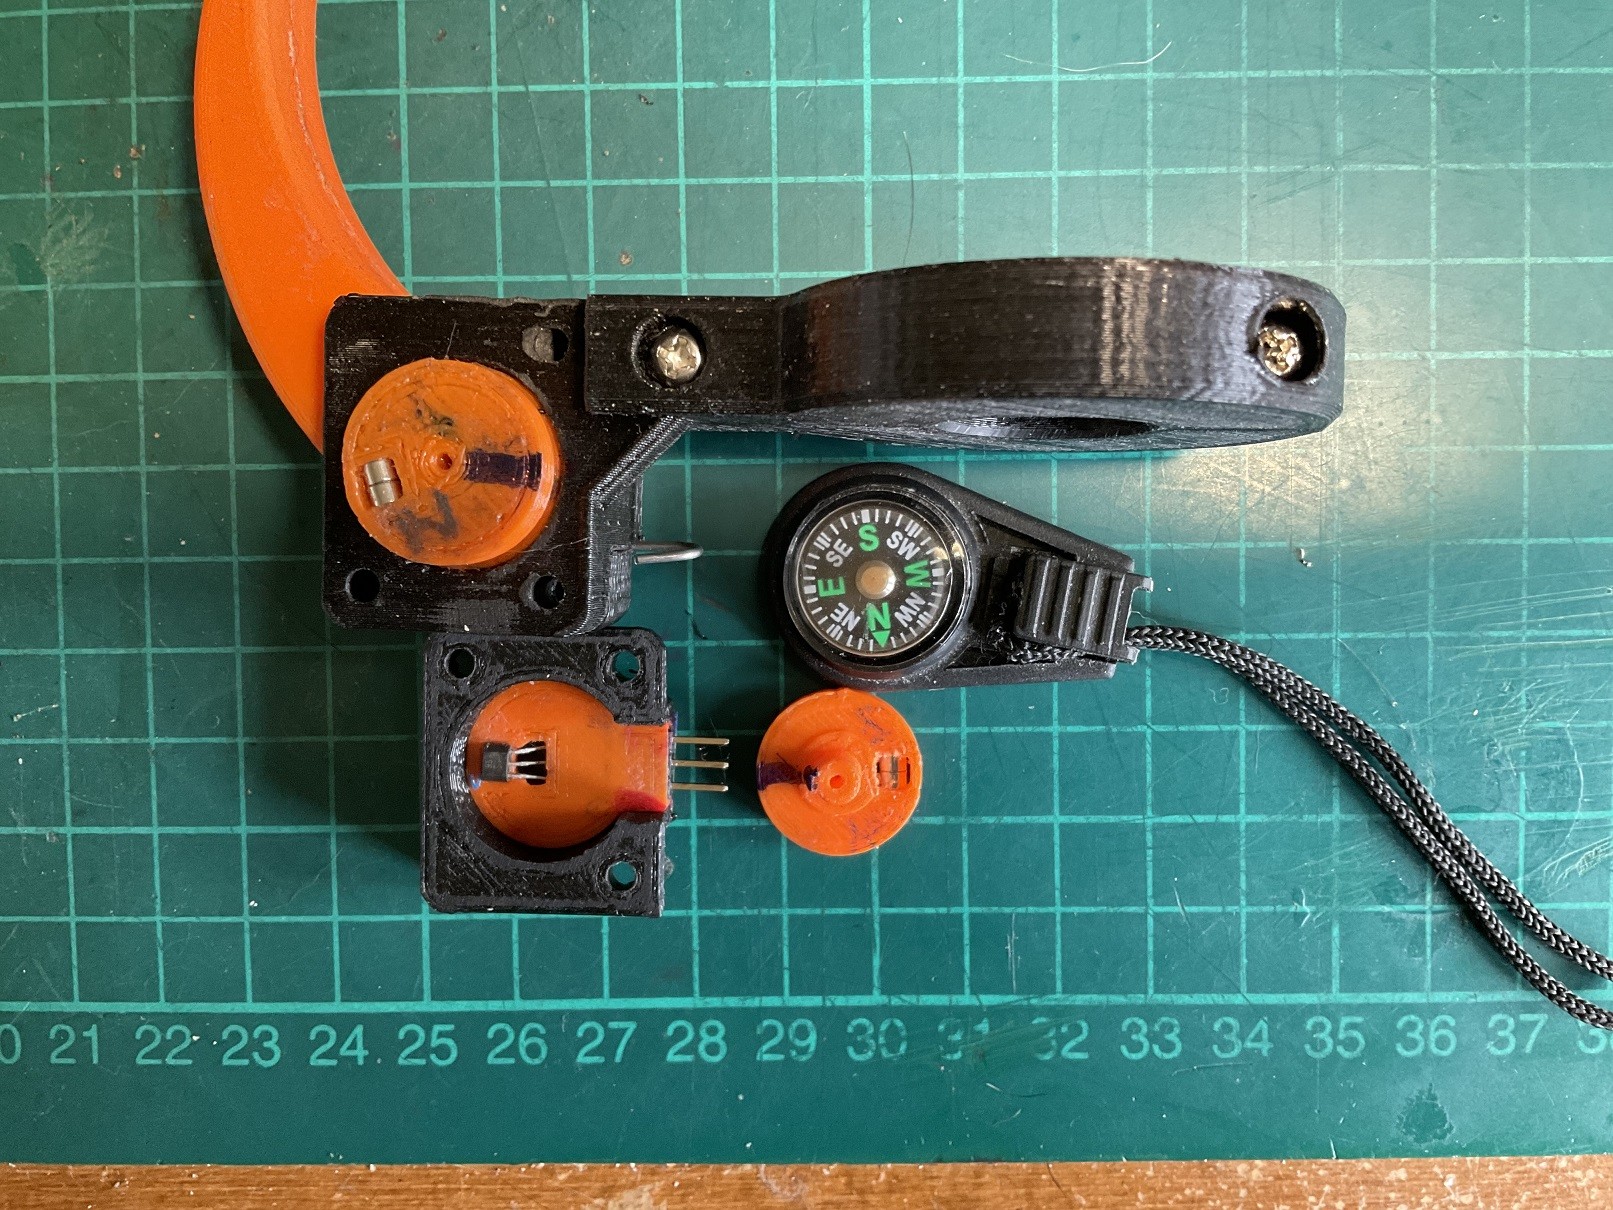
I note that your modifications put a keyway onto the magnet holder to lock it in position relative to the lever. Using this, I got only about half the expected output; from mid point to either full or zero voltage depending on the orientation of the magnets.
I modified my version to get the full output range by shifting the magnet slightly so that it travels over the full length of the sensor, not just from the center to one side. The lever moves a bit more than 30° so I moved the magnet 15°
Also, if the magnet(s) are inserted so that the South pole is uppermost, then the axis does not have to be inverted in the DCS controls setup.
Attache are the modified files. Please feel free to use them if you wish to include them in any updates of your program.
Magnet holder v3.f3zMagnet holder v3.gcode

- Show previous comments 6 more
-
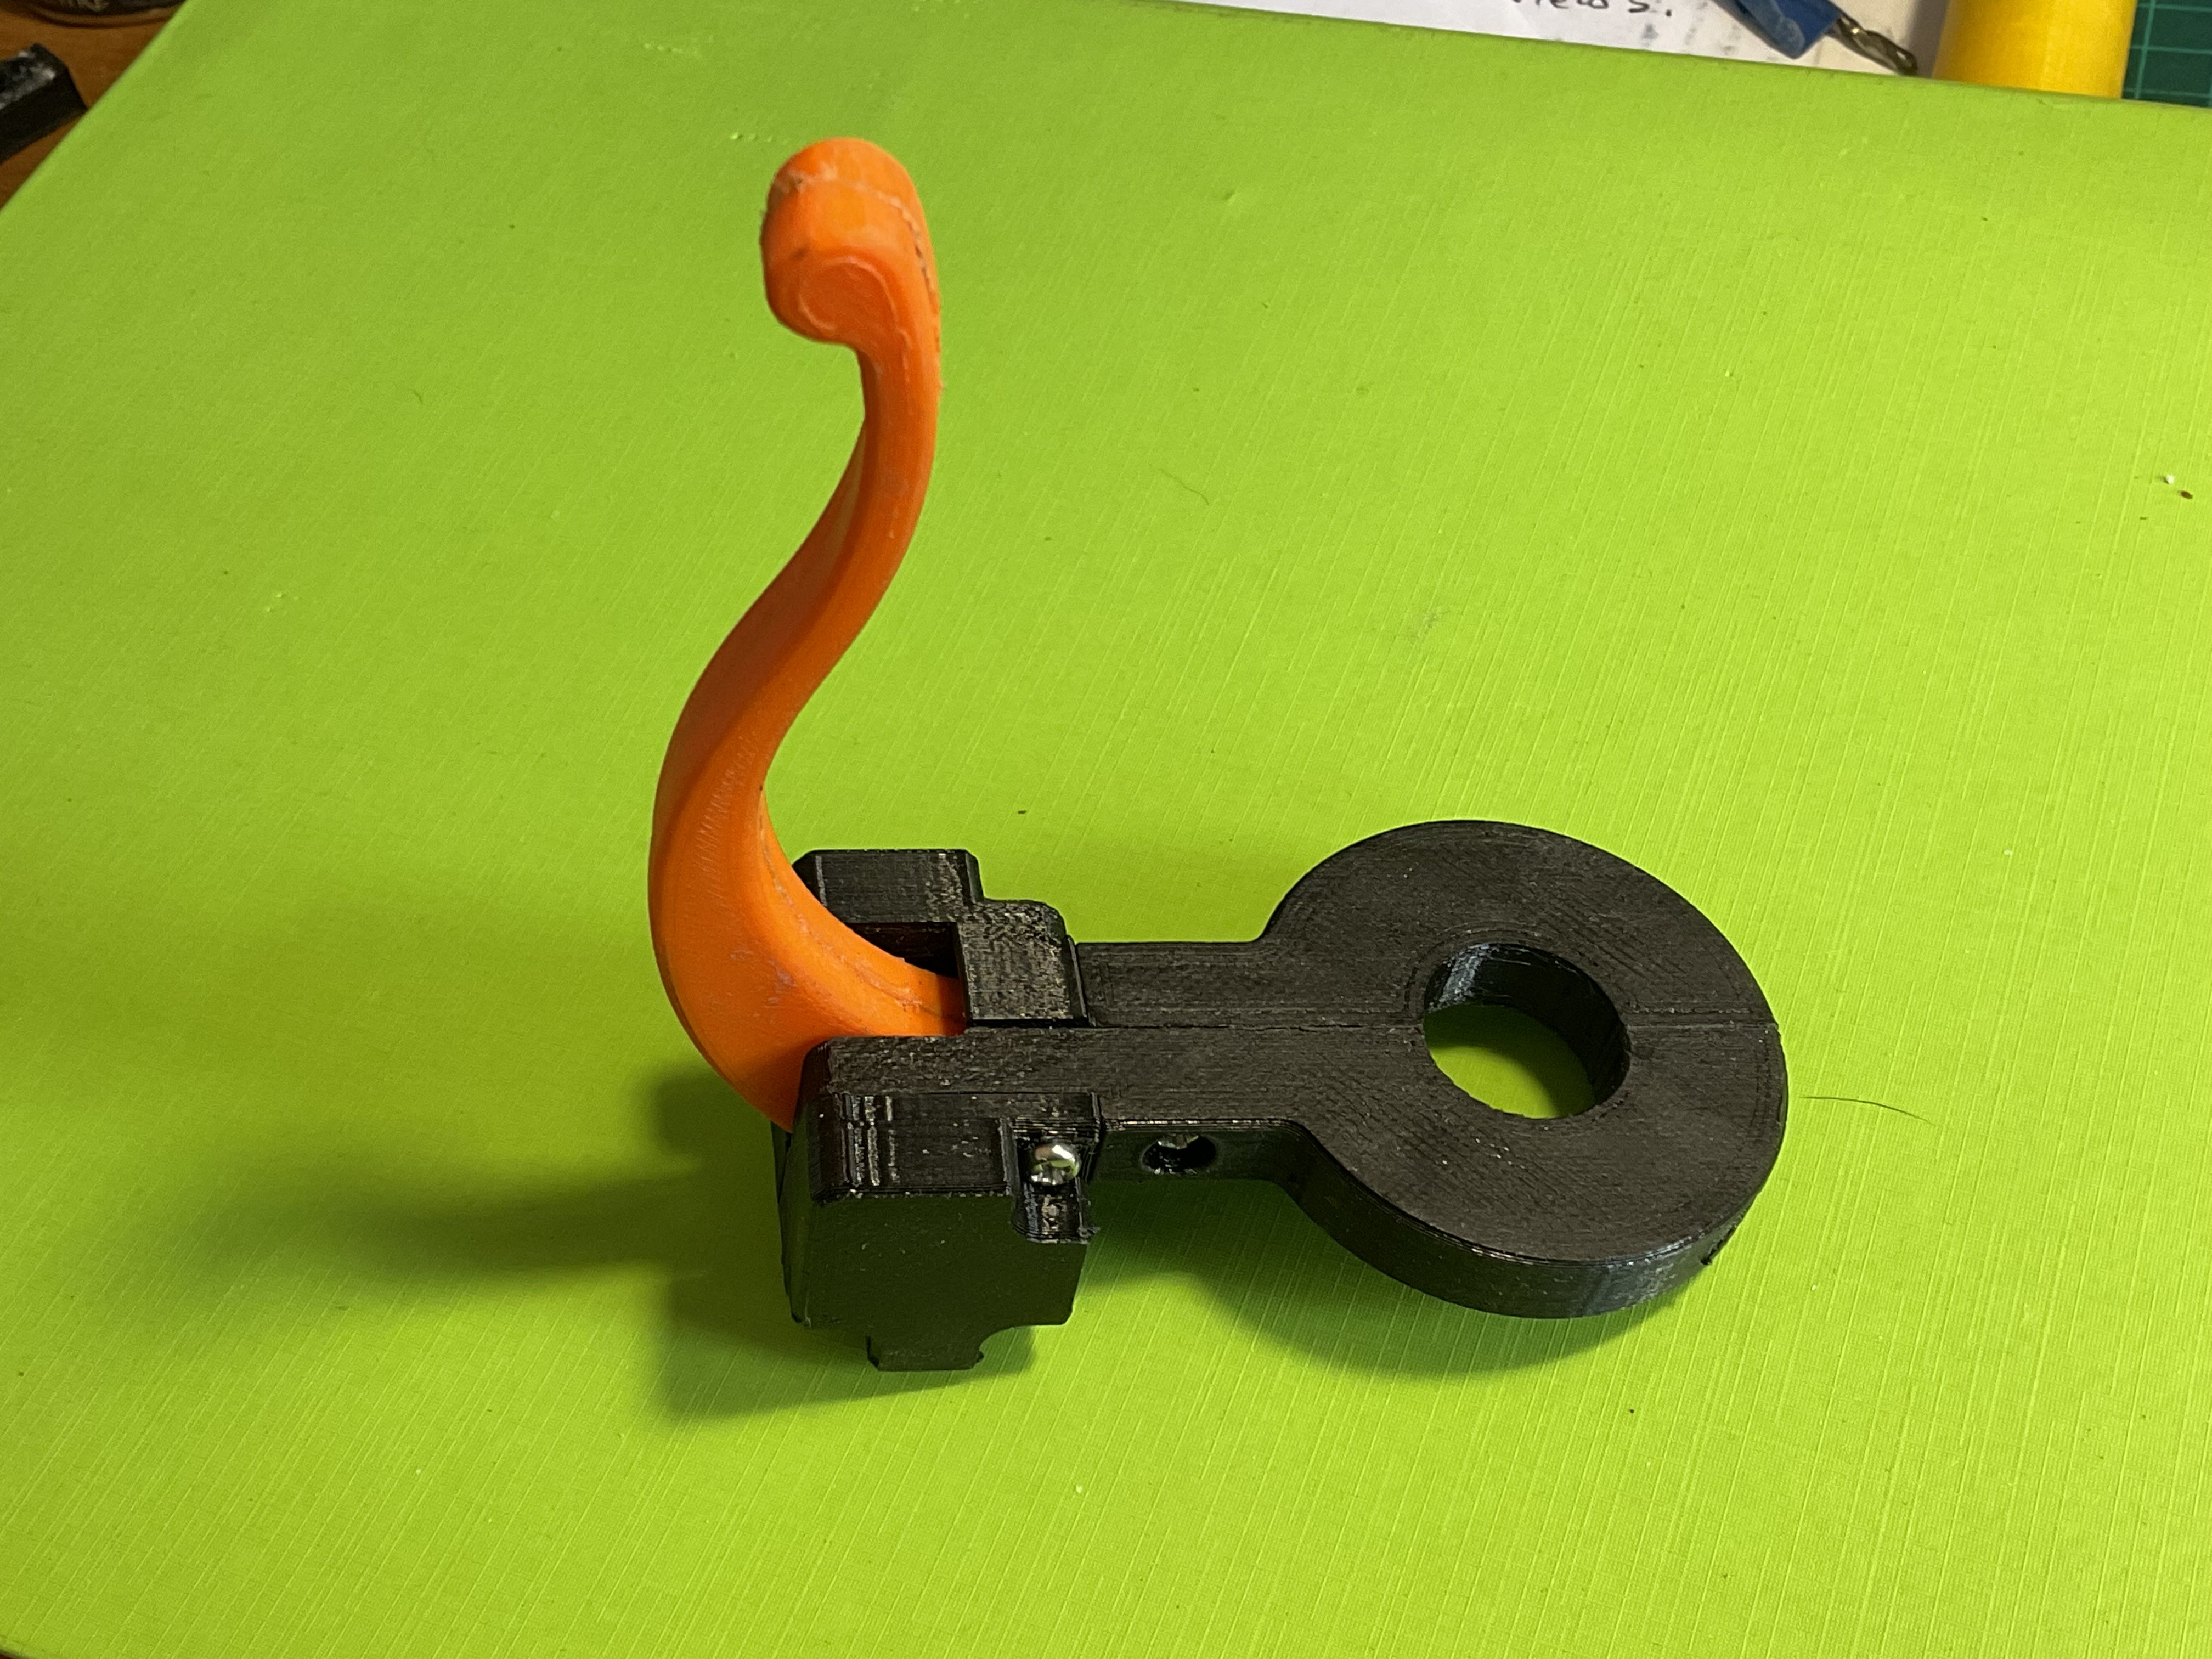
Success! It works perfectly - just like the real thing.
I printed only the modified side plates then ran a 3mm pilot hole through the main body and the lever. Then a 6mm drill to enlarge the hole in the lever and the recess on the main body. Not ideal as this was not solid but mainly infill. However, it worked, although it would be better reprinting all the parts.
Here are the modified files for you to use if you wish to add then to your project.
Feel free to use any of the pictures or text in our messages. This has been a great project.
-

-
-
Analogue Brake Lever Add-ON For Warthog Stick
Terry Dactil replied to No1sonuk's topic in Thrustmaster
Me too! Thanks for providing all the Fusion360 files so any changes or modifications can be made easily. -
Analogue Brake Lever Add-ON For Warthog Stick
Terry Dactil replied to No1sonuk's topic in Thrustmaster
Great design! Everyone with the Spitfire or Mosquito module should have one. Half a day's 3D printing produced this. Somme comments: I am impressed with the Hall sensor mechanism being so small. I'll be using that setup in future projects. The ball bearings are probably design overkill. I did not have any of the specified size handy, so just printed and fitted the plastic bodies used in the design layout. Plastic bearing work fine for me and they should be quite adequate for the purpose here. To avoid using supports, I split the handle design in two so they could be printed flat and then glued them together after printing. No problems making the spring. I used 1mm piano wire wrapped around the 8mm diameter of an Exacto knife handle and it finished up at 10.5mm diameter and fitted perfectly. I'm thinking that version 2 should have a spring loaded pin to hold the parking brake on, as in the real thing. This is not an easy "just print and assemble" type project, but it is well worth the effort if you have the equipment available (drills and other stuff as well as knowing your way around in the Fusion360 and Cura programs) .
-
Analogue Brake Lever Add-ON For Warthog Stick
Terry Dactil replied to No1sonuk's topic in Thrustmaster
Thank you! That is something I really need. I made some RPM levers for the Mosquito and feel a bit ashamed for using only two of all the available inputs on the BU0836 board. This will be an easy drop-in connection to make. -
Try Voice Atack. Voice Attack can be used to tell you the actual time, elapsed time, count up or down stopwatch type functions. It is perfect for using in VR. Here is what I have for timing the P-51 bombing profile I use where the bombs are released 16 seconds after starting the dive.