Floyd1212
-
Posts
1376 -
Joined
-
Last visited
Content Type
Profiles
Forums
Events
Everything posted by Floyd1212
-
It is located in the install folder of the AH-64D module. For example: G:\Eagle Dynamics\DCS World OpenBeta\Mods\aircraft\AH-64D\Doc\DCS AH-64D Quick Start Manual EN.pdf
-
missing track file Why do I seem to be falling out of the sky alot?
Floyd1212 replied to gdotts's topic in Bugs and Problems
After moving the power levers all the way forward with the left half of your HOTAS, use your mouse in the cockpit and see if you can get any more out of the levers in game, just to be sure. I know it’s tough to fight the urge, but remove that axis from the left half and let it come along for the ride with the right half as the collective. Then you can rest your hand on it properly and access the buttons and switches as intended. -
Page 240 of the new manual describes the procedure. Before you can type in a point using the KU you need to press L1 for "POINT>?".
-

-
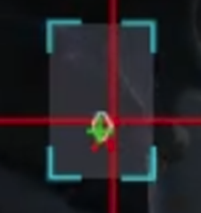
What appears to be happening is the threat is shown as though the ownship icon was still located at the bottom-center, like where it would be when in HDG-UP mode. In this screenshot I grabbed yesterday, the warning was "SA2, tracking, 5 o'clock". In the ASE circle to the right, you can see the correct orientation. In the threat display on the TSD to the left, while in N-UP mode, the dashed "tracking" line is not drawn to the ownship icon, but to the bottom-center position. If the ownship icon were moved to that location, but kept facing the same direction, it would look correct. This also seems to hold true on your screenshots (more or less). Maybe a SME can answer if this is working correctly?
-
missing track file Why do I seem to be falling out of the sky alot?
Floyd1212 replied to gdotts's topic in Bugs and Problems
My first thought is that you are messing with the power levers, or your controler is not allowing the power levers to reach 100%. Push the power levers to FLY and leave them there. You should only be manipulating the collective while flying, not power. If that doesn't sound like your issue, you will need to provide a track file so others can take a look at what's going on. -
If you are using Center Position Trimmer mode, are you are sure you are allowing your stick to return to exact center again?
- 1 reply
-
- 1
-

-
@Comrade Doge As a feature request, would it be possible to add checkboxes in front of the items and then the button at the bottom would be "transfer checked to DCS"? This would be useful in the Apache, and possibly in other aircraft, where I might go to the F10 map and save 3 points for waypoints, and then 3 more points where enemy units are positioned. Then back in the cockpit I would leave 1-3 checked and transfer those in NAV mode and they are created as waypoints, then I uncheck those and check 4-6, switch to ATTACK mode and transfer just those as target points. Then, after eliminating those units I can delete items 4-6 with the trashcan icon and leave the waypoints in the list. If I get shot down and spawn into a new aircraft, I recheck 1-3 to transfer those again, and add more points as needed. Basically, a way to keep items around in the list for a bit, but not always transfer them by default.
-
This new feature helps you maintain situational awareness of where those enemy targets are located as you are flying around by looking at your TSD. (On a side note, I find the SAT underlay on the TSD very helpful in helping locate those target points in relation to forests, rivers, towns, etc.) After you have safely masked and are ready to strike one of the targets, T02 for example, you can select T02 as your ACQ source and the queued LOS reticle will show you where that location is in your HMD. This also lets you know how far the target is from your position, and when it is about to be unmasked by a hill or something. You can't tell George to focus directly to those targets using their target points the way a human CPG could, but once you have visibility to the units again, line up your HMD on the dotted reticle and tell George to look there and let him get to work. At some point you might want to switch back to TADS as the ACQ to see exactly what George is looking at as you work through targets in the area. This feature is even more helpful for players that like to swap seats. After George has stored those target locations and you have swapped to the front seat, it is very easy for you to reacquire them using their target points and slaving to them.
-
You can make note of the MGRS coordinates of the target point and create a new waypoint with that information. You can use the cursor to add a new waypoint roughly in the same place as the target point by moving the cursor to the location of the target point. This is probably the quickest method I can think of. You can use a target point to set a DIR to for navigation. It wouldn't be part of the RTE specifically, but when you want to fly to that point use the DIR function, fly to it, then DIR to the next WP in your RTE again.
-
getting coordinates for target points from f10 map
Floyd1212 replied to poochies's topic in DCS: AH-64D
An updated release from a week or two ago fixed several issues. Working well for me now. So Scratchpad can now transfer the points into the TSD like The Way is doing? I'll have to give it another look, then. -
I tested this last night and it didn't work as well as I was hoping. George found a few targets out in front of me (beyond 9999) and reported them in the list. I told him to Store the first target in the list and he stored a spot on the ground about 1km in front of me. After selecting that item from the list, he started lasing it and I was able to Store it again at the correct location. I don't think he is squirting the laser prior to storing when you haven't selected the item from the list yet. I'll do more testing again this evening.
-
reported Wipers default to “Low” position at Cold Start in MP
Floyd1212 replied to CrimsonGhost's topic in Bugs and Problems
I flew on a MP server last night in a Cold Start slot, and did not see this issue. -
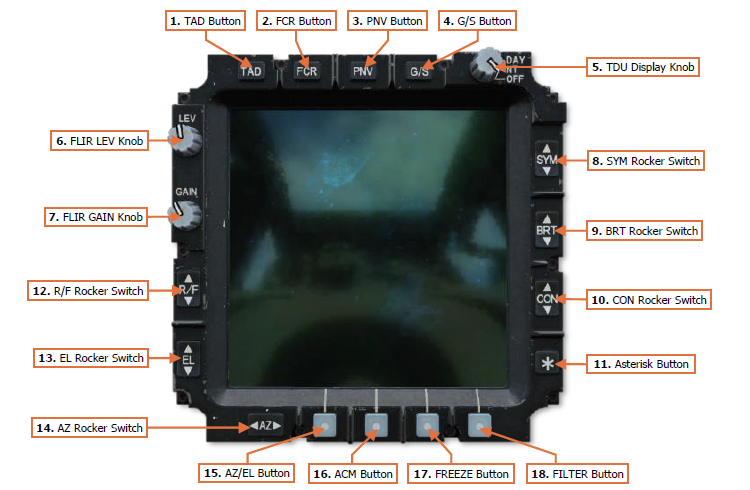
Page 74 of the (new) manual does a good job of explaining this. 8. SYM Rocker Switch. Controls the brightness level of displayed symbology on the TDU or within the CPG’s HDU. When the CPG’s selected sight is HMD, the symbology within the CPG’s HDU will be adjusted. When the CPG’s selected sight is TADS or FCR, the symbology brightness on the TDU will be adjusted. The symbology brightness may be incrementally adjusted using short presses, or continually adjusted using continuous presses. 9. BRT Rocker Switch. Controls the overall brightness level of the TDU or CPG’s HDU. When the CPG’s selected sight is HMD, the overall brightness level of the CPG’s HDU will be adjusted. When the CPG’s selected sight is TADS or FCR, the overall brightness level of the TDU will be adjusted. The brightness level may be incrementally adjusted using short presses, or continually adjusted using continuous presses. 10. CON Rocker Switch. Controls the contrast level of the TDU or CPG’s HDU. When the CPG’s selected sight is HMD, the contrast level of the CPG’s HDU will be adjusted. When the CPG’s selected sight is TADS or FCR, the contrast level of the TDU will be adjusted. The contrast level may be incrementally adjusted using short presses, or continually adjusted using continuous presses. 11. Asterisk Button. Resets the overall brightness and contrast levels to their default settings. When the CPG’s selected sight is HMD, the overall brightness and contrast of the CPG’s HDUwill be reset. When the CPG’s selected sight is TADS or FCR, the overall brightness and contrast of the TDU will be reset.
-
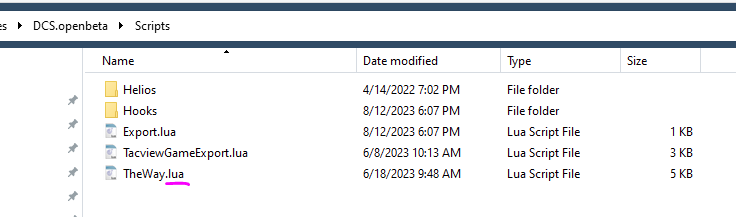
Yeah, if you follow the instructions provided to have the OS show all file extensions you probably would have seen "Export.lua.lua" which does not work properly. In your screenshot, you still aren't seeing the file extension for "TheWay.lua" either. Once enabled, it would look like this: This is by no means a requirement, but most Windows "power users" would have this enabled so they can better see what's going on under the hood. Glad you got that part working.
-
It looks like the manual you can download from the ED site is still the old version. Can ED update this to the new manual? https://www.digitalcombatsimulator.com/upload/iblock/c22/hyhtbs5kqjyjauapanut3az7bbs3p3b1/DCS_AH-64D_Quick_Start_Manual_EN.pdf In the meantime, the new manual can be found in the folder on your machine where the aircraft is installed: \Eagle Dynamics\DCS World OpenBeta\Mods\aircraft\AH-64D\Doc\DCS AH-64D Quick Start Manual EN.pdf
-
First, you need to show file extensions in your OS. Open File Explorer (open any folder). Click the View tab. Select "File name extension" so the box is checked. Filename extensions will now be visible. Now you can see that your file is actually called "Export.lua.txt". Click on the file name to edit it, and get rid of the .txt at the end.
-
I also like to fly with my TSD set to N-UP, so I often bring up the ASE overlay on the video feed from the TADS on the other display. This ASE overlay still presents the threats in relation to the front of the aircraft being at 12 o'clock, even when the TSD on the other screen is showing the threats relative to the ownship icon and direction of flight on the map. This way you get the best of both worlds.
-
Is the threat being shown at the 3 o'clock position relative to the direction your ownship is facing on the TSD? In other words, if you have the map set to N-UP and you are flying east, and there is a threat at your 3 o'clock, is it drawing the threat along the bottom edge of the TSD, to the south?
-
Check your radios, and check if Easy Communications is enabled in Options > Gameplay. I'm not a DCS guru, but I think this is the way it works: If Easy Comms is enabled, you should always be able to use "\" to call up the comms menu. If Easy Comms is disabled (either by you, or by the forced settings in the mission itself), you have to make sure your radios are set to the correct frequencies, and then use "RALT+\" to call up the comms menu.
-
You might take a look at the RotorOps mission generation tool. You can pack the zones with as much armor as you can stand, and there is even a “Defend” mode where an enemy column of armor is advancing on you, and you have to annihilate it before it overruns your defenses. Other options are the Foothold and Pretense missions. These can be difficult if you are playing them SP, as there are enemy AI CAP flights that are looking for targets to shoot down. Foothold might be a better starting point between those two. None of the above are fully “scripted” missions with “characters” talking to you over the radio, or with surprise events happening off triggers, but if it’s armor you want to shoot at, check them out.
-
During your startup procedure you need to flip each of the squelch switches forward, momentarily.
-
If you read above, it appears this is one of the fixes the author is currently working on.
-
Apologies. I was getting your posts and martinistripes confused. One last suggestion for your FFB situation: What if you were to let your stick fall forward after you take your hands off of it, and then tap trim again with a bind on the keyboard? Would this reposition the red X under the white diamond, or would this then update some feedback to the stick and it would simply fall forward a bit from the new position? Not knowing how the G940 works internally, is there no way to service or modify the internals to tighten up the mechanism?
-
Going back to look at the video, it does appear that the white diamond (your stick position) has moved off of the red X (the trim setting) slightly. After establishing the hover and engaging ATT Hold, are you continuing to move the stick, or does the stick drift off on its own? Maybe tighten down those dry clutches a bit more?