
VampireNZ
-
Posts
1924 -
Joined
-
Last visited
-
Days Won
2
Content Type
Profiles
Forums
Events
Everything posted by VampireNZ
-
Bob
-

Cloud base too low when not using a preset
VampireNZ replied to 104th_Money's topic in Weather System Bugs & Problems
Would be nice if ED could tone down the blue tinge while inside clouds....in my experience flying through clouds they are white/grey. -
Also agree with the above - I won't use the adjectives I use while in VR to describe the clouds currently (would get me banned) - suffice to say they are BAD, like - real bad. Like 1980's flight-sim bad. That big white blob, and the poor interaction at the edges with terrain etc, and don't even mention the 'jitters'. Also what is with the 'once-per-second-update' cloud reflection stripes jolting down the interior of the Viper cockpit - very nasty. Could we PLEASE have an option to just disable clouds fully in the settings page (not just using the ME) until this is sorted! Simple check-box.... I appreciate that pancake gamers are experiencing wonderful new clouds and I am happy for them - but I would much rather just not have them at all in VR.
-
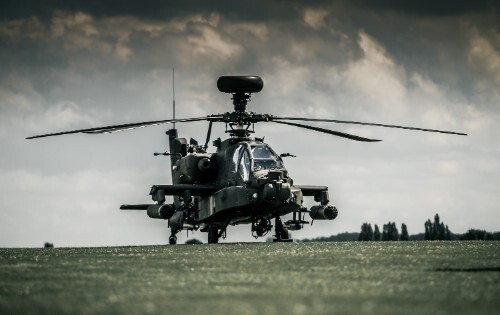
Just to play devils advocate, the first shots of Operation Desert Storm were taken by AH-64 Apache helicopters - without air superiority or a bajillion vipers etc. These attacks made a hole for nearly 100 allied aircraft to 'gain' air superiority. The F-111 & F-117's that were also airborne at the time were hardly 'controlling the skies' for the helicopter's safe operation, so Apaches are not always used in totally safe airspace - just sayin. Apache Attack Now I am not saying that the Apache is enemy-aircraft proof or anything silly like that - it is a slow moving chopper at the end of the day...you just need to utilise it sensibly.
-
You just need to use DCS' poor control configuration against itself - cockpit rotary dials/knobs by default have stupidly small 'increments' of travel per click/input - so map a hat or something to the roll trim dial on the trim panel at your left-aft side panel. That way one click of that trim instead of the trim hat on your stick will give you much finer trim control. ....and just continue having to rotate your rotary encoder mapped to cockpit lighting/HUD brightness etc. a billion times to actually adjust that stuff lol.
-
droplets on windshield when flying through clouds?
VampireNZ replied to WelshZeCorgi's topic in Wishlist
I can absolutely assure everyone that yes you do indeed get rain droplets forming on the windshield, (and whole aircraft actually) when flying through clouds with no visible 'rain'. Obviously depends on the cloud 'solidity' and type etc. Clouds are simply made up of water droplets formed around a 'aerosol' such as a dust/dirt particle (unless they consist of 'frozen rain') - so of course you are going to get water build-up as these droplets impact and collect on your windshield etc. In the P-3 Orion we always taxied through the 'bird bath', or jets of fresh water from the ground, to wash the salt spray off the aircraft after a low level patrol/mission over the water. But if we managed to locate a few decent clouds on the way home at higher level then that would suffice to ''wash' the aircraft adequately to remove salt spray build-up etc not requiring a bird bath wash once landed. Fighter jets can have a 'rain removal/windshield heat' system that consists of blowing a 'sheet' of hot bleed air over the exterior of the canopy/windshield to remove/inhibit rain on the windshield - so you would need to check each specific jet type to see what system is implemented. System doubles as rain removal and also maintains a warm windshield that is more 'compliant' and less likely to shatter if anything solid hits it. -
Also missing from the canopy of your aircraft when you fly through clouds..... Clouds are made of moisture....which deposits on your aircraft when you fly through them.
-
Display tanker direction lights in an overlay?
VampireNZ replied to TobiasA's topic in DCS: F-16C Viper
Hopefully the lights won't be so dim once ED sorts out its lighting - maybe coming with 2.7? -
Cloud base and height is not something you just 'design' into the sim to make it look nice. There are specific environmental factors involved with determining the current cloud base. Luckily these factors are easily found using the current ATIS (which I am still hoping for in DCS.....one day). Here’s how to calculate a cloud base: Find the difference between the temperature at the surface and the dew point. Divide the difference by 2.5. Multiply the result by 1,000. This will then give you the height above ground level. Add the elevation of the airfield and this will give height above sea level. So for example, at 18 deg C surface temp and 10 deg C dew point. The cloud base will be 3,200 feet AGL, with a cloud temp of 8 degrees (so less than +10 deg and visible moisture = anti-ice on if flying through clouds). Another way is = (Air temperature at surface – dew point temperature) x 400. Cloud height will depend on cloud type and temp etc. So for example in the tropics you get tower cu that grows at a crazy rate right in front of your eyes to huge heights. To the point that if your in an old aircraft, Say a P-3 Orion that can only pressurize up to around 28,000', the cloud tops could be higher than that and you have to find a way around them. Which is tricky when they are building so fast and closing gaps right in front of you! Where in other places with 'normal' temperate climates the clouds could only be say 5,000' high or less.
-
Goes without saying....Pre-Ordered!
-
After upgrading to a 5900X and 6800XT I treated myself to some cockpit shadows, haven't had any for years - looks fancy!
-
Mi-8 module has this same trim hat functionality as well.
-
More 'Waiting In Perpetuity' than 'Work in Progress'....but we get the point
-
Are you new here? - 'soon' = 2 weeks
-
Interesting behaviour you are getting on approach - I am not seeing that at all landing the Viper. I position the FPM on the threshold with the stick (once I get the glideslope line in HUD where I want it- usually at edge of runway), then I control the AOA staple position on the FPM using the throttle - so the FPM stays exactly where I put it previously, and the staple moves up and down with throttle movement, so I am adjusting power to keep staple positioned so top edge is on the FPM. Then at flare I pull back stick to move FPM to end of runway and reduce throttle to land, holding that 10deg flare to aerobrake to 90 knots. So opposite of what you are seeing, and yes this is exactly the opposite of how I fly the Tomcat for example where you set AOA with trim & power then you just adjust glideslope with power without touching the stick aside from for line-up (I believe you actually get a wave-off if you are moving the nose too much on approach) Not sure why you are seeing something different with landing the Viper? Perhaps it is because I am just slightly moving they throttle in the bounds of what I need to perform a normal landing - perhaps if I moved it way to much either way I would see the FPM movement you mention. But just landing the jet normally it all behaves at it should.
-
Oh, but schurem says "they work joos' fine sir, joos' fine."
-
Which part in particular? Most of it is just a collection of info from the Viper User Downloads section created by other users, apart from the pop-up ref sheets, Morse ref and Thunderbirds collection. I also made a quik-ref rotate speed vs weight chart that I see others have 'appropriated' for themselves, added to their 'Viper kneeboard' and released in the user section as their own with no credit given lol.
-
Just FYI - you are aware we can have different kneeboard setups for each aircraft right? In any case, in my Viper kneeboard I also have the standard info such as freqs etc for each map, HARM codes with full DB list of all emitters if you want to swap one out of the tables, full Viper checklist from pre-flight to shutdown, also a Morse code cheat sheet for identifiers (more than one occasion in DLC Campaigns have been given duff freqs/I.D's/codes for navaids) and a couple of pop-up attack ref sheets for a few different profiles from a great online calculator someone posted a while ago. Also have a separate kneeboard in my Thunderbirds mission with each manoeuvre on a page with specifics, then whole combined display on a couple of pages.
-
Am the same way, one thing I could never stand in PC games is aliasing and shimmer, and that goes double in VR! Any sort of performance gain is not worth looking at garbage graphics. I do wonder sometimes when I see people fettling their PD and SS and then say they run with no MSAA.... Am going to try out the PD 0.5 as I currently run PD 1.0 and 50% SS same as you, but won't be disabling MSAA 2X.
-
vr Настройки Bignewy Reverb G2 для высокой частоты кадров
VampireNZ replied to BIGNEWY's topic in Virtual Reality
I currently used DCS PD of 1.0 with 50% SS in SteamVR. So I think the point is that I can use a DCS PD of 0.5 and 200% SS in Steam VR and get the same visual quality but at better performance? Correct me if I am wrong (don't really get too deep in to the specifics, just set stuff till it works and looks good). -
Using a side-mounted FSSB force-sensing stick with 0% curve/1 unit of DZ on each axis and not having any problems at all. Not seeing any of that huge DZ issue and can easily use one finger and thumb to apply tiny amounts of pressure to stick to maintain position during AAR (granted you have reduced gains in AAR mode). A/C response seems to match whatever pressure I am applying - so smooth slow rolls compared to crisp snap rolls side to side with solid stops. Generally with G on I can smoothly alter the G-load at 0.1g at a time with minor pressure changes - so no big jumps/spikes in G-load that I have seen. Happily control G to regain speed at 1kt/sec for example back to best corner etc (then just blow all that speed trying to greedily get the death dot on the MiG-29s canopy lol). Yes the A/C is pretty mushy during landing approach, but just being smooth with no big changes on glideslope/bank angle and she handles fine all the way to touchdown. Not having 'very ugly, distorted glide path' and FPM sits exactly where I want it (be that on the threshold, or above/below depending if I am correcting glideslope), while holding at the top of the staple/AOA with power variations. Not saying the Viper handling is done by any stretch of the imagination, but not having any major issues so far with my specific hardware.
-
Have had Oculus CV1 & CV2 and now have Reverb G2 - the G2 is awesome! Even at lower res to keep the frames up (6800XT & 5900X) the image quality is superb with next-to-no screen door etc. You should get a few more frames with the 3090, the 5950 won't gain much over a 5900 thou in DCS, but my CPU frametime comfortably sits below 10ms most of the time. As far as glasses go, I previously used the prescription inserts in the CV1 & CV2, but found there is heaps of room in the G2 and just wear it over my current glasses no problems at all. FOV has never been a bug-bear of mine in VR so don't mind the screens are a bit further from my face. The convenience of just placing the headset over glasses and tilting head strap down over back of head is great. Obviously this will depend on the size/shape of your glasses frame, but I don't even notice I am wearing them in VR.
-
All good stuff written above, but to add - it is in your 'best interests' to uncage prior to firing the Aim-9 to ensure the seeker is 'locked' to the heat source as best it can be. Yes you can launch just keeping the target in boresight and hearing the tone - but you will notice the tone is not reliable and will fade with even a small shift in aspect - whereas the tone will be solid and strong once uncaged as the seeker can track the heat source itself. Imagine that loss of tone with a small shift in aspect to the target if not caged - and then consider that ok I can hear tone so it's fine - 'launch', but then in the process of launching the fixed seeker of the missile offsets even slightly from the heat source and loses lock (as easily as you lose tone with a small shift off-boresight), and thus goes ballistic. For the sake of a 1-sec button push prior to launch - it is 1 second well spent.
-
Way to quickly mark current position on HSD?
VampireNZ replied to normanleto's topic in DCS: F-16C Viper
One implementation of the DED MARK Points system - no doubt ED will have a 'slightly different version'.... The MARK mode rotary will cycle through the 4 existing modes via SEQ in this order: HUD, TGP, OFLY, FCR. When entering DED MARK page (ICP 7 button) the MARK mode will be set automatically according to the master mode and relevant sensors state. If the system is in NAV or AG master modes, the FCR is in AG mode (not AGR), the FCR is the SOI and the FCR is designating something, MARK mode will be automatically set to FCR. When entering MARK page at this state, a FCR MARKPOINT will be automatically recorded. If the system is in NAV or AG master modes, the TGP is in AG mode, the TGP is the SOI and ground stabilized, MARK mode will be automatically set to TGP. When entering MARK mode at this state, a TGP MARKPOINT will be automatically recorded. If the system is in NAV or AG master modes and conditions are not sufficient to set FCR or TGP modes, MARK mode will be automatically set to HUD. If the system is in AA master mode, MARK mode will be automatically set to OFLY. When entering MARK mode at this state, an OFLY MARKPOINT will be automatically recorded. MARK HUD functionality: When the system is in NAV or AG master modes and the MARK mode is set to HUD, an HMC (HUD MARK Cue) will appear in the HUD. The HMC is a 12mr circle with a 1mr aiming dot inside it. There are 2 states for MARK HUD mode, pre-designate and post designate. In pre-designate mode the HMC will appear on the FPM, The cue then can be slewed to the desired position and a TMS-Forward will ground stabilize it. At this stage the position of the actual MARK may be refined using the cursors, then a second TMS-Forward will mark the point. When the cue is ground stabilized, a TMS-AFT will cancel the stabilization and return to pre-designate mode and the HMC will be again placed on the FPM. Note that if trying to ground stabilize or mark with TMS-Forward when the cue is not on the ground, nothing will happen. If setting with the ICP sequence (SEQ) button a MARK mode which does not match the current system and sensors state (for example setting FCR mode when the system is in AA master mode) and trying to mark, an OFLY MARKPOINT will be recorded. Use TMS-Forward (in all modes) to set MARK point. When at MARKPOINT DED page and the current MARKPOINT is valid (has positional data) then M-SEL button (ICP 0) is used to set the MARKPOINT as the current active steer point. When at MARKPOINT DED page and pressing one of the 1-9 ICP buttons, a MARK mode change will happen (just like using the sequence button). Just like any other steer point, a recorded MARK point can be sent to another aircraft via the IDM. -
Had trouble getting my G2 to work on X570 board with any USB slot - but it just turned out to be a conflict with iCue. Deleted the Lenovo folders in Program Files\Corsair\Corsair iCue Software\Plugins folder and it works fine. Get a problem now and then but just re-plug the USB and it's fine. As far as working with the 6800XT there is no problem.

